Describe AlertDialog class and its functionality.
AlertDialog class is used for creating Alert notification or alert dialog box. Dialog class is base class of AlertDialog. By using AlertDialog class you can create different types of alert window such as one button dialog, two button dialog, radioButton dialog etc.
To build an AlertDialog window you have to Instantiate an AlertDialog.Builder with its constructor as follows.
Step 1:
AlertDialog.Builder dialog = new AlertDialog.Builder(this);
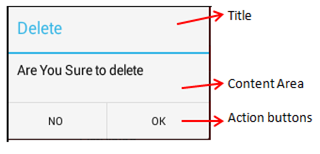
There are three regions of an alert dialog:- Title: You can provide the title of AlertDialog.
- Content area: It displays message or custom layout.
- Action buttons: You can add one or two or three button on alert dialog but not more than three.
 Step 2:
dialog.setTitle(“CareerRide”);
dialog.setMessage(“Welcome”);
Step 3:
create() method will return the AlertDialog object.
AlertDialog ad = dialog.create();
Ad.show();
You can add three different action button (Positive, Negative, Neutral) on the dialog by using the code given below:
dialog.setPositiveButton("OK",newDialogInterface.OnClickListener()
{
@Override
publicvoidonClick(DialogInterface dialog, int which)
{
// TODO Auto-generated method stub
// Write your code here
}
});
The first parameter of setPositiveButton method will set the caption of the action button.
Create an alert dialog that have positive, negative, and cancel button. Explain with example.
Example:
AlertDialog class has three standard methods to add positive, negative, and cancel button. Methods are as follows.
- setNegativeButton(CharSequence text, DialogInterface.OnClickListener listener)
This method sets a listener and it will be invoked when the negative button of the dialog is pressed.- setNeutralButton(CharSequence text, DialogInterface.OnClickListener listener)
This method sets a listener and it will be invoked when the neutral button of the dialog is pressed.- setPositiveButton(CharSequence text, DialogInterface.OnClickListener listener)
This method sets a listener and it will be invoked when the positive button of the dialog is pressed.
Following is the content of res/layout/activity_main.xml file:
<LinearLayoutxmlns:android = "http://schemas.android.com/apk/res/android"
xmlns:tools = "http://schemas.android.com/tools"
android:layout_width = "match_parent"
android:layout_height = "match_parent"
android:orientation = "vertical">
<Button
android:id="@+id/threeButtonDialog"
android:layout_width = "match_parent"
android:layout_height = "wrap_content"
android:layout_marginTop = "50dp"
android:text = "ThreeButtonDialog"
android:textSize = "30dp"/>
</LinearLayout>
Following is the content of the modified MainActivity.java file
publicclassMainActivityextends Activity implementsOnClickListener
{
Button button1;
@Override
protectedvoidonCreate (Bundle savedInstanceState)
{
super.onCreate (savedInstanceState);
setContentView (R.layout.activity_main);
button1 = (Button)findViewById(R.id.threeButtonDialog);
button1.setOnClickListener (this);
}
@Override
publicvoidonClick(View v)
{
// TODO Auto-generated method stub
showThreeButtonDialog();
}
publicvoidshowThreeButtonDialog()
{
AlertDialog.Builder dialog = newAlertDialog.Builder(this);
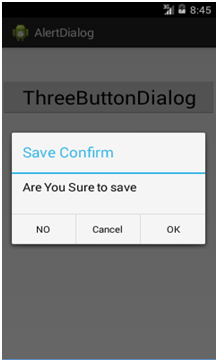
dialog.setTitle("Save Confirm");
dialog.setMessage("Are You Sure to save");
dialog.setPositiveButton("OK",newDialogInterface.OnClickListener()
{
@Override
publicvoidonClick(DialogInterface dialog, int which)
{
// TODO Auto-generated method stub
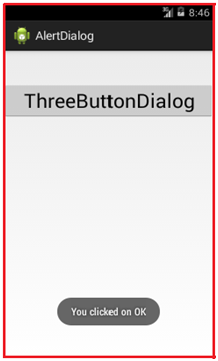
Toast.makeText(getApplicationContext(), "You clicked on OK", Toast.LENGTH_SHORT).show();
}
});
dialog.setNegativeButton("NO", newDialogInterface.OnClickListener()
{
@Override
publicvoidonClick(DialogInterface dialog, int which)
{
// TODO Auto-generated method stub
Toast.makeText(getApplicationContext(), "You clicked on NO", Toast.LENGTH_SHORT).show();
}
});
dialog.setNeutralButton("Cancel", newDialogInterface.OnClickListener()
{
@Override
publicvoidonClick(DialogInterface dialog, int which)
{
// TODO Auto-generated method stub
Toast.makeText(getApplicationContext(), "You clicked on Cancel button", Toast.LENGTH_SHORT).show();
}
});
AlertDialog ad = dialog.create();
ad.show();
}
}
Execute your application and you will get the output as given below images.
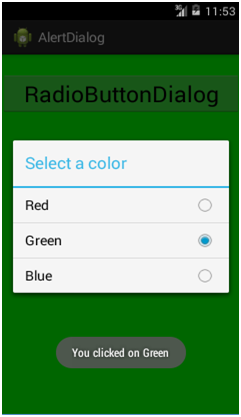
Create an alert dialog that must have radio button with caption as Red, green blue etc. as color name. When user selects a radiobutton, the background should be changed according to selected color.
In this example, I have taken an initialized
array color [ ] = {"Red","Green","Blue"}; for simplicity. For changing the color of background, we need the ID of layout, so I declared the ID of LinearLayout explicitly as
android:id = "@+id/dialog". I will use this ID to refer the LinearLayout and for changing the background color.
Following will be the content of res/layout/activity_main.xml file:
<LinearLayoutxmlns:android = "http://schemas.android.com/apk/res/android"
xmlns:tools = "http://schemas.android.com/tools"
android:layout_width = "match_parent"
android:layout_height = "match_parent"
android:orientation = "vertical"
android:id = "@+id/dialog">
<Button
android:id = "@+id/RadioButtonDialog"
android:layout_width = "match_parent"
android:layout_height = "wrap_content"
android:layout_marginTop = "25dp"
android:text = "RadioButtonDialog"
android:textSize = "30dp"
/>
</LinearLayout>
Following is the content of the modified MainActivity.java file
publicclassMainActivityextends Activity implementsOnClickListener
{
Button button1;
LinearLayoutLL;
@Override
protectedvoidonCreate(Bundle savedInstanceState)
{
super.onCreate(savedInstanceState);
setContentView(R.layout.activity_main);
LL = (LinearLayout)findViewById(R.id.dialog);
button1 = (Button)findViewById(R.id.RadioButtonDialog);
button1.setOnClickListener(this);
}
@Override
publicvoidonClick(View v)
{
// TODO Auto-generated method stub
showRadioDialog();
}
publicvoidshowRadioDialog()
{
final String color[]={"Red","Green","Blue"};
AlertDialog.Builder dialog=newAlertDialog.Builder(this);
dialog.setTitle("Select a color");
dialog.setSingleChoiceItems(color, -1, newDialogInterface.OnClickListener()
{
@Override
publicvoidonClick(DialogInterface dialog, int which)
{
// TODO Auto-generated method stub
Toast.makeText(getApplicationContext(), "You clicked on "+color[which], Toast.LENGTH_SHORT).show();
switch(which)
{
case 0:
LL.setBackgroundColor(Color.RED);
break;
case 1:
LL.setBackgroundColor(Color.GREEN);
break;
case 2:
LL.setBackgroundColor(Color.BLUE);
break;
}
}
});
AlertDialog ad = dialog.create();
ad.show();
}
}
Execute your application and you will get the output as the image given below: