Android Linear Layout
Explain LinearLayout in Android.
In Android, Graphical User Interface (IGI) is built by using View and ViewGroup objects. LinearLayout arranges all child control in vertically or horizontally. You can provide the layout direction with the android: orientation attribute. In this layout all the controls are placed in single row or single column. By default, the layout orientation is horizontal.
view structure in Android
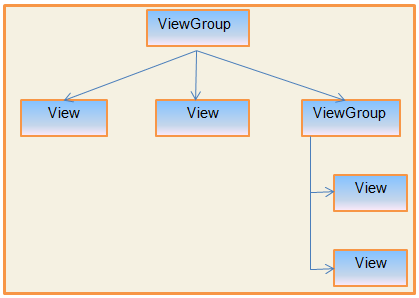
View objects are UI widgets such as buttons or text fields. View objects are responsible for handling events.
Give example of LinearLayout.
- Open Android studio and create new project. Provide some name, I have provided LinearLayoutProg.
- In Android Studio, from the res/layout directory, open the content_main.xml file. By default, layout of this file is RelativeLayout, Change the <RelativeLayout> element to <LinearLayout>.
- Add the android:orientation attribute and set it to "vertical".
- Delete the <TextView> element and add three buttons.
Following will be the content of res/layout/content_main.xml file:
<?xml version = "1.0" encoding = "utf-8"?>
<LinearLayout
xmlns:android = "http://schemas.android.com/apk/res/android"
xmlns:tools = "http://schemas.android.com/tools"
xmlns:app = "http://schemas.android.com/apk/res-auto"
android:orientation = "vertical"
android:layout_width = "match_parent"
android:layout_height = "match_parent"
android:paddingLeft = "@dimen/activity_horizontal_margin"
android:paddingRight = "@dimen/activity_horizontal_margin"
android:paddingTop = "@dimen/activity_vertical_margin"
android:paddingBottom = "@dimen/activity_vertical_margin"
app:layout_behavior = "@string/appbar_scrolling_view_behavior"
tools:showIn = "@layout/activity_main"
tools:context = "com.example.itwin.demo1.MainActivity">
<Button
android:layout_width = "wrap_content"
android:layout_height = "wrap_content"
android:text = "Start"
android:id = "@+id/button"
android:layout_alignParentLeft = "true"
android:layout_alignParentStart = "true"
android:background = "#fff000"
android:textSize = "25dp"
/>
<Button
android:layout_width = "wrap_content"
android:layout_height = "wrap_content"
android:text = "Stop"
android:id = "@+id/button2"
android:layout_below = "@+id/button"
android:layout_alignParentLeft = "true"
android:layout_alignParentStart = "true"
android:background = "#0000ff"
android:textSize = "25dp"
/>
<Button
android:layout_width = "wrap_content"
android:layout_height = "wrap_content"
android:text = "Pause"
android:id = "@+id/button3"
android:layout_below = "@+id/button2"
android:layout_alignParentLeft = "true"
android:layout_alignParentStart = "true"
android:background = "#00f000"
android:textSize = "25dp"
/>
</LinearLayout>
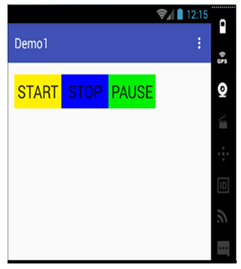
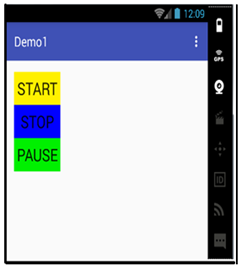
Run the application, you will see the output given below. If you change the orientation to horizontal then the output will be like second screen.
android:orientation="vertical"
 android:orientation="horizontal”