Structure Your Content
Tom Conklin will show here how to structure and organize your content so
that your site is poised to grow.
Just like building a house, you need to have a strong foundation and framework
to support a site that is built to last, without needing any major rebuilding
in the future. Proper planning from the beginning will go a long way toward
having a site that is easy to maintain.
|
This chapter excerpt from
Practical Plone 3: A Beginner's Guide to Building Powerful Website by
Jon Stahl, Martin Aspeli, David Convent, Darci Hanning, Ricardo Newbery, John
DeStefano, Clayton Parker, Alex Clark, Veda Williams, Tom Conklin, Sam Knox,
Steve McMahon, Matt Bowen , is printed with permission from
Packt Publishing, Copyright 2007.
|
Real world information architecture tips
Based on what your users need and/or want to see, you need to structure your
content within topics, or high-level containers that are typically
content-specifi c sections. As an example, we will take a look at
http://Plone.org.

When visitors enter a Plone site, no matter how deep they go, the navigation
tends to stay the same. The following screenshot shows that a visitor is in the
Documentation section of the site, with the opportunity to drill down within
this section for additional documentation topics:
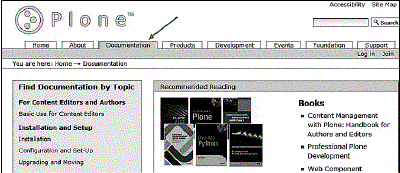
By default, Plone has a portlet that shows the navigation aids on the left-hand
side of the browser, which helps the visitors navigate within the subject
matter. In this example, there are several subsections below Development.
Structuring your content
Whe n planning your site, you must fi rst decide how you want to structure your
content. The structuring can be worked out through brainstorming sessions with
other people involved with your site, in order to come up with a structure
suits your business objectives. Investigating other sites that share your
organization's model could be a good starting point towards developing your
final solution.
To really understand how Plone can be an effective solution for your content
delivery needs, we will take a look at how to implement Plone for a High School
web site. In this type of structure, you will see how some content is targeted
at all users, while other content is tailored to specifi c users.
We will use the following high-level topics for demonstration purposes:
-
Home
-
News
-
Events
-
Academics
-
Sports
-
Clubs
-
PTO (Parent-Teacher Organization)
-
Alumni
In order to create these sections, we will fi rst create folders for the above
sections, into which you will add content. Each of the above sections will be
visible in your top-level navigation. Within each top-level folder, we will
also create subfolders to help you to structure your content.
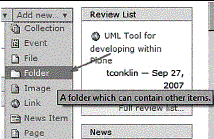
To create a folder, go to your homepage, select Add new… and choose the Folder
option from the drop-down list, as shown in the following screenshot:
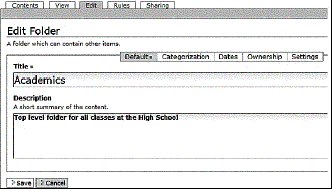
Specify the Title and the optional Description. In this case, we will create a
folder for the Academics section:
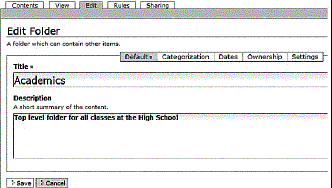
We're going to just keep the defaults here; we will cover the Settings tab
shortly.
Clic k on Save, and then make sure that your folder has been published:
Now take a look at the overall navigation structure:

There is now a new tab in your navigation bar, which represents a container for
holding all of the content that will be part of the academics section of the
site. You will follow the same process to create the rest of the top-level
tabs.
First, we will need to make a change to the default tab behavior in Plone.
Specifically, we want to remove Users as a top-level navigation item. Removing
it from the tab navigation does not mean that it no longer exists; we're just
making sure that items that are more important to this specifi c site are shown
to the visitors and users.
To remove Users from the navigation bar, click on the Users tab, and then select
Edit. Once you are in Edit mode, there is the section where you can select
Settings. You can then select the Exclude from navigation checkbox.
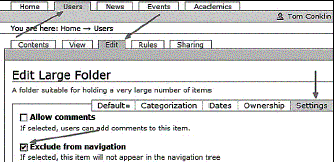
After saving your changes, you can see that the tab Users is no longer part of
your navigation:

Using the same process for adding new folders, we'll add Sports, Clubs and PTO.
We end up with the following:

Now that w e have the top-level structure in place, we can focus on what will
need to go within each topic. The process is similar, with the difference being
that you need to be within the given topic before creating the next level of
folders.
When you create folders in the Home section, you have the ability to create
top-level tabs. Creating folders within the other top-level folders you create
allows you to be more specifi c for the given topic. We will use the example of
the Sports top-level tab for creating an additional folder/site structure. We
will need to create the following sub-folders:
-
Football
-
Basketball
-
Soccer
-
Track and Field
-
Lacrosse
-
Baseball
-
Softball
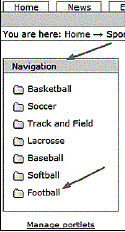
To do so, we must drill down into the Sports folder and add new folders within
it. Once you have added these folders under the Sports section, the Navigation
to the new folders is available in the leftmost side of your browser window:
Note that the navigation shows only the contents of the current folder. This can
be adjusted via the Manage portlets link, which is available on the home page,
below the left and right columns. This link is also accessible via
http://www.mysite. com/@@manage-portlets, where www.mysite.com is the name of
your Plone site. Simply set the Start Level to 0 and save your changes.
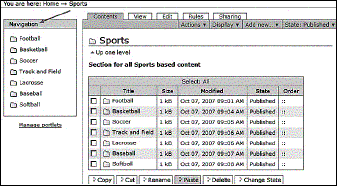
Now that the structure for the Sports folder is in place, let's take a look at
how you can change the order of display of the folders. If the football season
is over, it may make sense to move this category to the bottom of the
navigation. To change the order of the Football folder, go to the Contents view
under Sports, then click in the Order column for the Football row. The row will
turn yellow, and the cursor will change to a four-headed arrow, which indicate
that the content object can be moved. Drag the row up or down in the list, to
the desired location.

Now, when yo u click on the top level of Sports, the navigation listing appears
in the new location that you have just defi ned:
Now, let's take the new folder structure created under the Sports section, and
create some more folders that are specifi c to each sub topic.
Select a folder, and then go to the Contents tabbed page. In this example, we
will create the following folders under the Soccer folder, which is under the
Sports folder:
Varsity
Boys
Girls
Junior
Varsity
Boys
Girls
Boosters
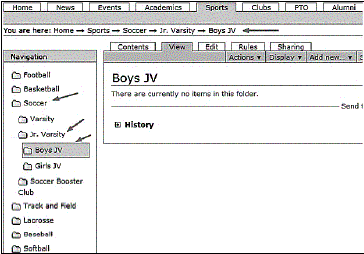
As identifi ed in the preceding screenshot, the breadcrumbs navigation shows the
progression through the site. You can also see how the navigation within the
Sports section can grow to fi t specifi c content.
By understanding these concepts that apply creating folders for your navigation
structure, you will be well on your way to having consistent navigation
throughout your site.
Adding Collections to your site
As your site i s expanding, you may fi nd that one section is too narrow in
scope, and needs to be placed into multiple sections on your site. The example
we will use is for the Booster Club to be in the Home section of the site, the
Sports section, as well as the Club section, but not as a top-level tab.
Additionally, the content that is created in each of the sections will be
available in the Home section of the site, but the authors will have only the
permission to add content from within their own folders. We will accomplish
this by using what is called Collections.
Collections look like Folders, and in the previous versions of Plone, they were
called Smart Folders and Topics. Their name has now been changed to Collections
due to the fact that they are not truly folders; they are actually queries of
items that follow specifi c criteria.
To create a ne w collection, go to the section where you want it to be created
(in this example, we will go to the Home section). Click Add new… and choose
Collection from the drop-down list:
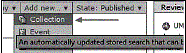
You are then presented with the following form, where you specify the mandatory
Title, the optional Description, and the Body Text:

Click on Settings, and then select Exclude from navigation. We will leave
everything else with the default values for now, so clicking on Save will hold
the current state of the object even though it will not have any functionality
just yet.
You will be able to return to this object by navigating to Home, and going to
the Contents tabbed page, where you can see your new collection. Also notice
that the icon for this object is a 'multiple pages' icon (and not a folder or
single page icon).

Clicking on the Boosters link will take you to the following page:
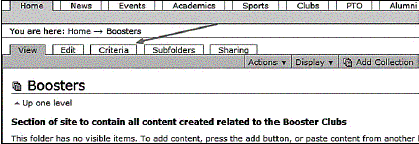
Note that we now h ave a new tab to work with, called Criteria. We will get back
to this section shortly. We fi rst need to tag items within our site so that
this new object can be included in the collection criteria that we are looking
for.
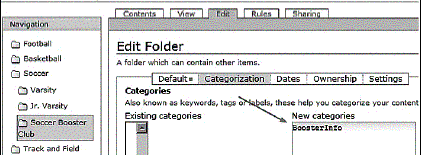
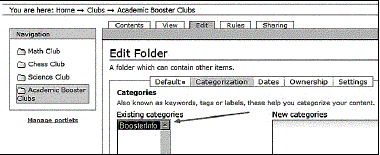
Let's now go back to the Boosters section folder under Soccer, select the Edit
tab, then select Categorization, and fi nally enter BoosterInfo in the New
Categories text box, and then click Save:
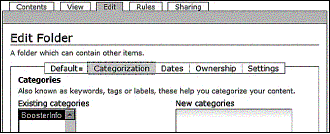
Now, when you refresh your view on this folder, the BoosterInfo is in an
existing category, and is available for selection from other content types, so
the following is displayed:
Now, let's go back to t he Booster collection that we had created previously.
Select Criteria, then under Field name, select Categories, and under Criteria
type, choose Select values from list.
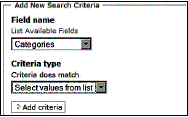
Finally, click on the Add criteria button.
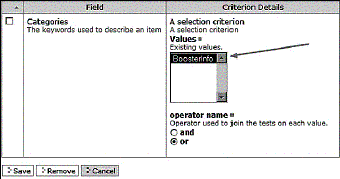
You are now presented with a form that you can use to complete the process.
Select BoosterInfo in the Values list (right now it just shows the one item).
Now, when we go back to the Boosters Collection view, we can see the results of
what we have just set up:
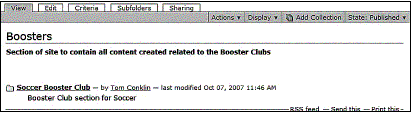
We see a folder for the Soccer Booster Club, and clicking on that link takes us
to the actual Soccer Booster Club folder, which is present elsewhere on the
site:
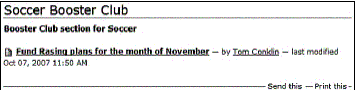
This is not a big deal yet. The visitor could have simply gone to that section
via the standard navigation. As the topic is about Boosters, let's go to
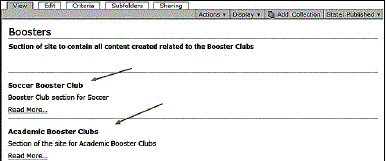
another section that has Booster information—Clubs. Then we will add a folder
called Academic Booster Clubs. Go to Categorization, select BoosterInfo, and
then click Save:
This folder is now set up and ready for content to be added to it. All content
that is added to this folder will be available via the collection created in
the Home section.
After creating a new page within this new section, we can carry out a tests to
check that our collection is working correctly, by viewing it. Here is the
result:
You may be thinking: "so what, what's the big deal"?. By itself, it still isn't
all that useful. But we have an additional tool to use in order to complete
this exercise. When you create a Collection, you are also creating an object
that is RSS-enabled by default. Now, visitors who are interested in any of the
booster clubs can subscribe to the Booster Collection, and receive a notifi
cation when content is added:
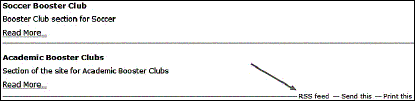
The following is the result after adding the RSS feed within FireFox:

We have only scratched the surface of using the Collections functionality within
Plone. As you get more comfortable using Collections, you will fi nd that you
can confi gure them with many different criteria such as item type, date,
creator, and so on that will ensure that specifi c results are returned.
For example, you may wish to set up a criteria along the lines of "Show me all
of the items in folder X, where there is a keyword of a OR b, AND the state is
published." Collections are very powerful for aggregating content that may be
scattered across your site.
Additional Collections
The News and Events sections also take advantage of the Collections
functionality. We can use this built-in functionality by creating News and
Events items within each topic area, and have the results displayed within News
and Events portlets for all of the site visitors to see.
We must fi rst ensure that the contributors to each specifi c area have the
ability to create these types of items within the section that they are
responsible for. By posting News and Events within their own area, Plone
automatically populates the news and events portlets in those sections. By
changing the criteria to recognize only the News and Events items listed in a
given folder, we can prevent other unrelated news and events items from
appearing.
In addition, as the News and Events sections are actually Collections, site
visitors can subscribe to the RSS feeds for this type of content.
Restricting types of content
As you grow your site an d delegate the creation of content within specifi c
folders to certain contributors, you may also want to prevent these
contributors from creating other types of objects, such as collections. We can
disable this functionality by removing the objects from the Add new… menu and
clicking on the Restrictions option.
Let's re-visit the Sports section. By default, contributors have the ability to
add the following types of content:

We only want to allow the contributors to create the following content types:
After clicking on Restriction s… we can disable the items that we don't want to
be available for use by deselecting the appropriate checkboxes:
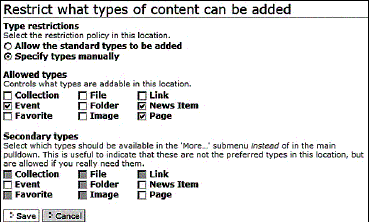
The result of this action is the following functionality, for someone with
Contributor rights:
Assuming that people have been assigned rights to create these items, they will
have content published in their specifi c sections (Sports, Boosters, and so
on).
This content will be available within the collection's results. For example, the
specifi c sections will include the News and Events fl agged as BoosterInfo,
and the default News and Events sections and portlets on the Home level will
also include these items, as the default criteria for these sections are more
general.
Moving content
Now that you know how to create folders and understand all the content items
that ship by default with Plone, you may be asking yourself: "What if I created
content in one section, but it really needs to be in a different section?".
This kind of change is inevitable in any site, and Plone has an easy way of
moving content to where it is needed.
Let's start off by creating some content in the Sports Section, and then move
this into the Clubs section.
We will fi rst go to the location where the content that needs to be moved
currently exists. In this example, the content is in the Football section.
Let's go to the Contents tabbed page for this section:
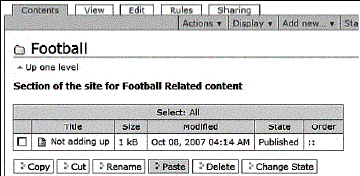
Select the checkbox to the left of the Not adding up item, and then click on the
Cut button. Now go to the folder where the content belongs. Make sure that you
are on the Contents tabbed page:
Click the Paste button, and now the item will be in the correct location:

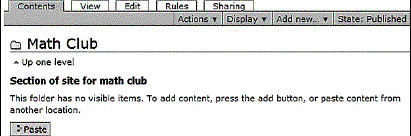
This same functionality is availab le for moving and/or copying entire folders.
An example of doing this is when you are fi rst building your site, and you
want to have identical folders within each subsection. Previously, we created
Varsity, Jr. Varsity, and Soccer Booster Club under the Soccer section. We can
copy these three folders and place them into the Football folder:
Now we just need to click the Change State button to publish them. You may also
need to make other minor changes, such as changing Soccer Booster Club to
Football Booster Club. Because this object was copied, the categorization
keyword we created for the booster folder (BoosterInfo) is also set up within
the copied folder.
Changing the order of pages
You may have a scenario where you w ant the visitor to be able to 'page through'
the content that you have created. An example would be a manual, or a long
document that you need to break up into sections.
In the following example, we will create a series of pages within a folder
called School Handbook in the Academic section with page navigation, and then
move around some of the pages so that the page fl ow in the correct order.
Go to the correct folder, select the Edit tab, then select Settings, and select
the Enable next previous navigation checkbox.
Now we can go and add some pages to this folder. When we add pages, they are
listed in the order of their creation, so we will make an obvious mistake:
We have the navigation working, but we need to correct the error of the pages
being out of order. We do this by going to the Contents tabbed page of the
School Handbook folder, and then selecting Page 4:

We then drag it to above Page 5:
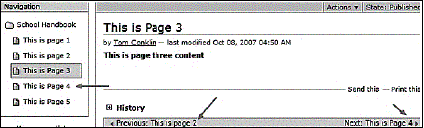
When yo u view your handbook again, you will see that the order has now been
changed:
Summary
In this chapter, we have learned how to:
Organize your content
Create folders
Organize folders based on topics and groups
Create Collections
Move files from one folder to another
Copy folders
Create page navigation
Move the order in which pages are displayed in the navigation
We've dug in a bit deeper into Plone's end user architecture. You should now
have the confi dence to start adding content to your site in an organized and
effective manner.
Also read
Here, we will learn to apply nice formatting to data that is displayed on our
page. We will learn to do this by making use of Cascading Style Sheets. We will
also learn how to format our data automatically, depending on the data values
(a technique known as conditional formatting). Then we will learn to filter and
sort our data, use formulae to perform calculations, and how to split our data
up into multiple pages.
|