Practice Non Verbal Reasoning questions on Analogy. Each question shows two sets of figures. Figures A, B, C and D form the Problem Set, and figures 1, 2, 3, 4 and 5 form the Answer Set. There is a definite relationship between figures A and B. Find the same relationship between figures C and D by selecting the figure from the Answer Set that replaces the question mark (?) in figure D.
Question 1
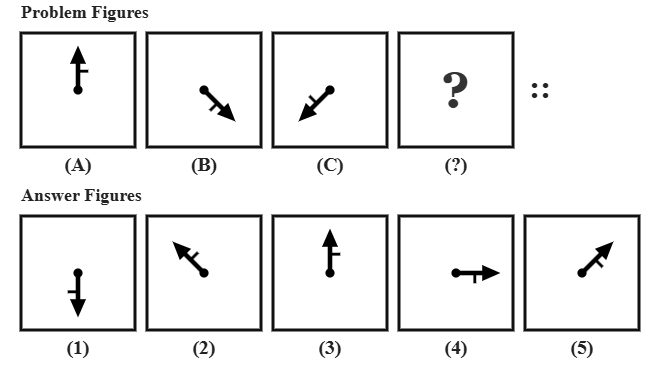
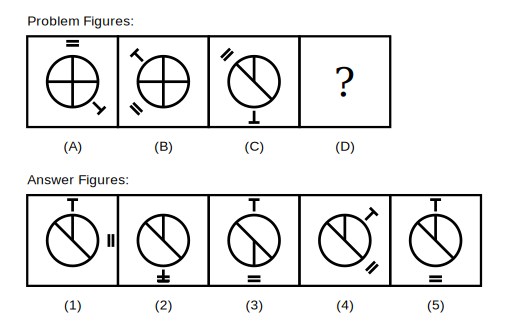
In each of the following questions, there is a certain relationship between the two figures given on the left side of (::). From the answer figures, select the one that has the same relationship with figure (C) as figure (B) has with figure (A).
Explanation
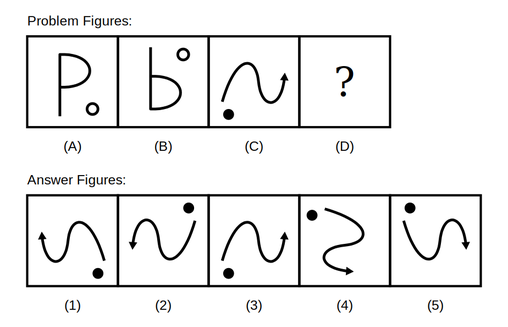
Figure B is figure A rotated 135 degrees clockwise, with the pivot dot at the tail and the small barb on the shaft both carried along unchanged. Applying the same 135-degree clockwise rotation to figure C (pointing down-left) brings it all the way back around to pointing straight up.
Option 1 points straight down, which is figure C turned only 45 degrees anticlockwise.
Option 2 shows a diagonal up-left arrow, 45 degrees short of the correct position.
Option 4 points right, which is figure C turned 135 degrees anticlockwise, the opposite direction to the rule.
Option 5 shows a diagonal up-right arrow, 45 degrees past the correct position.
Option 3 correctly shows the arrow pointing straight up, exactly 135 degrees clockwise from figure C, so it is the right answer.
Option 1 points straight down, which is figure C turned only 45 degrees anticlockwise.
Option 2 shows a diagonal up-left arrow, 45 degrees short of the correct position.
Option 4 points right, which is figure C turned 135 degrees anticlockwise, the opposite direction to the rule.
Option 5 shows a diagonal up-right arrow, 45 degrees past the correct position.
Option 3 correctly shows the arrow pointing straight up, exactly 135 degrees clockwise from figure C, so it is the right answer.
Shortcut Method
Rule: A → B is a 135° clockwise turn (pivot dot and barb move with it) → apply the same turn to C (down-left, 225°) → 225+135=360=0° (up)
∴ Option 3 is correct ✓
∴ Option 3 is correct ✓
Question 2
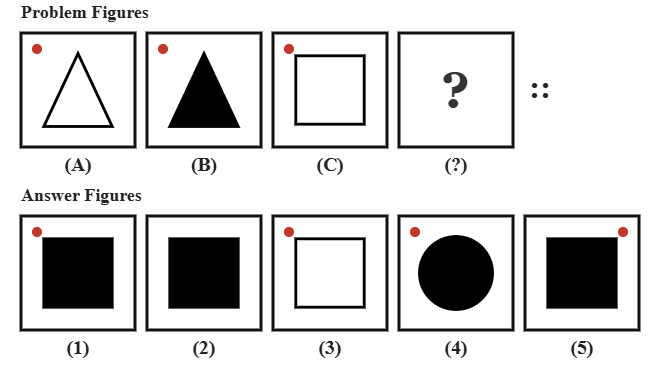
Study figures (A) and (B) below; they share a definite relationship. Choose the answer figure that relates to figure (C) in the very same way.
Explanation
Two things must both carry over from A to B: the shape becomes solid black, and the small red reference dot stays fixed in the top-left corner throughout. Applying both to figure C (a hollow square with the dot top-left) gives a solid black square with the dot still in the top-left corner.
Option 2 correctly fills the square solid black but drops the reference dot entirely.
Option 3 keeps the dot in place but leaves the square hollow, not applying the fill toggle.
Option 4 correctly fills the shape solid black and keeps a dot in the top-left corner, but changes the shape itself to a circle instead of keeping it a square.
Option 5 correctly fills the square solid black but moves the dot to the top-right corner instead of leaving it top-left.
Option 1 correctly shows a solid black square with the red dot still in the top-left corner, so it is the right answer.
Option 2 correctly fills the square solid black but drops the reference dot entirely.
Option 3 keeps the dot in place but leaves the square hollow, not applying the fill toggle.
Option 4 correctly fills the shape solid black and keeps a dot in the top-left corner, but changes the shape itself to a circle instead of keeping it a square.
Option 5 correctly fills the square solid black but moves the dot to the top-right corner instead of leaving it top-left.
Option 1 correctly shows a solid black square with the red dot still in the top-left corner, so it is the right answer.
Shortcut Method
Rule: A → B fills the shape solid black AND keeps the corner dot fixed → apply both to C (square) → solid black square, dot still top-left
∴ Option 1 is correct ✓
∴ Option 1 is correct ✓
Question 3
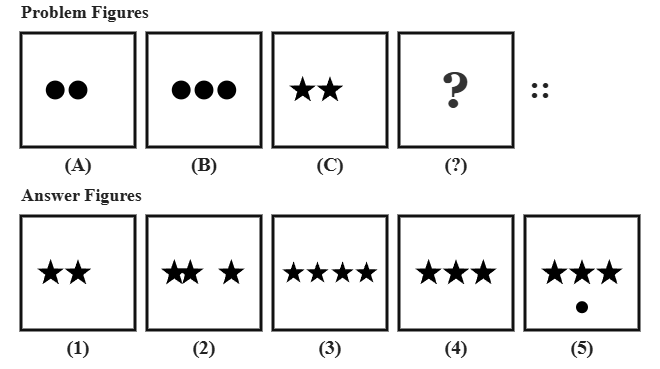
Figures (A) and (B) are related in a specific way. Pick the answer figure that bears the same relationship to figure (C).
Explanation
Figure B has one more dot than figure A (2 dots becomes 3 dots), the shape itself unchanged. Applying the same "count increases by 1" rule to figure C (2 stars) gives 3 stars, evenly spaced.
Option 1 simply repeats figure C unchanged, with no increase in count.
Option 2 shows 3 stars but unevenly spaced, with two stars bunched close together and the third set apart -- the count is right but the spacing is wrong, so look carefully rather than just counting.
Option 3 shows 4 stars, two more than C rather than one more.
Option 5 shows 3 evenly spaced stars plus an extra small dot beneath them, an unrelated addition rather than a true count increase.
Option 4 correctly shows exactly 3 evenly spaced stars, one more than C, so it is the right answer.
Option 1 simply repeats figure C unchanged, with no increase in count.
Option 2 shows 3 stars but unevenly spaced, with two stars bunched close together and the third set apart -- the count is right but the spacing is wrong, so look carefully rather than just counting.
Option 3 shows 4 stars, two more than C rather than one more.
Option 5 shows 3 evenly spaced stars plus an extra small dot beneath them, an unrelated addition rather than a true count increase.
Option 4 correctly shows exactly 3 evenly spaced stars, one more than C, so it is the right answer.
Shortcut Method
Rule: A → B adds one more of the same item → apply to C (2 stars) → 3 stars
∴ Option 4 is correct ✓
∴ Option 4 is correct ✓
Question 4
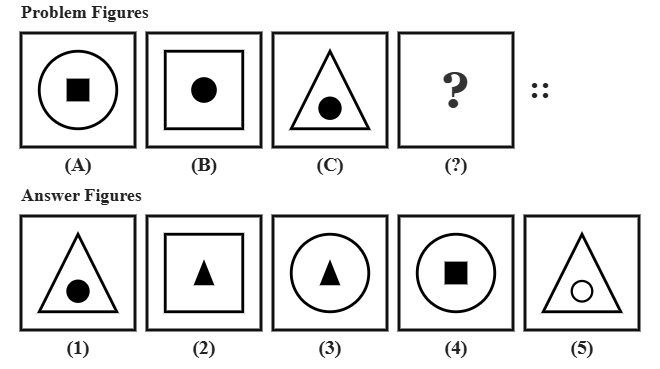
A particular rule links figure (A) to figure (B). Identify the answer figure that follows the same rule when applied to figure (C).
Explanation
Figure B swaps the outer and inner shapes of figure A: the circle (previously outer) becomes the small inner shape, and the square (previously inner) becomes the outer shape. Applying the same swap to figure C (triangle outside, circle inside) gives a circle outside with a small solid triangle inside.
Option 1 simply repeats figure C unchanged, with no swap.
Option 2 swaps the outer shape to a square instead of a circle.
Option 4 keeps the circle outside but leaves a small solid square inside instead of a triangle.
Option 5 keeps the triangle outside and only makes the inner circle hollow, without swapping the shapes at all.
Option 3 correctly shows a circle outside with a small solid triangle inside, so it is the right answer.
Option 1 simply repeats figure C unchanged, with no swap.
Option 2 swaps the outer shape to a square instead of a circle.
Option 4 keeps the circle outside but leaves a small solid square inside instead of a triangle.
Option 5 keeps the triangle outside and only makes the inner circle hollow, without swapping the shapes at all.
Option 3 correctly shows a circle outside with a small solid triangle inside, so it is the right answer.
Shortcut Method
Rule: A → B swaps which shape is outside and which is the small inner shape → apply to C (triangle-out, circle-in) → circle-out, triangle-in
∴ Option 3 is correct ✓
∴ Option 3 is correct ✓
Question 5
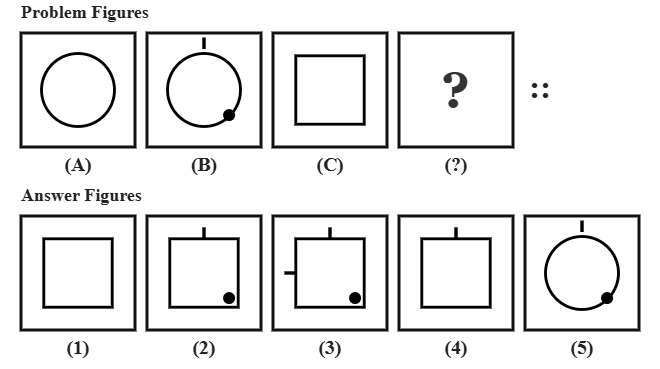
Observe how figure (B) differs from figure (A). Select the answer figure that differs from figure (C) in exactly the same way.
Explanation
Two marks are added from A to B together: a small tick on top and a small dot at the bottom-right, with nothing else changed. Applying both additions to figure C (a plain square) gives a square with a tick on top and a dot at the bottom-right.
Option 1 simply repeats figure C unchanged, with neither mark added.
Option 3 correctly adds both the tick and the dot but also adds an extra, unwanted tick on the left side.
Option 4 adds only the top tick and leaves out the bottom-right dot.
Option 5 correctly adds both marks but changes the shape to a circle instead of keeping it a square.
Option 2 correctly shows the square with exactly the top tick and the bottom-right dot added, nothing more and nothing less, so it is the right answer.
Option 1 simply repeats figure C unchanged, with neither mark added.
Option 3 correctly adds both the tick and the dot but also adds an extra, unwanted tick on the left side.
Option 4 adds only the top tick and leaves out the bottom-right dot.
Option 5 correctly adds both marks but changes the shape to a circle instead of keeping it a square.
Option 2 correctly shows the square with exactly the top tick and the bottom-right dot added, nothing more and nothing less, so it is the right answer.
Shortcut Method
Rule: A → B adds a top tick AND a bottom-right dot together → apply both to C (square) → square with tick on top and dot at bottom-right, nothing extra
∴ Option 2 is correct ✓
∴ Option 2 is correct ✓
Question 6
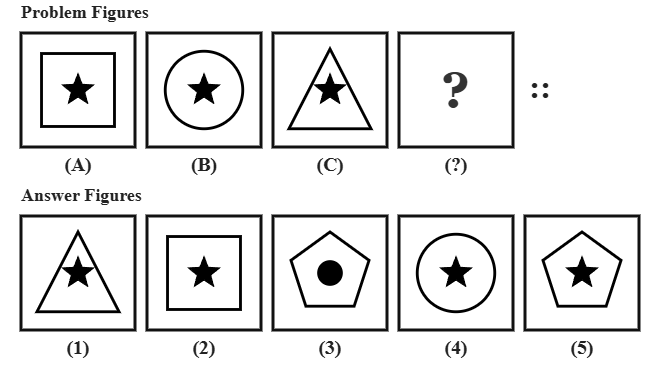
Figure (B) is related to figure (A) by a certain transformation. Find the answer figure that is related to figure (C) by that same transformation.
Explanation
From figure (A) to figure (B), the inner star stays exactly the same while the outer square is replaced by a circle. Applying the same change to figure (C) (a star inside a triangle) replaces the triangle with a circle and keeps the star.
Option 1 keeps the triangle, Option 2 uses a square, Option 3 uses a pentagon and replaces the star with a dot, and Option 5 uses a pentagon instead of a circle.
Option 4 correctly shows the same star inside a circle, so it is the right answer.
Option 1 keeps the triangle, Option 2 uses a square, Option 3 uses a pentagon and replaces the star with a dot, and Option 5 uses a pentagon instead of a circle.
Option 4 correctly shows the same star inside a circle, so it is the right answer.
Shortcut Method
Rule: A → B replaces the outer shape with a circle, star unchanged → apply to C (triangle) → star inside a circle
∴ Option 4 is correct ✓
∴ Option 4 is correct ✓
Question 7
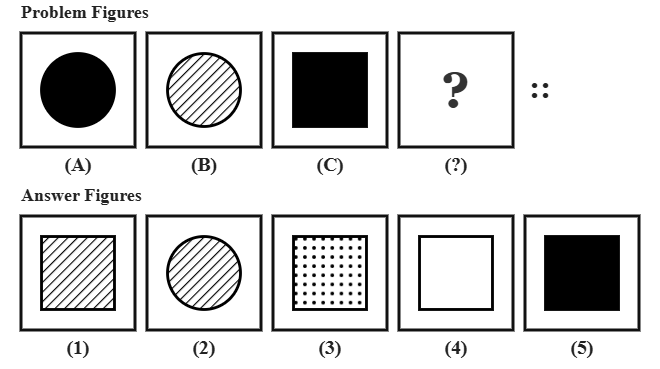
There is a hidden rule connecting figure (A) to figure (B). Choose the answer figure that connects to figure (C) using the identical rule.
Explanation
Figure B replaces the solid black fill of figure A with diagonal line hatching, the outline unchanged. Applying the same rule to figure C (a solid black square) gives a square filled with diagonal hatching.
Option 2 keeps the shape a circle instead of changing it to a square.
Option 3 uses a dotted fill pattern instead of diagonal line hatching.
Option 4 leaves the square completely hollow instead of hatched.
Option 5 simply repeats figure C unchanged, still solid black.
Option 1 correctly shows the square filled with diagonal hatching, so it is the right answer.
Option 2 keeps the shape a circle instead of changing it to a square.
Option 3 uses a dotted fill pattern instead of diagonal line hatching.
Option 4 leaves the square completely hollow instead of hatched.
Option 5 simply repeats figure C unchanged, still solid black.
Option 1 correctly shows the square filled with diagonal hatching, so it is the right answer.
Shortcut Method
Rule: A → B replaces solid fill with diagonal hatching, outline unchanged → apply to C (solid square) → hatched square
∴ Option 1 is correct ✓
∴ Option 1 is correct ✓
Question 8
The change from figure (A) to figure (B) follows a set pattern. Select the answer figure that shows the same pattern of change applied to figure (C).
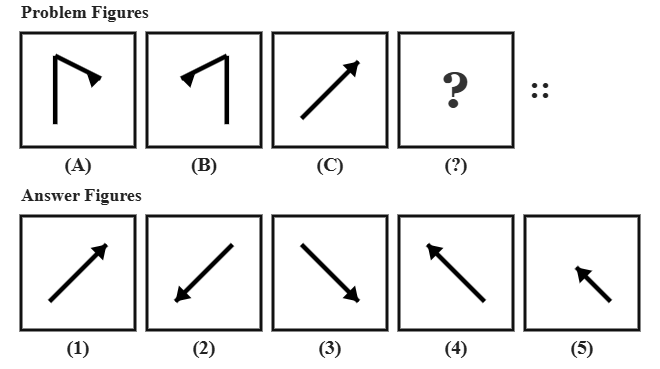
Explanation
Figure B is figure A mirrored left-to-right, with nothing else changed. Applying the same left-right mirror to figure C (an arrow pointing up-right) gives an arrow pointing up-left.
Option 1 simply repeats figure C unchanged, with no mirroring.
Option 2 rotates the arrow 180 degrees instead of mirroring it, pointing down-left.
Option 3 flips the arrow top-to-bottom instead of left-to-right, pointing down-right.
Option 5 shows a mirrored arrow that is noticeably shorter than the original, an inconsistent change in length.
Option 4 correctly shows the arrow mirrored left-to-right, pointing up-left at the same length, so it is the right answer.
Option 1 simply repeats figure C unchanged, with no mirroring.
Option 2 rotates the arrow 180 degrees instead of mirroring it, pointing down-left.
Option 3 flips the arrow top-to-bottom instead of left-to-right, pointing down-right.
Option 5 shows a mirrored arrow that is noticeably shorter than the original, an inconsistent change in length.
Option 4 correctly shows the arrow mirrored left-to-right, pointing up-left at the same length, so it is the right answer.
Shortcut Method
Rule: A → B is a left-right mirror flip → apply to C (up-right arrow) → up-left arrow
∴ Option 4 is correct ✓
∴ Option 4 is correct ✓
Question 9
Figure (B) is obtained from figure (A) by multiplying the number of spokes, not by adding to it. Select the answer figure that has the same relationship with figure (C).
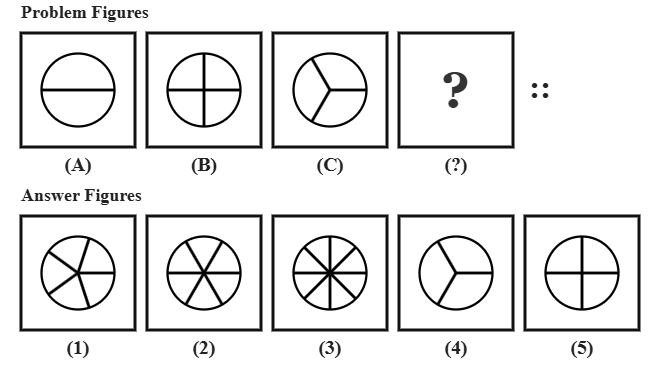
Explanation
Figure B has exactly double the number of spokes of figure A (2 spokes becomes 4 spokes). Applying the same doubling rule to figure C (3 spokes) gives 6 spokes.
Option 1 shows 5 spokes, which adds 2 to figure C instead of doubling it.
Option 3 shows 8 spokes, more than double.
Option 4 shows only 3 spokes, simply repeating figure C unchanged.
Option 5 shows 4 spokes, repeating figure B's count instead of doubling C.
Option 2 correctly shows exactly 6 spokes, double the count of figure C, so it is the right answer.
Option 1 shows 5 spokes, which adds 2 to figure C instead of doubling it.
Option 3 shows 8 spokes, more than double.
Option 4 shows only 3 spokes, simply repeating figure C unchanged.
Option 5 shows 4 spokes, repeating figure B's count instead of doubling C.
Option 2 correctly shows exactly 6 spokes, double the count of figure C, so it is the right answer.
Shortcut Method
Rule: A → B doubles the spoke count (2 → 4) → apply to C (3 spokes) → 6 spokes
∴ Option 2 is correct ✓
∴ Option 2 is correct ✓
Question 10
Figure (A) becomes figure (B) after one specific change. Choose the answer figure that results from applying the identical change to figure (C).
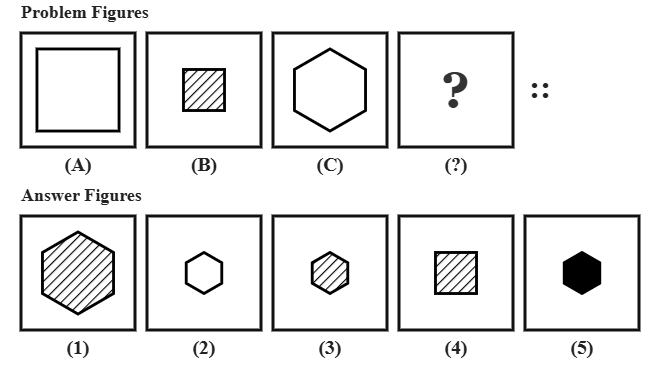
Explanation
Two changes happen from A to B together: the shape shrinks to exactly half its size, and its fill changes from hollow to diagonal hatching. Applying both changes to figure C (a large hollow hexagon) gives a half-size hatched hexagon.
Option 1 correctly applies the hatched fill but keeps the hexagon at full size, not shrinking it.
Option 2 correctly shrinks the hexagon to half size but leaves it hollow instead of hatching it.
Option 4 correctly shrinks the shape to half size and hatches it, but the shape is a square instead of a hexagon.
Option 5 correctly shrinks the hexagon to half size but fills it fully solid black instead of with diagonal hatching.
Option 3 correctly shows a half-size hexagon with diagonal hatching, applying both changes together, so it is the right answer.
Option 1 correctly applies the hatched fill but keeps the hexagon at full size, not shrinking it.
Option 2 correctly shrinks the hexagon to half size but leaves it hollow instead of hatching it.
Option 4 correctly shrinks the shape to half size and hatches it, but the shape is a square instead of a hexagon.
Option 5 correctly shrinks the hexagon to half size but fills it fully solid black instead of with diagonal hatching.
Option 3 correctly shows a half-size hexagon with diagonal hatching, applying both changes together, so it is the right answer.
Shortcut Method
Rule: A → B shrinks to half size AND hollow becomes hatched → apply both to C (large hexagon) → half-size hatched hexagon
∴ Option 3 is correct ✓
∴ Option 3 is correct ✓
Question 11
Note the way figure (A) is transformed into figure (B). Pick the answer figure obtained by transforming figure (C) in the same way.
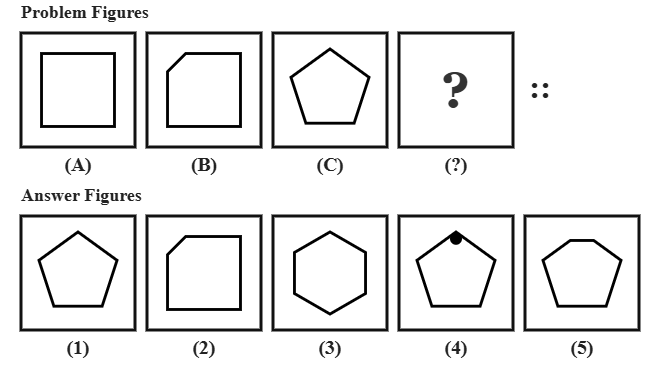
Explanation
Figure B is figure A with exactly one corner cut off (replaced by a short diagonal edge), everything else unchanged. Applying the same rule to figure C (a plain pentagon) gives a pentagon with one corner cut off.
Option 1 simply repeats figure C unchanged, with no corner cut.
Option 2 keeps the shape a square instead of a pentagon.
Option 3 changes the shape to a hexagon instead of cutting a corner off the pentagon.
Option 4 correctly cuts one corner but also adds an unrelated dot near the top, an extra change beyond the established rule.
Option 5 correctly shows the pentagon with exactly one corner cut off and nothing else changed, so it is the right answer.
Option 1 simply repeats figure C unchanged, with no corner cut.
Option 2 keeps the shape a square instead of a pentagon.
Option 3 changes the shape to a hexagon instead of cutting a corner off the pentagon.
Option 4 correctly cuts one corner but also adds an unrelated dot near the top, an extra change beyond the established rule.
Option 5 correctly shows the pentagon with exactly one corner cut off and nothing else changed, so it is the right answer.
Shortcut Method
Rule: A → B cuts exactly one corner off the shape → apply to C (pentagon) → pentagon with one corner cut, no other change
∴ Option 5 is correct ✓
∴ Option 5 is correct ✓
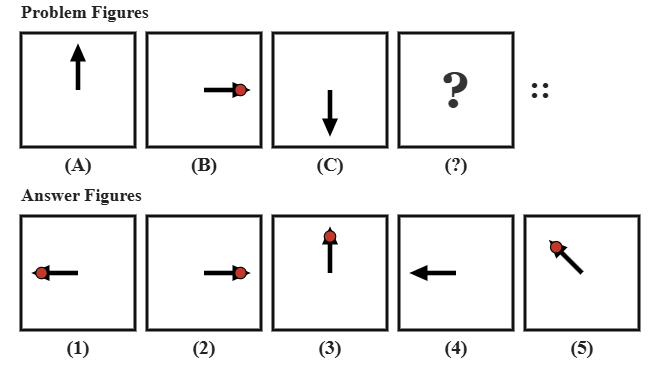
Question 12
Two related changes turn figure (A) into figure (B). Select the answer figure produced when the same two changes are applied to figure (C).
Explanation
Two changes happen from A to B together: the arrow rotates 90 degrees clockwise (up becomes right), and a red dot is added at its tip. Applying both changes to figure C (a plain arrow pointing down) gives an arrow pointing left with a red dot at its tip.
Option 2 points right with a dot, which turns figure C 90 degrees anticlockwise instead of clockwise.
Option 3 points up with a dot, which turns figure C through 180 degrees instead of 90 degrees.
Option 4 correctly rotates the arrow to point left but leaves out the red dot entirely.
Option 5 rotates the arrow to a diagonal up-left direction with a dot, overshooting the correct 90-degree step.
Option 1 correctly shows the arrow pointing left with a red dot at its tip, applying both changes together, so it is the right answer.
Option 2 points right with a dot, which turns figure C 90 degrees anticlockwise instead of clockwise.
Option 3 points up with a dot, which turns figure C through 180 degrees instead of 90 degrees.
Option 4 correctly rotates the arrow to point left but leaves out the red dot entirely.
Option 5 rotates the arrow to a diagonal up-left direction with a dot, overshooting the correct 90-degree step.
Option 1 correctly shows the arrow pointing left with a red dot at its tip, applying both changes together, so it is the right answer.
Shortcut Method
Rule: A → B does two things at once -- rotate 90° clockwise AND add a dot at the tip → apply both to C (down arrow) → left arrow with dot
∴ Option 1 is correct ✓
∴ Option 1 is correct ✓
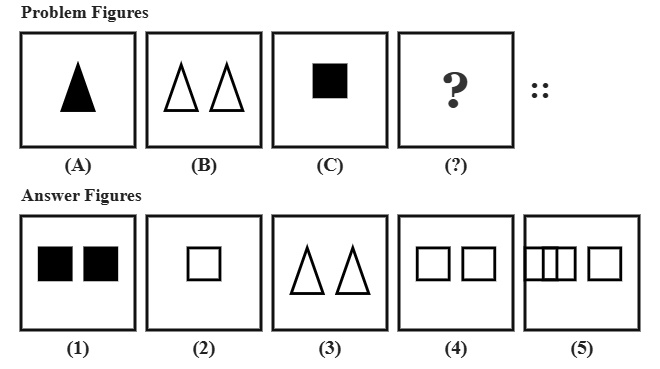
Question 13
A combination of changes links figure (A) to figure (B). Identify the answer figure linked to figure (C) by that same combination of changes.
Explanation
Two changes happen from A to B together: the count increases from one shape to two, and the fill toggles from solid black to hollow. Applying both changes to figure C (one solid black square) gives two hollow squares side by side.
Option 1 shows two squares but they remain solid black instead of toggling to hollow.
Option 2 correctly toggles to hollow but keeps the count at one square instead of two.
Option 3 correctly shows two hollow shapes but they are triangles, not squares, ignoring figure C's shape.
Option 5 shows three hollow squares, one more than the correct count of two.
Option 4 correctly shows exactly two hollow squares side by side, applying both changes together, so it is the right answer.
Option 1 shows two squares but they remain solid black instead of toggling to hollow.
Option 2 correctly toggles to hollow but keeps the count at one square instead of two.
Option 3 correctly shows two hollow shapes but they are triangles, not squares, ignoring figure C's shape.
Option 5 shows three hollow squares, one more than the correct count of two.
Option 4 correctly shows exactly two hollow squares side by side, applying both changes together, so it is the right answer.
Shortcut Method
Rule: A → B does two things at once -- count goes from one to two AND fill toggles solid-to-hollow → apply both to C (one solid square) → two hollow squares
∴ Option 4 is correct ✓
∴ Option 4 is correct ✓
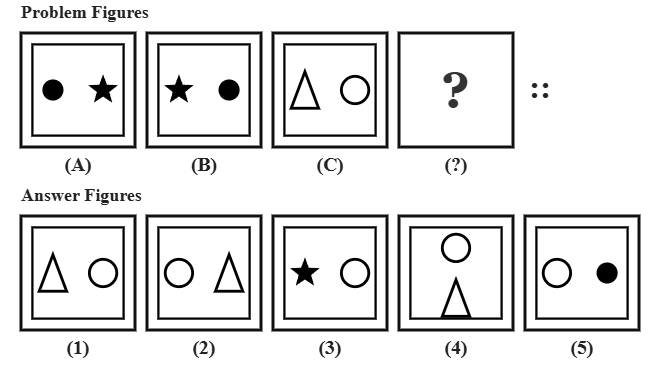
Question 14
Figure (B) rearranges the elements of figure (A) in a fixed way. Choose the answer figure that rearranges the elements of figure (C) in the same fixed way.
Explanation
Figure B swaps the left and right positions of the two elements in figure A, with the elements themselves unchanged. Applying the same left-right swap to figure C (triangle on the left, circle on the right) gives the circle on the left and the triangle on the right.
Option 1 simply repeats figure C unchanged, with no positions swapped.
Option 3 keeps the circle on the right but replaces the triangle with a star, changing the elements instead of just swapping them.
Option 4 swaps the elements' vertical arrangement (circle above, triangle below) rather than swapping left and right.
Option 5 correctly places the circle on the left but replaces the triangle with a dot on the right, an unrelated element change.
Option 2 correctly shows the circle on the left and the triangle on the right, the same two elements simply swapped, so it is the right answer.
Option 1 simply repeats figure C unchanged, with no positions swapped.
Option 3 keeps the circle on the right but replaces the triangle with a star, changing the elements instead of just swapping them.
Option 4 swaps the elements' vertical arrangement (circle above, triangle below) rather than swapping left and right.
Option 5 correctly places the circle on the left but replaces the triangle with a dot on the right, an unrelated element change.
Option 2 correctly shows the circle on the left and the triangle on the right, the same two elements simply swapped, so it is the right answer.
Shortcut Method
Rule: A → B swaps the left and right elements, elements unchanged → apply to C (triangle-left, circle-right) → circle-left, triangle-right
∴ Option 2 is correct ✓
∴ Option 2 is correct ✓
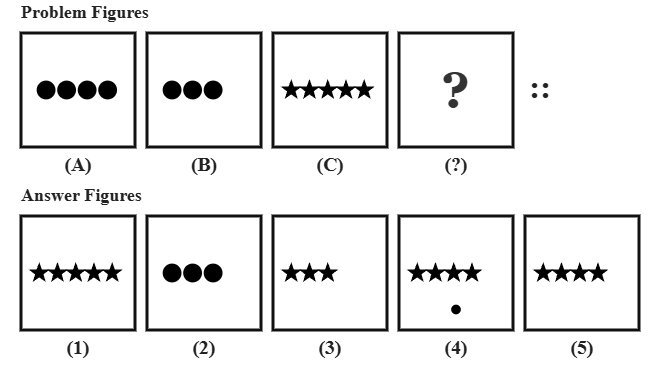
Question 15
Figure (A) relates to figure (B) through a single defined change. Select the answer figure that relates to figure (C) through the identical change.
Explanation
Figure B has one fewer dot than figure A (4 dots becomes 3 dots), the shape itself unchanged. Applying the same "count decreases by 1" rule to figure C (5 stars) gives 4 stars.
Option 1 simply repeats figure C unchanged, with no decrease in count.
Option 2 changes the shape to dots instead of keeping it stars.
Option 3 shows 3 stars, two fewer than C rather than one fewer.
Option 4 shows 4 stars but with an extra small dot beneath them, an unrelated addition rather than a clean count decrease.
Option 5 correctly shows exactly 4 stars with nothing else added, one fewer than C, so it is the right answer.
Option 1 simply repeats figure C unchanged, with no decrease in count.
Option 2 changes the shape to dots instead of keeping it stars.
Option 3 shows 3 stars, two fewer than C rather than one fewer.
Option 4 shows 4 stars but with an extra small dot beneath them, an unrelated addition rather than a clean count decrease.
Option 5 correctly shows exactly 4 stars with nothing else added, one fewer than C, so it is the right answer.
Shortcut Method
Rule: A → B removes one item from the row → apply to C (5 stars) → 4 stars
∴ Option 5 is correct ✓
∴ Option 5 is correct ✓
Question 16
Look carefully at how figure (A) changes into figure (B), then apply the same change to figure (C) to find the answer.
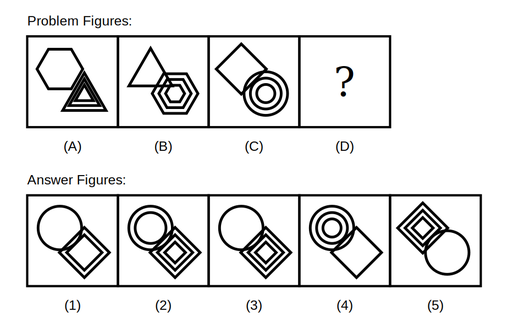
Explanation
Figure (A) has two overlapping shapes: a single-outline hexagon at the top-left and a triangle drawn with three nested outlines at the bottom-right. In figure (B) the two shapes swap roles but the positions keep their style: the triangle is now the single outline at the top-left, and the hexagon is now drawn with three nested outlines at the bottom-right. Figure (C) has a single diamond at the top-left and a nested circle at the bottom-right, so the answer is a single circle at the top-left with a diamond drawn with three nested outlines at the bottom-right.
Option 1 draws the diamond with only two outlines instead of three.
Option 2 keeps the circle nested.
Option 4 keeps the circle nested and the diamond single, only moving them.
Option 5 swaps the roles but puts the nested diamond at the top-left and the single circle at the bottom-right.
Option 3 correctly shows a single circle at the top-left and a three-outline diamond at the bottom-right, so it is the right answer.
Option 1 draws the diamond with only two outlines instead of three.
Option 2 keeps the circle nested.
Option 4 keeps the circle nested and the diamond single, only moving them.
Option 5 swaps the roles but puts the nested diamond at the top-left and the single circle at the bottom-right.
Option 3 correctly shows a single circle at the top-left and a three-outline diamond at the bottom-right, so it is the right answer.
Shortcut Method
Rule: single and nested roles swap; the single shape stays at top-left and the three-outline shape stays at bottom-right → apply to C (diamond single, circle nested) → circle single at top-left, diamond nested at bottom-right
∴ Option 3 is correct ✓
∴ Option 3 is correct ✓
Question 17
A rule links figure (A) to figure (B). Find the answer figure that is linked to figure (C) by the same rule.
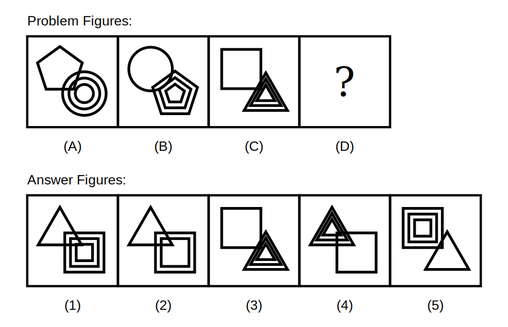
Explanation
From figure (A) to figure (B), the single-outline shape and the nested shape swap roles while the positions keep their style: the pentagon (single at top-left in A) becomes the three-outline shape at bottom-right in B, and the circle (nested in A) becomes the single outline at top-left in B. Figure (C) has a single square at the top-left and a nested triangle at the bottom-right, so the answer is a single triangle at the top-left with a square drawn with three nested outlines at the bottom-right.
Option 2 draws the square with only two outlines instead of three.
Option 3 repeats figure (C) unchanged.
Option 4 keeps the triangle nested and the square single, only moving them.
Option 5 swaps the roles but puts the nested square at the top-left and the single triangle at the bottom-right.
Option 1 correctly shows a single triangle at the top-left and a three-outline square at the bottom-right, so it is the right answer.
Option 2 draws the square with only two outlines instead of three.
Option 3 repeats figure (C) unchanged.
Option 4 keeps the triangle nested and the square single, only moving them.
Option 5 swaps the roles but puts the nested square at the top-left and the single triangle at the bottom-right.
Option 1 correctly shows a single triangle at the top-left and a three-outline square at the bottom-right, so it is the right answer.
Shortcut Method
Rule: single and nested roles swap; the single shape stays at top-left and the three-outline shape stays at bottom-right → apply to C (square single, triangle nested) → triangle single at top-left, square nested at bottom-right
∴ Option 1 is correct ✓
∴ Option 1 is correct ✓
Question 18
Identify how figure (A) is transformed into figure (B), and apply that same transformation to figure (C).
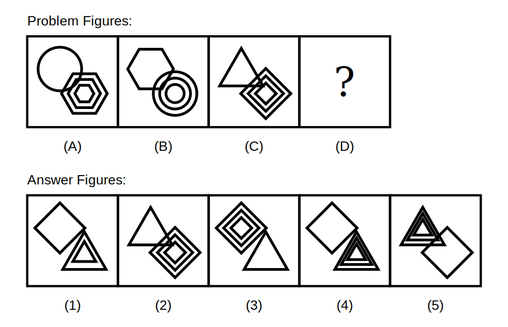
Explanation
The single-outline shape and the nested shape swap roles from figure (A) to figure (B) while the positions keep their style: the circle (single at top-left in A) becomes the three-outline shape at bottom-right in B, and the hexagon (nested in A) becomes the single outline at top-left in B. Figure (C) has a single triangle at the top-left and a nested diamond at the bottom-right, so the answer is a single diamond at the top-left with a triangle drawn with three nested outlines at the bottom-right.
Option 1 draws the triangle with only two outlines instead of three.
Option 2 repeats figure (C) unchanged.
Option 3 keeps the diamond nested and the triangle single, only moving them.
Option 5 swaps the roles but puts the nested triangle at the top-left and the single diamond at the bottom-right.
Option 4 correctly shows a single diamond at the top-left and a three-outline triangle at the bottom-right, so it is the right answer.
Option 1 draws the triangle with only two outlines instead of three.
Option 2 repeats figure (C) unchanged.
Option 3 keeps the diamond nested and the triangle single, only moving them.
Option 5 swaps the roles but puts the nested triangle at the top-left and the single diamond at the bottom-right.
Option 4 correctly shows a single diamond at the top-left and a three-outline triangle at the bottom-right, so it is the right answer.
Shortcut Method
Rule: single and nested roles swap; the single shape stays at top-left and the three-outline shape stays at bottom-right → apply to C (triangle single, diamond nested) → diamond single at top-left, triangle nested at bottom-right
∴ Option 4 is correct ✓
∴ Option 4 is correct ✓
Question 19
Figure (B) below is related to figure (A) in a specific way. Select the answer figure related to figure (C) in that same way.
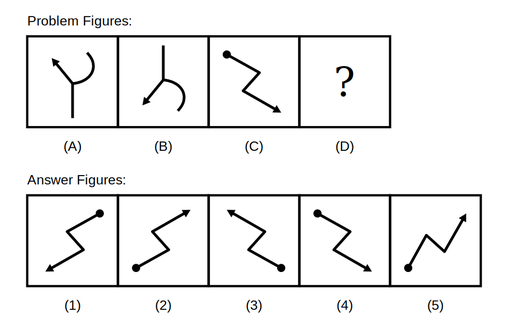
Explanation
Figure (B) is figure (A)'s water image: the whole figure is flipped upside down, as if mirrored on a horizontal line, so top and bottom swap while left and right stay the same. Applying the same upside-down flip to figure (C) (a zigzag with a dot at the top-left end and an arrowhead at the bottom-right end) moves the dot to the bottom-left and the arrowhead to the top-right, with the zigzag's bends also flipped vertically.
Options that leave the dot and arrowhead on the same ends as (C), or only mirror left-right instead of flipping top-bottom, are not the water image.
Option 2 correctly shows the vertically flipped zigzag with the dot now at bottom-left and the arrowhead now at top-right, so it is the right answer.
Options that leave the dot and arrowhead on the same ends as (C), or only mirror left-right instead of flipping top-bottom, are not the water image.
Option 2 correctly shows the vertically flipped zigzag with the dot now at bottom-left and the arrowhead now at top-right, so it is the right answer.
Shortcut Method
Rule: B is the water image of A (flip upside down, left/right unchanged) → apply to C → flip the zigzag upside down
∴ Option 2 is correct ✓
∴ Option 2 is correct ✓
Question 20
There is a definite relationship between figures (A) and (B) below. Choose the answer figure that shows figure (C) in that same relationship.
Explanation
Figure (B) is the water image of figure (A): flipped upside down on a horizontal line, which also carries the small hollow circle from the bottom to the top. Applying the same upside-down flip to figure (C) (an S-curve with an arrow and a dot near the bottom-left) turns the curve's bends upside down and moves the dot and arrow to the top.
Options that keep the curve the same way up as (C), or only mirror it left-right, are not its water image.
Option 5 correctly shows the S-curve flipped upside down with the dot and arrow carried to the top, so it is the right answer.
Options that keep the curve the same way up as (C), or only mirror it left-right, are not its water image.
Option 5 correctly shows the S-curve flipped upside down with the dot and arrow carried to the top, so it is the right answer.
Shortcut Method
Rule: B is the water image of A → apply to C → flip the S-curve upside down
∴ Option 5 is correct ✓
∴ Option 5 is correct ✓
Question 21
Work out the relationship between figures (A) and (B) below, then apply it to figure (C).
Explanation
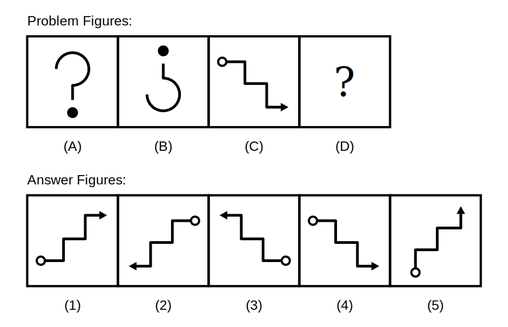
Figure (B) is figure (A) flipped upside down on a horizontal line (its water image), which moves the dot from the bottom of the curve to the top. Applying the same upside-down flip to figure (C) (a hollow circle joined to a staircase line ending in an arrowhead) turns the staircase upside down and swaps which end has the circle and which has the arrowhead vertically.
Options that keep the staircase the same way up, or only mirror it left-right, are not the water image of (C).
Option 1 correctly shows the staircase flipped upside down, so it is the right answer.
Options that keep the staircase the same way up, or only mirror it left-right, are not the water image of (C).
Option 1 correctly shows the staircase flipped upside down, so it is the right answer.
Shortcut Method
Rule: B is the water image of A → apply to C → flip the staircase line upside down
∴ Option 1 is correct ✓
∴ Option 1 is correct ✓
Question 22
Figures (A) and (B) below are connected by a rule that also fixes how many outlines each position gets. Apply the same rule to figure (C).
Explanation
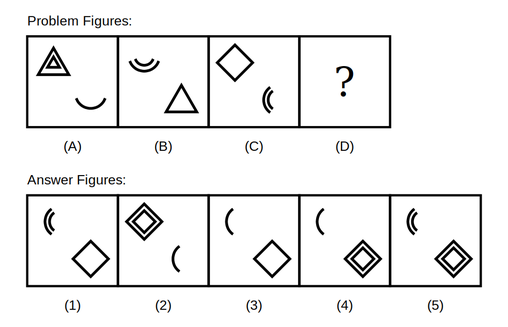
In figure (A), the top-left position holds a double outline and the bottom-right position holds a single outline. In figure (B), the two shapes (triangle and arc) swap positions, but each position keeps its own outline count: top-left is still double (now the arc), and bottom-right is still single (now the triangle). Figure (C) reverses which position is which: top-left is single (a diamond) and bottom-right is double (an arc). Swapping the shapes while keeping each position's own outline count means the arc moves to top-left and stays single there, and the diamond moves to bottom-right and becomes double there.
Option 1 and Option 5 draw the arc double at the top-left, Option 2 leaves the diamond at the top-left, and Option 3 draws both shapes single.
Option 4 correctly shows a single arc at top-left and a double-outlined diamond at bottom-right, so it is the right answer.
Option 1 and Option 5 draw the arc double at the top-left, Option 2 leaves the diamond at the top-left, and Option 3 draws both shapes single.
Option 4 correctly shows a single arc at top-left and a double-outlined diamond at bottom-right, so it is the right answer.
Shortcut Method
Rule: shapes swap positions, but each position's own outline count (fixed by that figure) stays the same → apply to C (top-left=single, bottom-right=double) → arc single at top-left, diamond double at bottom-right
∴ Option 4 is correct ✓
∴ Option 4 is correct ✓
Question 23
Notice which position keeps its outline count fixed as figure (A) becomes figure (B), then apply the same idea to figure (C).
Explanation
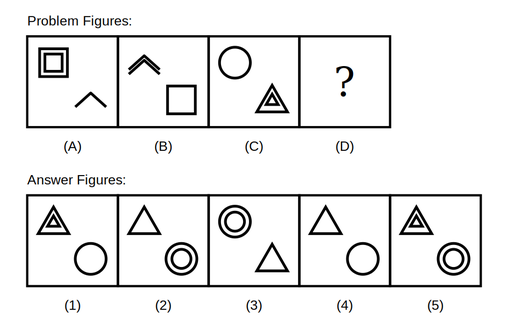
In figure (A), top-left is double-outlined and bottom-right is single. The two shapes swap positions from (A) to (B), but each position's own outline count does not change: top-left stays double (now the chevron), bottom-right stays single (now the square). Figure (C) has the opposite pattern: top-left single (a circle), bottom-right double (a triangle). Swapping the shapes while keeping each position's fixed outline count sends the triangle to top-left, staying single there, and the circle to bottom-right, becoming double there.
Options that keep the circle single, or draw the triangle with more than one outline at top-left, break this fixed pattern.
Option 2 correctly shows a single triangle at top-left and a double-outlined circle at bottom-right, so it is the right answer.
Options that keep the circle single, or draw the triangle with more than one outline at top-left, break this fixed pattern.
Option 2 correctly shows a single triangle at top-left and a double-outlined circle at bottom-right, so it is the right answer.
Shortcut Method
Rule: shapes swap positions, outline count stays fixed per position → apply to C (top-left=single, bottom-right=double) → triangle single at top-left, circle double at bottom-right
∴ Option 2 is correct ✓
∴ Option 2 is correct ✓
Question 24
Determine the rule connecting figures (A) and (B) below, paying attention to which position holds the extra outlines, then apply it to figure (C).
Explanation
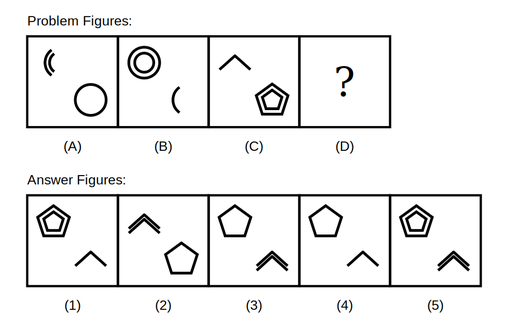
Figure (A) has a double-outlined arc at the top-left and a single circle at the bottom-right. From (A) to (B), the shapes swap positions but each position keeps its own outline count: top-left stays double (now the circle), bottom-right stays single (now the arc). Figure (C) has the reverse pattern: top-left single (a chevron), bottom-right double (a pentagon). Swapping the shapes while keeping each position's fixed count moves the pentagon to top-left, staying single there, and the chevron to bottom-right, becoming double there.
Option 1 draws the pentagon double at the top-left, Option 2 leaves the chevron at the top-left, Option 4 draws both shapes single, and Option 5 draws both shapes double.
Option 3 correctly shows a single pentagon at top-left and a double-outlined chevron at bottom-right, so it is the right answer.
Option 1 draws the pentagon double at the top-left, Option 2 leaves the chevron at the top-left, Option 4 draws both shapes single, and Option 5 draws both shapes double.
Option 3 correctly shows a single pentagon at top-left and a double-outlined chevron at bottom-right, so it is the right answer.
Shortcut Method
Rule: shapes swap positions, outline count stays fixed per position → apply to C (top-left=single, bottom-right=double) → pentagon single at top-left, chevron double at bottom-right
∴ Option 3 is correct ✓
∴ Option 3 is correct ✓
Question 25
Three small symbols are arranged differently in figures (A) and (B) below. Work out how each one moves and turns, then apply the same moves to figure (C).
Explanation
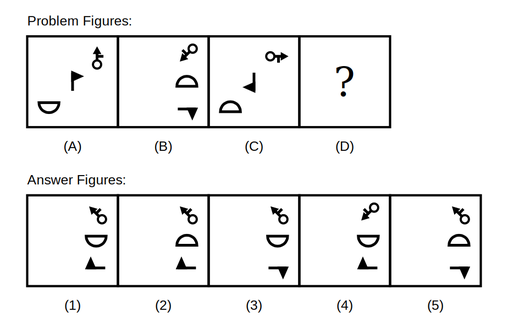
All three symbols move from their scattered positions in figure (A) into a single column in figure (B), each with its own specific turn: the symbol that was top-right moves to the top of the column and turns 135 degrees anticlockwise; the symbol that was bottom-left moves to the middle and is turned upside down; the symbol that was in the centre moves to the bottom and turns 90 degrees clockwise. Applying the same three moves to figure (C) places its top-right symbol, turned 135 degrees anticlockwise, at the top; its bottom-left symbol, turned upside down, in the middle; and its centre symbol, turned 90 degrees clockwise, at the bottom.
Options that use the wrong turn for a symbol, or place a symbol in the wrong slot of the column, do not match all three moves at once.
Option 1 correctly places and turns all three symbols as required, so it is the right answer.
Options that use the wrong turn for a symbol, or place a symbol in the wrong slot of the column, do not match all three moves at once.
Option 1 correctly places and turns all three symbols as required, so it is the right answer.
Shortcut Method
Rule: all 3 symbols move into one column → top-right symbol → top, turn 135° ACW; bottom-left symbol → middle, turn 180°; centre symbol → bottom, turn 90° CW
∴ Option 1 is correct ✓
∴ Option 1 is correct ✓
Question 26
Each of the three symbols in figure (A) below moves to a fixed slot and turns by a fixed amount to produce figure (B). Apply the same three moves to figure (C).
Explanation
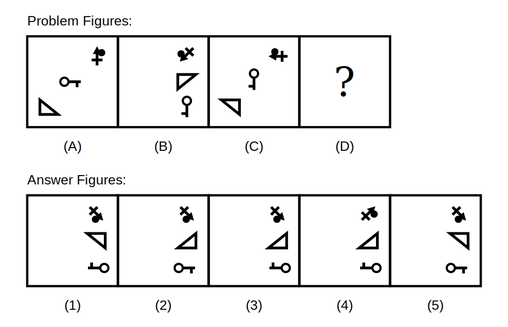
From figure (A) to figure (B), all three symbols move into a single column: the top-right symbol goes to the top of the column and turns 135 degrees anticlockwise, the bottom-left symbol goes to the middle and is flipped upside down (mirrored top to bottom), and the centre symbol goes to the bottom and turns 90 degrees clockwise. Applying the same three moves to figure (C) places its top-right symbol (turned 135 degrees anticlockwise) at the top, its bottom-left symbol (flipped upside down (mirrored top to bottom)) in the middle, and its centre symbol (turned 90 degrees clockwise) at the bottom.
Options that misplace a symbol in the column or give it the wrong turn do not satisfy all three moves together.
Option 3 correctly places and turns all three symbols as required, so it is the right answer.
Options that misplace a symbol in the column or give it the wrong turn do not satisfy all three moves together.
Option 3 correctly places and turns all three symbols as required, so it is the right answer.
Shortcut Method
Rule: top-right symbol → top, turn 135° ACW; bottom-left symbol → middle, flipped upside down (mirrored top to bottom); centre symbol → bottom, turn 90° CW
∴ Option 3 is correct ✓
∴ Option 3 is correct ✓
Question 27
Trace where each of the three symbols in figure (A) below ends up in figure (B), and by how much each one turns, then do the same to figure (C).
Explanation
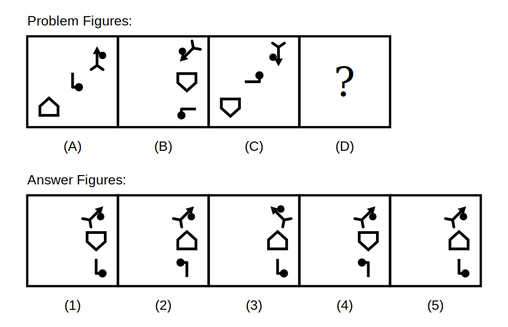
All three symbols relocate into a single column from figure (A) to figure (B): the top-right symbol goes to the top of the column, turning 135 degrees anticlockwise; the bottom-left symbol goes to the middle, turned upside down; and the centre symbol goes to the bottom, turning 90 degrees clockwise. Doing the same to figure (C) places its top-right symbol (turned 135 degrees anticlockwise) at the top, its bottom-left symbol (turned upside down) in the middle, and its centre symbol (turned 90 degrees clockwise) at the bottom.
Options that place a symbol in the wrong slot or apply the wrong turn do not satisfy all three moves.
Option 5 correctly places and turns all three symbols as required, so it is the right answer.
Options that place a symbol in the wrong slot or apply the wrong turn do not satisfy all three moves.
Option 5 correctly places and turns all three symbols as required, so it is the right answer.
Shortcut Method
Rule: top-right symbol → top, turn 135° ACW; bottom-left symbol → middle, turn 180°; centre symbol → bottom, turn 90° CW
∴ Option 5 is correct ✓
∴ Option 5 is correct ✓
Question 28
Figure (B) below results from two changes to figure (A) happening together. Identify both changes and apply them to figure (C).
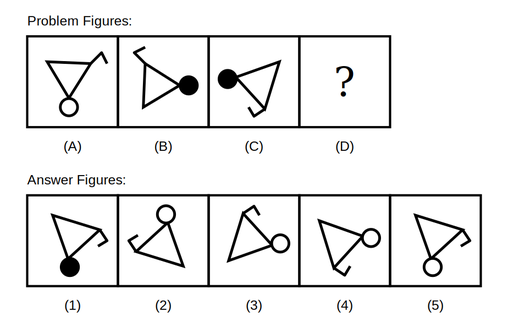
Explanation
Two changes happen together from figure (A) to figure (B): the whole figure turns 90 degrees anticlockwise, and the circle's fill toggles from hollow to solid black. Applying both changes to figure (C) (which also has a hollow circle) turns the figure 90 degrees anticlockwise and fills its circle solid black.
Options that apply the rotation but leave the circle hollow, or fill the circle but skip the rotation, apply only one of the two changes.
Option 5 correctly shows the figure rotated 90 degrees anticlockwise with the circle filled solid black, so it is the right answer.
Options that apply the rotation but leave the circle hollow, or fill the circle but skip the rotation, apply only one of the two changes.
Option 5 correctly shows the figure rotated 90 degrees anticlockwise with the circle filled solid black, so it is the right answer.
Shortcut Method
Rule: A → B turns 90° anticlockwise AND the circle's fill toggles → apply both to C
∴ Option 5 is correct ✓
∴ Option 5 is correct ✓
Question 29
Two things change together between figure (A) and figure (B) below. Find both changes and apply them to figure (C).
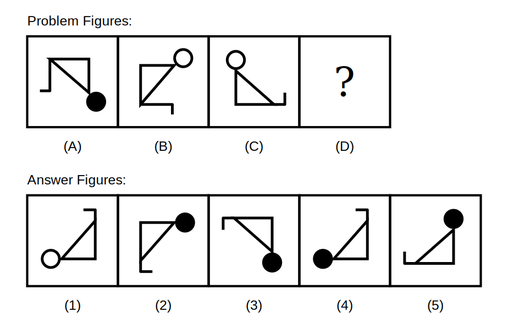
Explanation
From figure (A) to figure (B), the figure rotates 90 degrees anticlockwise and the circle's fill toggles from hollow to solid black, both at once. Applying both changes to figure (C) turns it 90 degrees anticlockwise and fills its hollow circle solid black.
Options that rotate the figure but keep the circle hollow, or fill the circle without rotating, apply only one of the two required changes.
Option 4 correctly shows the figure rotated 90 degrees anticlockwise with a solid black circle, so it is the right answer.
Options that rotate the figure but keep the circle hollow, or fill the circle without rotating, apply only one of the two required changes.
Option 4 correctly shows the figure rotated 90 degrees anticlockwise with a solid black circle, so it is the right answer.
Shortcut Method
Rule: A → B turns 90° anticlockwise AND the circle's fill toggles → apply both to C
∴ Option 4 is correct ✓
∴ Option 4 is correct ✓
Question 30
Observe the two simultaneous changes that turn figure (A) into figure (B) below, then apply both to figure (C).
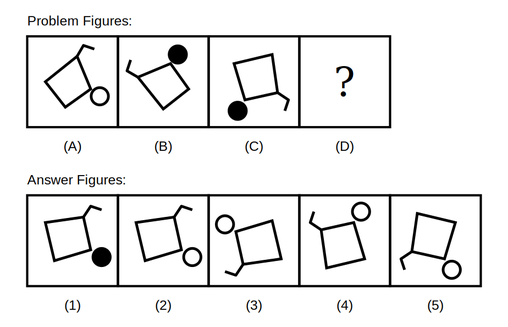
Explanation
Figure (B) is figure (A) turned 90 degrees anticlockwise with its circle's fill also toggled from hollow to solid black, both changes happening together. Applying the same two changes to figure (C) turns it 90 degrees anticlockwise and fills its circle solid black.
Options that rotate without changing the circle's fill, or change the fill without rotating, only satisfy one of the two changes.
Option 2 correctly shows the figure rotated 90 degrees anticlockwise with a solid black circle, so it is the right answer.
Options that rotate without changing the circle's fill, or change the fill without rotating, only satisfy one of the two changes.
Option 2 correctly shows the figure rotated 90 degrees anticlockwise with a solid black circle, so it is the right answer.
Shortcut Method
Rule: A → B turns 90° anticlockwise AND the circle's fill toggles → apply both to C
∴ Option 2 is correct ✓
∴ Option 2 is correct ✓
Question 31
Figure (B) below is figure (A) reflected in an unusual way. Work out the axis of reflection and apply it to figure (C).
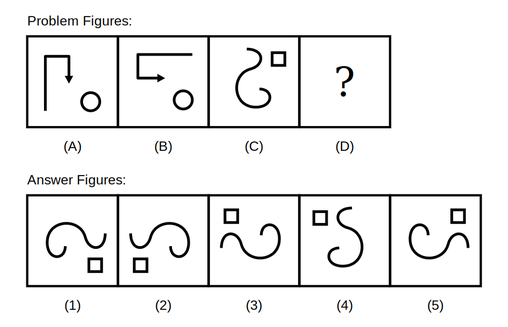
Explanation
Figure (B) is figure (A) mirrored along the diagonal running from top-left to bottom-right, not a plain left-right or top-bottom flip -- this swaps vertical strokes for horizontal ones and horizontal strokes for vertical ones. Applying the same diagonal mirror to figure (C) swaps its vertical and horizontal strokes in the same way.
Options that use an ordinary left-right or top-bottom mirror instead of the diagonal one give the wrong orientation.
Option 2 correctly shows figure (C) mirrored along the top-left-to-bottom-right diagonal, so it is the right answer.
Options that use an ordinary left-right or top-bottom mirror instead of the diagonal one give the wrong orientation.
Option 2 correctly shows figure (C) mirrored along the top-left-to-bottom-right diagonal, so it is the right answer.
Shortcut Method
Rule: B is A mirrored along the top-left-to-bottom-right diagonal (vertical ↔ horizontal) → apply to C
∴ Option 2 is correct ✓
∴ Option 2 is correct ✓
Question 32
Compare figures (A) and (B) below to find the axis of reflection used, then reflect figure (C) the same way.
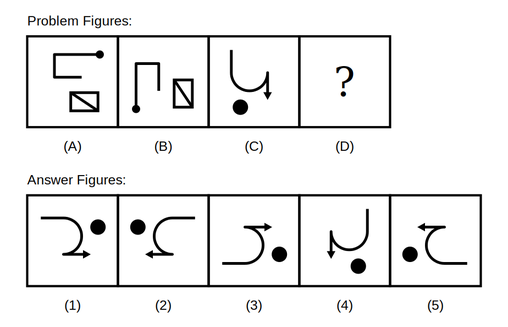
Explanation
Figure (B) is figure (A) reflected along the diagonal from top-left to bottom-right, which exchanges every vertical stroke for a horizontal one and every horizontal stroke for a vertical one. Reflecting figure (C) the same way swaps its vertical and horizontal strokes accordingly.
Options reflecting figure (C) left-right or top-bottom instead of along the diagonal do not match the rule shown by (A) and (B).
Option 1 correctly shows figure (C) reflected along the top-left-to-bottom-right diagonal, so it is the right answer.
Options reflecting figure (C) left-right or top-bottom instead of along the diagonal do not match the rule shown by (A) and (B).
Option 1 correctly shows figure (C) reflected along the top-left-to-bottom-right diagonal, so it is the right answer.
Shortcut Method
Rule: B is A mirrored along the top-left-to-bottom-right diagonal → apply to C
∴ Option 1 is correct ✓
∴ Option 1 is correct ✓
Question 33
Determine the axis figure (A) is reflected across to produce figure (B) below, then reflect figure (C) across the same axis.
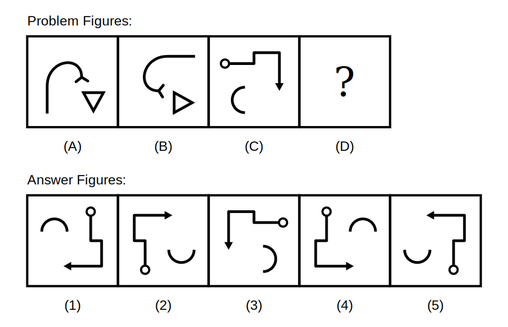
Explanation
Figure (B) is figure (A) reflected along the top-left-to-bottom-right diagonal, turning vertical strokes into horizontal ones and horizontal strokes into vertical ones. The same diagonal reflection applied to figure (C) swaps its vertical and horizontal strokes in the same way.
Options using a plain left-right or top-bottom mirror instead of the diagonal one do not reproduce the relationship shown by (A) and (B).
Option 4 correctly shows figure (C) reflected along the top-left-to-bottom-right diagonal, so it is the right answer.
Options using a plain left-right or top-bottom mirror instead of the diagonal one do not reproduce the relationship shown by (A) and (B).
Option 4 correctly shows figure (C) reflected along the top-left-to-bottom-right diagonal, so it is the right answer.
Shortcut Method
Rule: B is A mirrored along the top-left-to-bottom-right diagonal → apply to C
∴ Option 4 is correct ✓
∴ Option 4 is correct ✓
Question 34
Figure (B) below is figure (A) turned by a fixed angle. Work out the angle and turn figure (C) by the same amount.
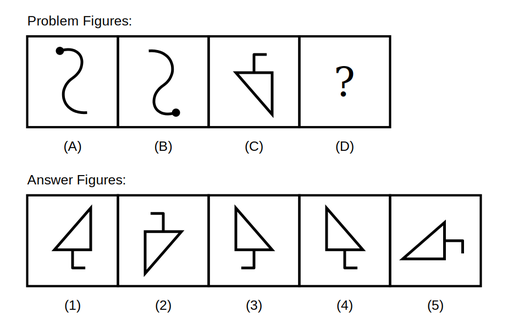
Explanation
Figure (B) is figure (A) turned through 180 degrees, which moves the dot from the top end of the curve to the bottom end and turns the whole figure upside down and back to front. Turning figure (C) through the same 180 degrees flips it completely, moving its bracket mark to the opposite end.
Options that turn figure (C) by a different angle, such as 90 degrees, do not match the 180-degree rule shown by (A) and (B).
Option 3 correctly shows figure (C) turned through 180 degrees, so it is the right answer.
Options that turn figure (C) by a different angle, such as 90 degrees, do not match the 180-degree rule shown by (A) and (B).
Option 3 correctly shows figure (C) turned through 180 degrees, so it is the right answer.
Shortcut Method
Rule: B is A turned 180° → turn C through 180°
∴ Option 3 is correct ✓
∴ Option 3 is correct ✓
Question 35
Establish the fixed angle that turns figure (A) into figure (B) below, then turn figure (C) by that same angle.
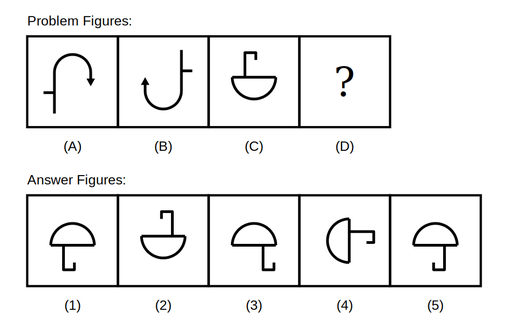
Explanation
Figure (B) is figure (A) turned through 180 degrees, which reverses the arrow's direction and turns the whole figure fully upside down and back to front. Turning figure (C) through 180 degrees flips it completely, moving its bracket mark to the opposite side.
Options that turn figure (C) by a smaller or larger angle than 180 degrees do not match the relationship shown by (A) and (B).
Option 5 correctly shows figure (C) turned through 180 degrees, so it is the right answer.
Options that turn figure (C) by a smaller or larger angle than 180 degrees do not match the relationship shown by (A) and (B).
Option 5 correctly shows figure (C) turned through 180 degrees, so it is the right answer.
Shortcut Method
Rule: B is A turned 180° → turn C through 180°
∴ Option 5 is correct ✓
∴ Option 5 is correct ✓
Question 36
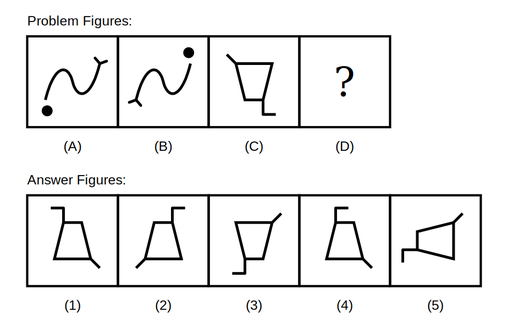
Figure (A) below turns through a fixed angle to produce figure (B). Apply that same turn to figure (C).
Explanation
Figure (B) is figure (A) turned through 180 degrees, carrying the dot from one end of the curve to the opposite end and turning the whole figure fully around. Turning figure (C) through the same 180 degrees flips it completely, moving its diagonal line mark to the opposite side.
Options that rotate figure (C) by a different angle do not reproduce the 180-degree relationship shown by (A) and (B).
Option 1 correctly shows figure (C) turned through 180 degrees, so it is the right answer.
Options that rotate figure (C) by a different angle do not reproduce the 180-degree relationship shown by (A) and (B).
Option 1 correctly shows figure (C) turned through 180 degrees, so it is the right answer.
Shortcut Method
Rule: B is A turned 180° → turn C through 180°
∴ Option 1 is correct ✓
∴ Option 1 is correct ✓
Question 37
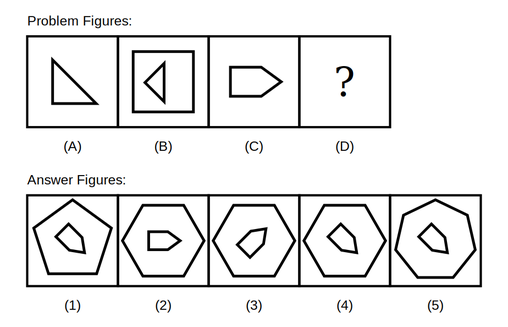
Figure (B) below redraws the shape from figure (A) with two changes applied together. Identify both and apply them to figure (C).
Explanation
Figure (B) takes the shape from figure (A), turns it 45 degrees clockwise, and draws it inside a new regular polygon with exactly one more side than before: the 3-sided triangle gains a 4-sided square around it. Applying the same two changes to figure (C) (a 5-sided pentagon) turns it 45 degrees clockwise and encloses it inside a 6-sided hexagon.
Options that turn the pentagon but enclose it in the wrong polygon, or enclose it correctly without rotating it, apply only one of the two required changes.
Option 4 correctly shows the pentagon turned 45 degrees clockwise inside a hexagon, so it is the right answer.
Options that turn the pentagon but enclose it in the wrong polygon, or enclose it correctly without rotating it, apply only one of the two required changes.
Option 4 correctly shows the pentagon turned 45 degrees clockwise inside a hexagon, so it is the right answer.
Shortcut Method
Rule: A → B turns the shape 45° clockwise AND encloses it in a polygon with one more side → apply to C (pentagon, 5 sides) → turned pentagon inside a hexagon (6 sides)
∴ Option 4 is correct ✓
∴ Option 4 is correct ✓
Question 38
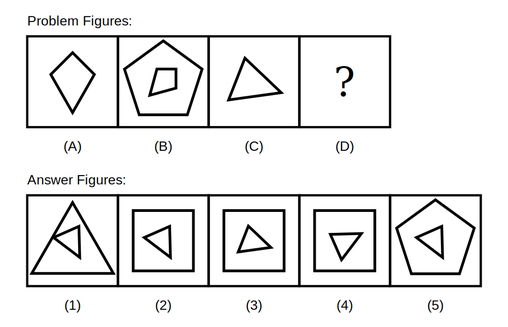
Two changes are applied together to the shape in figure (A) below to produce figure (B). Apply the same two changes to figure (C).
Explanation
Figure (B) takes the 4-sided kite from figure (A), turns it 45 degrees clockwise, draws it smaller, and encloses it in a polygon with exactly one more side: a 5-sided pentagon. Applying the same two changes to figure (C) (a 3-sided triangle) turns it 45 degrees clockwise and encloses it in a 4-sided square.
Option 1 encloses the triangle in a triangle and Option 5 encloses it in a pentagon, so the outer polygon has the wrong number of sides.
Option 3 leaves the triangle unturned and Option 4 turns it by the wrong amount, although both use a square.
Option 2 correctly shows the triangle turned 45 degrees clockwise inside a square, so it is the right answer.
Option 1 encloses the triangle in a triangle and Option 5 encloses it in a pentagon, so the outer polygon has the wrong number of sides.
Option 3 leaves the triangle unturned and Option 4 turns it by the wrong amount, although both use a square.
Option 2 correctly shows the triangle turned 45 degrees clockwise inside a square, so it is the right answer.
Shortcut Method
Rule: A → B turns the shape 45° clockwise AND encloses it in a polygon with one more side → apply to C (triangle, 3 sides) → turned triangle inside a square (4 sides)
∴ Option 2 is correct ✓
∴ Option 2 is correct ✓
Question 39
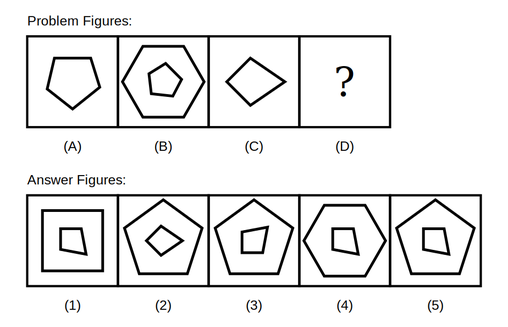
Figure (B) below is produced from figure (A) by turning its shape and changing its enclosing polygon together. Apply the same two changes to figure (C).
Explanation
Figure (B) takes the 5-sided pentagon from figure (A), turns it 45 degrees clockwise, draws it smaller, and encloses it in a polygon with exactly one more side: a 6-sided hexagon. Applying the same two changes to figure (C) (a 4-sided kite) turns it 45 degrees clockwise and encloses it in a 5-sided pentagon.
Option 1 uses a square and Option 4 uses a hexagon, so the outer polygon has the wrong number of sides.
Option 2 leaves the kite unturned, and Option 3 turns it 45 degrees anticlockwise instead of clockwise.
Option 5 correctly shows the kite turned 45 degrees clockwise inside a pentagon, so it is the right answer.
Option 1 uses a square and Option 4 uses a hexagon, so the outer polygon has the wrong number of sides.
Option 2 leaves the kite unturned, and Option 3 turns it 45 degrees anticlockwise instead of clockwise.
Option 5 correctly shows the kite turned 45 degrees clockwise inside a pentagon, so it is the right answer.
Shortcut Method
Rule: A → B turns the shape 45° clockwise AND encloses it in a polygon with one more side → apply to C (kite, 4 sides) → turned kite inside a pentagon (5 sides)
∴ Option 5 is correct ✓
∴ Option 5 is correct ✓
Question 40
Figure (B) below changes figure (A) in two ways together. Work out both changes and apply them to figure (C).
Explanation
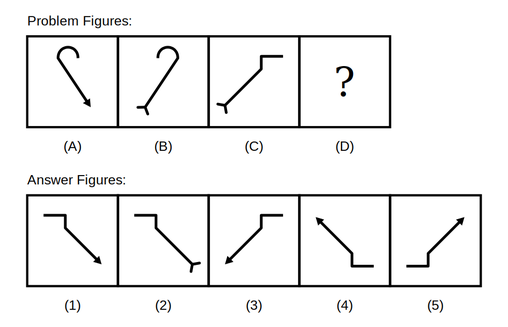
Two changes happen together from figure (A) to figure (B): the whole figure is mirrored left to right, and its arrowhead changes into a two-pronged fork. Figure (C) already ends in a fork, so applying the same two changes mirrors figure (C) left to right and changes its fork into an arrowhead (the reverse substitution).
Options that mirror figure (C) but keep the fork, or change the fork to an arrowhead without mirroring, apply only one of the two required changes.
Option 1 correctly shows figure (C) mirrored left to right with an arrowhead in place of the fork, so it is the right answer.
Options that mirror figure (C) but keep the fork, or change the fork to an arrowhead without mirroring, apply only one of the two required changes.
Option 1 correctly shows figure (C) mirrored left to right with an arrowhead in place of the fork, so it is the right answer.
Shortcut Method
Rule: A → B mirrors left-right AND arrowhead becomes a fork → apply to C (which has a fork) → mirrored, fork becomes an arrowhead
∴ Option 1 is correct ✓
∴ Option 1 is correct ✓
Question 41
Identify the two simultaneous changes between figure (A) and figure (B) below, then apply both to figure (C).
Explanation
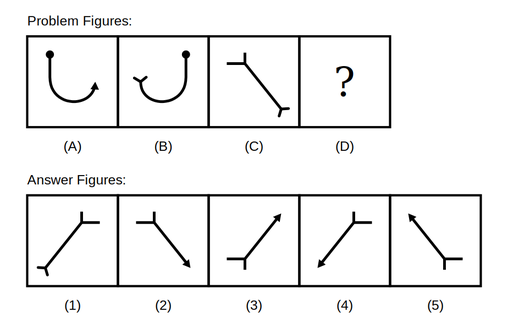
Figure (B) mirrors figure (A) left to right and also changes its arrowhead into a two-pronged fork, both at once. Since figure (C) already has a fork, applying the same two changes mirrors figure (C) left to right and turns its fork into an arrowhead.
Options that mirror figure (C) without changing the fork, or change the fork without mirroring, only apply one of the two required changes.
Option 4 correctly shows figure (C) mirrored left to right with an arrowhead in place of the fork, so it is the right answer.
Options that mirror figure (C) without changing the fork, or change the fork without mirroring, only apply one of the two required changes.
Option 4 correctly shows figure (C) mirrored left to right with an arrowhead in place of the fork, so it is the right answer.
Shortcut Method
Rule: A → B mirrors left-right AND arrowhead becomes a fork → apply to C (which has a fork) → mirrored, fork becomes an arrowhead
∴ Option 4 is correct ✓
∴ Option 4 is correct ✓
Question 42
Figure (A) below changes in two ways at once to give figure (B). Apply the same two changes to figure (C).
Explanation
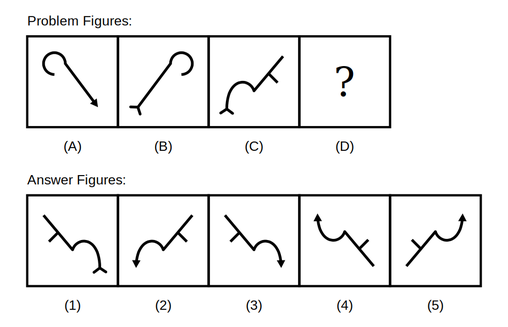
Two changes happen together from figure (A) to figure (B): the figure is mirrored left to right, and its arrowhead becomes a two-pronged fork. Since figure (C) already ends in a fork, applying the same two changes mirrors figure (C) left to right and turns its fork into an arrowhead.
Options that mirror figure (C) but leave the fork unchanged, or swap the fork for an arrowhead without mirroring, apply only one of the two required changes.
Option 3 correctly shows figure (C) mirrored left to right with an arrowhead in place of the fork, so it is the right answer.
Options that mirror figure (C) but leave the fork unchanged, or swap the fork for an arrowhead without mirroring, apply only one of the two required changes.
Option 3 correctly shows figure (C) mirrored left to right with an arrowhead in place of the fork, so it is the right answer.
Shortcut Method
Rule: A → B mirrors left-right AND arrowhead becomes a fork → apply to C (which has a fork) → mirrored, fork becomes an arrowhead
∴ Option 3 is correct ✓
∴ Option 3 is correct ✓
Question 43
Figure (B) below results from two changes to figure (A) that happen together. Work out both and apply them to figure (C).
Explanation
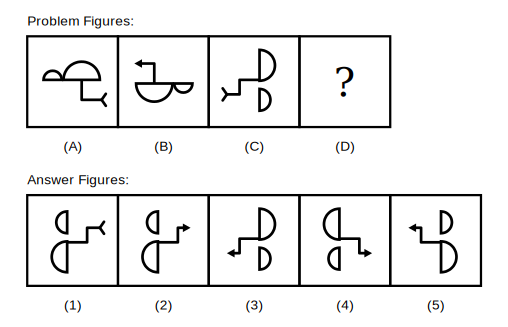
Two changes happen together from figure (A) to figure (B): the whole figure turns through 180 degrees, and the forked end of the line becomes an arrowhead. Applying both changes to figure (C) turns it through 180 degrees and replaces its fork with an arrowhead.
Options that rotate the figure but keep the fork, or change the fork to an arrowhead without rotating, apply only one of the two required changes.
Option 2 correctly shows figure (C) turned through 180 degrees with an arrowhead in place of the fork, so it is the right answer.
Options that rotate the figure but keep the fork, or change the fork to an arrowhead without rotating, apply only one of the two required changes.
Option 2 correctly shows figure (C) turned through 180 degrees with an arrowhead in place of the fork, so it is the right answer.
Shortcut Method
Rule: A → B turns 180° AND the fork becomes an arrowhead → apply both to C
∴ Option 2 is correct ✓
∴ Option 2 is correct ✓
Question 44
Identify the two simultaneous changes that turn figure (A) into figure (B) below, then apply both to figure (C).
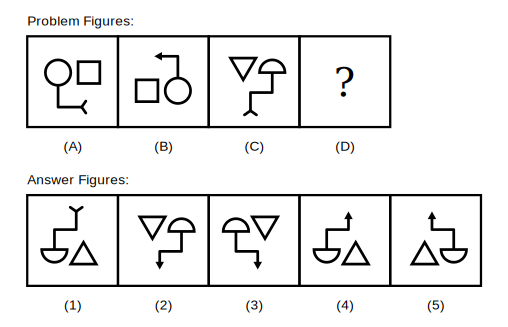
Explanation
Figure (B) is figure (A) turned through 180 degrees with its forked end also replaced by an arrowhead, both changes happening together. Applying the same two changes to figure (C) turns it through 180 degrees and replaces its fork with an arrowhead.
Options that only rotate the figure, or only change the fork to an arrowhead, satisfy just one of the two required changes.
Option 4 correctly shows figure (C) turned through 180 degrees with an arrowhead in place of the fork, so it is the right answer.
Options that only rotate the figure, or only change the fork to an arrowhead, satisfy just one of the two required changes.
Option 4 correctly shows figure (C) turned through 180 degrees with an arrowhead in place of the fork, so it is the right answer.
Shortcut Method
Rule: A → B turns 180° AND the fork becomes an arrowhead → apply both to C
∴ Option 4 is correct ✓
∴ Option 4 is correct ✓
Question 45
Figure (A) below changes in two ways at once to produce figure (B). Apply the same two changes to figure (C).
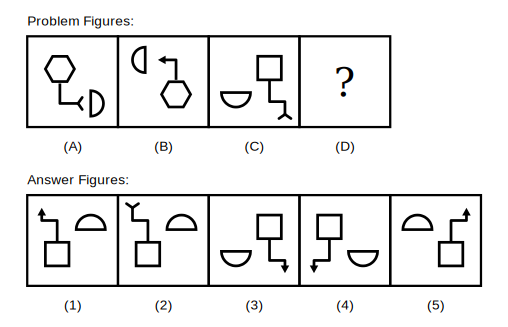
Explanation
Two changes occur together from figure (A) to figure (B): a 180-degree turn of the whole figure, and the forked end of the line becoming an arrowhead. Applying both changes to figure (C) turns it through 180 degrees and replaces its fork with an arrowhead.
Options applying only the rotation or only the fork-to-arrowhead change satisfy just one of the two required changes.
Option 1 correctly shows figure (C) turned through 180 degrees with an arrowhead in place of the fork, so it is the right answer.
Options applying only the rotation or only the fork-to-arrowhead change satisfy just one of the two required changes.
Option 1 correctly shows figure (C) turned through 180 degrees with an arrowhead in place of the fork, so it is the right answer.
Shortcut Method
Rule: A → B turns 180° AND the fork becomes an arrowhead → apply both to C
∴ Option 1 is correct ✓
∴ Option 1 is correct ✓
Question 46
Two small markers move around the unchanged centre figure from (A) to (B) below, each by its own fixed amount. Apply the same two moves to figure (C).
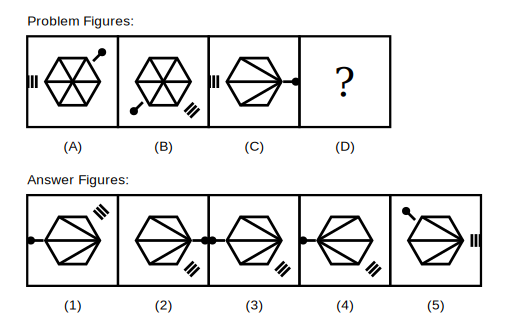
Explanation
The centre hexagon does not change at all from figure (A) to figure (B). Of the two markers around it, the short-line marker orbits 135 degrees anticlockwise, and the stick-with-dot marker moves all the way to the opposite side of the figure (180 degrees). Applying the same two moves to figure (C) keeps its hexagon unchanged, orbits its short-line marker 135 degrees anticlockwise, and moves its stick marker to the opposite side.
Options that move either marker by the wrong amount, or that alter the centre hexagon itself, do not match both moves.
Option 3 correctly keeps the hexagon unchanged with both markers moved by their own fixed amount, so it is the right answer.
Options that move either marker by the wrong amount, or that alter the centre hexagon itself, do not match both moves.
Option 3 correctly keeps the hexagon unchanged with both markers moved by their own fixed amount, so it is the right answer.
Shortcut Method
Rule: centre shape never changes; short-line marker orbits 135° anticlockwise; stick marker moves to the opposite side (180°) → apply both to C
∴ Option 3 is correct ✓
∴ Option 3 is correct ✓
Question 47
Work out how far each of the two markers around the unchanged centre figure moves from (A) to (B) below, then apply the same moves to figure (C).
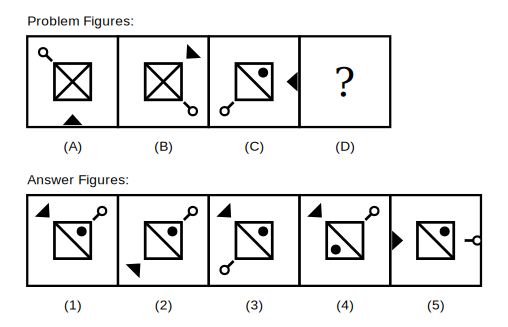
Explanation
The centre square stays exactly the same from figure (A) to figure (B). The triangle marker orbits 135 degrees anticlockwise around it (from the bottom to the top-right), while the lollipop marker moves to the exact opposite side of the figure (from the top-left to the bottom-right). Applying the same two moves to figure (C) leaves its centre square (one diagonal and a dot) unchanged, orbits its triangle marker 135 degrees anticlockwise from the right to the top-left, and moves its lollipop from the bottom-left to the top-right.
Option 2 puts the triangle at the bottom-left, Option 3 leaves the lollipop at the bottom-left, Option 4 moves the dot inside the square, and Option 5 puts the triangle at the left and the lollipop at the right.
Option 1 correctly keeps the centre square unchanged with the triangle at the top-left and the lollipop at the top-right, so it is the right answer.
Option 2 puts the triangle at the bottom-left, Option 3 leaves the lollipop at the bottom-left, Option 4 moves the dot inside the square, and Option 5 puts the triangle at the left and the lollipop at the right.
Option 1 correctly keeps the centre square unchanged with the triangle at the top-left and the lollipop at the top-right, so it is the right answer.
Shortcut Method
Rule: centre shape never changes; triangle marker orbits 135° anticlockwise; lollipop marker moves to the opposite side (180°) → apply both to C
∴ Option 1 is correct ✓
∴ Option 1 is correct ✓
Question 48
Figure (A) below has two markers that relocate by fixed amounts around an unchanged centre shape to give figure (B). Apply the same two moves to figure (C).
Explanation
The centre shape is unchanged from figure (A) to figure (B). One marker orbits 135 degrees anticlockwise around it, and the other marker moves to the exact opposite side of the figure. Applying the same two moves to figure (C) keeps its centre shape unchanged, orbits the short-line marker 135 degrees anticlockwise, and moves the other marker to the opposite side.
Options that alter the centre shape, or move a marker by the wrong amount or in the wrong direction, break one part of the rule.
Option 5 correctly keeps the centre shape unchanged with both markers moved by their own fixed amount, so it is the right answer.
Options that alter the centre shape, or move a marker by the wrong amount or in the wrong direction, break one part of the rule.
Option 5 correctly keeps the centre shape unchanged with both markers moved by their own fixed amount, so it is the right answer.
Shortcut Method
Rule: centre shape never changes; one marker orbits 135° anticlockwise; the other moves to the opposite side (180°) → apply both to C
∴ Option 5 is correct ✓
∴ Option 5 is correct ✓
Question 49
Figure (B) below shows figure (A) with one part removed from every arm. Apply the same removal to figure (C).
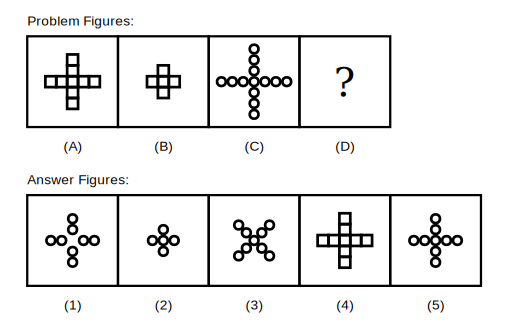
Explanation
From figure (A) to figure (B), every arm of the plus-shaped figure loses its outermost piece, while the centre piece stays exactly as it is. Applying the same removal to figure (C) (made of small circles) removes the outermost circle from each of the four arms, leaving the centre circle and two circles per arm.
Options that remove pieces from the centre, or remove more or fewer than one piece per arm, do not match the rule.
Option 5 correctly shows the outermost circle removed from every arm with the centre unchanged, so it is the right answer.
Options that remove pieces from the centre, or remove more or fewer than one piece per arm, do not match the rule.
Option 5 correctly shows the outermost circle removed from every arm with the centre unchanged, so it is the right answer.
Shortcut Method
Rule: every arm loses its outermost piece, centre stays unchanged → apply to C
∴ Option 5 is correct ✓
∴ Option 5 is correct ✓
Question 50
Compare figures (A) and (B) below to see what is removed from each arm, then remove the same part from each arm of figure (C).
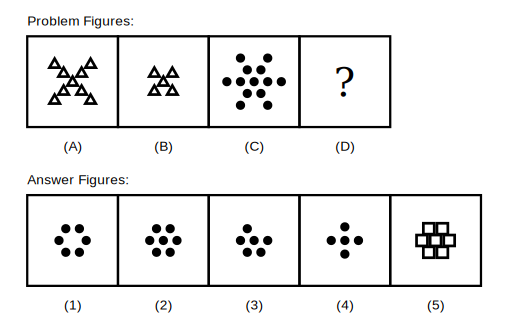
Explanation
Each arm of the branching figure loses its outermost piece from (A) to (B), while the centre piece is unchanged. Applying the same removal to figure (C) (made of dots) removes the outermost dot from each branch, leaving the centre dot and the remaining inner dots in place.
Options that remove a different number of pieces per arm, or that disturb the centre piece, do not match the rule.
Option 2 correctly shows the outermost dot removed from every arm with the centre unchanged, so it is the right answer.
Options that remove a different number of pieces per arm, or that disturb the centre piece, do not match the rule.
Option 2 correctly shows the outermost dot removed from every arm with the centre unchanged, so it is the right answer.
Shortcut Method
Rule: every arm loses its outermost piece, centre stays unchanged → apply to C
∴ Option 2 is correct ✓
∴ Option 2 is correct ✓
Question 51
Figure (A) below loses one piece from every arm to produce figure (B). Apply the same rule to figure (C).
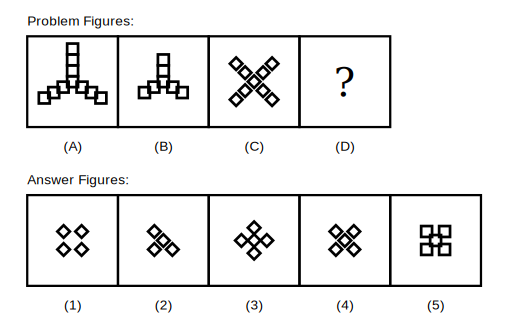
Explanation
Every arm of the figure loses its outermost piece going from (A) to (B), and the centre piece is left untouched. Applying the same removal to figure (C) (an X-shaped cluster of diamonds) removes the outermost diamond from each of the four arms while keeping the centre diamond in place.
Options that remove the wrong number of pieces per arm, or that change the centre piece, do not match the rule.
Option 4 correctly shows the outermost diamond removed from every arm with the centre unchanged, so it is the right answer.
Options that remove the wrong number of pieces per arm, or that change the centre piece, do not match the rule.
Option 4 correctly shows the outermost diamond removed from every arm with the centre unchanged, so it is the right answer.
Shortcut Method
Rule: every arm loses its outermost piece, centre stays unchanged → apply to C
∴ Option 4 is correct ✓
∴ Option 4 is correct ✓
Question 52
In figure (A) below, a small mark is only part of a shape. See what happens to it and to the other shape in figure (B), then do the same to figure (C).
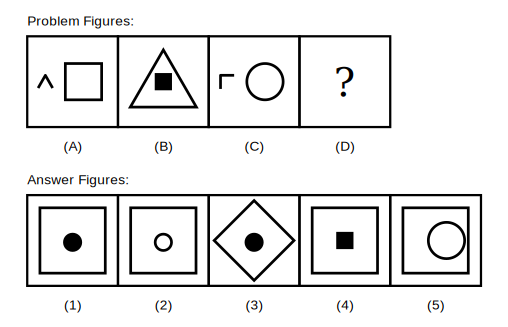
Explanation
In figure (A), the small curved mark is only a fragment of a triangle, and a separate large hollow square sits beside it. In figure (B), that triangle is completed and redrawn large as a hollow outline, and the square that was large in (A) becomes a small solid black shape inside the new triangle outline. Figure (C) has a small corner-bracket mark (a fragment of a square) beside a large hollow circle; completing the square and drawing it large as a hollow outline, with the circle from (C) becoming a small solid black shape inside it, gives the answer.
Options that draw the completed square solid instead of hollow, put a hollow (not solid black) shape inside, or put the wrong shape inside, do not match both parts of the rule.
Option 1 correctly shows a large hollow square with a small solid black circle inside it, so it is the right answer.
Options that draw the completed square solid instead of hollow, put a hollow (not solid black) shape inside, or put the wrong shape inside, do not match both parts of the rule.
Option 1 correctly shows a large hollow square with a small solid black circle inside it, so it is the right answer.
Shortcut Method
Rule: complete the small fragment into a large HOLLOW shape; the shape that was large becomes a small SOLID BLACK shape inside it → apply to C (fragment=square, large shape=circle) → large hollow square with small black circle inside
∴ Option 1 is correct ✓
∴ Option 1 is correct ✓
Question 53
A small mark in figure (A) below is a fragment of a shape. Work out what figure (B) does with it and with the other shape, then apply the same idea to figure (C).
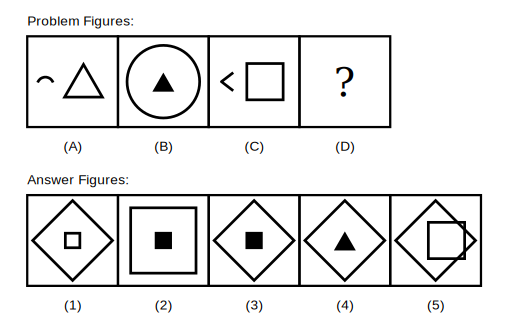
Explanation
The small fragment in figure (A) is completed into a full circle in figure (B), drawn large, and the triangle that was large in (A) becomes a small solid black shape inside it. Figure (C) has a small corner fragment of a diamond beside a hollow square; completing the diamond and drawing it large, with the square from (C) becoming a small solid black shape inside it, gives the answer.
Option 1 puts a hollow square inside, Option 2 completes the wrong shape (a square instead of a diamond), Option 4 puts a black triangle inside, and Option 5 leaves the square large and hollow.
Option 3 correctly shows a large hollow diamond with a small solid black square inside it, so it is the right answer.
Option 1 puts a hollow square inside, Option 2 completes the wrong shape (a square instead of a diamond), Option 4 puts a black triangle inside, and Option 5 leaves the square large and hollow.
Option 3 correctly shows a large hollow diamond with a small solid black square inside it, so it is the right answer.
Shortcut Method
Rule: complete the fragment into a large HOLLOW shape; the old large shape becomes a small SOLID BLACK shape inside it → apply to C (fragment=diamond, large shape=square)
∴ Option 3 is correct ✓
∴ Option 3 is correct ✓
Question 54
Figure (A) below contains a fragment of a shape next to a complete one. See how figure (B) treats both, then apply the same treatment to figure (C).
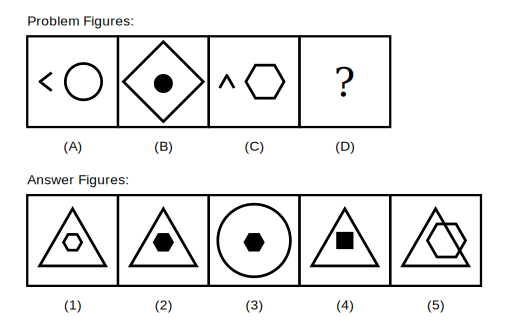
Explanation
The small fragment in figure (A) is completed into a full diamond in figure (B), drawn large as a hollow outline, with the circle that was large in (A) becoming a small solid black shape inside it. The same treatment of figure (C) completes its peak-shaped fragment into a large hollow triangle, with the hexagon from (C) becoming a small solid black shape inside it.
Option 1 puts a hollow hexagon inside, Option 3 completes the wrong shape (a circle instead of a triangle), Option 4 puts a black square inside, and Option 5 leaves the hexagon large and hollow.
Option 2 correctly shows a large hollow triangle with a small solid black hexagon inside it, so it is the right answer.
Option 1 puts a hollow hexagon inside, Option 3 completes the wrong shape (a circle instead of a triangle), Option 4 puts a black square inside, and Option 5 leaves the hexagon large and hollow.
Option 2 correctly shows a large hollow triangle with a small solid black hexagon inside it, so it is the right answer.
Shortcut Method
Rule: complete the fragment into a large HOLLOW shape; the old large shape becomes a small SOLID BLACK shape inside it → apply to C (fragment=triangle, large shape=hexagon)
∴ Option 2 is correct ✓
∴ Option 2 is correct ✓
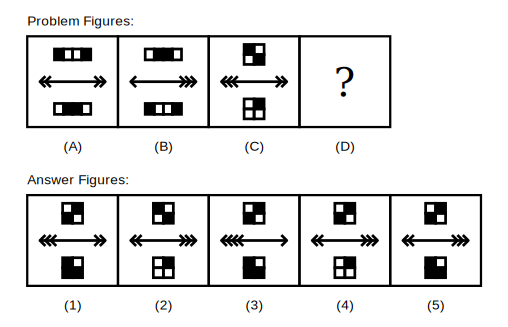
Question 55
Two changes happen together between figure (A) and figure (B) below: a colour reversal and an arrowhead relocation. Apply both to figure (C).
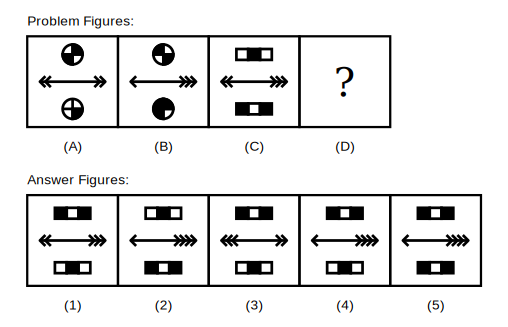
Explanation
Two changes happen together from figure (A) to figure (B): the black and white parts of both patterns swap (black becomes white and white becomes black), and one chevron moves from the left end of the line to the right end (two and two become one and three). Applying both changes to figure (C) reverses the black and white parts of its rectangles and changes its line from two left and three right chevrons to one left and four right.
Option 1 reverses the colours but leaves the line unchanged, Option 2 changes the line but keeps the original colours, Option 3 moves a chevron the wrong way, and Option 5 reverses only the top rectangle.
Option 4 correctly shows both rectangles colour-reversed with one chevron moved from the left end to the right end, so it is the right answer.
Option 1 reverses the colours but leaves the line unchanged, Option 2 changes the line but keeps the original colours, Option 3 moves a chevron the wrong way, and Option 5 reverses only the top rectangle.
Option 4 correctly shows both rectangles colour-reversed with one chevron moved from the left end to the right end, so it is the right answer.
Shortcut Method
Rule: A → B reverses black/white in both patterns AND moves one chevron from the left end to the right end → apply both to C (2 left, 3 right → 1 left, 4 right)
∴ Option 4 is correct ✓
∴ Option 4 is correct ✓
Question 56
Work out the colour change and the arrowhead change that together turn figure (A) into figure (B) below, then apply both to figure (C).
Explanation
From figure (A) to figure (B), the black and white parts of both patterns reverse, and one chevron moves from the left end of the line to the right end (two and two become one and three). Applying the same two changes to figure (C) reverses the black and white parts of its squares and changes its line from three left and two right chevrons to two left and three right.
Option 1 reverses the colours but leaves the line unchanged, Option 2 changes the line but keeps the original colours, Option 3 moves a chevron the wrong way, and Option 4 reverses only the top square.
Option 5 correctly shows both squares colour-reversed with one chevron moved from the left end to the right end, so it is the right answer.
Option 1 reverses the colours but leaves the line unchanged, Option 2 changes the line but keeps the original colours, Option 3 moves a chevron the wrong way, and Option 4 reverses only the top square.
Option 5 correctly shows both squares colour-reversed with one chevron moved from the left end to the right end, so it is the right answer.
Shortcut Method
Rule: A → B reverses black/white in both patterns AND moves one chevron from the left end to the right end → apply both to C (3 left, 2 right → 2 left, 3 right)
∴ Option 5 is correct ✓
∴ Option 5 is correct ✓
Question 57
Figure (B) below applies a colour reversal and an arrowhead move to figure (A), both together. Apply the same two changes to figure (C).
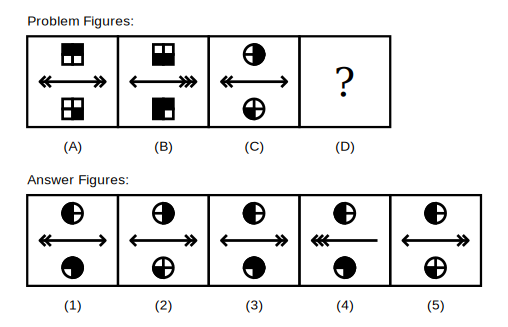
Explanation
Two changes happen together from figure (A) to figure (B): the black and white parts of both patterns swap, and one chevron moves from the left end of the line to the right end (two and two become one and three). Applying the same two changes to figure (C) reverses the black and white parts of its circles and changes its line from two left and one right to one left and two right.
Option 1 reverses the colours but leaves the line unchanged, Option 2 changes the line but keeps the original colours, Option 4 moves a chevron the wrong way, and Option 5 reverses only the top circle.
Option 3 correctly shows both circles colour-reversed with one chevron moved from the left end to the right end, so it is the right answer.
Option 1 reverses the colours but leaves the line unchanged, Option 2 changes the line but keeps the original colours, Option 4 moves a chevron the wrong way, and Option 5 reverses only the top circle.
Option 3 correctly shows both circles colour-reversed with one chevron moved from the left end to the right end, so it is the right answer.
Shortcut Method
Rule: A → B reverses black/white in both patterns AND moves one chevron from the left end to the right end → apply both to C (2 left, 1 right → 1 left, 2 right)
∴ Option 3 is correct ✓
∴ Option 3 is correct ✓
Question 58
Every arrow in figure (A) below points the opposite way in figure (B). Reverse every arrow in figure (C) the same way.
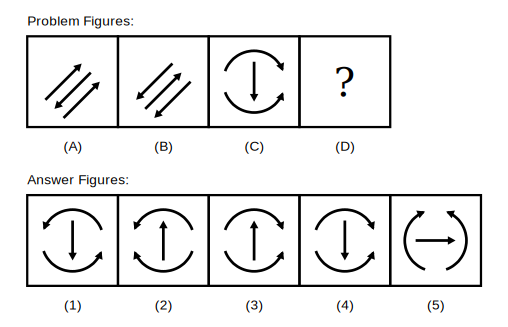
Explanation
In figure (A) the three diagonal arrows point up-right, down-left and up-right; in figure (B) each of them points the opposite way, with nothing else changed. Reversing every arrow in figure (C) turns the downward centre arrow upward and moves the arrowhead on each curved arc to the other end of that arc, while the curved paths themselves stay the same.
Option 1 reverses only the top arc, Option 3 reverses only the centre arrow, Option 4 repeats figure (C) unchanged, and Option 5 turns the figure instead of reversing the arrows.
Option 2 correctly shows every arrow in figure (C) reversed, so it is the right answer.
Option 1 reverses only the top arc, Option 3 reverses only the centre arrow, Option 4 repeats figure (C) unchanged, and Option 5 turns the figure instead of reversing the arrows.
Option 2 correctly shows every arrow in figure (C) reversed, so it is the right answer.
Shortcut Method
Rule: every arrow in A points the opposite way in B → reverse every arrow in C
∴ Option 2 is correct ✓
∴ Option 2 is correct ✓
Question 59
Compare the arrow directions in figures (A) and (B) below, then reverse every arrow direction in figure (C).
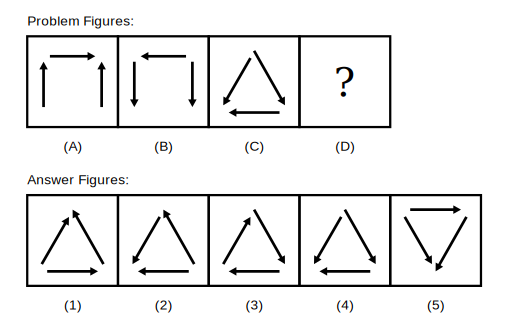
Explanation
Every arrow in figure (A) points the opposite way in figure (B): the two side arrows turn from up to down and the top arrow turns from right to left, with the arrangement unchanged. Reversing every arrow in figure (C) turns its two sloping arrows to point up towards the top corner and its bottom arrow to point right, while the triangle arrangement stays the same.
Option 2 reverses only the right-hand arrow, Option 3 reverses only the left-hand arrow, Option 4 repeats figure (C) unchanged, and Option 5 turns the whole triangle upside down.
Option 1 correctly shows every arrow in figure (C) reversed, so it is the right answer.
Option 2 reverses only the right-hand arrow, Option 3 reverses only the left-hand arrow, Option 4 repeats figure (C) unchanged, and Option 5 turns the whole triangle upside down.
Option 1 correctly shows every arrow in figure (C) reversed, so it is the right answer.
Shortcut Method
Rule: every arrow in A points the opposite way in B → reverse every arrow in C
∴ Option 1 is correct ✓
∴ Option 1 is correct ✓
Question 60
Figure (A) below has its arrows all reversed in figure (B). Apply the same reversal to every arrow in figure (C).
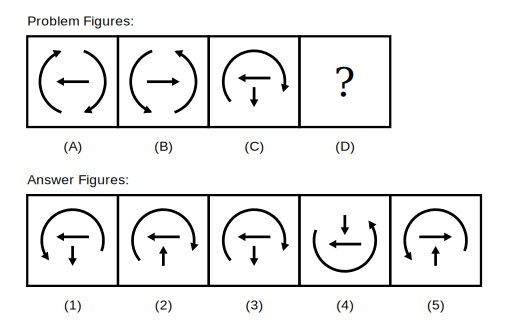
Explanation
Every arrow in figure (A) points the opposite way in figure (B): the arrowheads on the two curved arcs move to the other ends of the arcs and the centre arrow turns from left to right, with the paths themselves unchanged. Applying the same reversal to figure (C) moves the arc arrowhead from its right end to its left end, turns the centre arrow from left to right and turns the small arrow from down to up.
Option 1 reverses only the arc, Option 2 reverses only the small arrow, Option 3 repeats figure (C) unchanged, and Option 4 redraws the figure upside down.
Option 5 correctly shows every arrow in figure (C) reversed, so it is the right answer.
Option 1 reverses only the arc, Option 2 reverses only the small arrow, Option 3 repeats figure (C) unchanged, and Option 4 redraws the figure upside down.
Option 5 correctly shows every arrow in figure (C) reversed, so it is the right answer.
Shortcut Method
Rule: every arrow in A points the opposite way in B → reverse every arrow in C
∴ Option 5 is correct ✓
∴ Option 5 is correct ✓