Test your Non Verbal Reasoning and IQ skills with questions designed to assess logical thinking, visual intelligence, pattern recognition and problem-solving ability. Practise identifying patterns, interpreting visual information and solving IQ-based reasoning problems.
Question 1
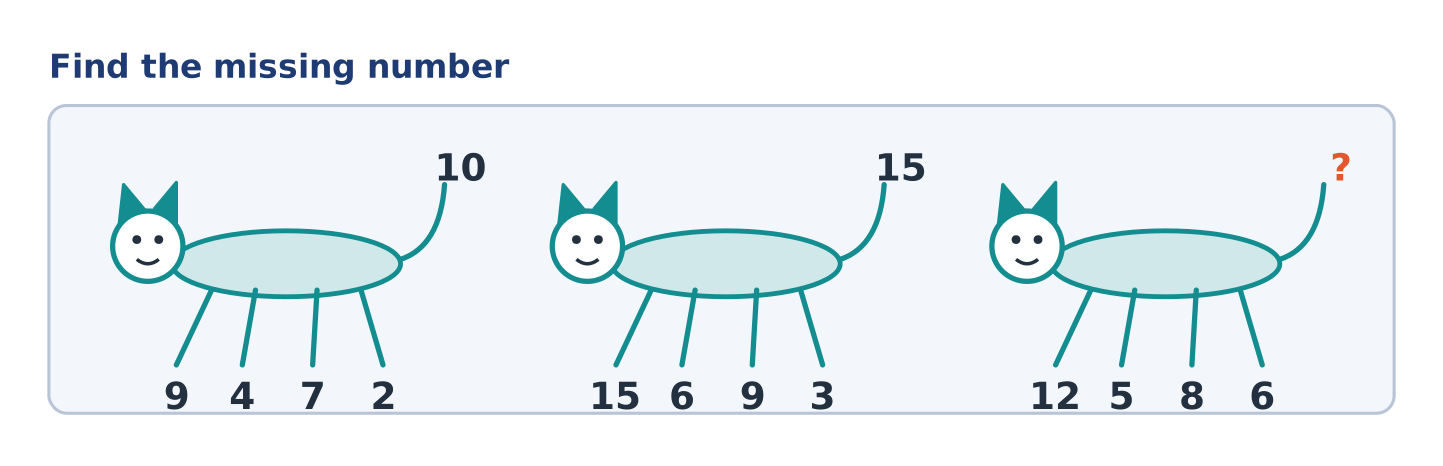
Study how the tail number of each animal is formed from its four leg numbers, then find the missing number (?) for the third animal.
Explanation
Call the leg numbers a, b, c, d from left to right. The tail is (a − b) + (c − d).
Figure 1: (9 − 4) + (7 − 2) = 5 + 5 = 10.
Figure 2: (15 − 6) + (9 − 3) = 9 + 6 = 15.
Figure 3: (12 − 5) + (8 − 6) = 7 + 2 = 9.
So ? = 9.
Figure 1: (9 − 4) + (7 − 2) = 5 + 5 = 10.
Figure 2: (15 − 6) + (9 − 3) = 9 + 6 = 15.
Figure 3: (12 − 5) + (8 − 6) = 7 + 2 = 9.
So ? = 9.
Shortcut Method
Rule: Tail = (a − b) + (c − d)
Figure 3: 7 + 2 = 9
∴ ? = 9 ✓
Figure 3: 7 + 2 = 9
∴ ? = 9 ✓
Question 2
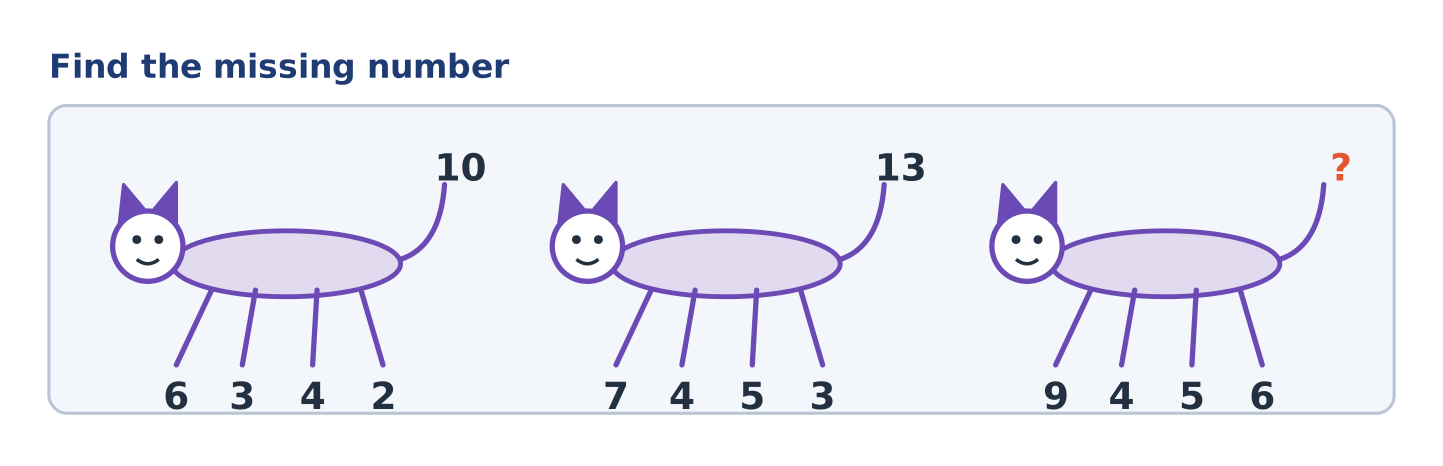
The tail number of every animal below follows one rule applied to its four leg numbers. Which number replaces the question mark on the third animal?
Explanation
Call the leg numbers a, b, c, d from left to right. The tail is (a × b) − (c × d).
Figure 1: 18 − 8 = 10.
Figure 2: 28 − 15 = 13.
Figure 3: 36 − 30 = 6.
So ? = 6.
Figure 1: 18 − 8 = 10.
Figure 2: 28 − 15 = 13.
Figure 3: 36 − 30 = 6.
So ? = 6.
Shortcut Method
Rule: Tail = (a × b) − (c × d)
Figure 3: 36 − 30 = 6
∴ ? = 6 ✓
Figure 3: 36 − 30 = 6
∴ ? = 6 ✓
Question 3
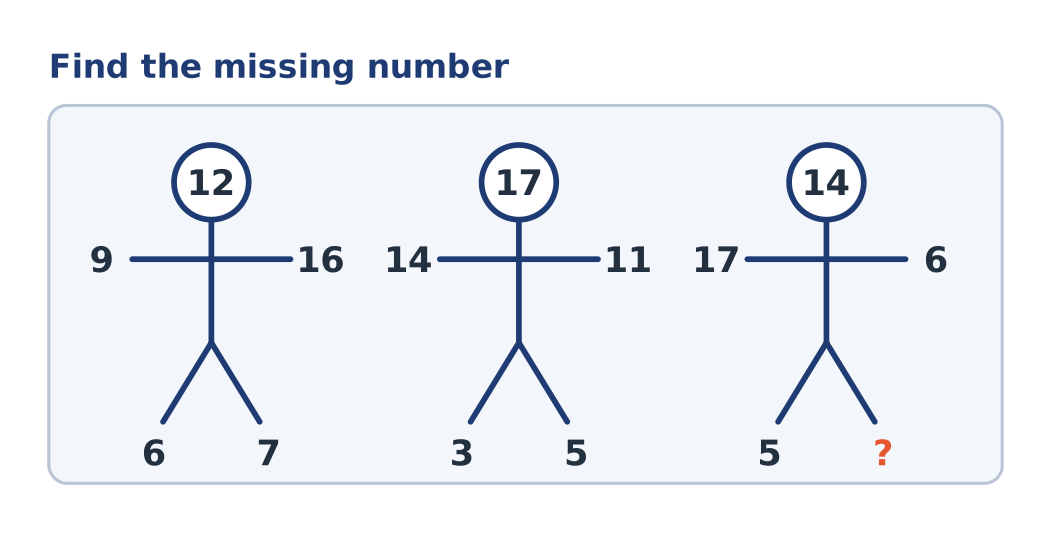
Each stick figure has a number on its head, on its two arms and on its two legs. Work out the rule linking them and find the missing number (?).
Explanation
The head number is (sum of the two arm numbers) − (sum of the two leg numbers).
Figure 1: (9 + 16) − (6 + 7) = 25 − 13 = 12.
Figure 2: (14 + 11) − (3 + 5) = 25 − 8 = 17.
Figure 3: (17 + 6) − (5 + ?) = 14, so 5 + ? = 23 − 14 = 9 and ? = 4.
Figure 1: (9 + 16) − (6 + 7) = 25 − 13 = 12.
Figure 2: (14 + 11) − (3 + 5) = 25 − 8 = 17.
Figure 3: (17 + 6) − (5 + ?) = 14, so 5 + ? = 23 − 14 = 9 and ? = 4.
Shortcut Method
Rule: Head = (arms) − (legs)
23 − (5 + ?) = 14 → 5 + ? = 9
∴ ? = 4 ✓
23 − (5 + ?) = 14 → 5 + ? = 9
∴ ? = 4 ✓
Question 4
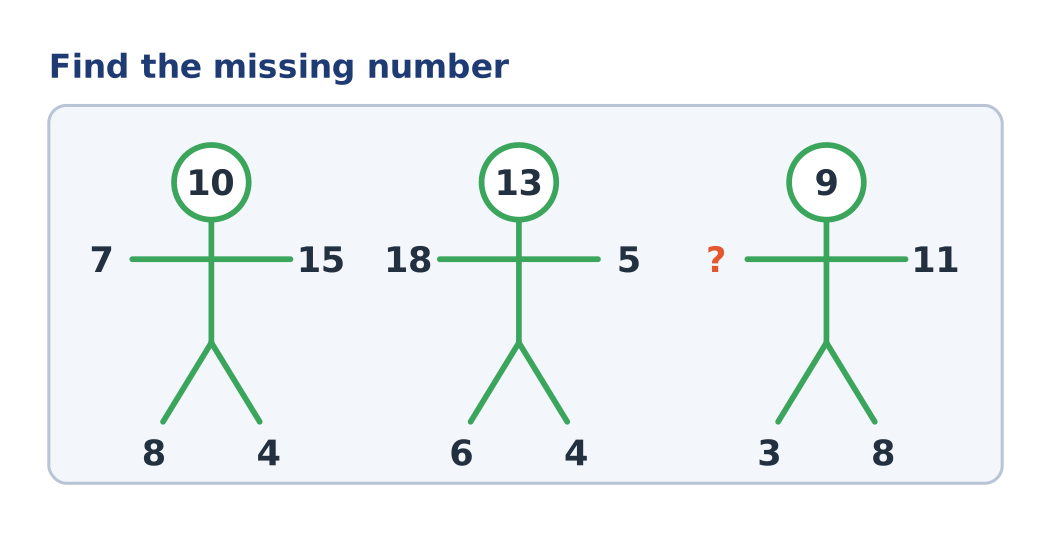
A fixed rule connects the numbers on the arms and legs of a stick figure to the number on its head. Find the number that should replace the question mark in the third figure.
Explanation
The head number is (sum of the two arm numbers) − (sum of the two leg numbers).
Figure 1: (7 + 15) − (8 + 4) = 22 − 12 = 10.
Figure 2: (18 + 5) − (6 + 4) = 23 − 10 = 13.
Figure 3: (? + 11) − (3 + 8) = 9, so ? + 11 = 20 and ? = 9.
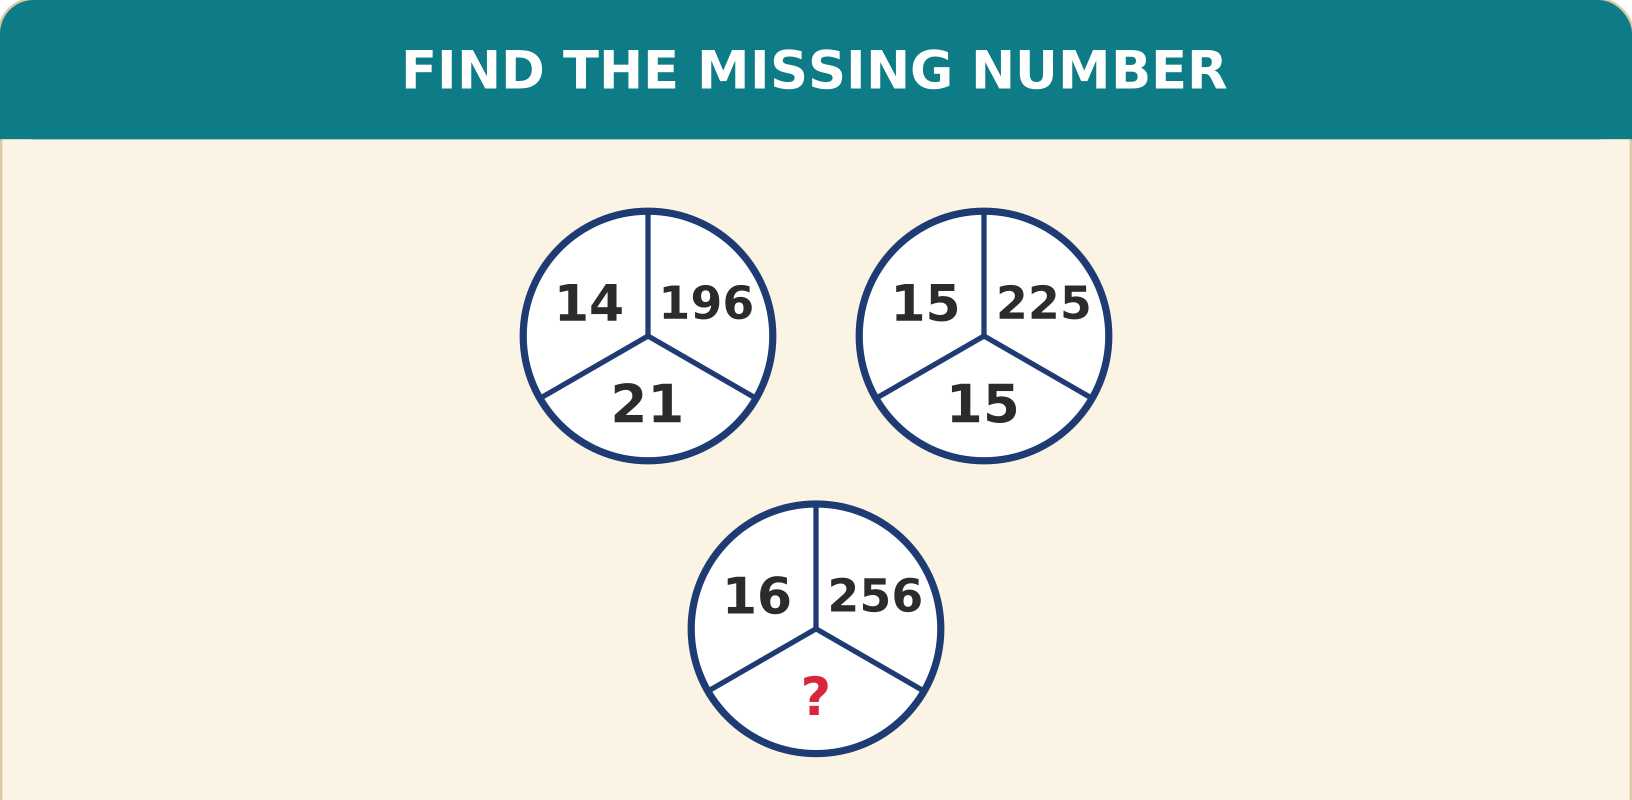
Figure 1: (7 + 15) − (8 + 4) = 22 − 12 = 10.
Figure 2: (18 + 5) − (6 + 4) = 23 − 10 = 13.
Figure 3: (? + 11) − (3 + 8) = 9, so ? + 11 = 20 and ? = 9.
Shortcut Method
Rule: Head = (arms) − (legs)
(? + 11) − 11 = 9
∴ ? = 9 ✓
(? + 11) − 11 = 9
∴ ? = 9 ✓
Question 5
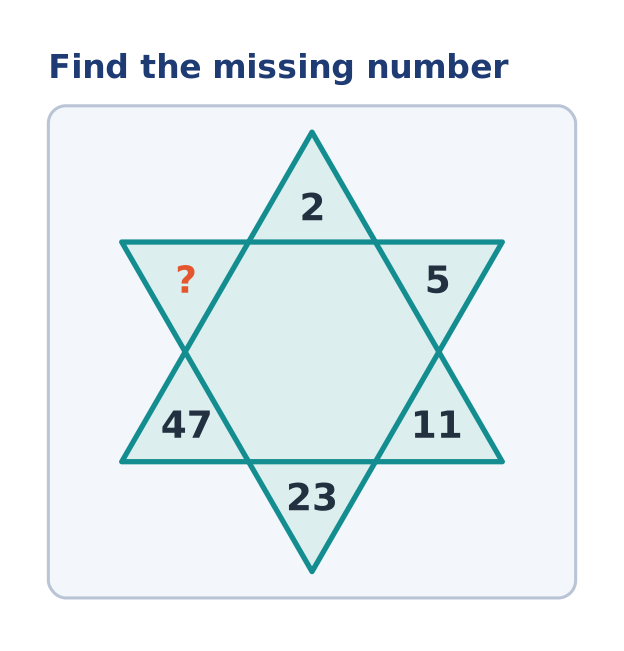
Starting at the top point of the star and moving clockwise, the numbers follow a pattern. Find the missing number (?) in the star.
Explanation
Going clockwise from the top point the numbers are 2, 5, 11, 23, 47, ?.
Each number is double the previous one plus 1:
2 × 2 + 1 = 5, 5 × 2 + 1 = 11, 11 × 2 + 1 = 23, 23 × 2 + 1 = 47.
So ? = 47 × 2 + 1 = 95.
Each number is double the previous one plus 1:
2 × 2 + 1 = 5, 5 × 2 + 1 = 11, 11 × 2 + 1 = 23, 23 × 2 + 1 = 47.
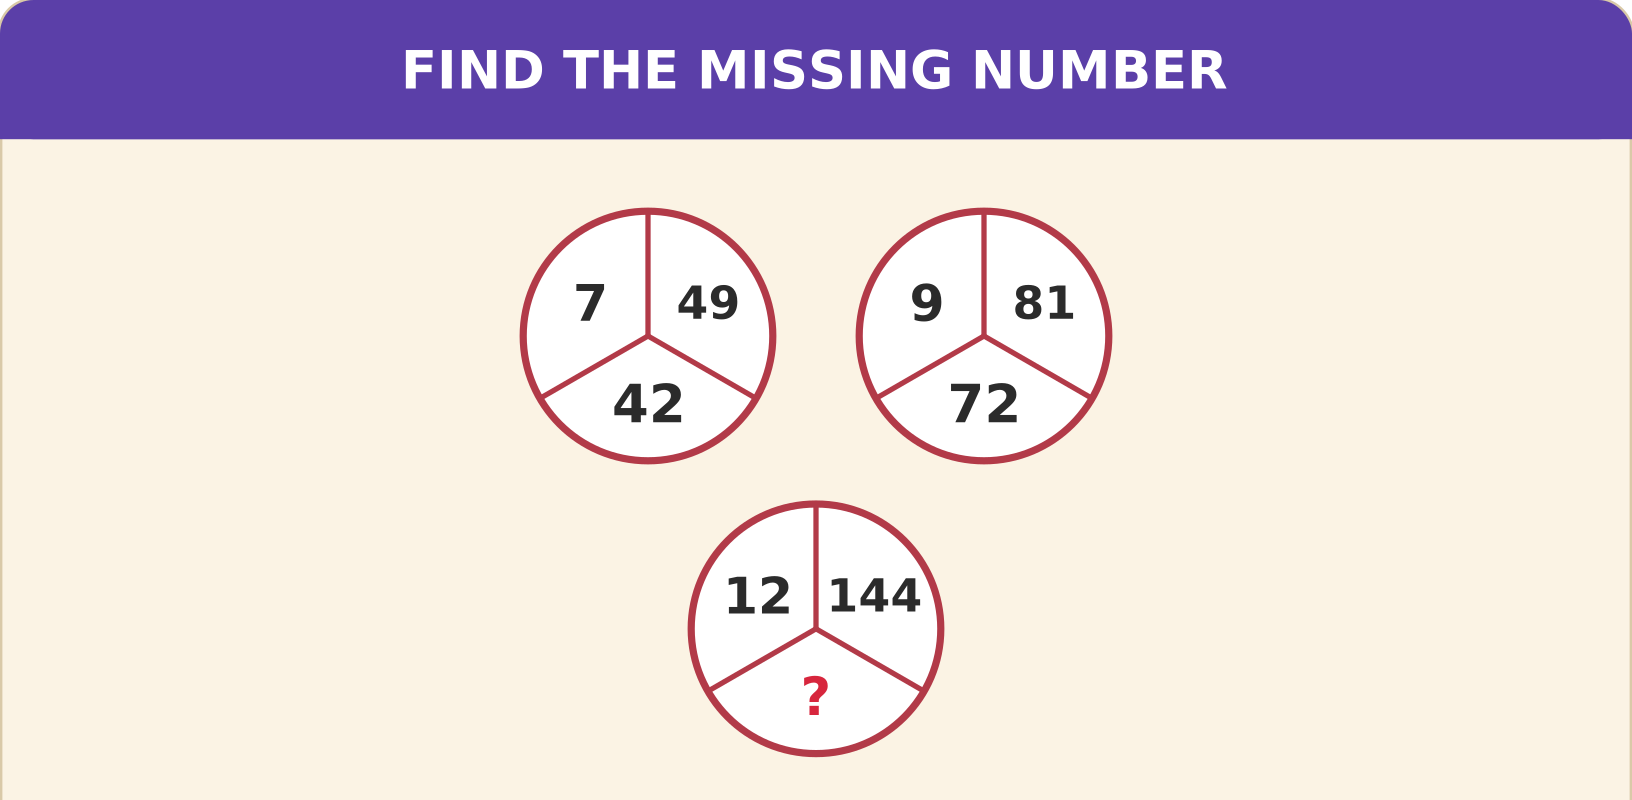
So ? = 47 × 2 + 1 = 95.
Shortcut Method
Rule: next = previous × 2 + 1
47 × 2 + 1 = 95
∴ ? = 95 ✓
47 × 2 + 1 = 95
∴ ? = 95 ✓
Question 6
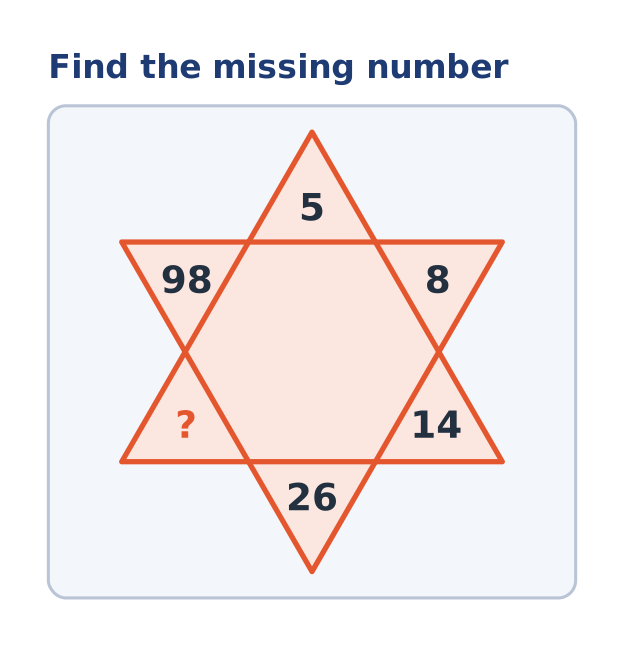
The numbers around the star run in a fixed pattern when read clockwise from the top. What number should replace the question mark?
Explanation
Going clockwise from the top point the numbers are 5, 8, 14, 26, ?, 98.
Each number is double the previous one minus 2:
5 × 2 − 2 = 8, 8 × 2 − 2 = 14, 14 × 2 − 2 = 26.
So ? = 26 × 2 − 2 = 50, and the check 50 × 2 − 2 = 98 agrees.
Each number is double the previous one minus 2:
5 × 2 − 2 = 8, 8 × 2 − 2 = 14, 14 × 2 − 2 = 26.
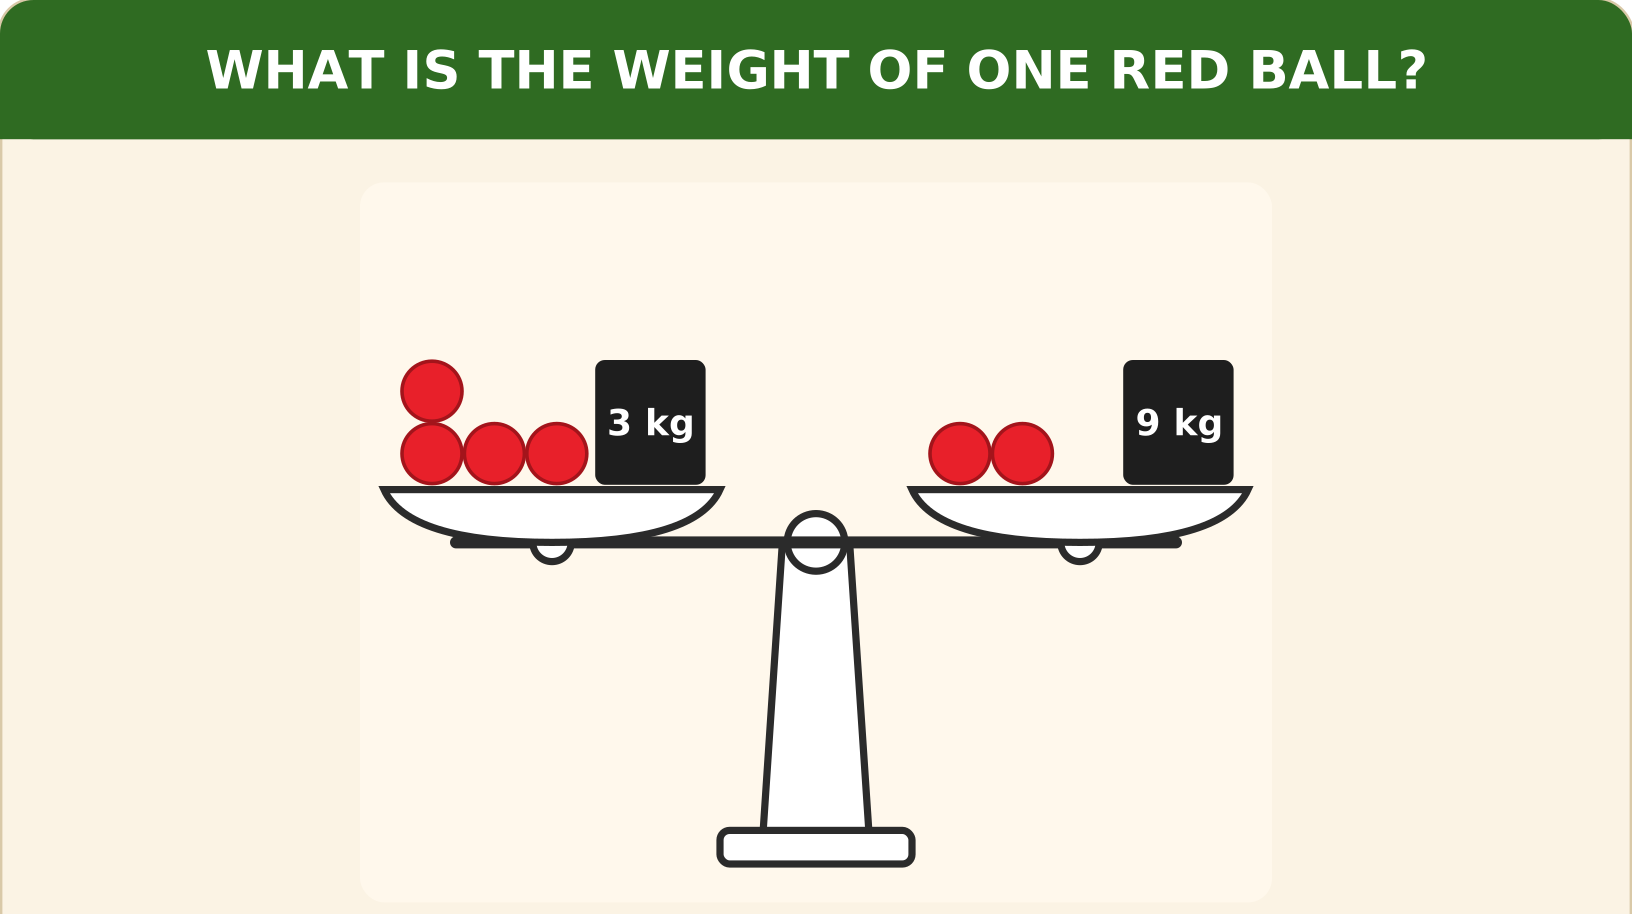
So ? = 26 × 2 − 2 = 50, and the check 50 × 2 − 2 = 98 agrees.
Shortcut Method
Rule: next = previous × 2 − 2
26 × 2 − 2 = 50 (and 50 × 2 − 2 = 98)
∴ ? = 50 ✓
26 × 2 − 2 = 50 (and 50 × 2 − 2 = 98)
∴ ? = 50 ✓
Question 7
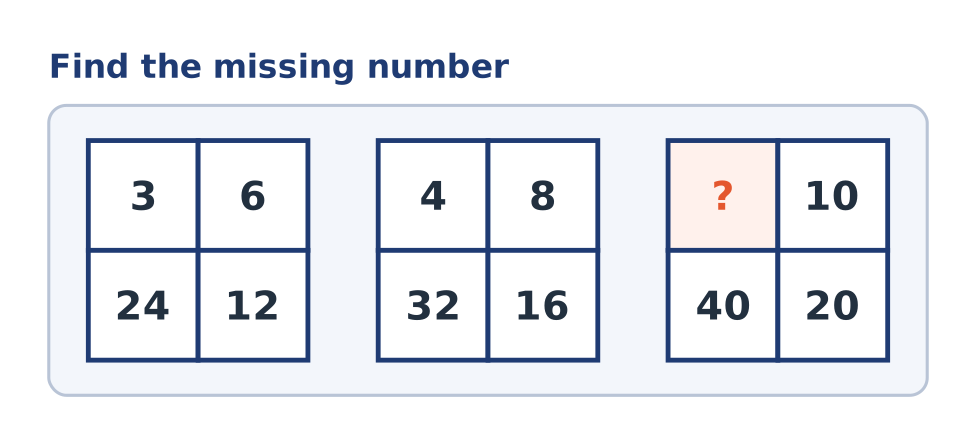
Each block has four boxes holding numbers. Find the pattern within a block and give the missing number (?) in the third block.
Explanation
In each block, going clockwise from the top-left box, every number is double the one before it.
Block 1: 3, 6, 12, 24. Block 2: 4, 8, 16, 32.
In block 3 the second number is 10, so ? × 2 = 10 and ? = 5 (the block then reads 5, 10, 20, 40).
Block 1: 3, 6, 12, 24. Block 2: 4, 8, 16, 32.
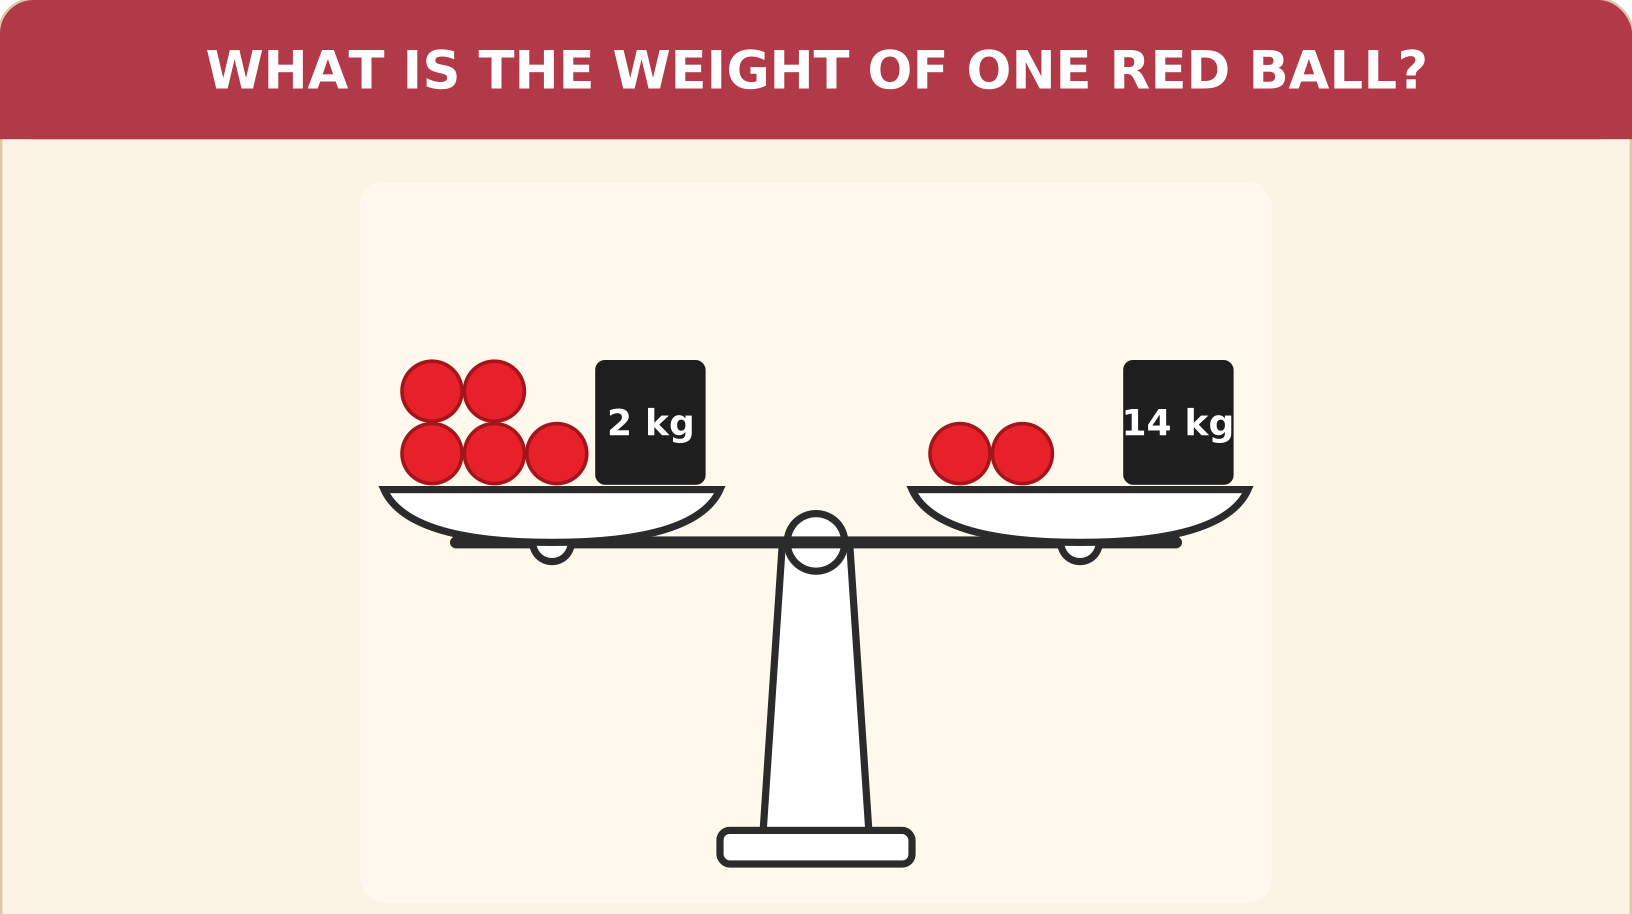
In block 3 the second number is 10, so ? × 2 = 10 and ? = 5 (the block then reads 5, 10, 20, 40).
Shortcut Method
Rule: each box = 2 × the box before it
? × 2 = 10
∴ ? = 5 ✓
? × 2 = 10
∴ ? = 5 ✓
Question 8
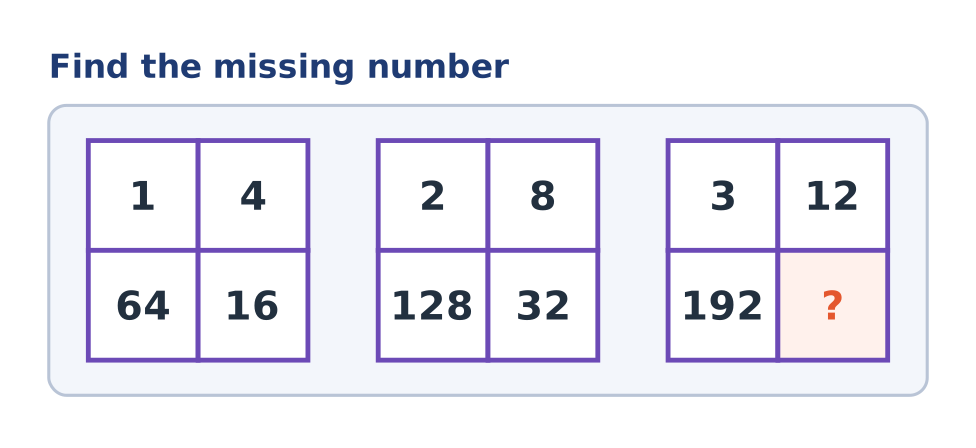
Look at the numbers in the four boxes of each block and identify how one box leads to the next. What is the missing number (?)?
Explanation
In each block, going clockwise from the top-left box, every number is 4 times the one before it.
Block 1: 1, 4, 16, 64. Block 2: 2, 8, 32, 128.
In block 3 the boxes are 3, 12, ?, 192, so ? = 12 × 4 = 48 (and 48 × 4 = 192 confirms it).
Block 1: 1, 4, 16, 64. Block 2: 2, 8, 32, 128.
In block 3 the boxes are 3, 12, ?, 192, so ? = 12 × 4 = 48 (and 48 × 4 = 192 confirms it).
Shortcut Method
Rule: each box = 4 × the box before it
12 × 4 = 48 (48 × 4 = 192)
∴ ? = 48 ✓
12 × 4 = 48 (48 × 4 = 192)
∴ ? = 48 ✓
Question 9
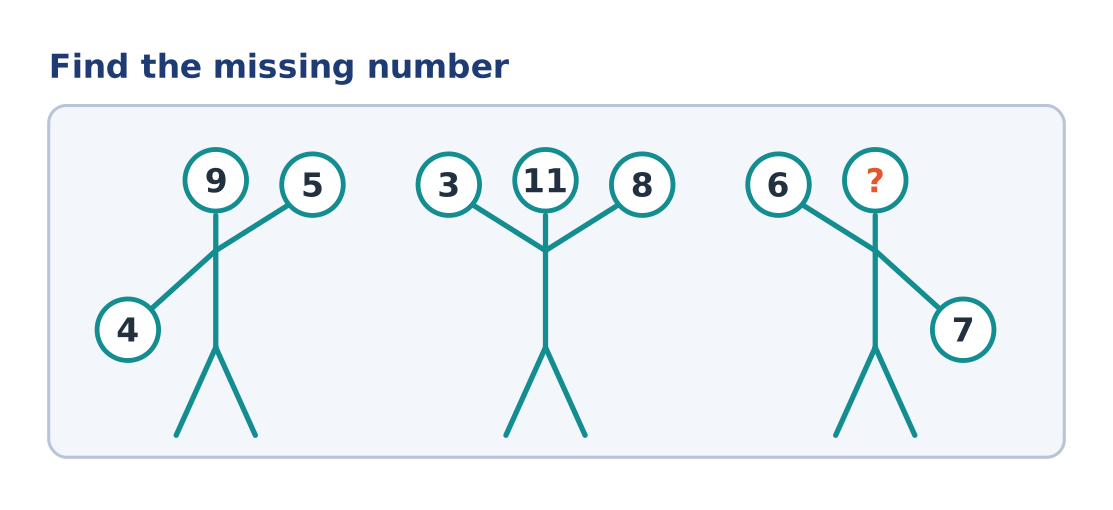
Each figure holds numbers in its hands and on its head. Find how the head number is obtained and work out the missing number (?).
Explanation
The number on the head is the sum of the numbers in the two hands.
Figure 1: 4 + 5 = 9. Figure 2: 3 + 8 = 11.
Figure 3: 6 + 7 = 13.
Figure 1: 4 + 5 = 9. Figure 2: 3 + 8 = 11.
Figure 3: 6 + 7 = 13.
Shortcut Method
Rule: Head = left hand + right hand
6 + 7 = 13
∴ ? = 13 ✓
6 + 7 = 13
∴ ? = 13 ✓
Question 10
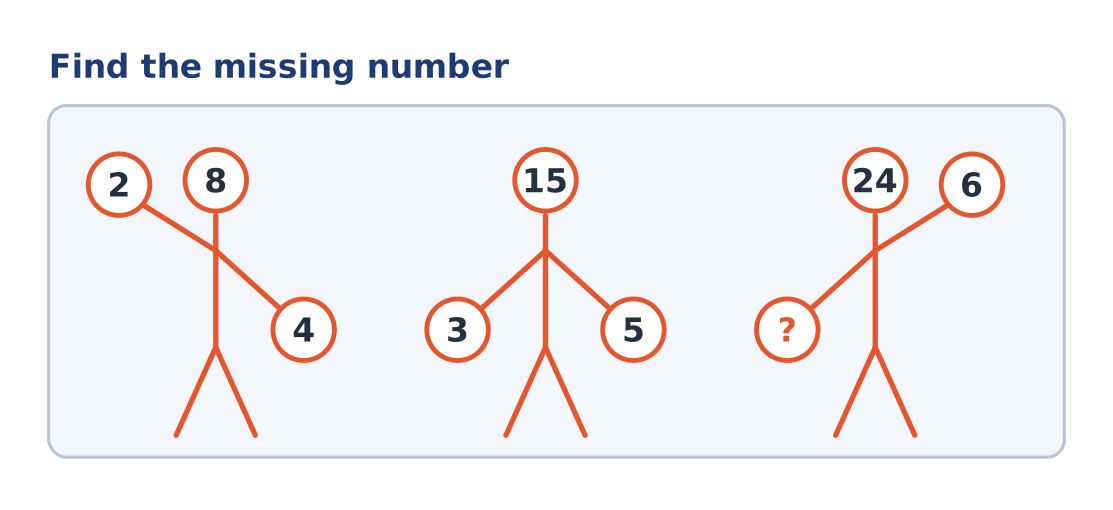
Three stick figures carry numbers in their circles. Using the rule that links the hand numbers with the head, find the number that replaces the question mark.
Explanation
The number on the head is the product of the numbers in the two hands.
Figure 1: 2 × 4 = 8. Figure 2: 3 × 5 = 15.
Figure 3: ? × 6 = 24, so ? = 24 ÷ 6 = 4.
Figure 1: 2 × 4 = 8. Figure 2: 3 × 5 = 15.
Figure 3: ? × 6 = 24, so ? = 24 ÷ 6 = 4.
Shortcut Method
Rule: Head = left hand × right hand
? × 6 = 24
∴ ? = 4 ✓
? × 6 = 24
∴ ? = 4 ✓
Question 11
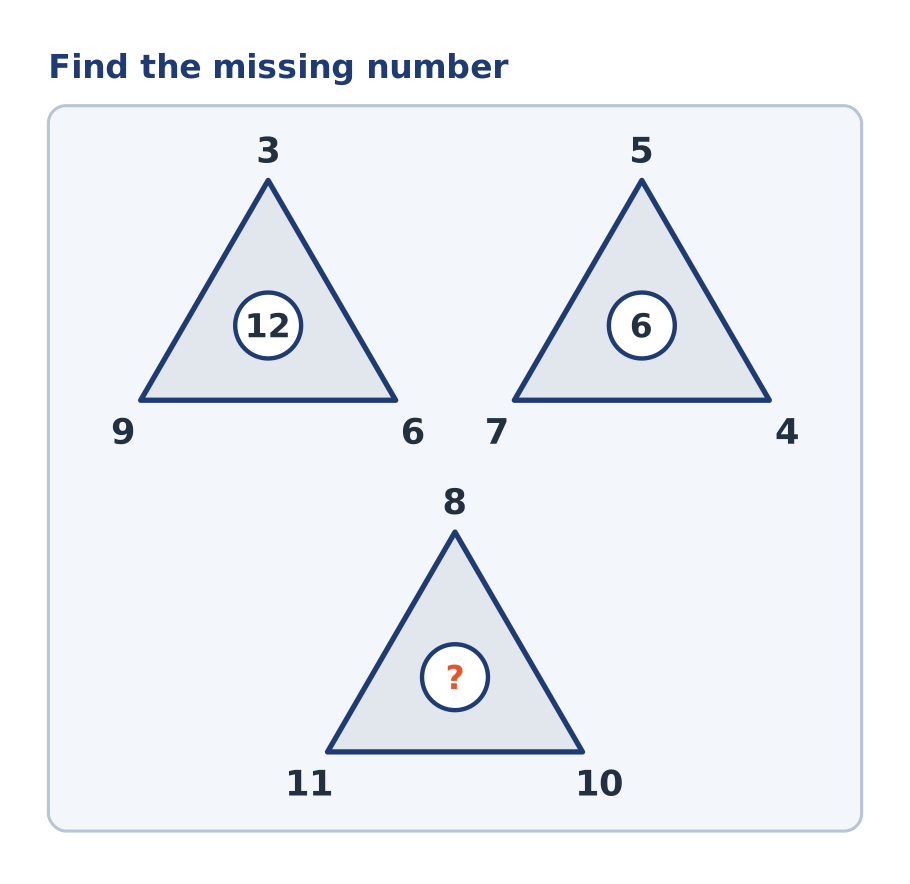
In each triangle the number in the centre depends on the three numbers at its corners. Find the missing number (?) in the third triangle.
Explanation
Centre = (bottom-left + bottom-right) − top.
Triangle 1: (9 + 6) − 3 = 12.
Triangle 2: (7 + 4) − 5 = 6.
Triangle 3: (11 + 10) − 8 = 13.
Triangle 1: (9 + 6) − 3 = 12.
Triangle 2: (7 + 4) − 5 = 6.
Triangle 3: (11 + 10) − 8 = 13.
Shortcut Method
Rule: Centre = (BL + BR) − Top
(11 + 10) − 8 = 13
∴ ? = 13 ✓
(11 + 10) − 8 = 13
∴ ? = 13 ✓
Question 12
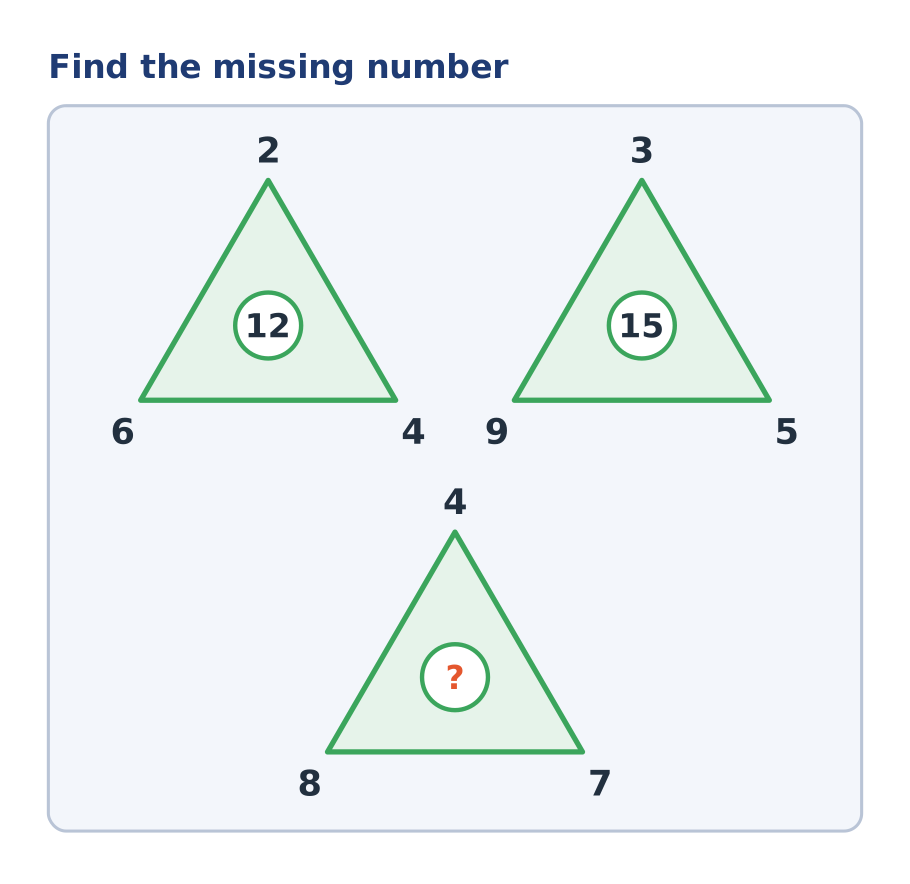
The three corner numbers of every triangle give the number at its centre by one rule. Which number replaces the question mark in the third triangle?
Explanation
Centre = (bottom-left × bottom-right) ÷ top.
Triangle 1: (6 × 4) ÷ 2 = 12.
Triangle 2: (9 × 5) ÷ 3 = 15.
Triangle 3: (8 × 7) ÷ 4 = 14.
Triangle 1: (6 × 4) ÷ 2 = 12.
Triangle 2: (9 × 5) ÷ 3 = 15.
Triangle 3: (8 × 7) ÷ 4 = 14.
Shortcut Method
Rule: Centre = (BL × BR) ÷ Top
(8 × 7) ÷ 4 = 14
∴ ? = 14 ✓
(8 × 7) ÷ 4 = 14
∴ ? = 14 ✓
Question 13
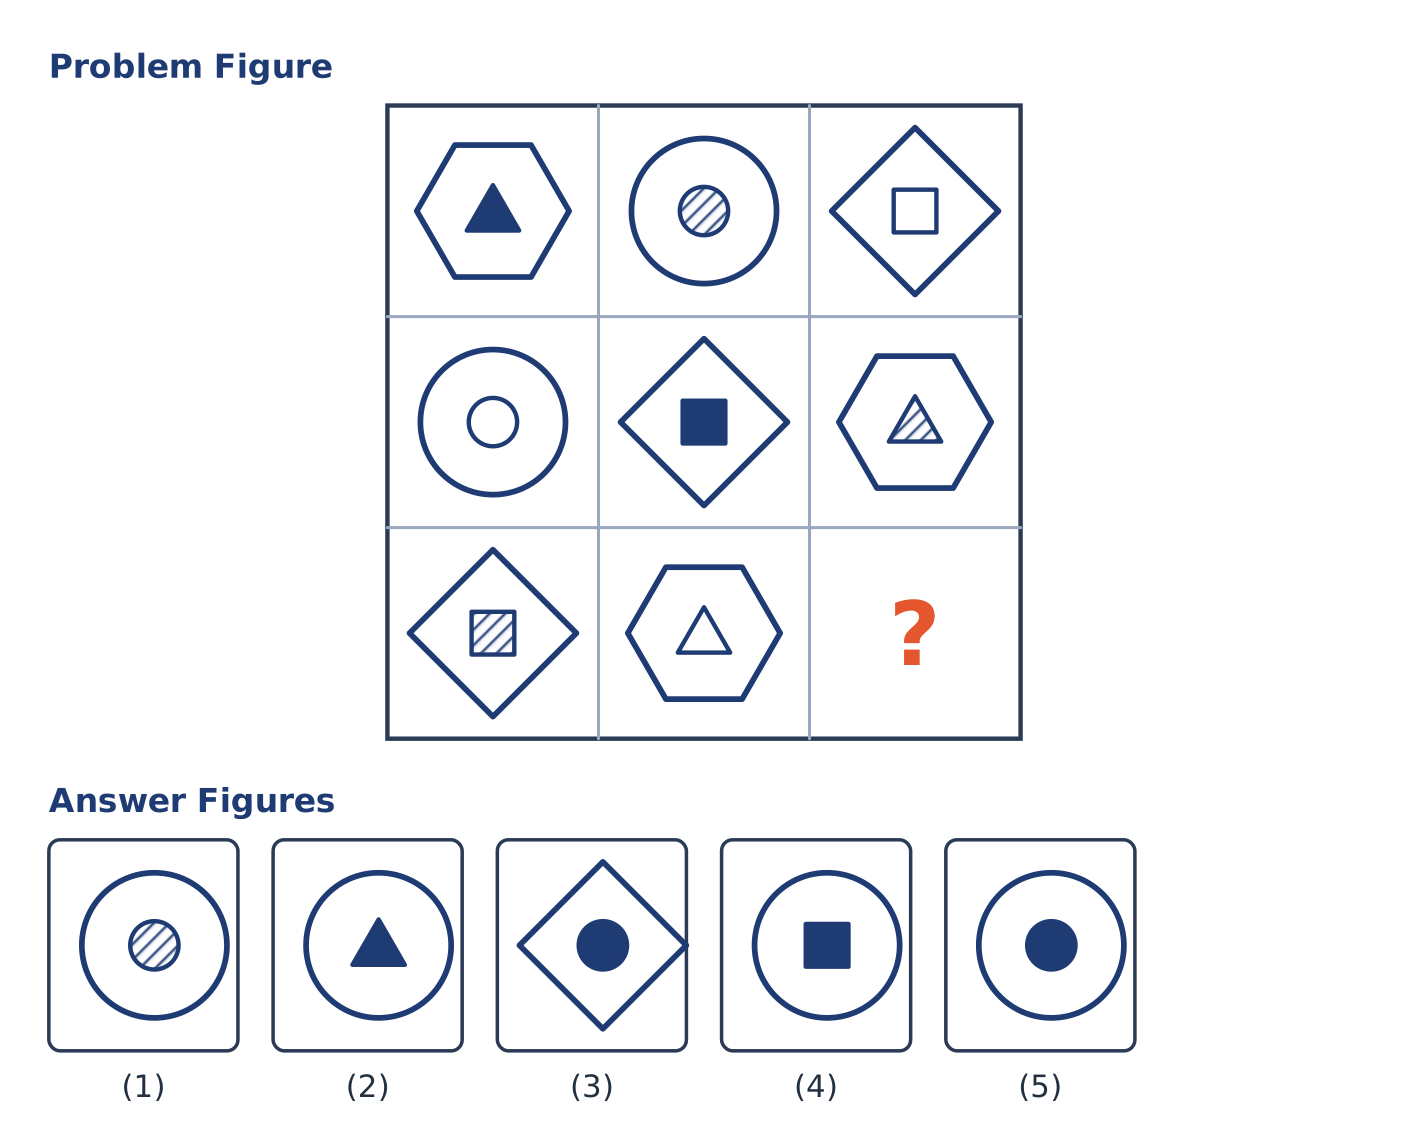
A 3 × 3 matrix of shapes is shown with the last cell missing. Which answer figure completes the matrix in place of the question mark (?)?
Explanation
Each row and each column has one hexagon, one circle and one diamond as the outer shape, so the missing outer shape is a circle.
The inner shape depends on the outer shape (hexagon has a triangle, circle has a circle, diamond has a square), so the inner shape is a circle.
The inner shading (solid, hatched, white) also appears once in every row and column. Row 3 already has white and hatched, so the shading is solid.
The answer is a circle with a solid circle inside, which is option (5).
The inner shape depends on the outer shape (hexagon has a triangle, circle has a circle, diamond has a square), so the inner shape is a circle.
The inner shading (solid, hatched, white) also appears once in every row and column. Row 3 already has white and hatched, so the shading is solid.
The answer is a circle with a solid circle inside, which is option (5).
Shortcut Method
Rule: Outer shape and inner shading each appear once per row and column
Missing = circle with a solid circle inside
∴ Option 5 is correct ✓
Missing = circle with a solid circle inside
∴ Option 5 is correct ✓
Question 14
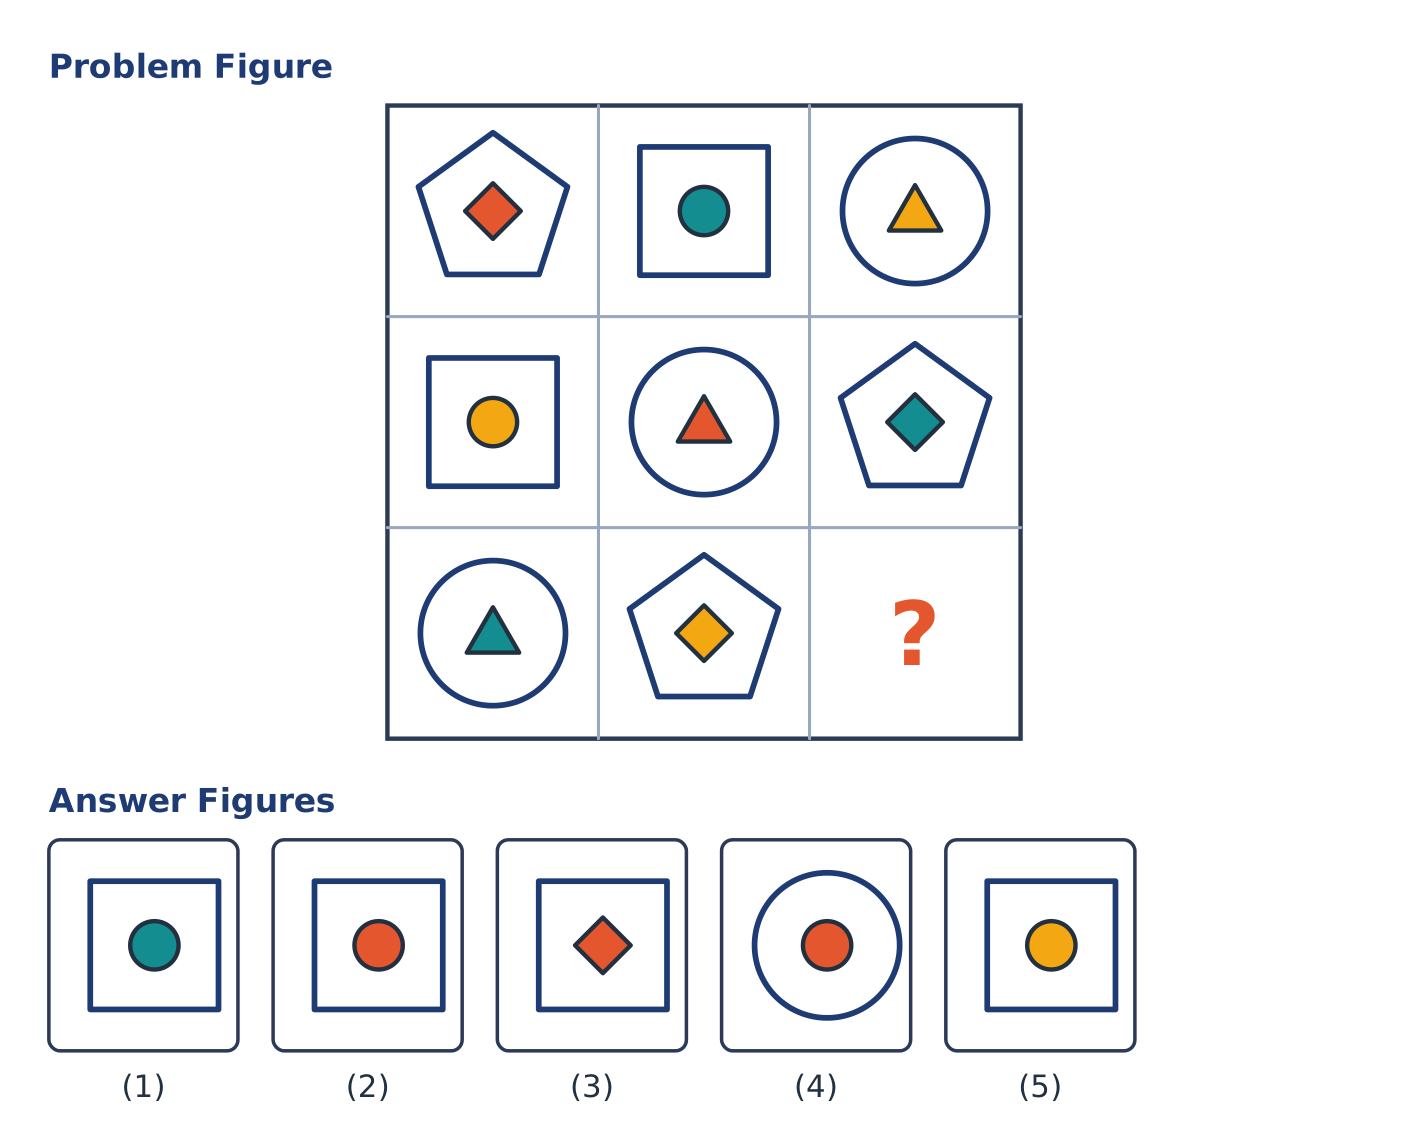
Study the nine cells of the matrix below, where each shape holds a smaller coloured shape. Select the answer figure that should replace the question mark.
Explanation
Each row and column has one pentagon, one square and one circle as the outer shape, so the missing outer shape is a square.
The inner shape depends on the outer shape (pentagon has a diamond, square has a circle, circle has a triangle), so the inner shape is a circle.
Each colour (red, green, yellow) appears once in every row and column. Row 3 has green and yellow, so the inner shape is red.
The answer is a square with a red circle inside, which is option (2).
The inner shape depends on the outer shape (pentagon has a diamond, square has a circle, circle has a triangle), so the inner shape is a circle.
Each colour (red, green, yellow) appears once in every row and column. Row 3 has green and yellow, so the inner shape is red.
The answer is a square with a red circle inside, which is option (2).
Shortcut Method
Rule: Outer shape and inner colour each appear once per row and column
Missing = square with a red circle inside
∴ Option 2 is correct ✓
Missing = square with a red circle inside
∴ Option 2 is correct ✓
Question 15
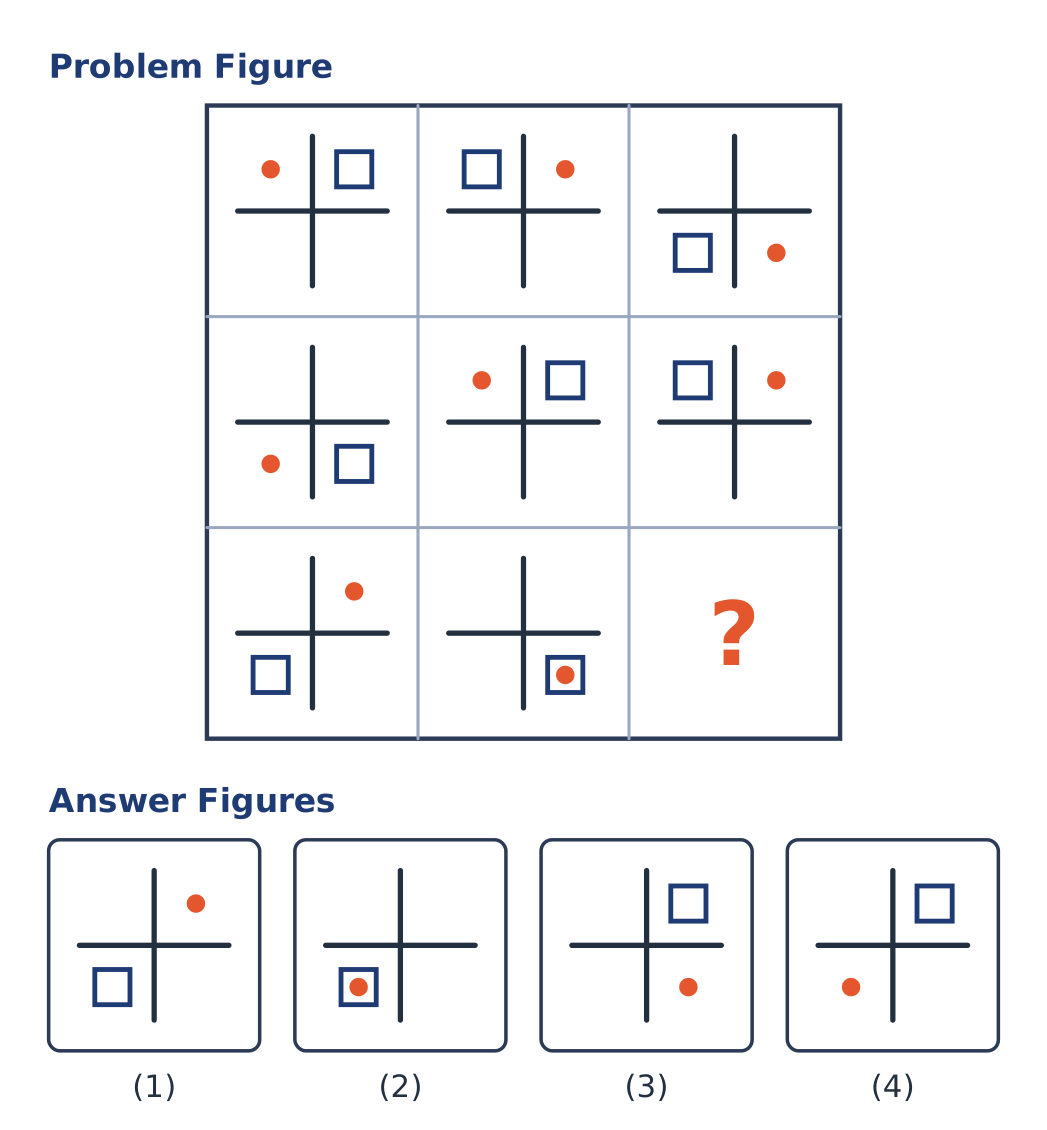
Look at the three rows of figures, each containing a cross with a dot and a square. Choose the answer figure that completes the third row in place of the question mark (?).
Explanation
Read along each row. The dot moves one quarter clockwise each time and the square moves one quarter anticlockwise. When both land in the same quarter the dot sits inside the square.
In row 3 the dot goes top-right, bottom-right, so next it is bottom-left. The square goes bottom-left, bottom-right, so next it is top-right.
The answer has the dot bottom-left and the square top-right, which is option (4).
In row 3 the dot goes top-right, bottom-right, so next it is bottom-left. The square goes bottom-left, bottom-right, so next it is top-right.
The answer has the dot bottom-left and the square top-right, which is option (4).
Shortcut Method
Rule: dot = 1 quarter clockwise, square = 1 quarter anticlockwise
Dot bottom-left, square top-right
∴ Option 4 is correct ✓
Dot bottom-left, square top-right
∴ Option 4 is correct ✓
Question 16
Each figure in the matrix has a small triangle and a ring placed on a cross. Find the figure that should take the place of the question mark.
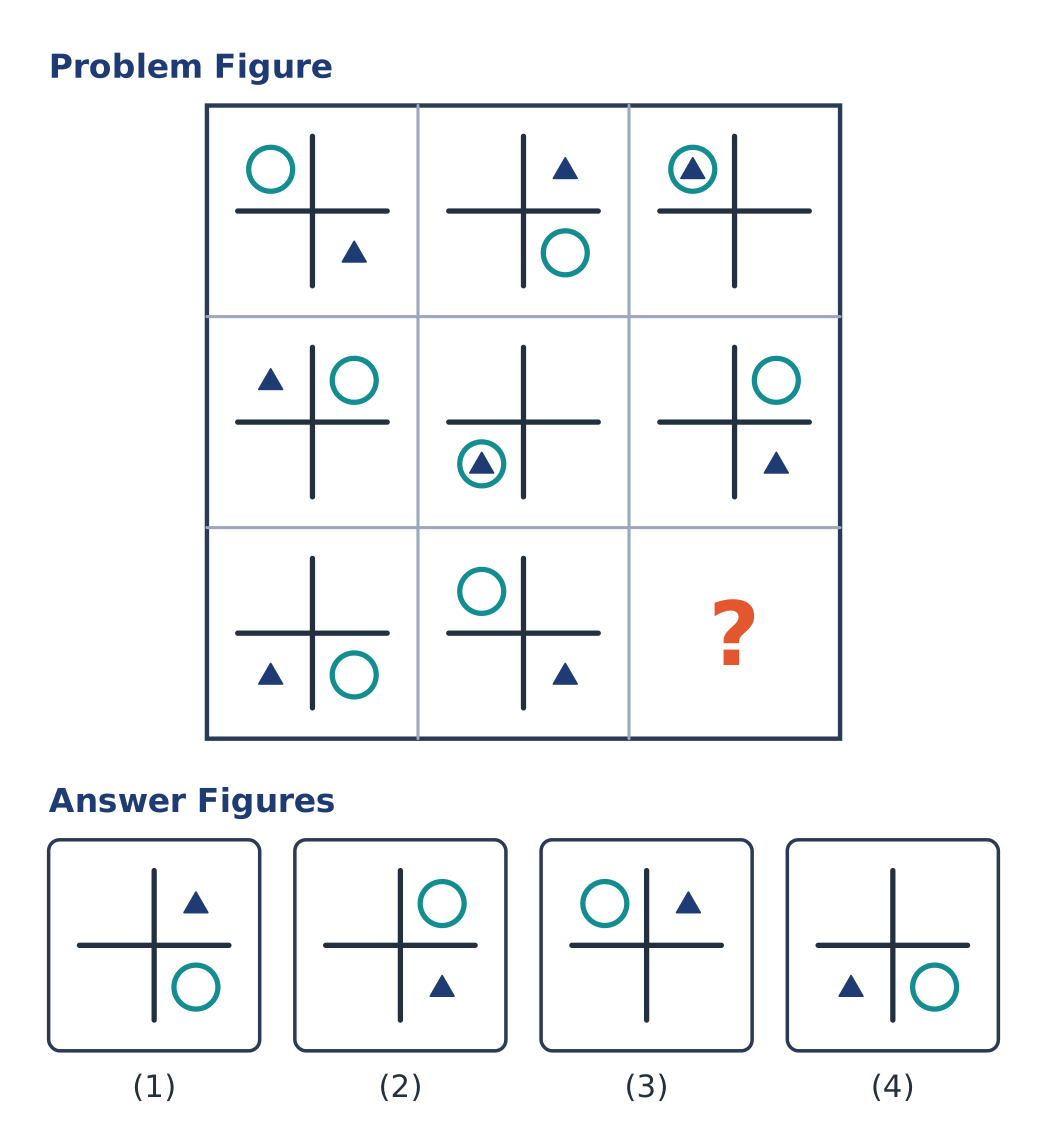
Explanation
Read along each row. The small triangle moves one quarter anticlockwise each time, while the ring jumps two quarters (to the opposite corner) each time. When both are in the same quarter the triangle sits inside the ring.
Row 3: the triangle goes bottom-left, bottom-right, so next it is top-right. The ring goes bottom-right, top-left, so next it is bottom-right.
The answer has the triangle top-right and the ring bottom-right, which is option (1).
Row 3: the triangle goes bottom-left, bottom-right, so next it is top-right. The ring goes bottom-right, top-left, so next it is bottom-right.
The answer has the triangle top-right and the ring bottom-right, which is option (1).
Shortcut Method
Rule: triangle = 1 quarter anticlockwise, ring = 2 quarters
Triangle top-right, ring bottom-right
∴ Option 1 is correct ✓
Triangle top-right, ring bottom-right
∴ Option 1 is correct ✓
Question 17
A half-dark arrowhead turns from figure to figure in the matrix below. Which answer figure replaces the question mark (?)?
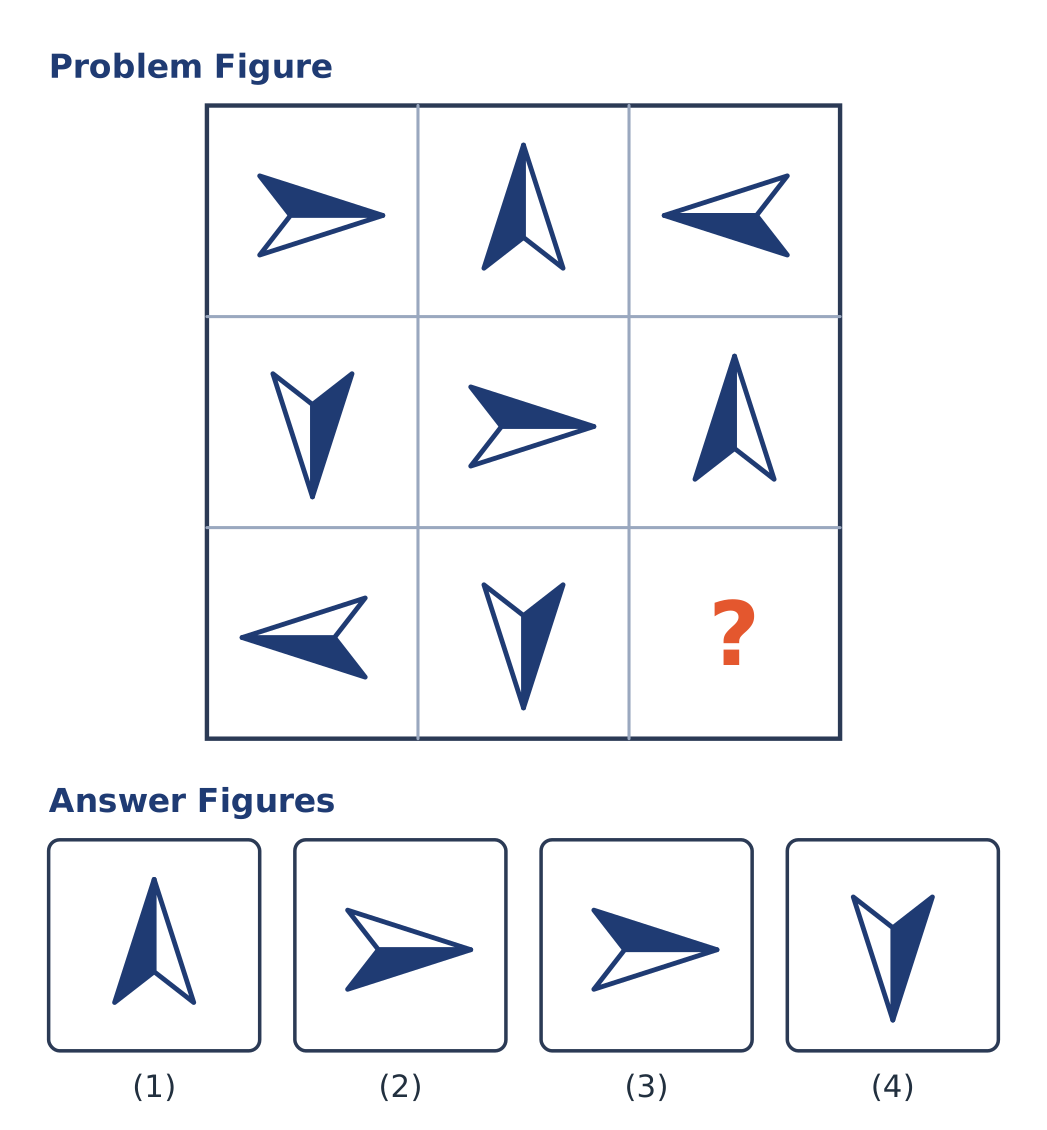
Explanation
Read the figures row by row (left to right, then the next row). The arrowhead turns 90 degrees anticlockwise at each step: right, up, left, down, right, up, left, down, so the ninth figure points right again.
The dark half must stay on the same side as in the other right-pointing figures (figures 1 and 5), so the option with the colours swapped is wrong.
The correct figure is option (3).
The dark half must stay on the same side as in the other right-pointing figures (figures 1 and 5), so the option with the colours swapped is wrong.
The correct figure is option (3).
Shortcut Method
Rule: 90° anticlockwise each step (reading row by row)
9th figure points right, dark half as in figures 1 and 5
∴ Option 3 is correct ✓
9th figure points right, dark half as in figures 1 and 5
∴ Option 3 is correct ✓
Question 18
In the matrix below a flag changes its direction from one figure to the next. Pick the answer figure that completes the matrix at the question mark.
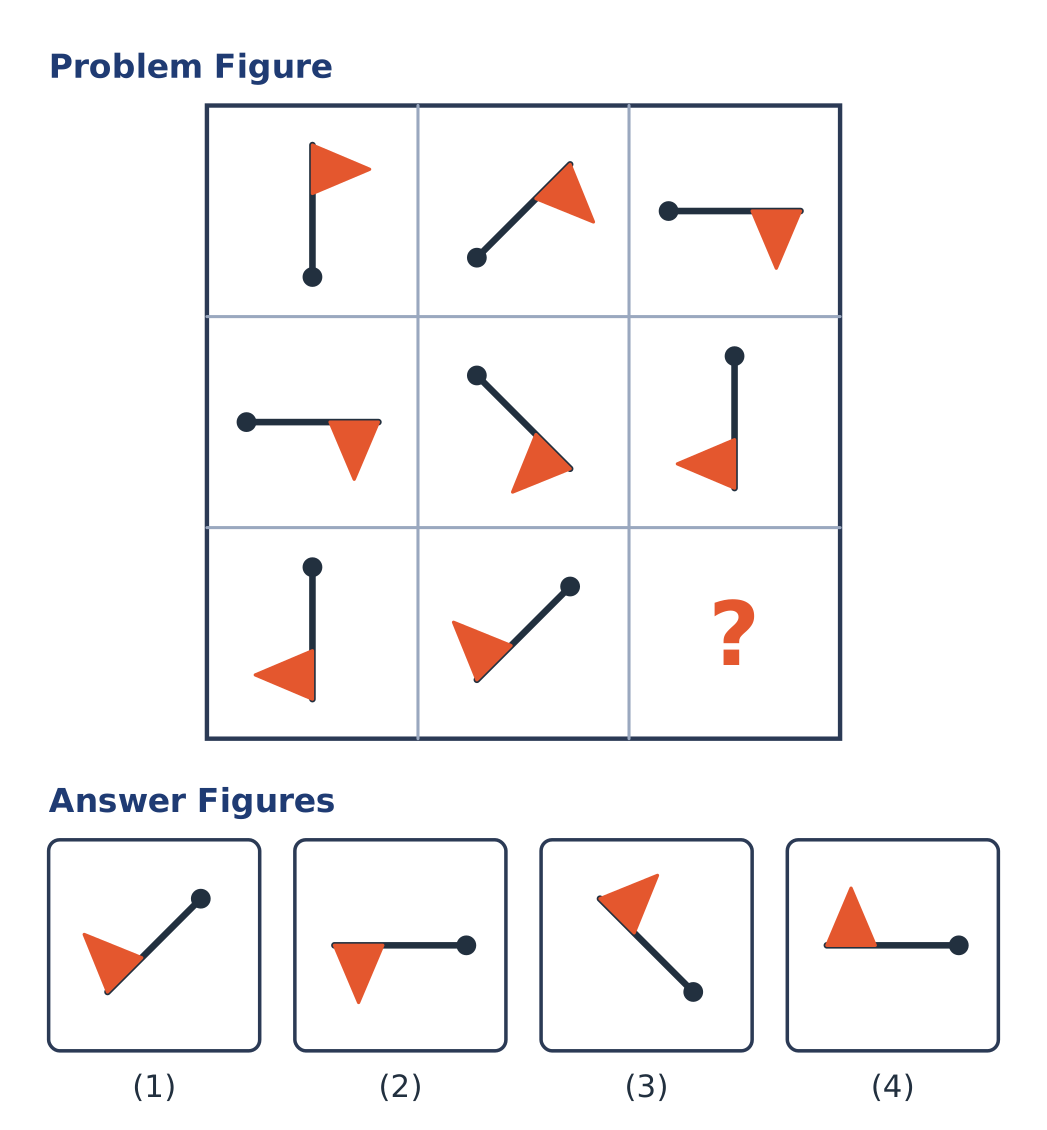
Explanation
In every row the flag turns 45 degrees clockwise from one figure to the next, and each row starts 90 degrees further round than the row above.
Row 3 starts pointing down (180 degrees) and the middle figure is at 225 degrees, so the last figure is at 270 degrees: the pole points left with the pennant on the same side as before.
One option is the mirror image, and two options are 45 degrees off, so the correct figure is option (4).
Row 3 starts pointing down (180 degrees) and the middle figure is at 225 degrees, so the last figure is at 270 degrees: the pole points left with the pennant on the same side as before.
One option is the mirror image, and two options are 45 degrees off, so the correct figure is option (4).
Shortcut Method
Rule: +45° clockwise along a row, +90° at each new row
Row 3: 180°, 225°, 270°
∴ Option 4 is correct ✓
Row 3: 180°, 225°, 270°
∴ Option 4 is correct ✓
Question 19
The box below is filled with the letter p, with a few q's hidden among them. How many 'q' are there in the box?
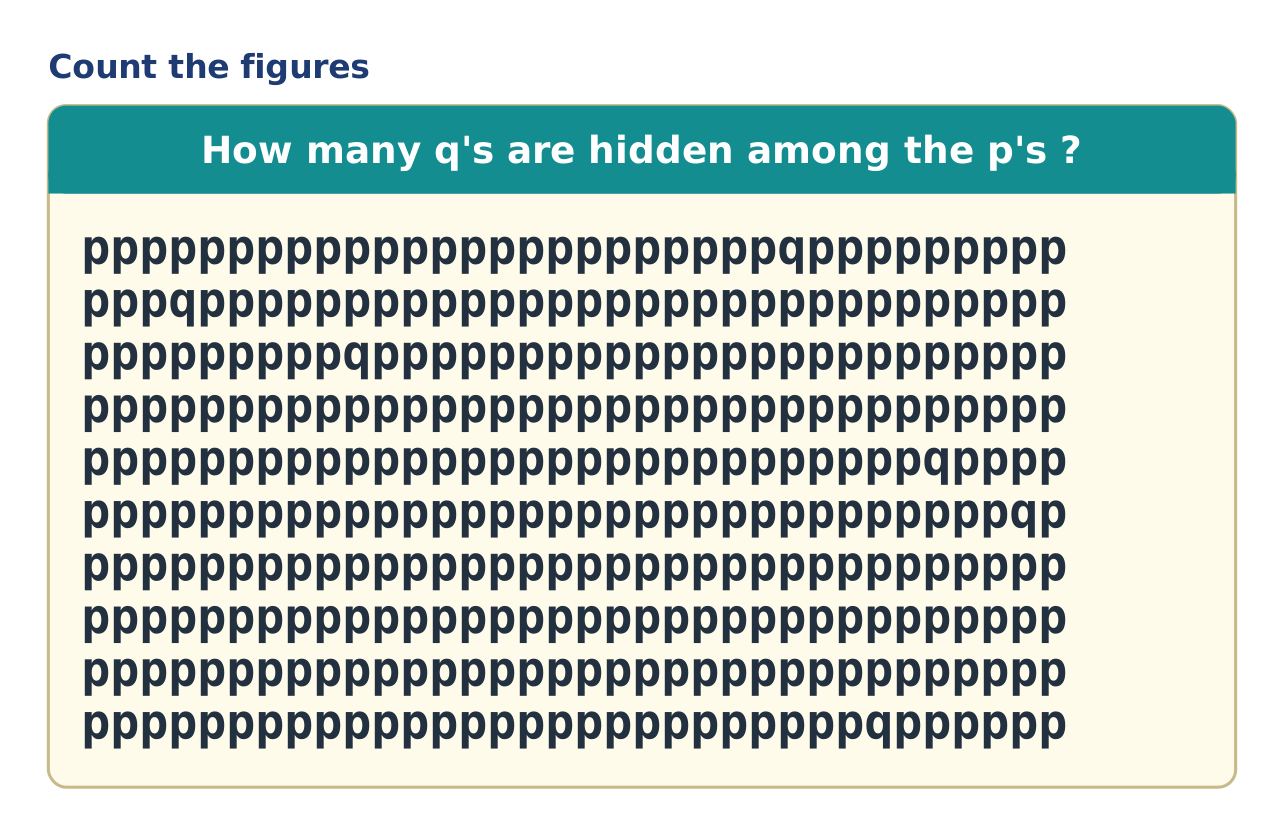
Explanation
Scan the box row by row from the top.
Row 1: 1, row 2: 1, row 3: 1, row 5: 1, row 6: 1, row 10: 1 (rows 4, 7, 8 and 9 have none).
Total = 6 q's.
Row 1: 1, row 2: 1, row 3: 1, row 5: 1, row 6: 1, row 10: 1 (rows 4, 7, 8 and 9 have none).
Total = 6 q's.
Shortcut Method
Count row by row: 1 + 1 + 1 + 1 + 1 + 1
∴ 6 q's ✓
∴ 6 q's ✓
Question 20
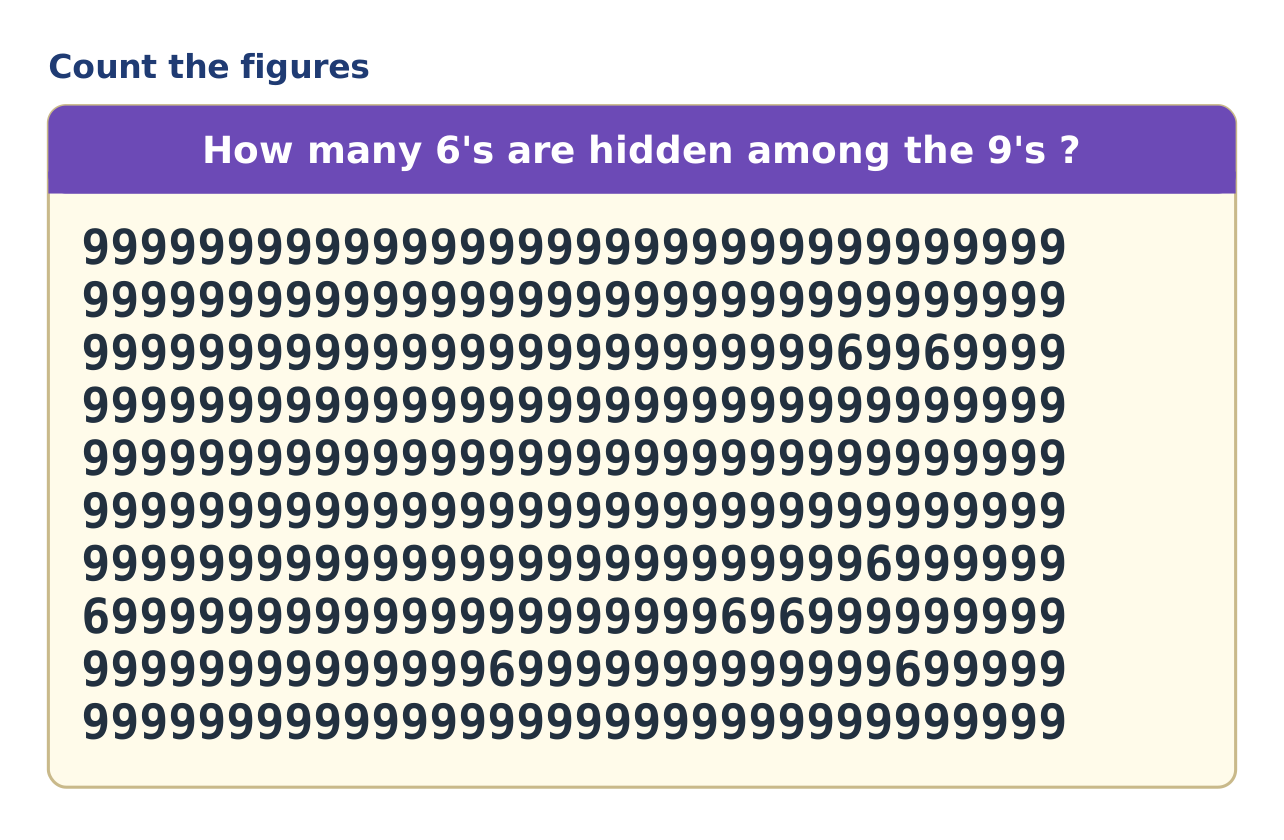
Most of the digits in the box are 9, but some of them are 6. How many '6' are there in the box?
Explanation
Scan the box row by row from the top.
Row 3: 2, row 7: 1, row 8: 3, row 9: 2 (the other rows have none).
Total = 2 + 1 + 3 + 2 = 8 sixes.
Row 3: 2, row 7: 1, row 8: 3, row 9: 2 (the other rows have none).
Total = 2 + 1 + 3 + 2 = 8 sixes.
Shortcut Method
Count row by row: 2 + 1 + 3 + 2
∴ 8 sixes ✓
∴ 8 sixes ✓
Question 21
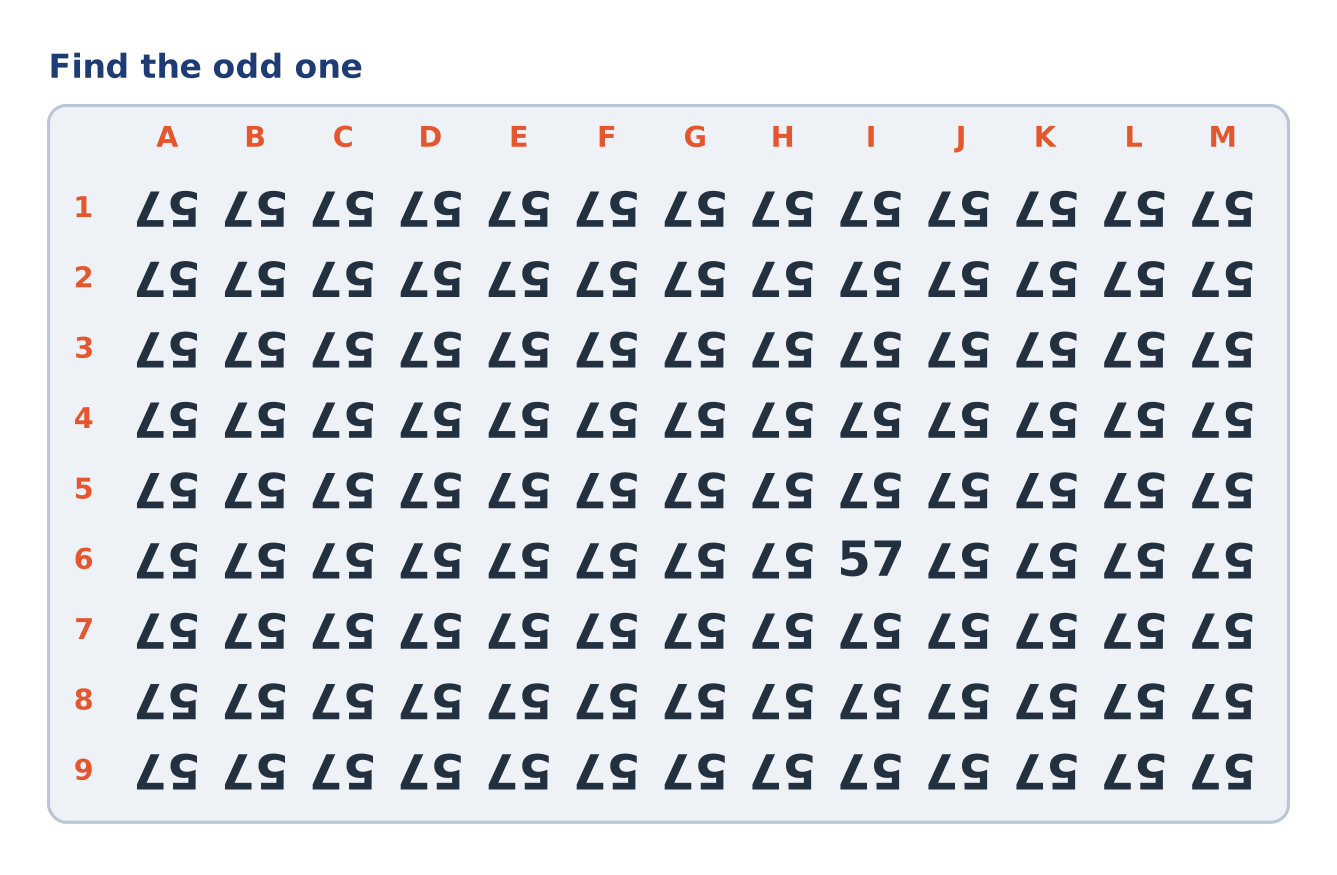
Every '57' in the grid below is turned upside down except for one that is the right way up. Where is the odd one? (Rows are numbered and columns are lettered.)
Explanation
Every figure in the grid is upside down except one. The only normal '57' is in row 6, column I.
Shortcut Method
Look for the one '57' that is the right way up
∴ Row 6, Column I ✓
∴ Row 6, Column I ✓
Question 22
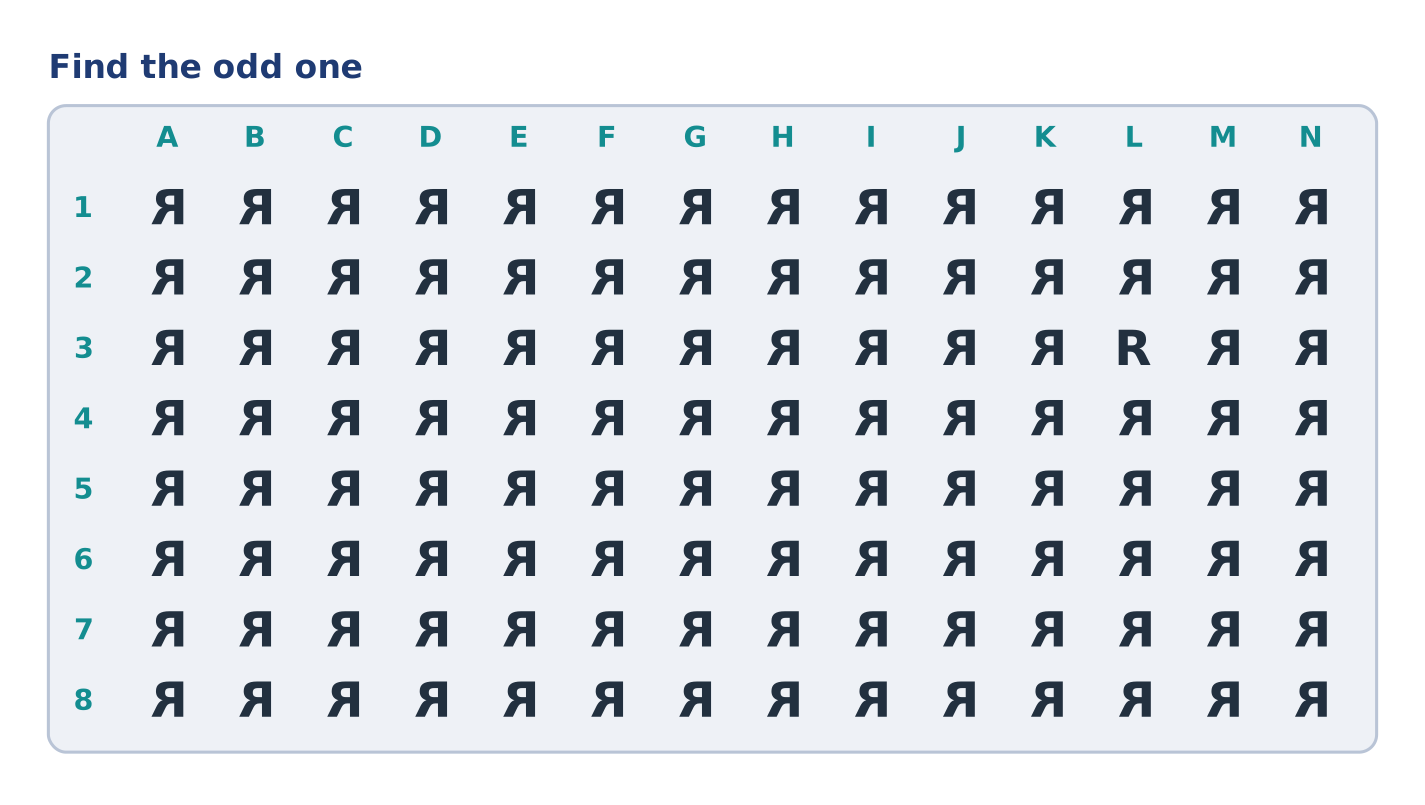
Every 'R' in the grid below is a mirror image except for one normal 'R'. Locate it. (Rows are numbered and columns are lettered.)
Explanation
Every figure in the grid is a mirror image except one. The only normal 'R' is in row 3, column L.
Shortcut Method
Look for the one 'R' that faces the right way
∴ Row 3, Column L ✓
∴ Row 3, Column L ✓
Question 23
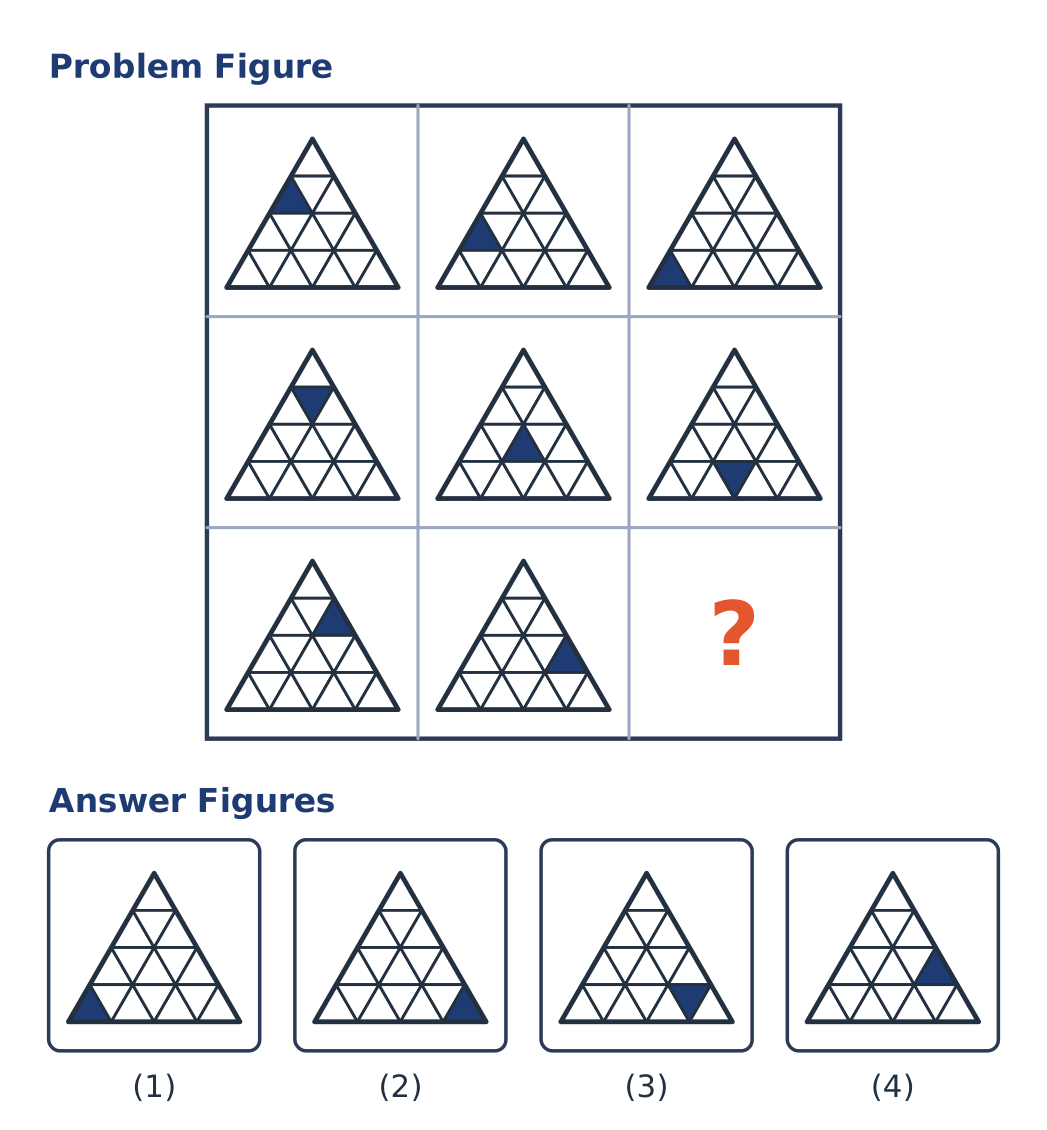
In the triangle matrix below, one small triangle is shaded in each big triangle. Which answer figure completes the matrix in place of the question mark (?)?
Explanation
In every row the shaded small triangle moves one level down the big triangle from figure to figure. Row 1 slides down the left edge, row 2 slides down the middle, and row 3 slides down the right edge.
So the last figure has the bottom-right corner triangle shaded, which is option (2).
So the last figure has the bottom-right corner triangle shaded, which is option (2).
Shortcut Method
Rule: shaded cell moves down one level per figure
Row 3 runs down the right edge, ending at the bottom-right corner
∴ Option 2 is correct ✓
Row 3 runs down the right edge, ending at the bottom-right corner
∴ Option 2 is correct ✓
Question 24
Each big triangle in the matrix has a grey top cell and one red cell that changes position. Choose the answer figure that goes in place of the question mark.
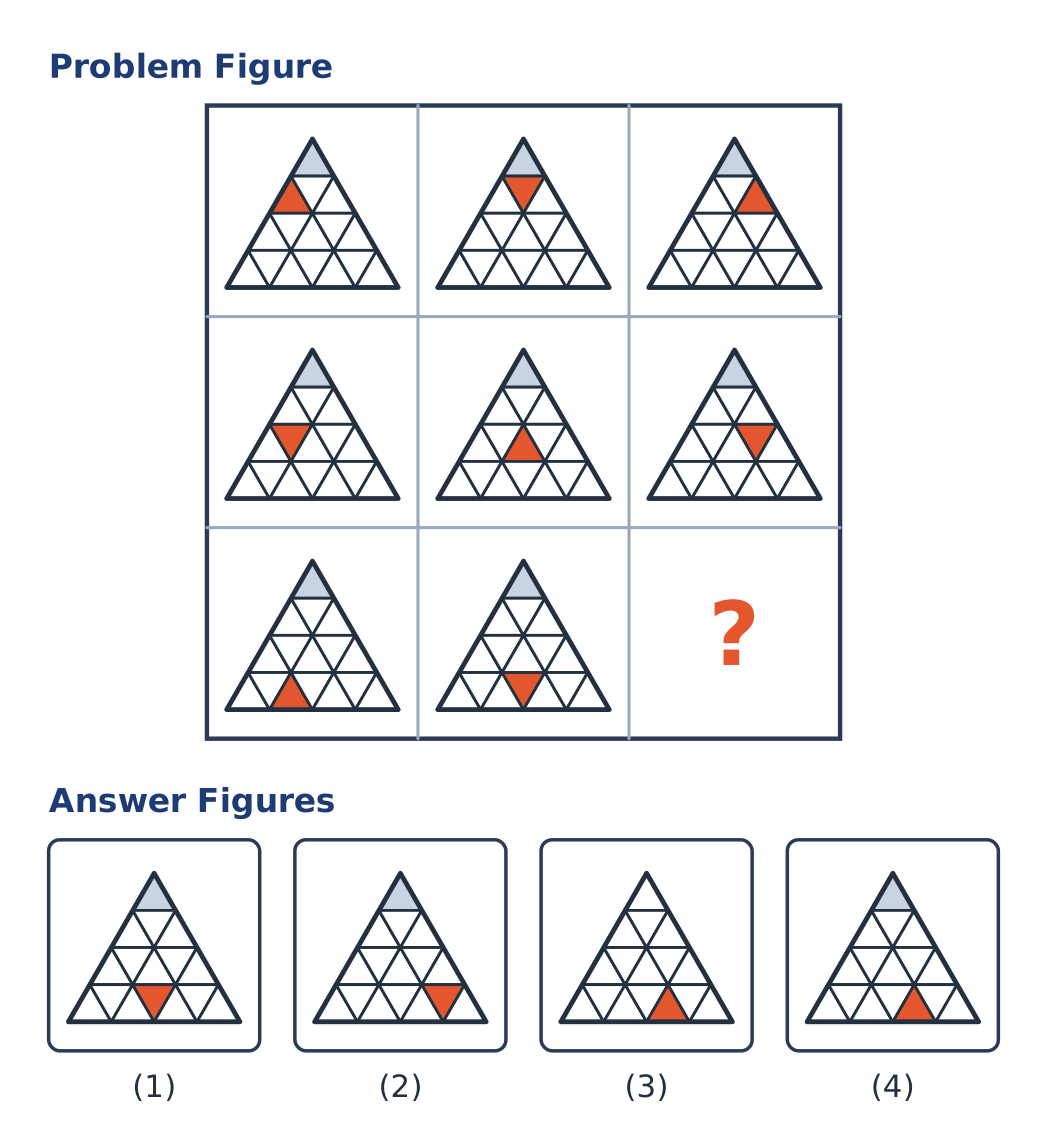
Explanation
In each row the red cell moves one small triangle to the right along one level of the big triangle (row 1 uses level 2, row 2 uses level 3, row 3 uses the bottom level). The grey top triangle never changes.
Row 3 shows bottom-level positions 3 and 4, so the answer has position 5 shaded red, with the grey top triangle still in place. That is option (4).
Row 3 shows bottom-level positions 3 and 4, so the answer has position 5 shaded red, with the grey top triangle still in place. That is option (4).
Shortcut Method
Rule: red cell moves 1 place right along its level, grey top stays
Row 3: positions 3, 4, then 5
∴ Option 4 is correct ✓
Row 3: positions 3, 4, then 5
∴ Option 4 is correct ✓
Question 25
A red and a green small triangle shift their positions in the big triangles of the matrix. Which answer figure replaces the question mark (?)?
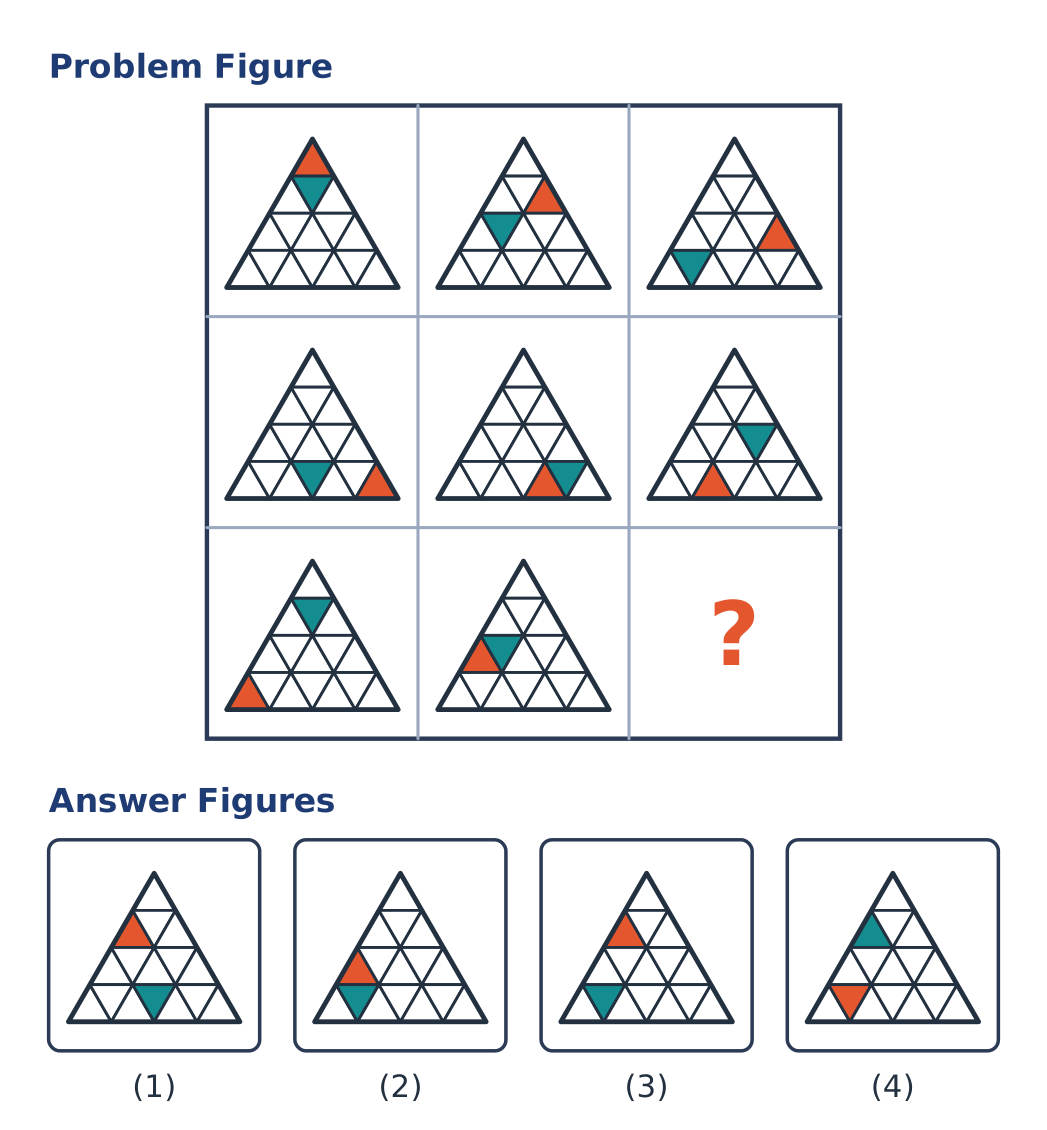
Explanation
Read the figures row by row. The red triangle walks clockwise round the outer upward-pointing cells, one cell per figure. The green triangle walks anticlockwise round the inner downward-pointing cells, one cell per figure.
After figure 8 the red cell reaches the left edge and moves up to the left edge of the second level, and the green cell moves to the second small triangle from the left on the bottom level.
This is option (3).
After figure 8 the red cell reaches the left edge and moves up to the left edge of the second level, and the green cell moves to the second small triangle from the left on the bottom level.
This is option (3).
Shortcut Method
Rule: red = 1 step clockwise (outer ring), green = 1 step anticlockwise (inner ring)
Red: left edge, level 2. Green: bottom level, second cell from left
∴ Option 3 is correct ✓
Red: left edge, level 2. Green: bottom level, second cell from left
∴ Option 3 is correct ✓
Question 26
In the matrix of coloured triangles below, a yellow and a purple small triangle change place from figure to figure. Choose the answer figure that goes in place of the question mark.
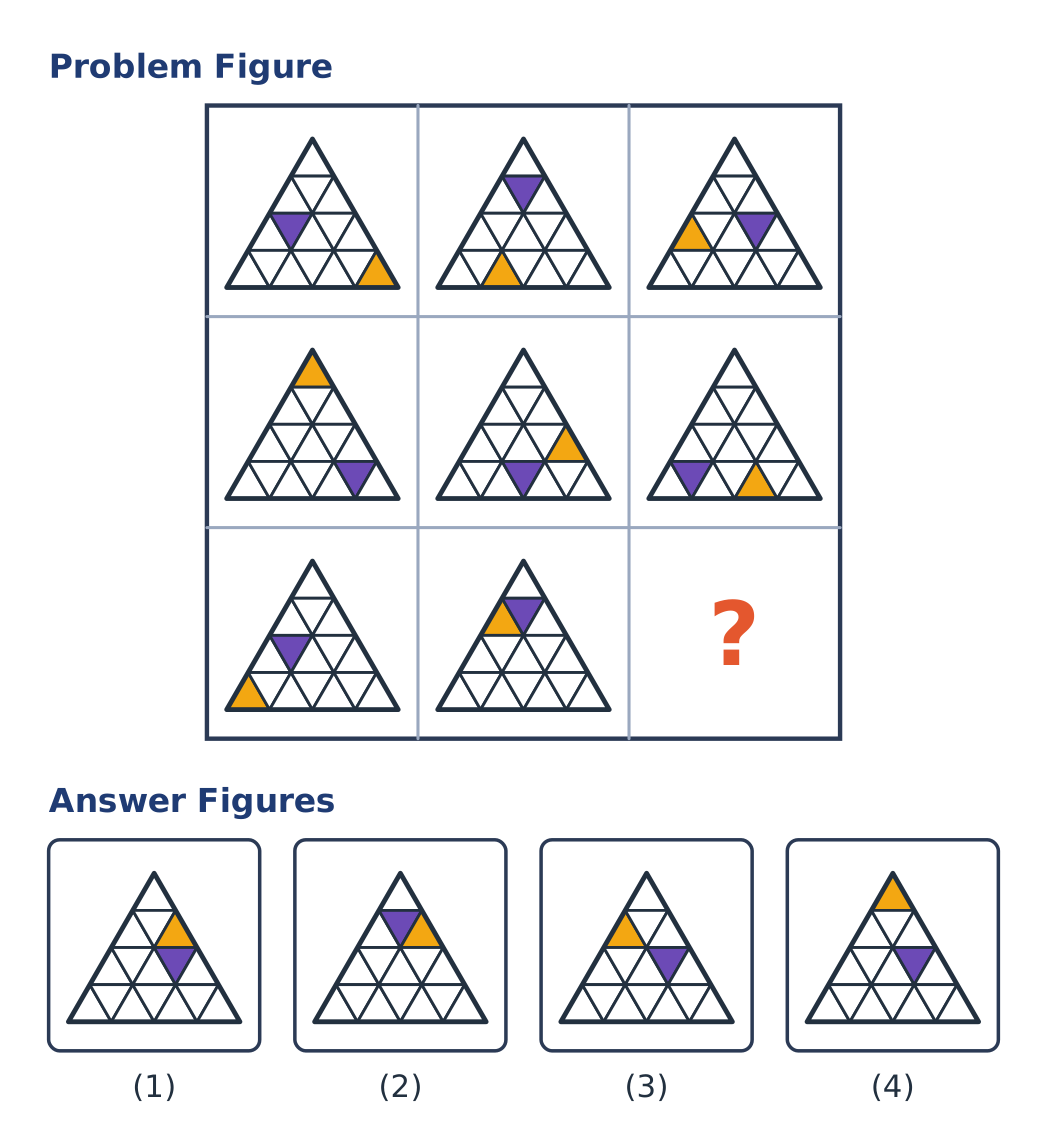
Explanation
Read the figures row by row. The yellow triangle moves round the nine outer upward-pointing cells, jumping two cells clockwise each time. The purple triangle moves one inner downward-pointing cell clockwise each time.
In figure 8 yellow is on the left edge of level 2 and purple is in the single downward cell of level 2. The next step puts yellow on the right edge of level 2 and purple in the right-hand downward cell of level 3.
This is option (1).
In figure 8 yellow is on the left edge of level 2 and purple is in the single downward cell of level 2. The next step puts yellow on the right edge of level 2 and purple in the right-hand downward cell of level 3.
This is option (1).
Shortcut Method
Rule: yellow = 2 cells clockwise on the outer ring, purple = 1 cell clockwise on the inner ring
Yellow right edge (level 2), purple right cell (level 3)
∴ Option 1 is correct ✓
Yellow right edge (level 2), purple right cell (level 3)
∴ Option 1 is correct ✓
Question 27
The solid teal shape at the top is a shadow cast by one of the four outline drawings below. Which drawing produces exactly this shadow?
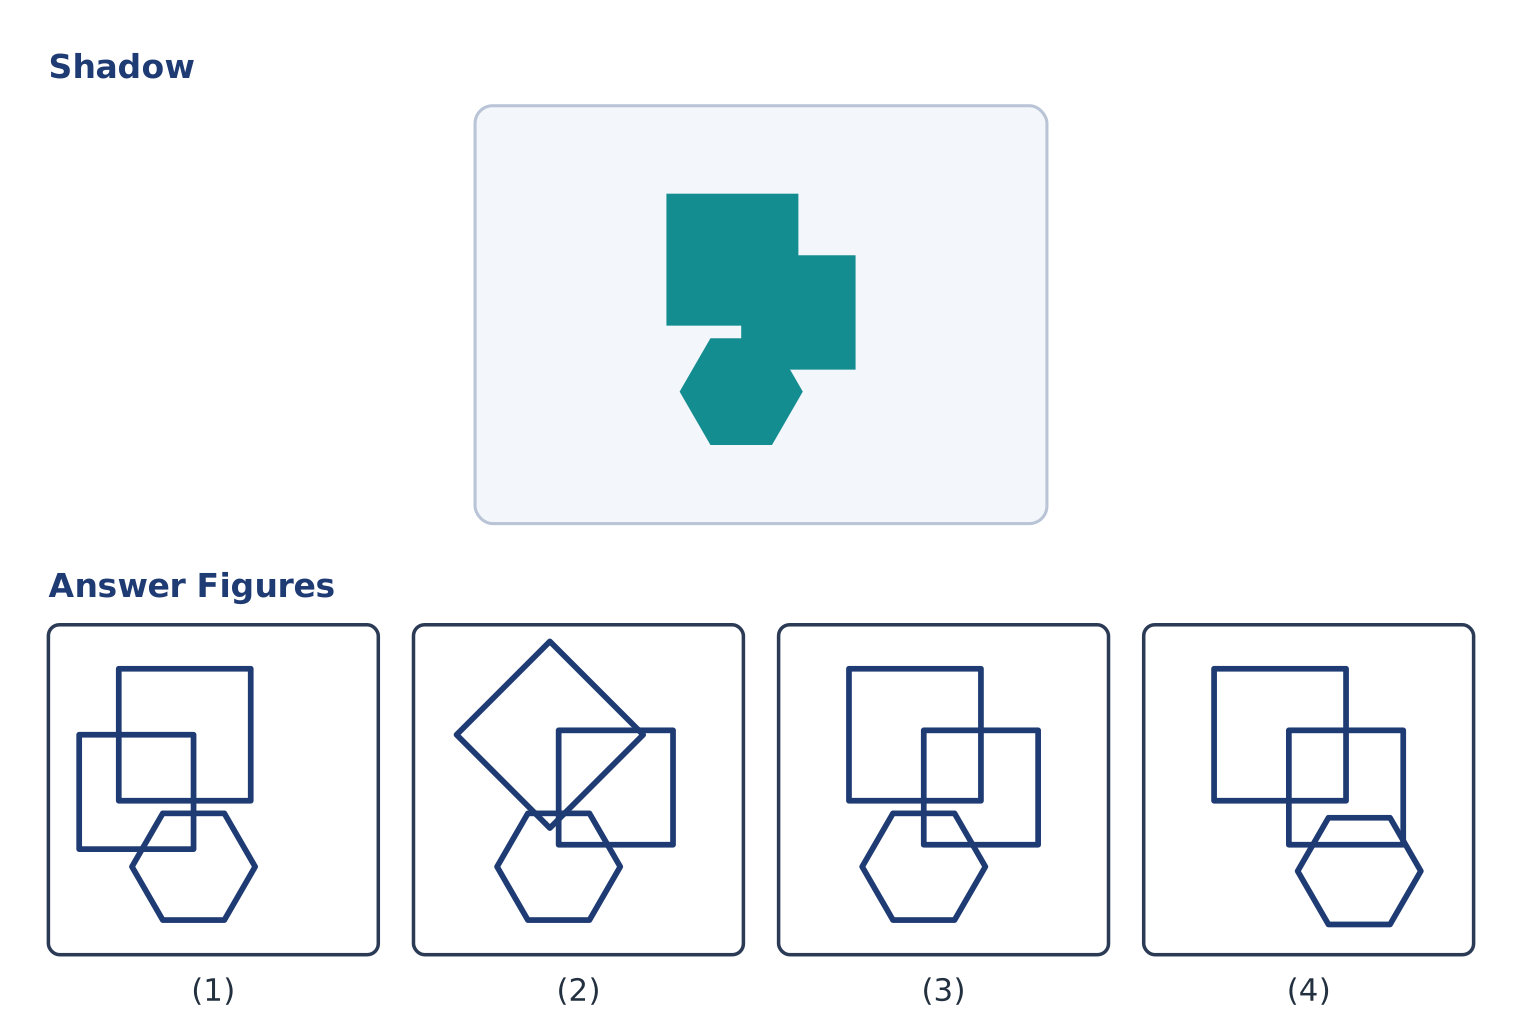
Explanation
The shadow is a big square at the top left, a smaller square overlapping its lower-right corner, and a hexagon under the big square.
In option 1 the small square is on the left, in option 2 the big square is turned into a diamond, and in option 4 the hexagon has moved to the right. Only option 3 matches.
In option 1 the small square is on the left, in option 2 the big square is turned into a diamond, and in option 4 the hexagon has moved to the right. Only option 3 matches.
Shortcut Method
Check position, size and orientation of each shape
Only option 3 matches the shadow
∴ Option 3 is correct ✓
Only option 3 matches the shadow
∴ Option 3 is correct ✓
Question 28
One of the four outline drawings casts the purple shadow shown above them. Which drawing makes exactly this shadow?
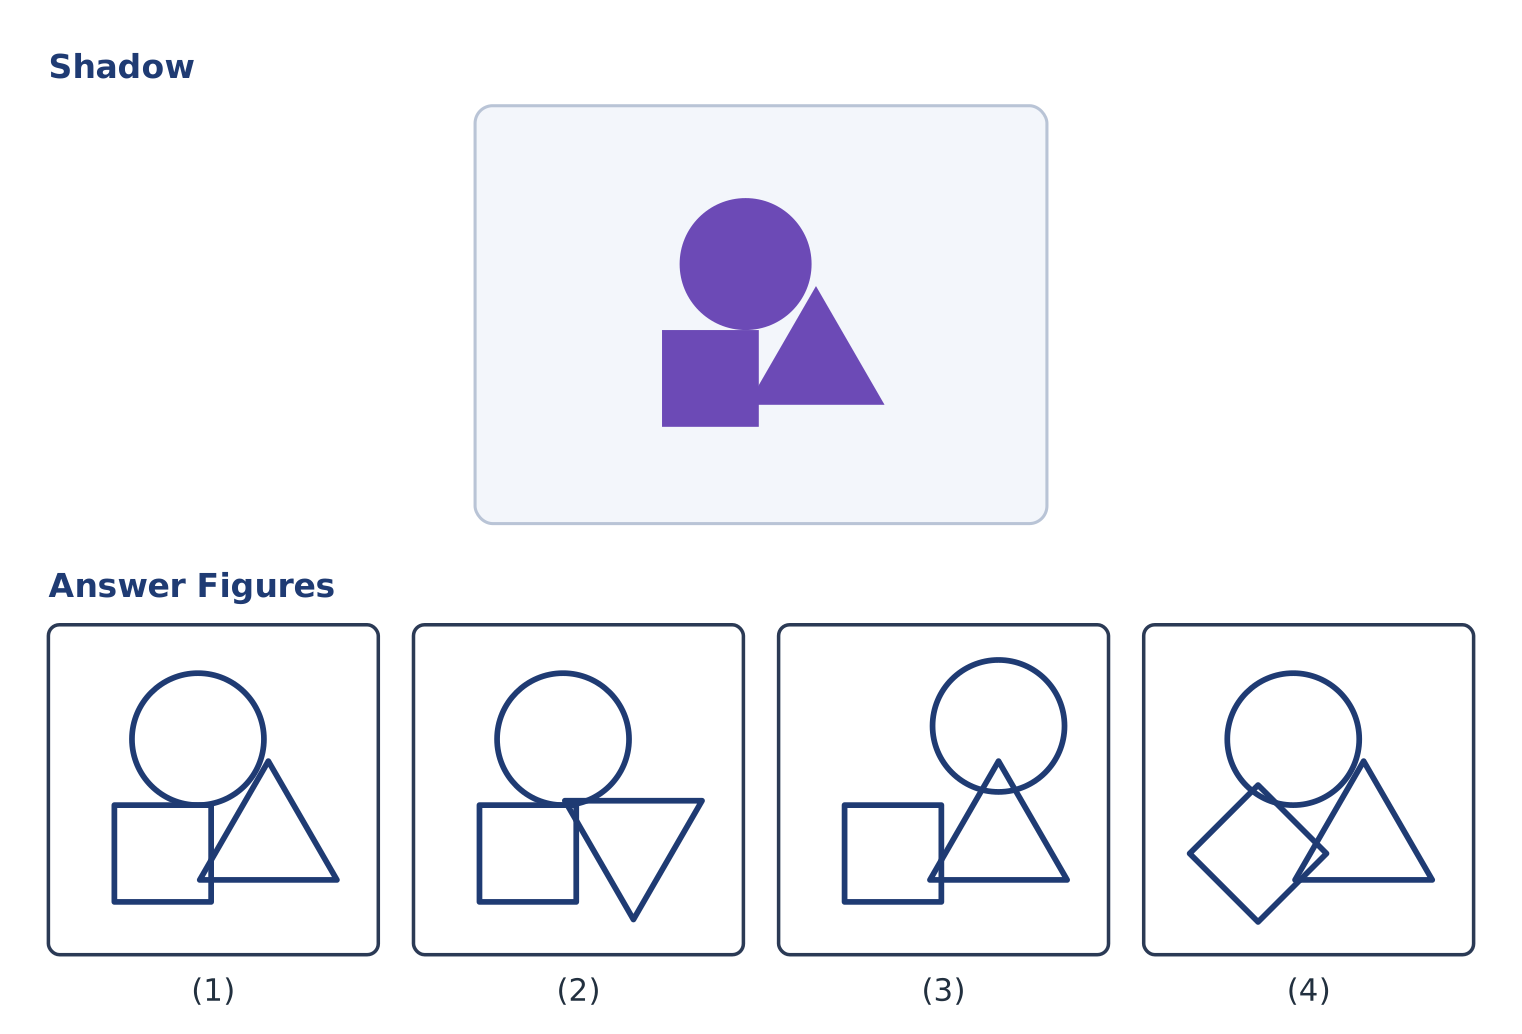
Explanation
The shadow has a circle at the top, a square at the lower left and a triangle pointing up at the lower right.
Option 2 has the triangle upside down, option 3 has the circle above the triangle instead of above the square, and option 4 has the square turned into a diamond. Only option 1 matches.
Option 2 has the triangle upside down, option 3 has the circle above the triangle instead of above the square, and option 4 has the square turned into a diamond. Only option 1 matches.
Shortcut Method
Check position, size and orientation of each shape
Only option 1 matches the shadow
∴ Option 1 is correct ✓
Only option 1 matches the shadow
∴ Option 1 is correct ✓
Question 29
Which of the four outline drawings throws the orange-red shadow displayed at the top? Select the one that makes exactly this shadow.
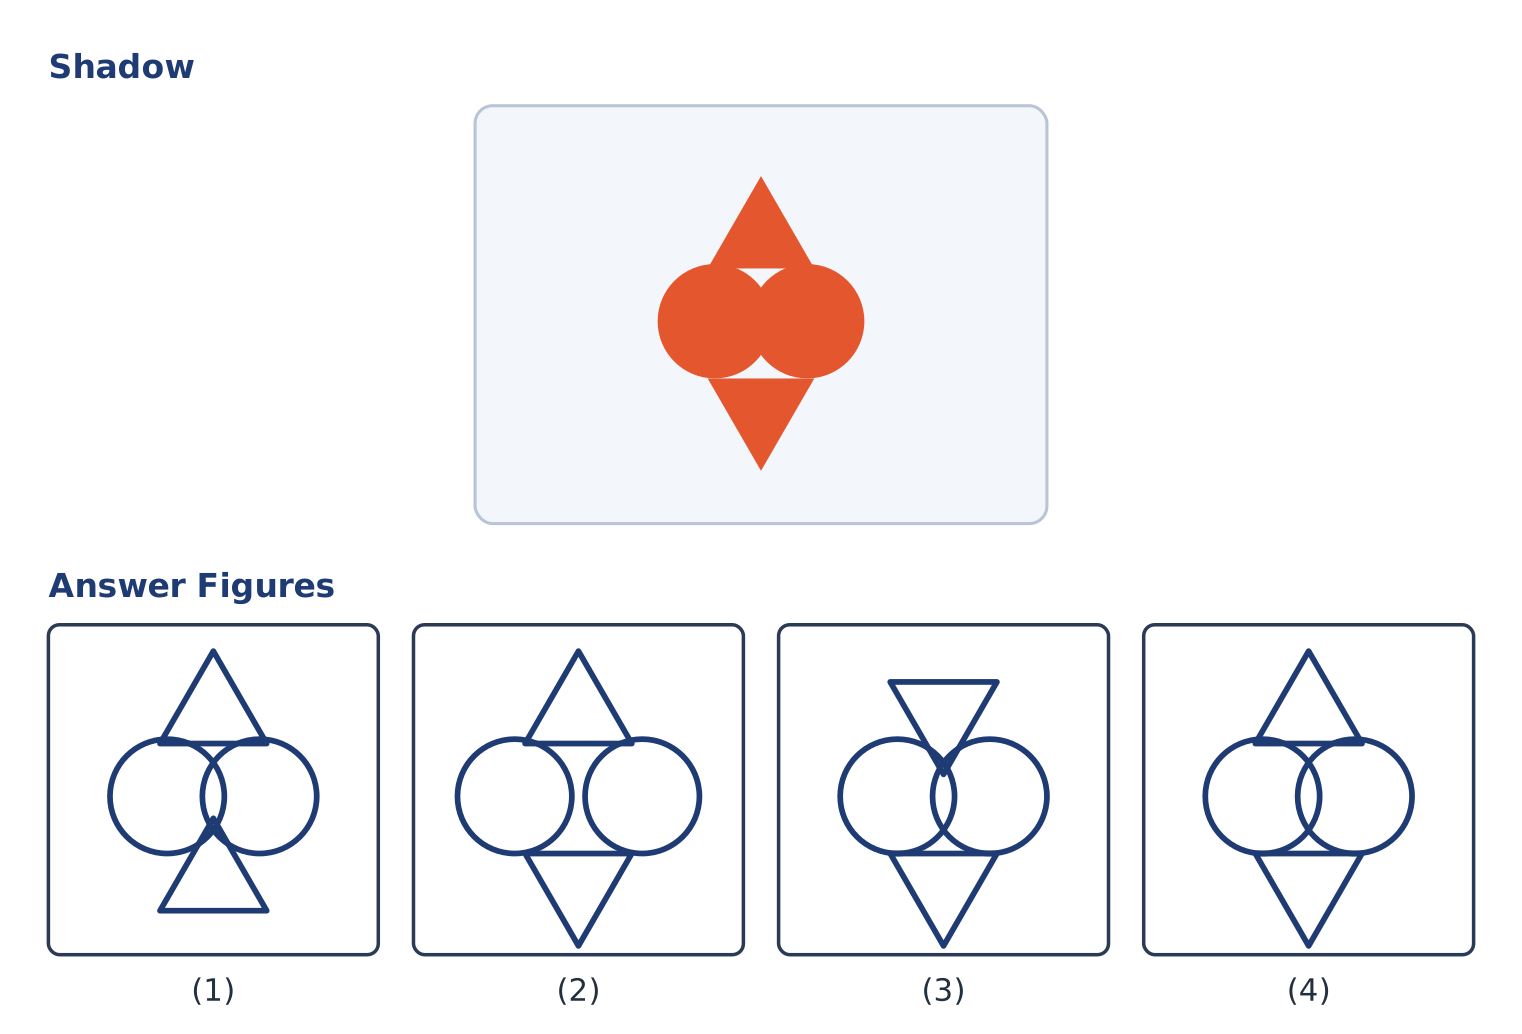
Explanation
The shadow is two overlapping circles side by side, a triangle pointing up on top and a triangle pointing down at the bottom.
Option 1 has the bottom triangle pointing up, option 2 has the circles pulled apart, and option 3 has the top triangle pointing down. Only option 4 matches.
Option 1 has the bottom triangle pointing up, option 2 has the circles pulled apart, and option 3 has the top triangle pointing down. Only option 4 matches.
Shortcut Method
Check position, size and orientation of each shape
Only option 4 matches the shadow
∴ Option 4 is correct ✓
Only option 4 matches the shadow
∴ Option 4 is correct ✓
Question 30
The dark blue silhouette shown here comes from just one of the outline drawings beneath it. Which drawing gives exactly this shadow?
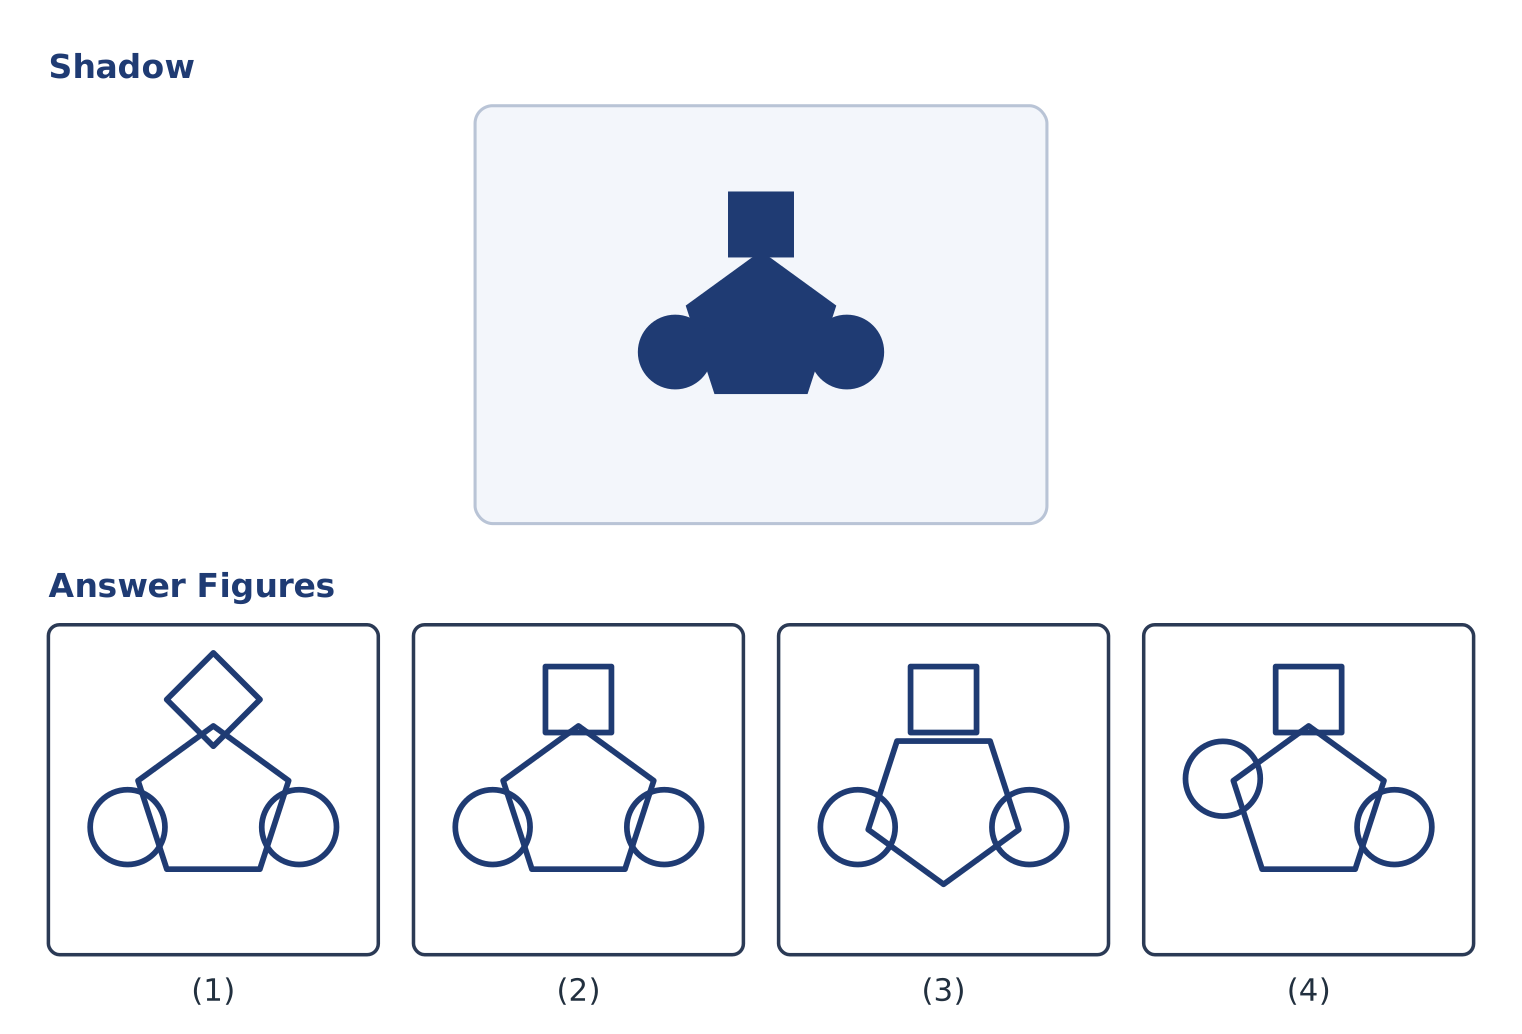
Explanation
The shadow is a pentagon pointing up, two equal circles at the same height on its left and right, and a small square standing straight on top.
Option 1 has the square turned into a diamond, option 3 has the pentagon upside down, and option 4 has the left circle raised. Only option 2 matches.
Option 1 has the square turned into a diamond, option 3 has the pentagon upside down, and option 4 has the left circle raised. Only option 2 matches.
Shortcut Method
Check position, size and orientation of each shape
Only option 2 matches the shadow
∴ Option 2 is correct ✓
Only option 2 matches the shadow
∴ Option 2 is correct ✓
Question 31
One round piece fits exactly in the white circle of this coloured picture. Which one is it?
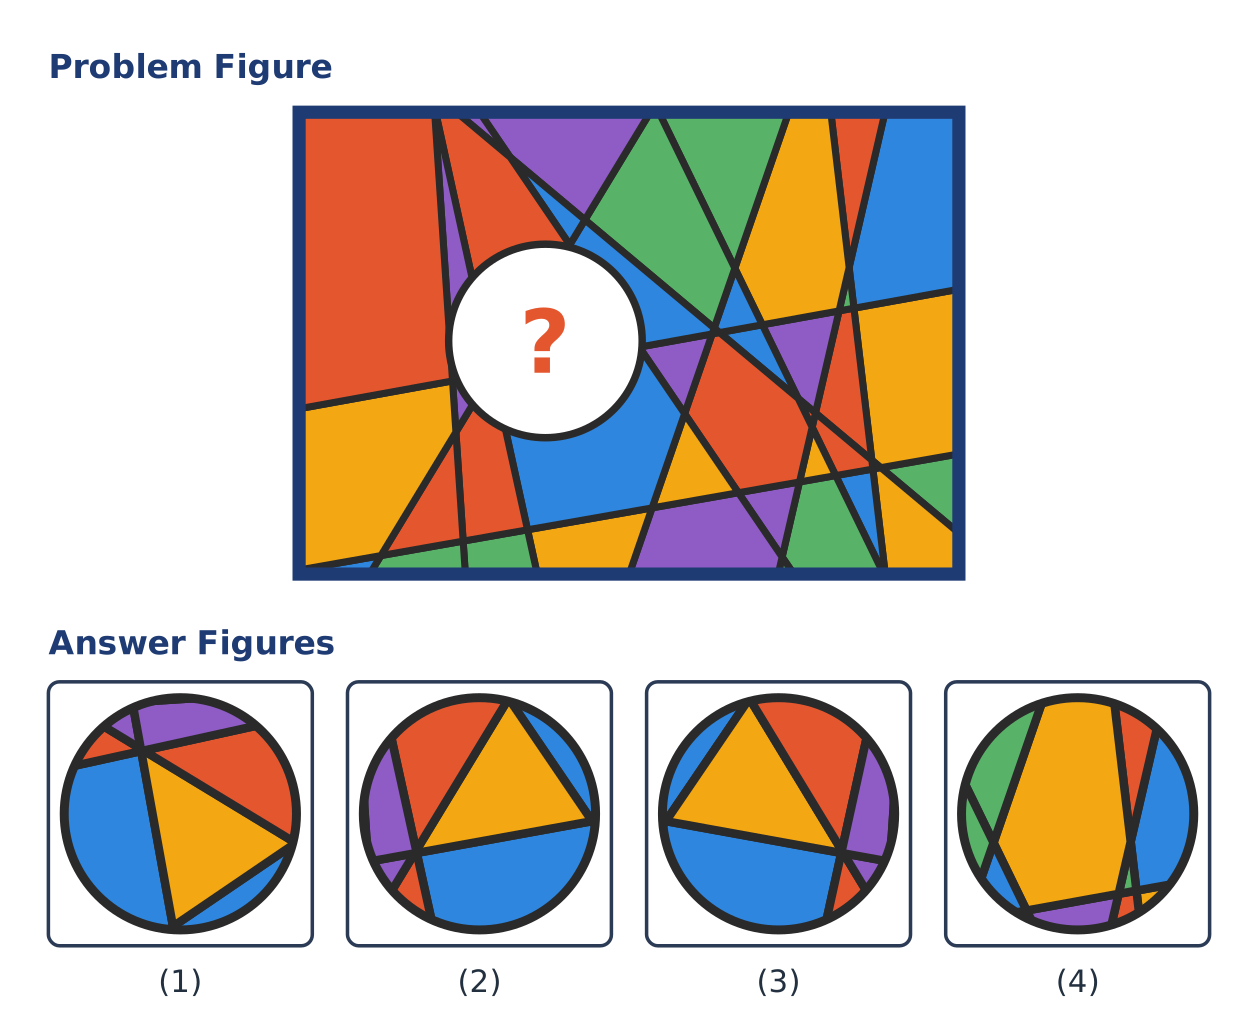
Explanation
Follow the dark lines that run into the white circle from outside and note the colours on each side of them. Only the correct piece continues every line and colour.
Of the other pieces, one is the correct piece turned 90 degrees, one is its mirror image, and one is cut from a different part of the picture.
The piece that matches is option (2).
Of the other pieces, one is the correct piece turned 90 degrees, one is its mirror image, and one is cut from a different part of the picture.
The piece that matches is option (2).
Shortcut Method
Continue each line and colour across the circle
Only option 2 lines up on every side
∴ Option 2 is correct ✓
Only option 2 lines up on every side
∴ Option 2 is correct ✓
Question 32
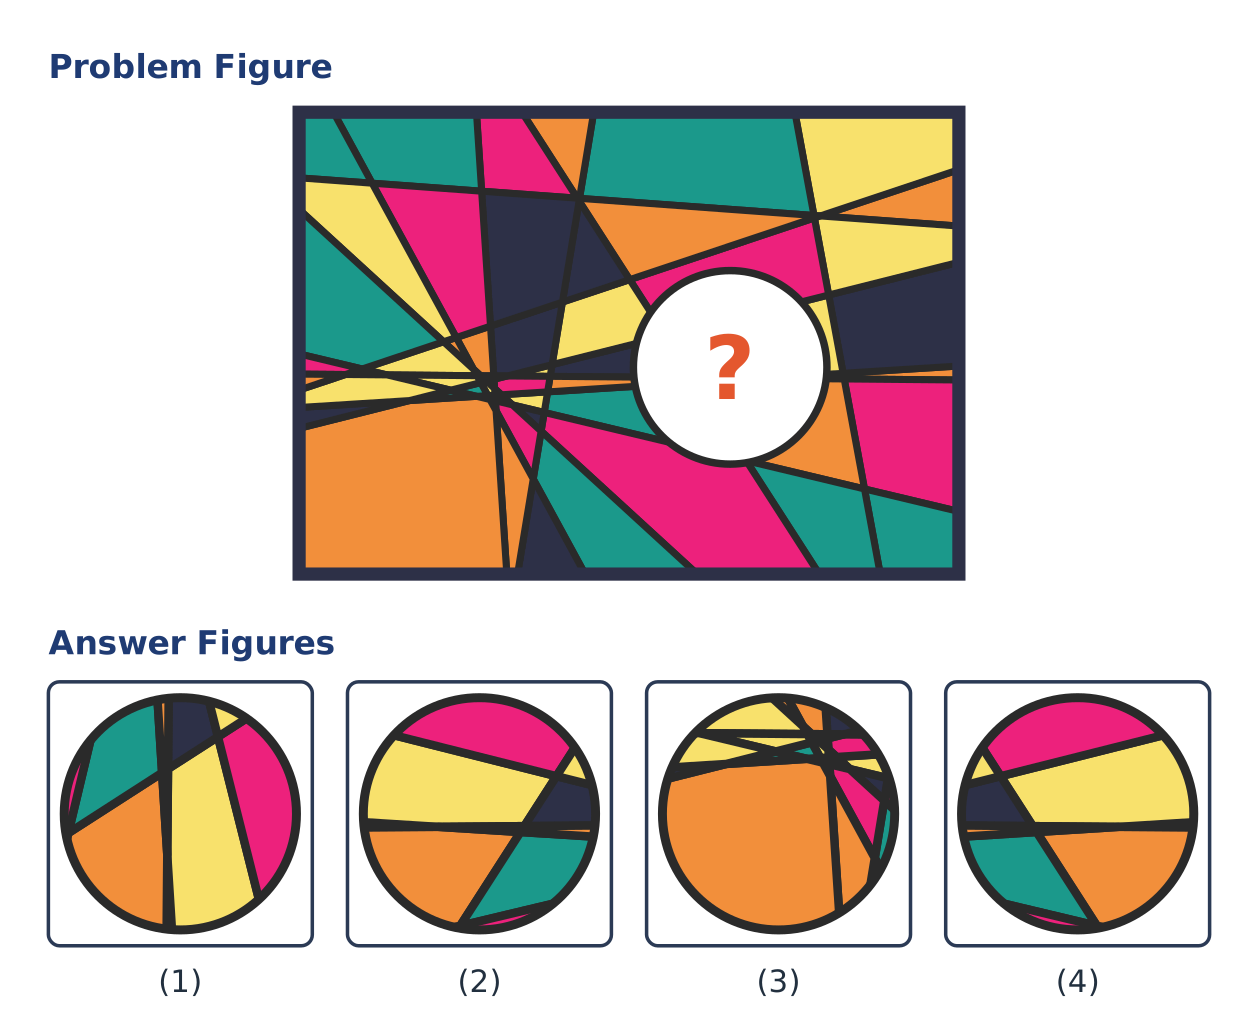
A round hole has been cut out of this picture of coloured regions. Which of the four round pieces fits it exactly?
Explanation
Follow the dark lines that run into the white circle from outside and note the colours on each side of them. Only the correct piece continues every line and colour.
Of the other pieces, one is the correct piece turned 90 degrees, one is its mirror image, and one is cut from a different part of the picture.
The piece that matches is option (4).
Of the other pieces, one is the correct piece turned 90 degrees, one is its mirror image, and one is cut from a different part of the picture.
The piece that matches is option (4).
Shortcut Method
Continue each line and colour across the circle
Only option 4 lines up on every side
∴ Option 4 is correct ✓
Only option 4 lines up on every side
∴ Option 4 is correct ✓
Question 33
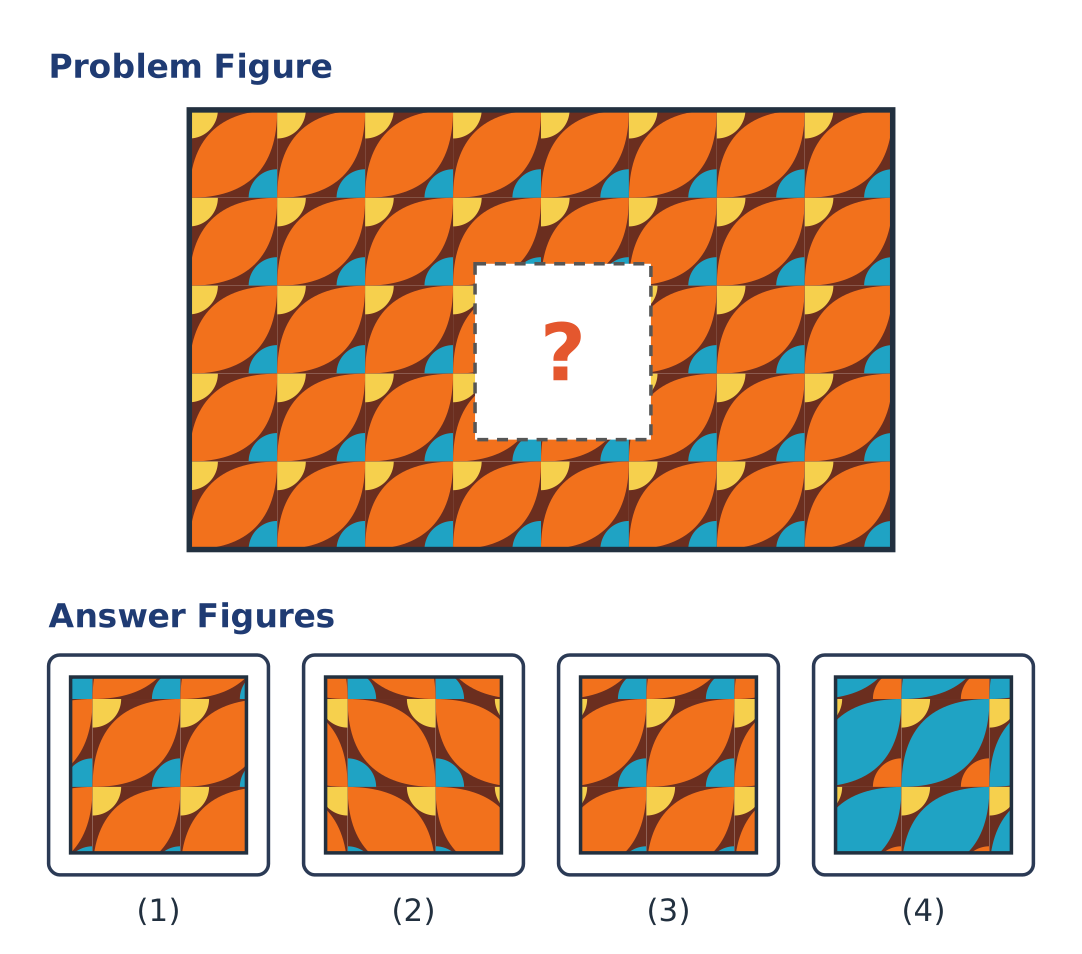
A square piece is missing from this repeating leaf pattern. Which piece completes the pattern in the white square?
Explanation
The same tile repeats in every row and column. Continue the shapes from the edges of the white square into it: only the correct piece lines up with the leaves around it.
Of the others, one is shifted by half a tile, one is a mirror image, and one has two colours swapped.
The piece that fits is option (3).
Of the others, one is shifted by half a tile, one is a mirror image, and one has two colours swapped.
The piece that fits is option (3).
Shortcut Method
Match the tile position, shapes and colours at the edges
Only option 3 lines up
∴ Option 3 is correct ✓
Only option 3 lines up
∴ Option 3 is correct ✓
Question 34
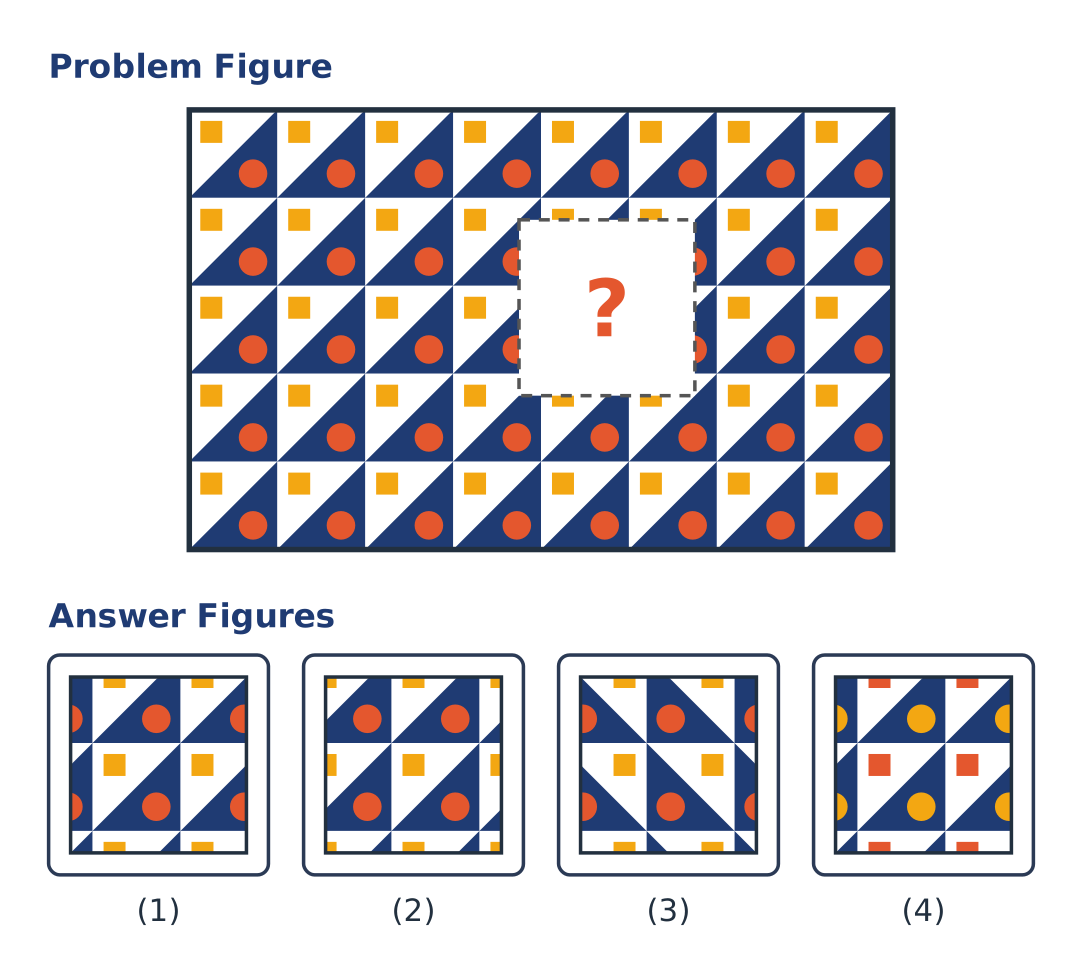
The pattern of triangles, squares and circles has a missing square patch. Which piece completes the pattern?
Explanation
The same tile repeats in every row and column. Continue the shapes from the edges of the white square into it: only the correct piece lines up with the triangles, squares and circles around it.
Of the others, one is shifted by half a tile, one is a mirror image, and one has two colours swapped.
The piece that fits is option (1).
Of the others, one is shifted by half a tile, one is a mirror image, and one has two colours swapped.
The piece that fits is option (1).
Shortcut Method
Match the tile position, shapes and colours at the edges
Only option 1 lines up
∴ Option 1 is correct ✓
Only option 1 lines up
∴ Option 1 is correct ✓
Question 35
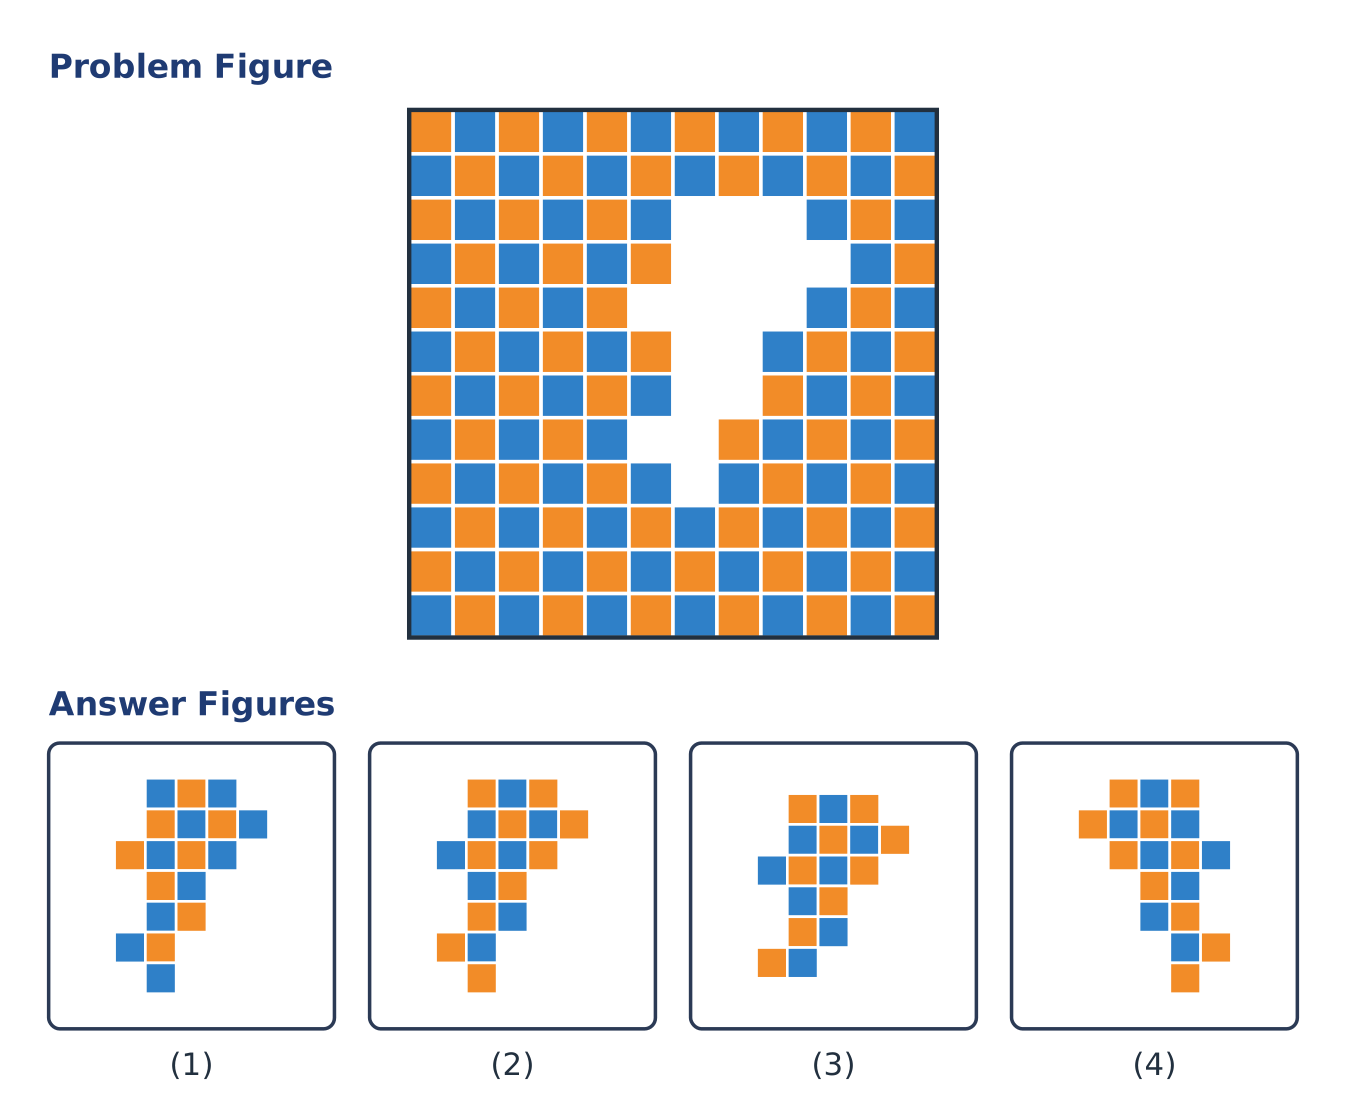
The blue and orange squares of this picture have a gap in the shape of the white space. Which piece fits exactly into the white gap so that the picture is complete?
Explanation
The piece must have exactly the shape of the gap and continue the colour pattern (orange and blue squares alternate like a chessboard).
Of the other pieces, one has the right shape but the wrong colours, one is missing a square, and one is the mirror image of the gap.
The piece that fits is option (2).
Of the other pieces, one has the right shape but the wrong colours, one is missing a square, and one is the mirror image of the gap.
The piece that fits is option (2).
Shortcut Method
Check the shape of the gap, then the chessboard colours
Only option 2 fits both
∴ Option 2 is correct ✓
Only option 2 fits both
∴ Option 2 is correct ✓
Question 36
Orange, blue and green squares form a picture with a gap in the middle. Which of the pieces below fits exactly to complete it?
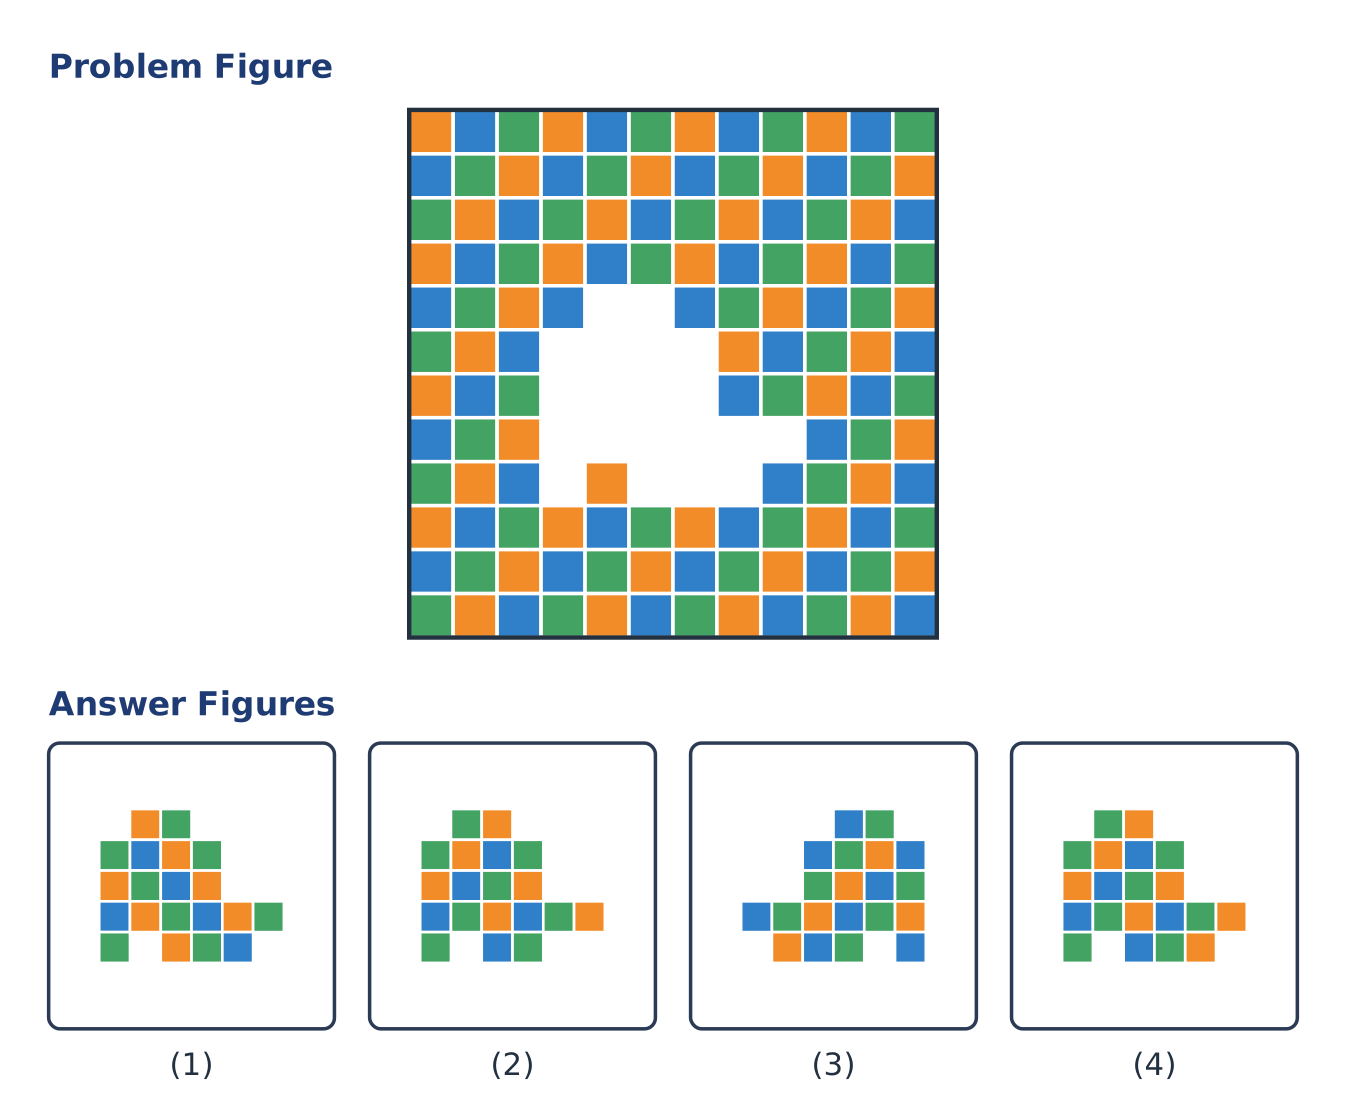
Explanation
The piece must have exactly the shape of the gap and continue the colour pattern (diagonal stripes of orange, blue and green running from top-right to bottom-left).
Of the other pieces, one has the right shape but the wrong colours, one is missing a square, and one is the mirror image of the gap.
The piece that fits is option (4).
Of the other pieces, one has the right shape but the wrong colours, one is missing a square, and one is the mirror image of the gap.
The piece that fits is option (4).
Shortcut Method
Check the shape of the gap, then the diagonal colour stripes
Only option 4 fits both
∴ Option 4 is correct ✓
Only option 4 fits both
∴ Option 4 is correct ✓
Question 37
In the matrix of dot grids below, a purple pair and a red pair of dots move from figure to figure. Which answer figure replaces the question mark (?)?
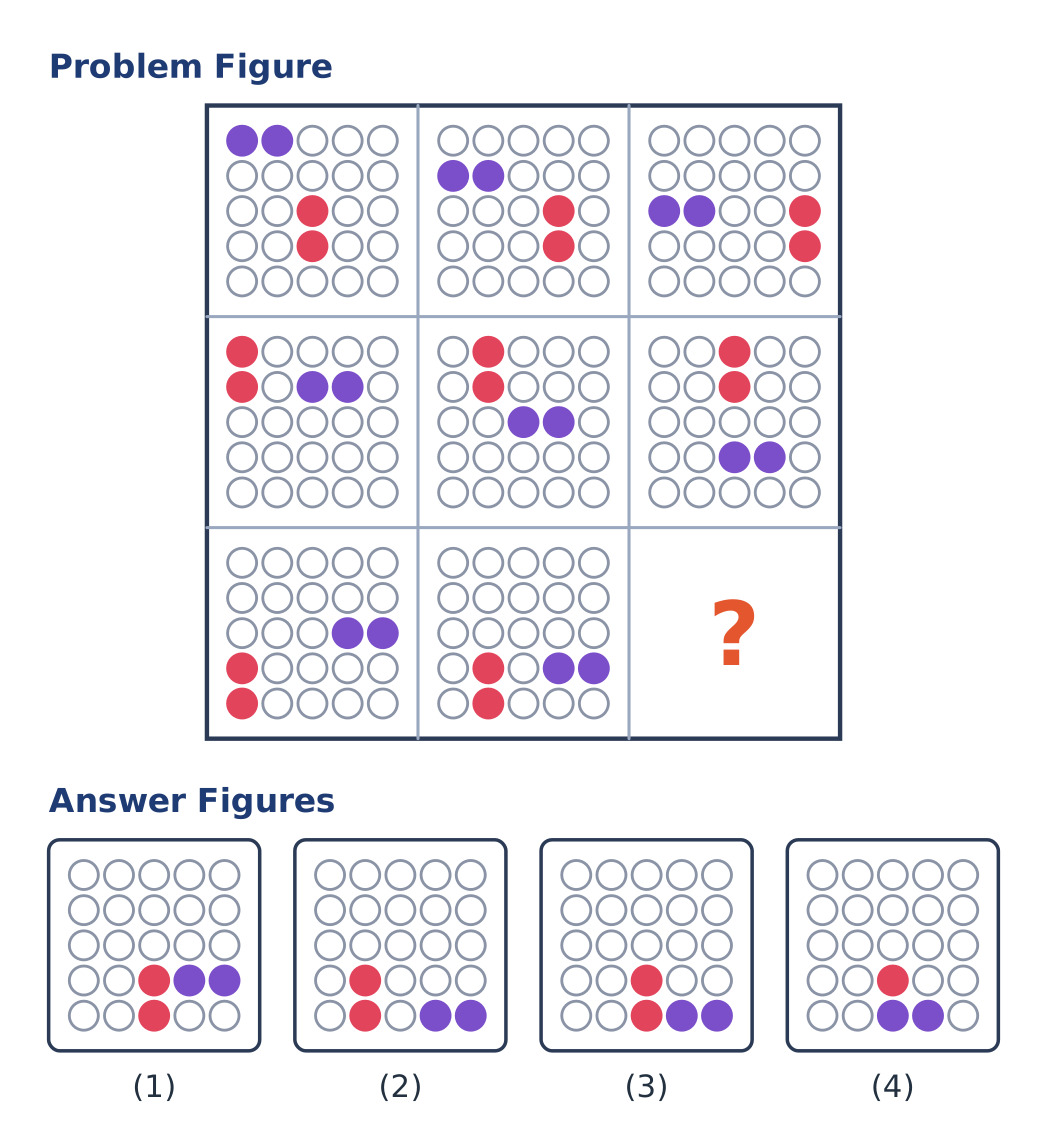
Explanation
In every row the purple pair moves one line down and the red pair moves one column to the right from figure to figure.
In row 3 purple goes from line 3 to line 4, so next it is on line 5 (the bottom), in columns 4-5. Red goes from column 1 to column 2, so next it is in column 3 (the bottom two dots).
This is option (3).
In row 3 purple goes from line 3 to line 4, so next it is on line 5 (the bottom), in columns 4-5. Red goes from column 1 to column 2, so next it is in column 3 (the bottom two dots).
This is option (3).
Shortcut Method
Rule: purple pair 1 line down, red pair 1 column right
Purple bottom line (columns 4-5), red column 3
∴ Option 3 is correct ✓
Purple bottom line (columns 4-5), red column 3
∴ Option 3 is correct ✓
Question 38
Each grid in the matrix has a pair of purple dots and a pair of red dots whose positions change. Select the answer figure that completes the matrix.
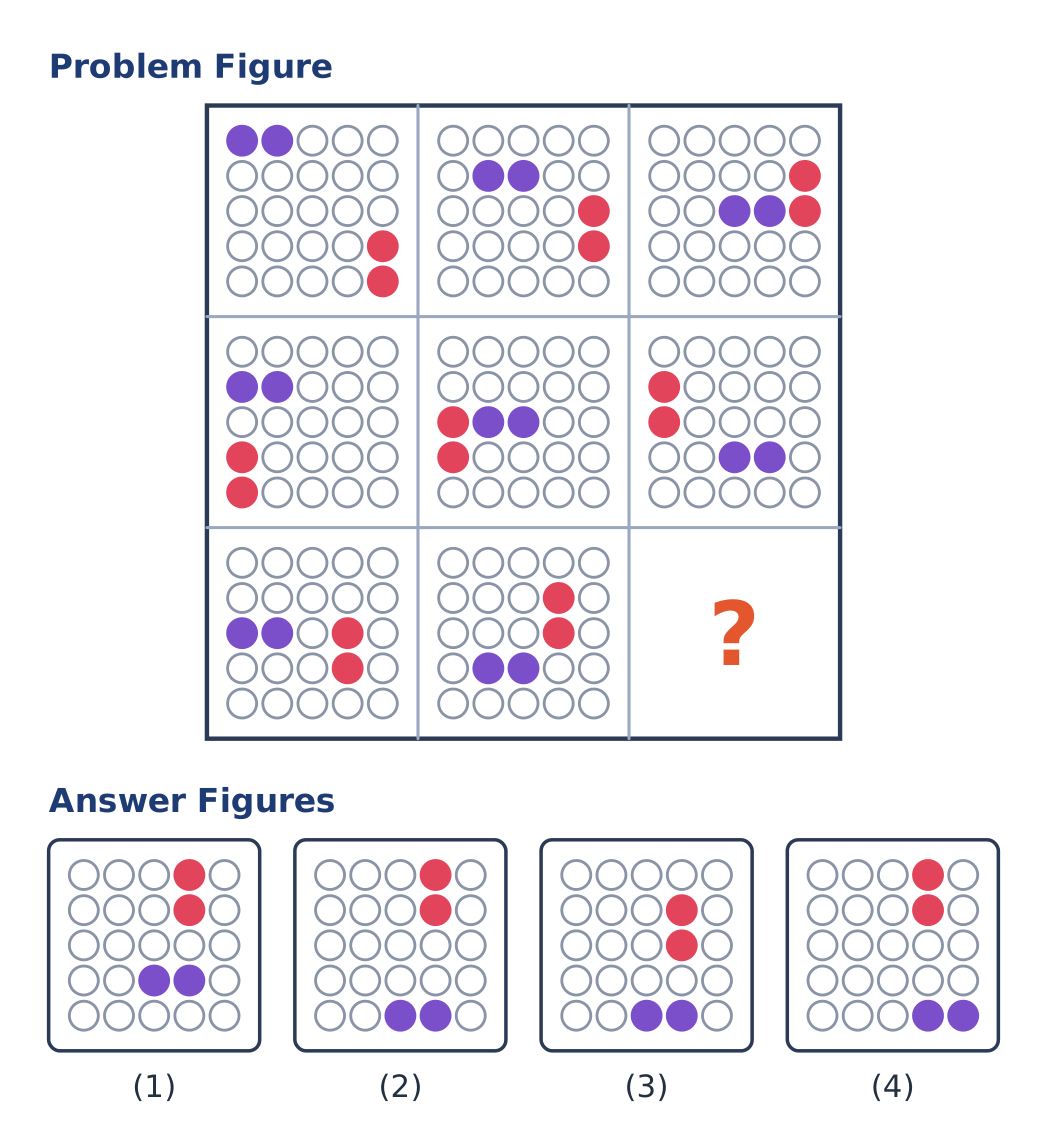
Explanation
In every row the purple pair moves one step diagonally down and to the right, and the red pair moves one dot up, from figure to figure.
In row 3 purple is next on the bottom line, in columns 3-4, and red reaches the top of column 4 (the top two dots).
This is option (2).
In row 3 purple is next on the bottom line, in columns 3-4, and red reaches the top of column 4 (the top two dots).
This is option (2).
Shortcut Method
Rule: purple pair 1 step diagonally down-right, red pair 1 dot up
Purple bottom line (columns 3-4), red top of column 4
∴ Option 2 is correct ✓
Purple bottom line (columns 3-4), red top of column 4
∴ Option 2 is correct ✓
Question 39
Count every triangle you can find in the figure below, including those made up of several smaller ones. How many triangles are there?
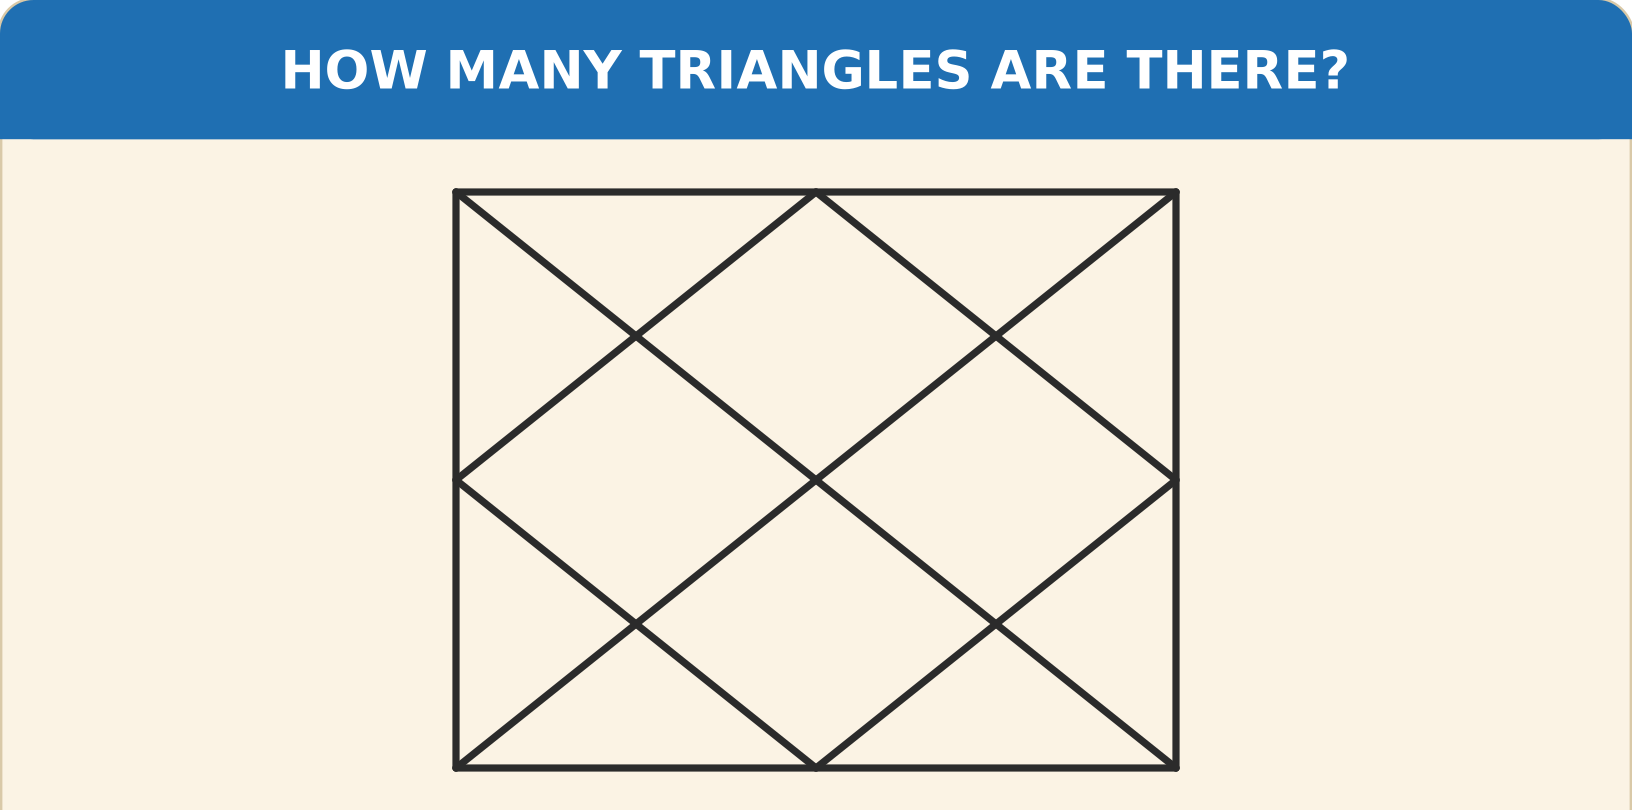
Explanation
Count the triangles in groups.
Smallest triangles: 8 (each corner piece outside the diamond is split in two by a diagonal).
Corner triangles outside the diamond, each made of 2 small ones: 4.
Triangles with their tip at the centre and one side of the rectangle as the base: 4.
Half-rectangle triangles cut off by one diagonal: 4.
Total = 8 + 4 + 4 + 4 = 20.
Smallest triangles: 8 (each corner piece outside the diamond is split in two by a diagonal).
Corner triangles outside the diamond, each made of 2 small ones: 4.
Triangles with their tip at the centre and one side of the rectangle as the base: 4.
Half-rectangle triangles cut off by one diagonal: 4.
Total = 8 + 4 + 4 + 4 = 20.
Shortcut Method
Count by size: 8 + 4 + 4 + 4
∴ 20 triangles ✓
∴ 20 triangles ✓
Question 40
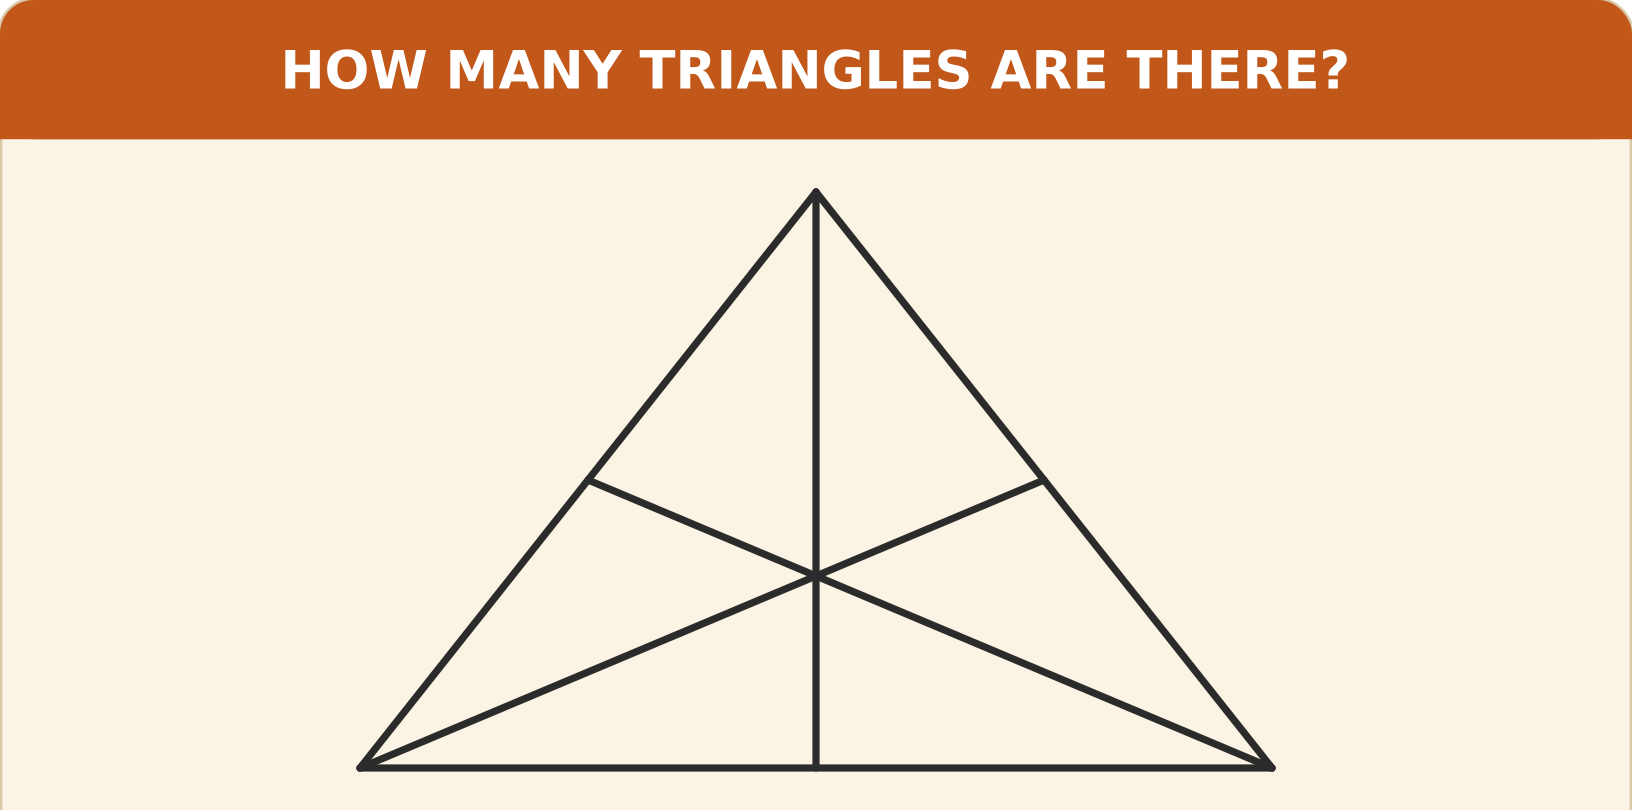
A big triangle is crossed by three straight lines that all pass through one point inside it. How many triangles can you find in the figure?
Explanation
The three lines through the centre split the big triangle into 6 small triangles.
Triangles made of 1 small piece: 6.
Triangles made of 2 small pieces (the centre point with two corners of the big triangle): 3.
Triangles made of 3 small pieces (each of the three lines cuts the big triangle into two halves): 6.
The big triangle itself: 1.
Total = 6 + 3 + 6 + 1 = 16.
Triangles made of 1 small piece: 6.
Triangles made of 2 small pieces (the centre point with two corners of the big triangle): 3.
Triangles made of 3 small pieces (each of the three lines cuts the big triangle into two halves): 6.
The big triangle itself: 1.
Total = 6 + 3 + 6 + 1 = 16.
Shortcut Method
Count by size: 6 + 3 + 6 + 1
∴ 16 triangles ✓
∴ 16 triangles ✓
Question 41
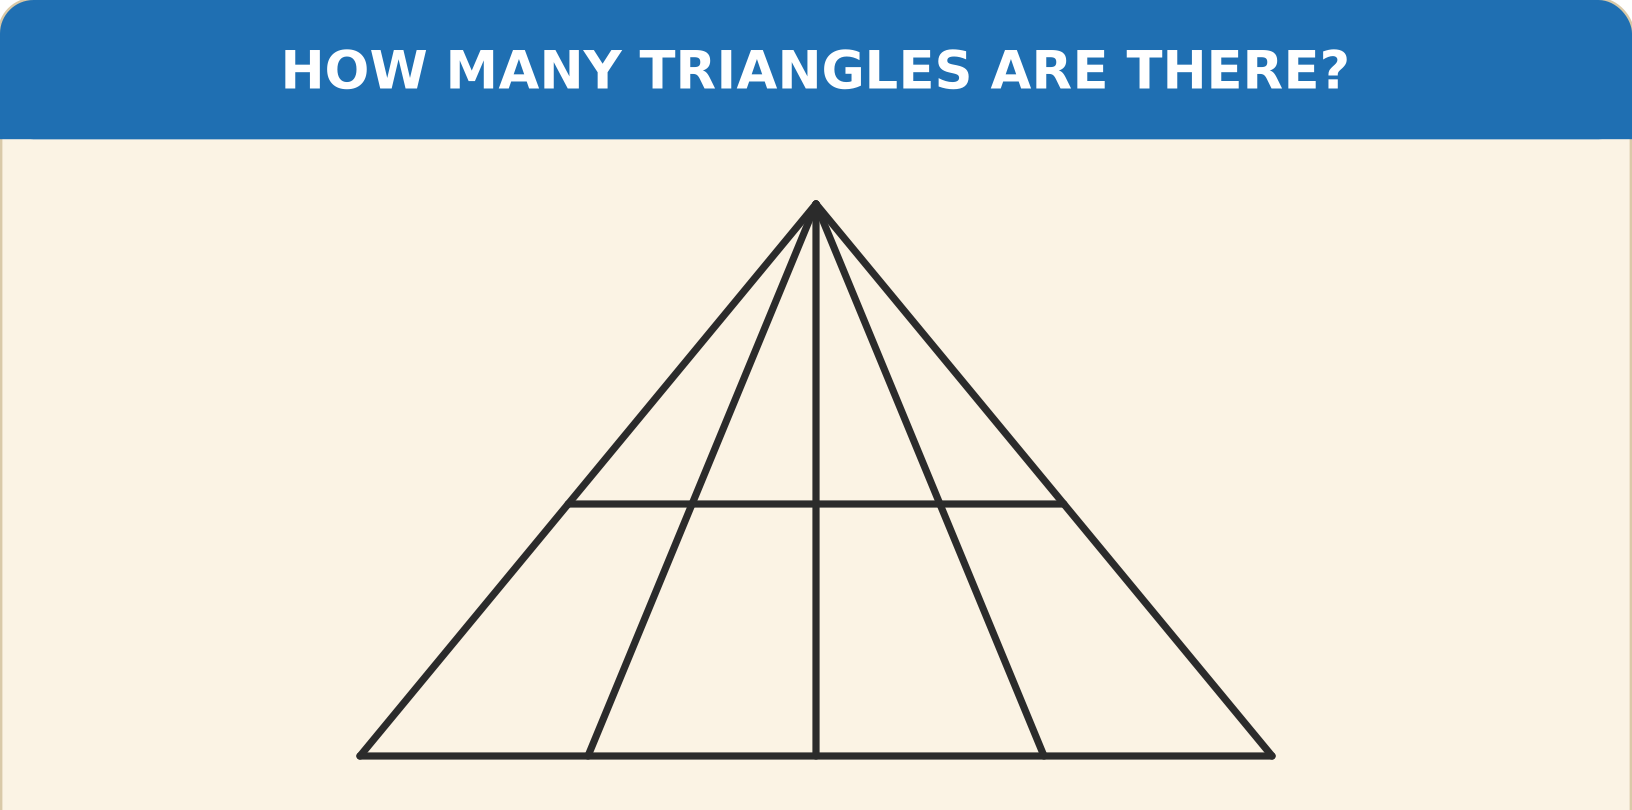
A triangle is cut by lines from its top point and by one line across it. What is the total number of triangles in the figure?
Explanation
The five lines from the top point (two sides and three inner lines) divide the figure into 4 thin triangles.
Triangles made of 1, 2, 3 or 4 neighbouring thin ones: 4 + 3 + 2 + 1 = 10 using the bottom line.
The same 10 can be made using the middle line.
Total = 10 + 10 = 20.
Triangles made of 1, 2, 3 or 4 neighbouring thin ones: 4 + 3 + 2 + 1 = 10 using the bottom line.
The same 10 can be made using the middle line.
Total = 10 + 10 = 20.
Shortcut Method
Triangles per base line: C(5,2) = 10
2 base lines: 10 + 10
∴ 20 triangles ✓
2 base lines: 10 + 10
∴ 20 triangles ✓
Question 42
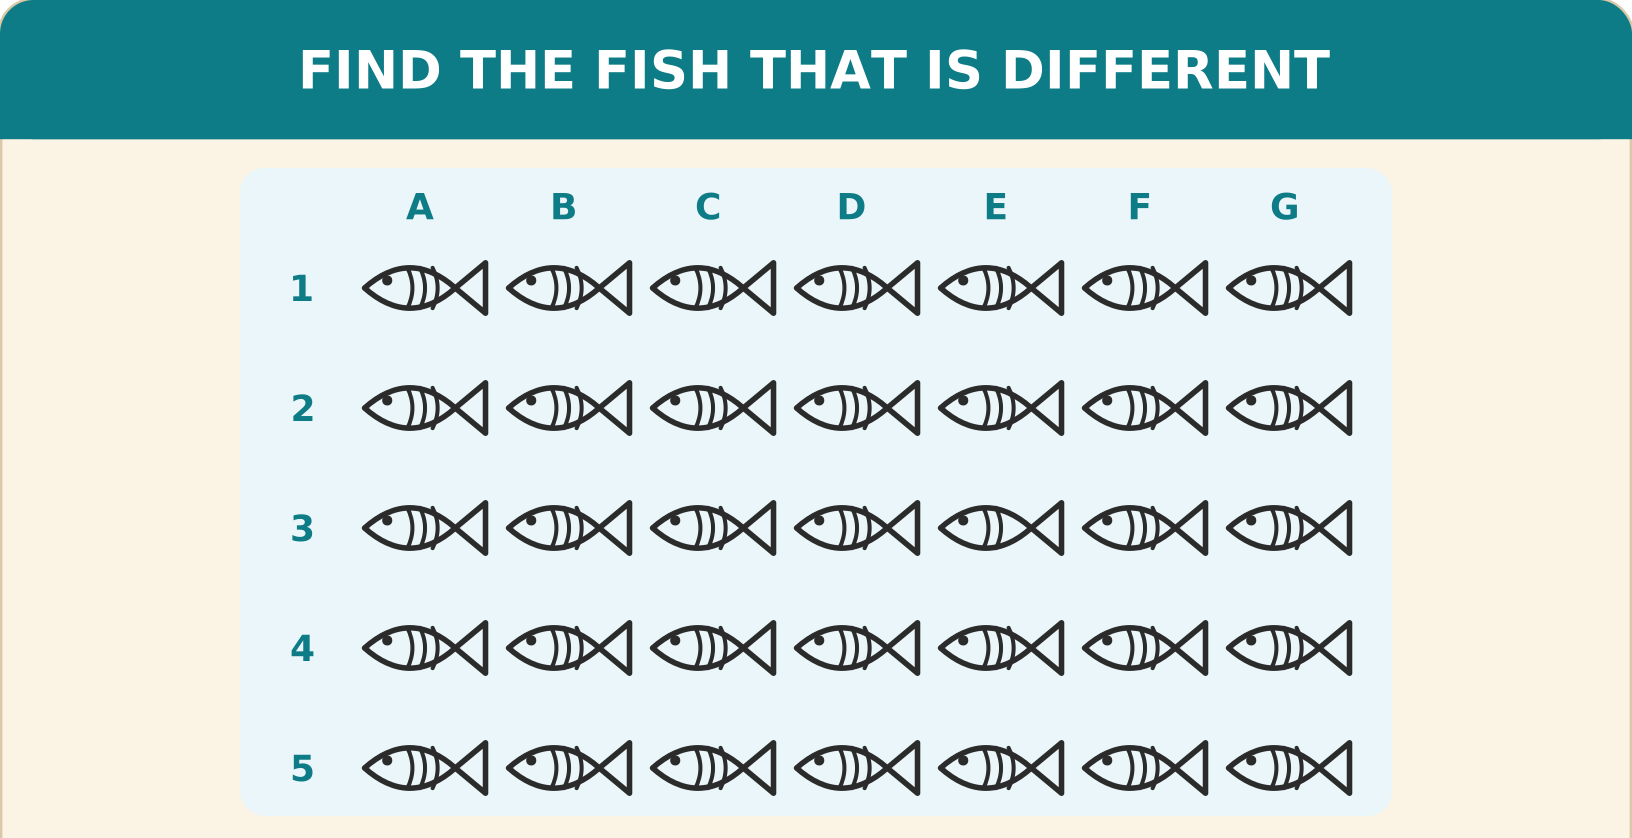
Every fish in the grid below is the same except one. Find the odd fish. (Rows are numbered and columns are lettered.)
Explanation
Every fish has 3 curved stripes on its body except the fish in row 3, column E, which has only 2.
Shortcut Method
Count the stripes on each fish
∴ Row 3, Column E ✓
∴ Row 3, Column E ✓
Question 43
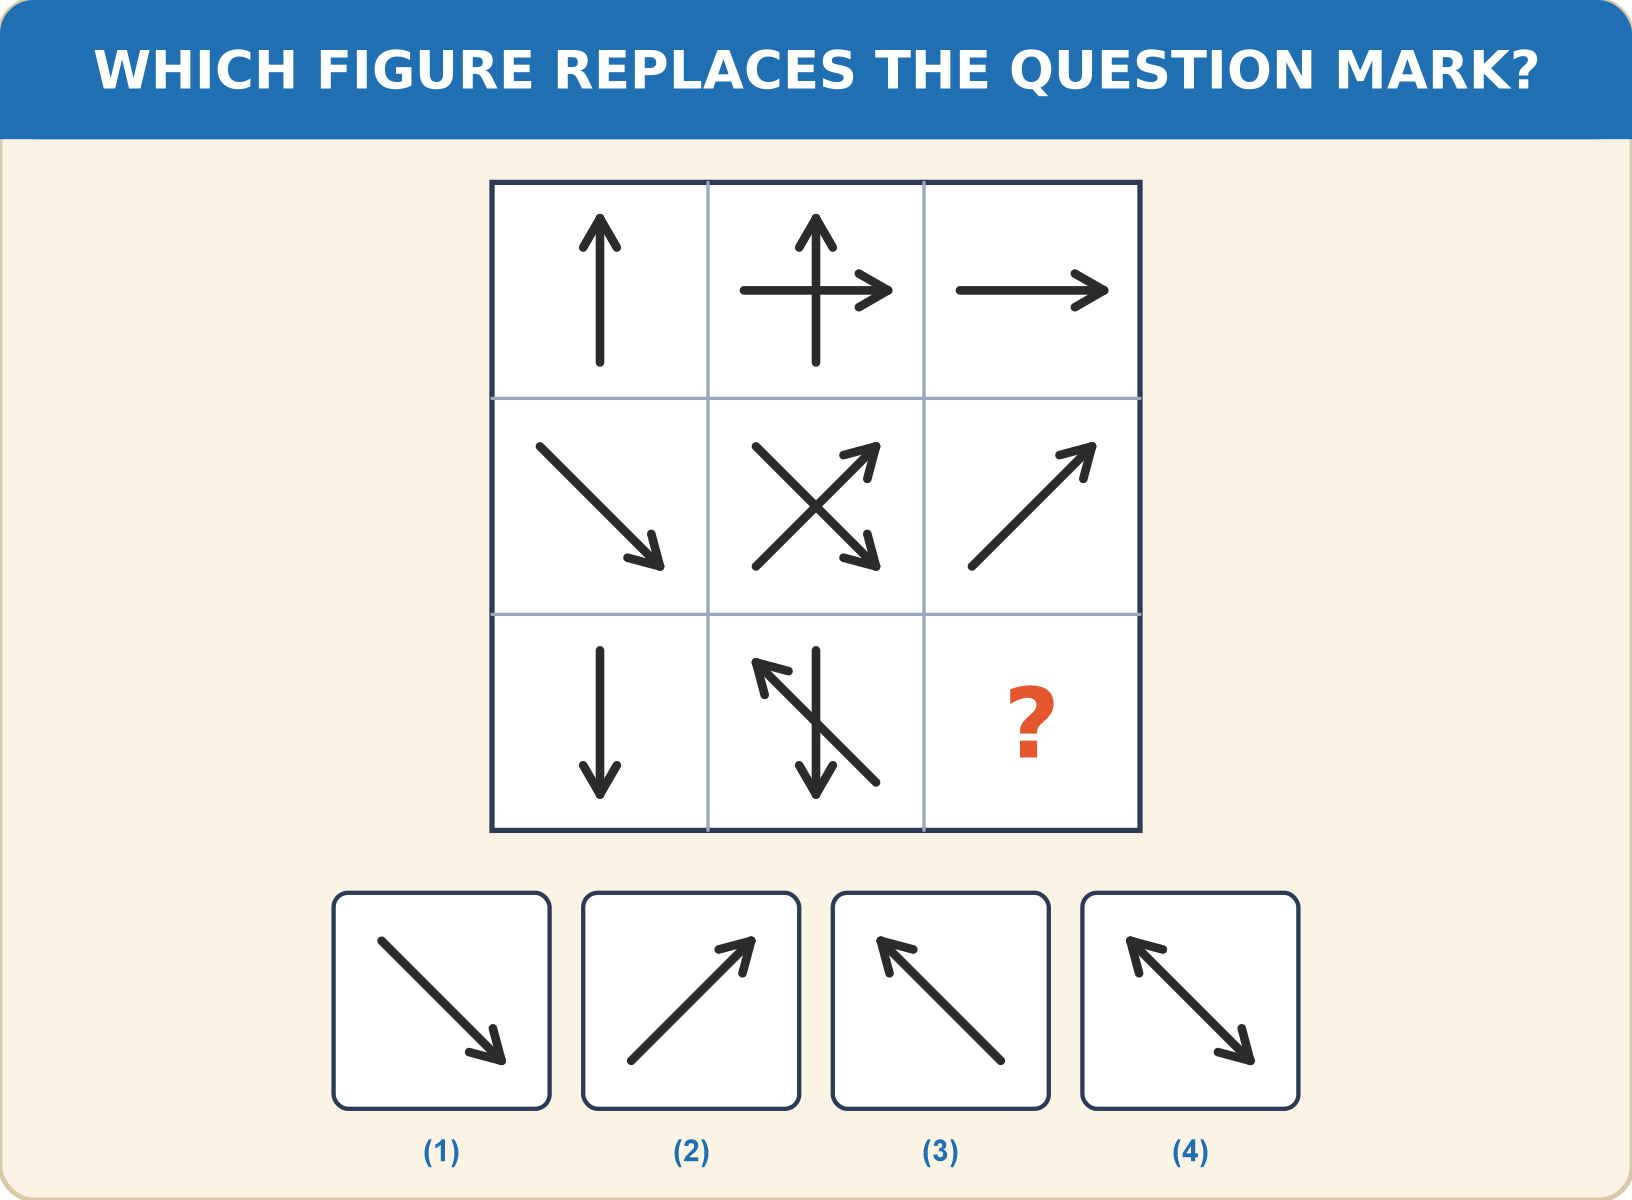
Each row of the arrow matrix below follows one rule linking its first, middle and last figures. Which figure replaces the question mark (?)?
Explanation
In every row the middle figure is the first and the last figure drawn on top of each other. So the last figure is the middle figure with the first figure's arrow taken away.
Row 3: the middle figure has a downward arrow and an arrow pointing to the top-left. Taking away the downward arrow of the first figure leaves the arrow pointing to the top-left.
This is option (3).
Row 3: the middle figure has a downward arrow and an arrow pointing to the top-left. Taking away the downward arrow of the first figure leaves the arrow pointing to the top-left.
This is option (3).
Shortcut Method
Rule: middle = first + last
Row 3: middle minus the down arrow = top-left arrow
∴ Option 3 is correct ✓
Row 3: middle minus the down arrow = top-left arrow
∴ Option 3 is correct ✓
Question 44
In the arrow matrix below, the middle figure of every row is built from the other two figures of that row. Select the figure that completes the matrix.
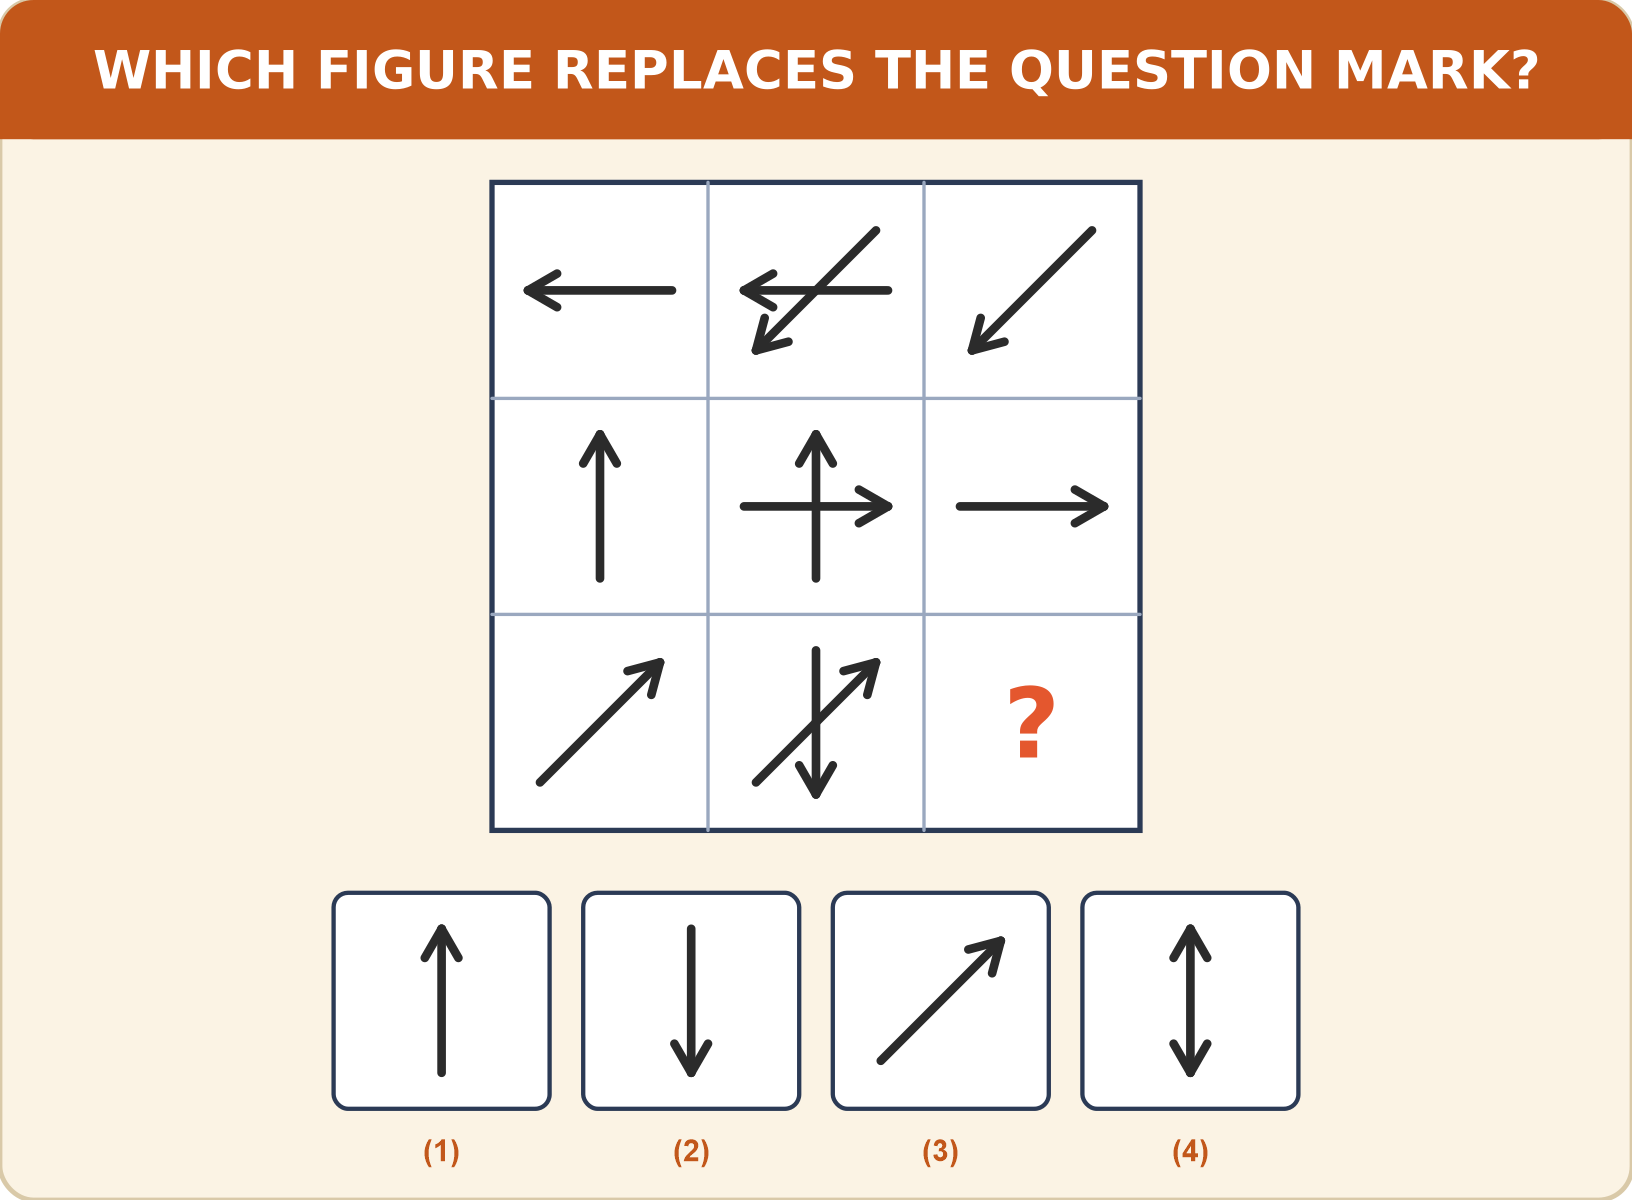
Explanation
In every row the middle figure is the first and the last figure drawn on top of each other.
Row 3: the middle figure has an arrow pointing to the top-right and a downward arrow. The first figure already supplies the top-right arrow, so the missing last figure is the downward arrow.
This is option (2).
Row 3: the middle figure has an arrow pointing to the top-right and a downward arrow. The first figure already supplies the top-right arrow, so the missing last figure is the downward arrow.
This is option (2).
Shortcut Method
Rule: middle = first + last
Row 3: middle minus the top-right arrow = down arrow
∴ Option 2 is correct ✓
Row 3: middle minus the top-right arrow = down arrow
∴ Option 2 is correct ✓
Question 45
Look at how the first two line figures in each row combine to give the third. Which figure replaces the question mark (?) in the matrix?
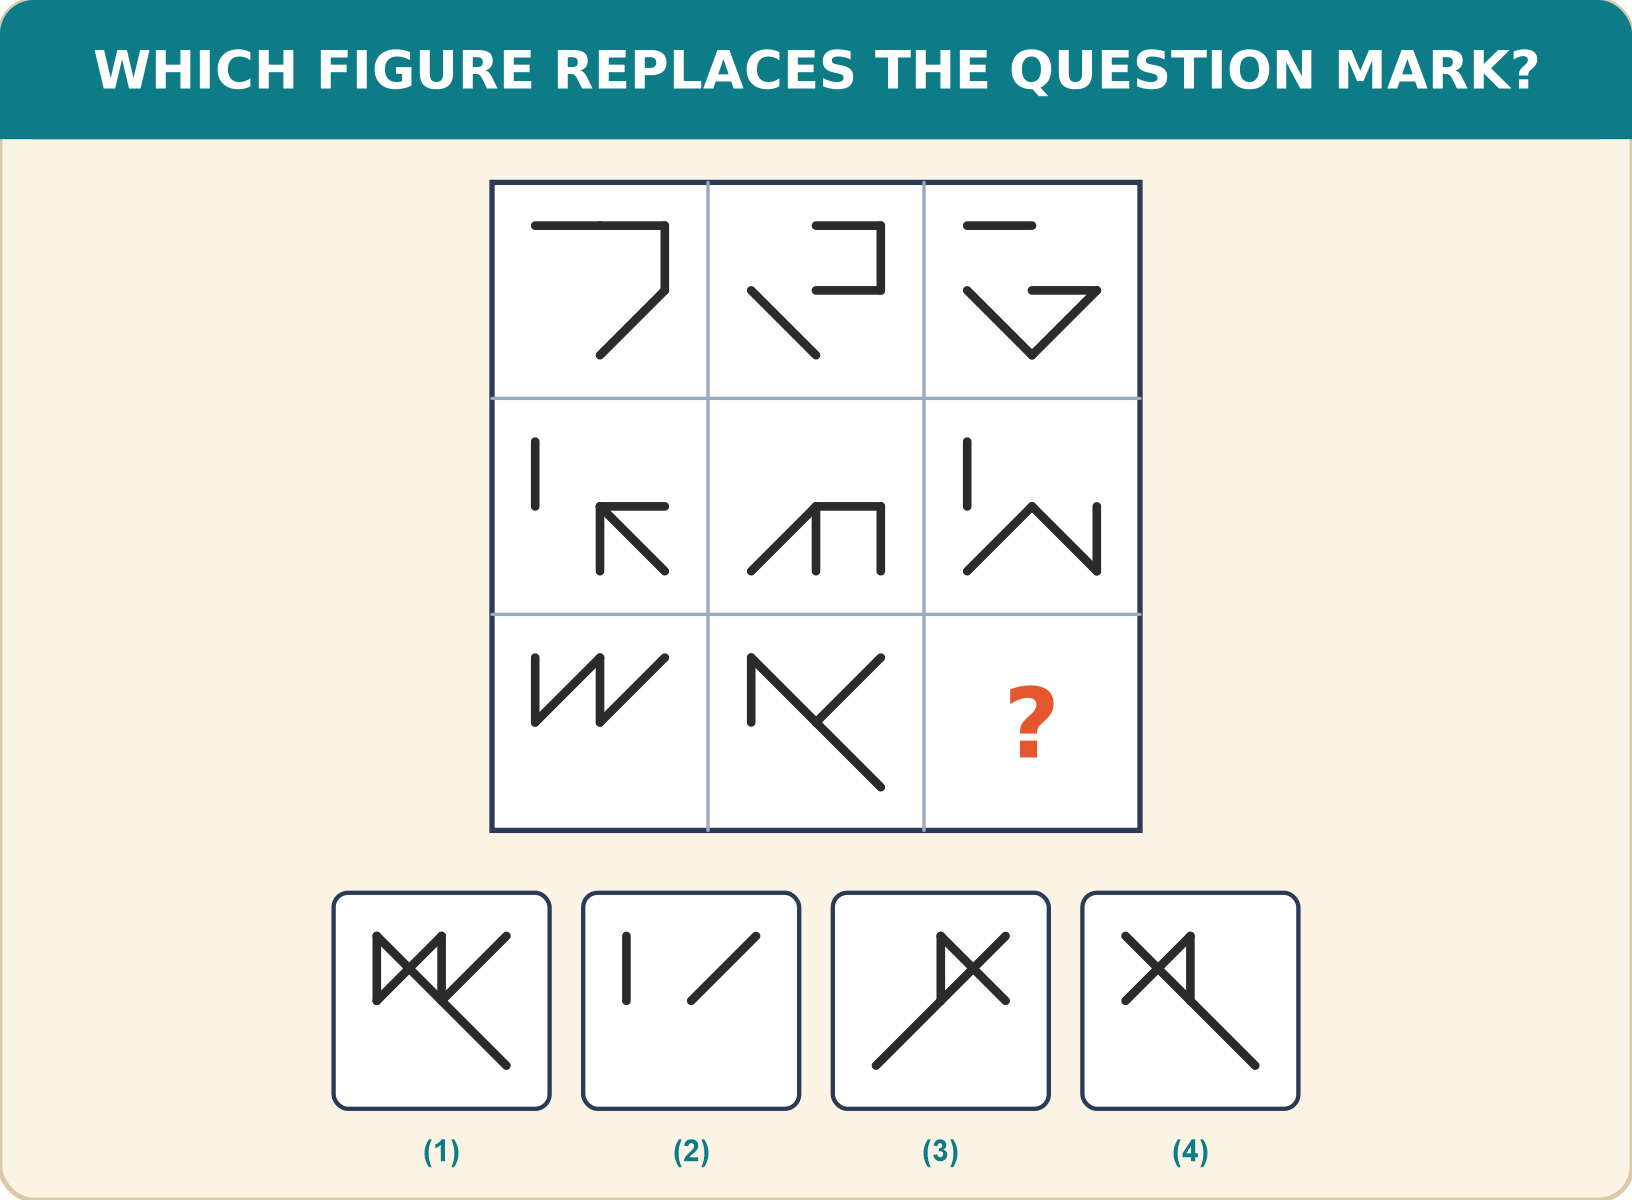
Explanation
In every row, put the first two figures on top of each other: a line that appears in both figures disappears, and every line that appears in only one of them stays. The result is the third figure.
Row 3: the short upright line at the left appears in both figures, so it disappears. The lines left over are the long diagonal running from the top-left down to the bottom-right, one short upright line and one short slanting line near the top-left.
Only option (4) shows exactly these lines.
Row 3: the short upright line at the left appears in both figures, so it disappears. The lines left over are the long diagonal running from the top-left down to the bottom-right, one short upright line and one short slanting line near the top-left.
Only option (4) shows exactly these lines.
Shortcut Method
Rule: a line in both figures disappears, any other line stays
Row 3: remove the shared upright line
∴ Option 4 is correct ✓
Row 3: remove the shared upright line
∴ Option 4 is correct ✓
Question 46
In this matrix each row ends with a figure that keeps only what the first two figures have in common. Which figure should replace the question mark (?)?
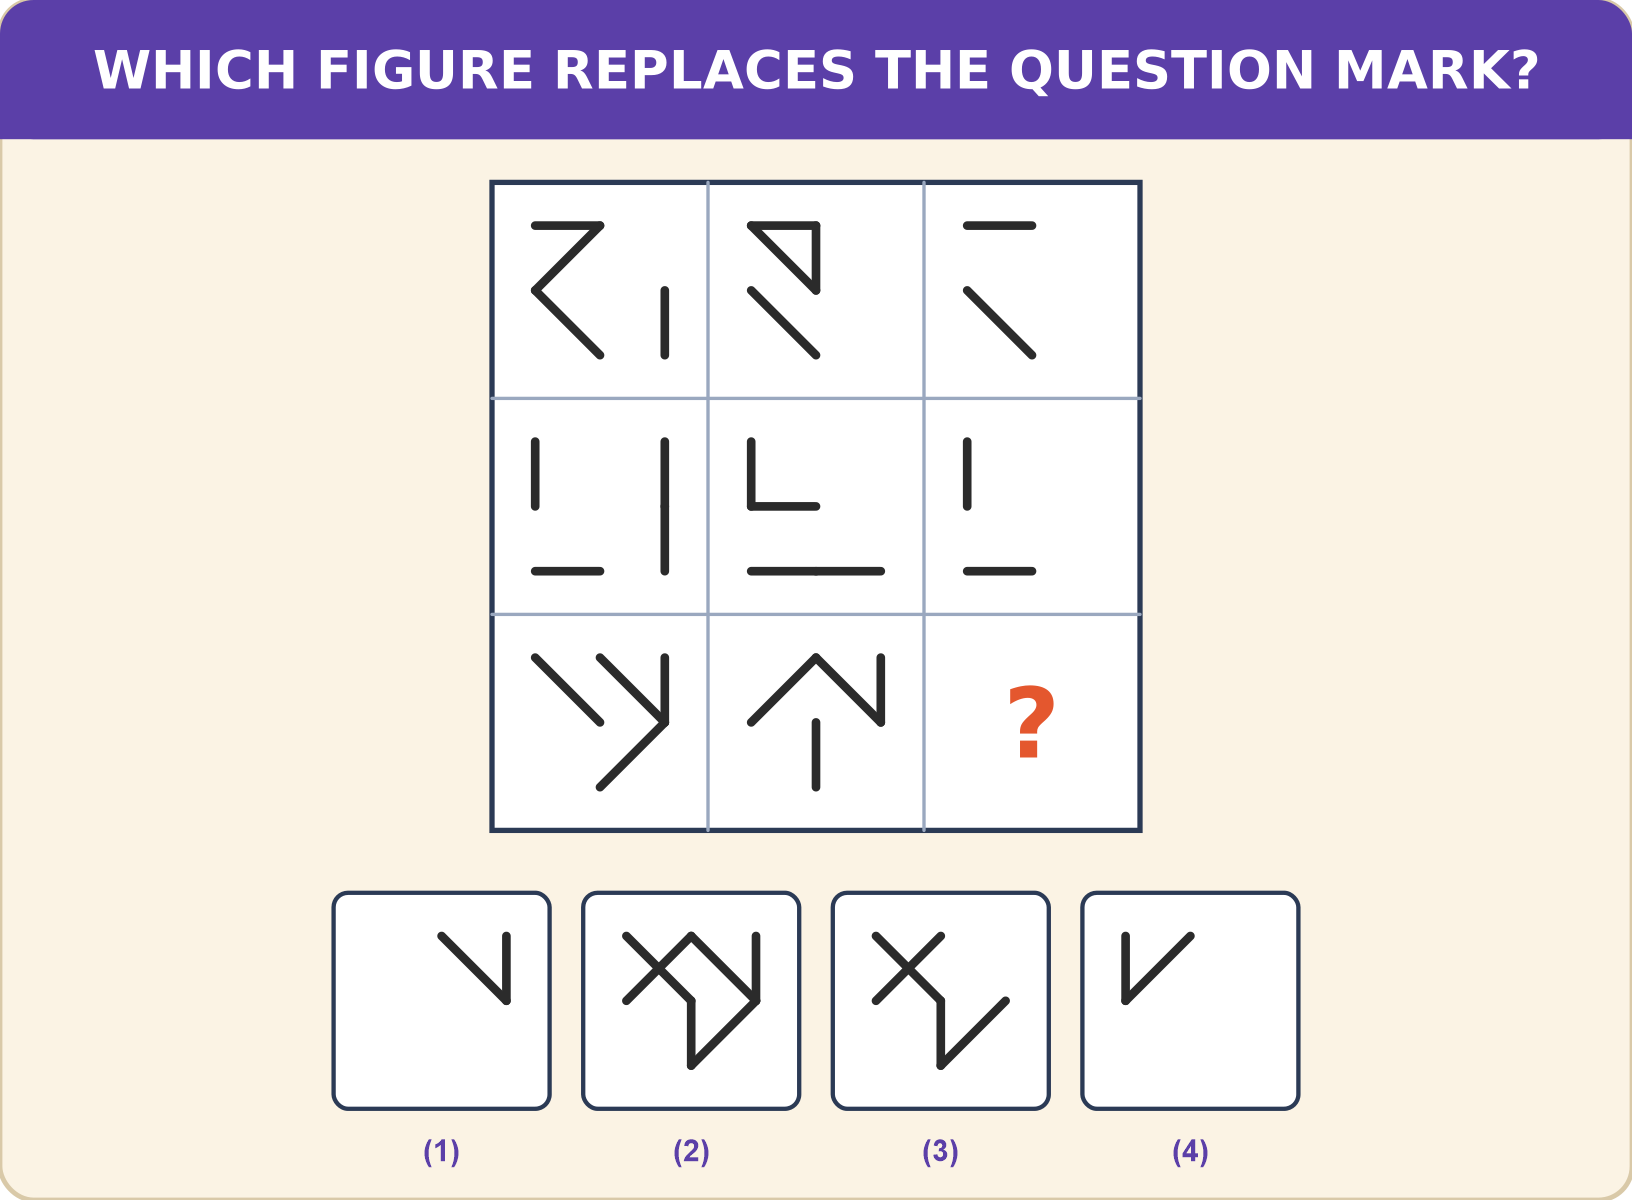
Explanation
In every row the third figure keeps only the lines that the first two figures share.
Row 3: the two figures share a short slanting line going down to the right and an upright line that meets it at its lower end. Nothing else is common to both figures.
This is option (1).
Row 3: the two figures share a short slanting line going down to the right and an upright line that meets it at its lower end. Nothing else is common to both figures.
This is option (1).
Shortcut Method
Rule: third figure = lines common to figures 1 and 2
Row 3: one slanting line + one upright line
∴ Option 1 is correct ✓
Row 3: one slanting line + one upright line
∴ Option 1 is correct ✓
Question 47
In every row of the matrix, the third figure is made from the first two. Which figure replaces the question mark (?)?
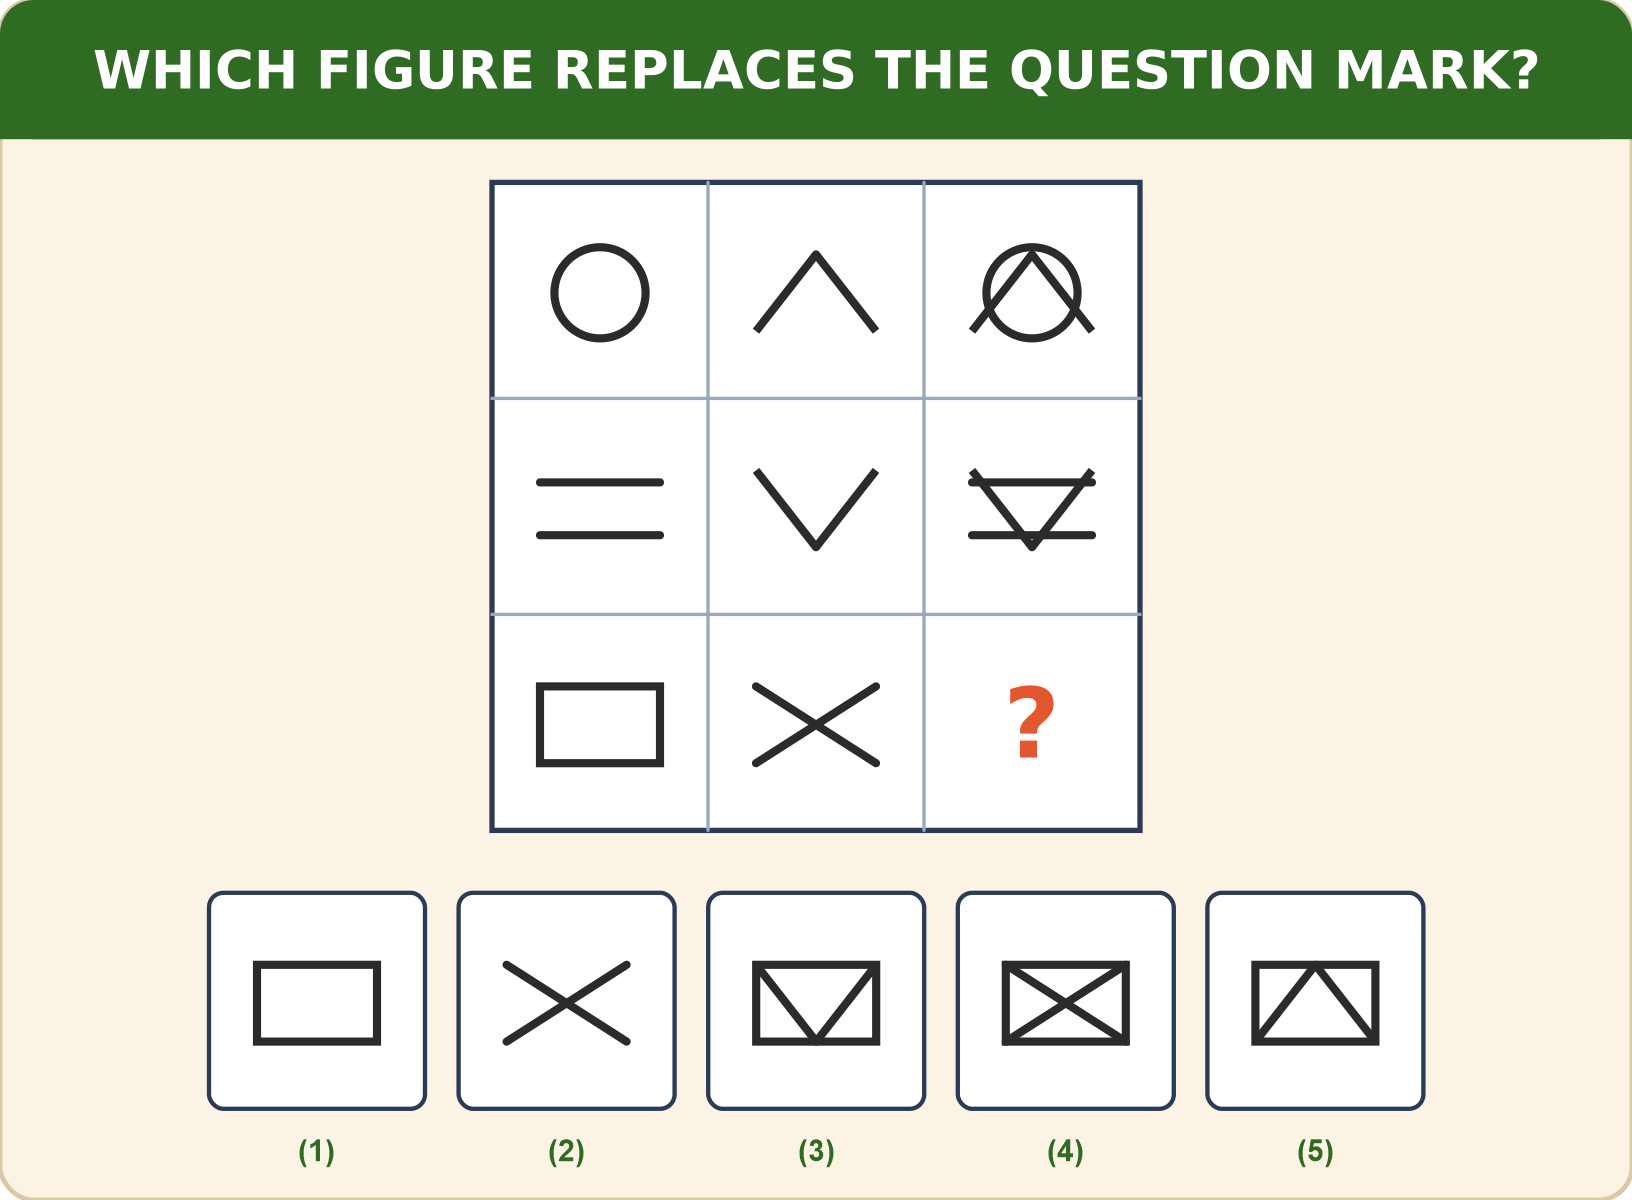
Explanation
In every row the third figure is the first figure and the second figure drawn together.
Row 1: a circle and an upward-pointing chevron give a circle with the chevron across it. Row 2: two horizontal lines and a downward-pointing V give the V with the two lines through it.
Row 3: a rectangle and a cross drawn together give a rectangle with a cross inside it.
This is option (4).
Row 1: a circle and an upward-pointing chevron give a circle with the chevron across it. Row 2: two horizontal lines and a downward-pointing V give the V with the two lines through it.
Row 3: a rectangle and a cross drawn together give a rectangle with a cross inside it.
This is option (4).
Shortcut Method
Rule: third = first + second
Row 3: rectangle + cross = rectangle with a cross inside
∴ Option 4 is correct ✓
Row 3: rectangle + cross = rectangle with a cross inside
∴ Option 4 is correct ✓
Question 48
Study how the figures in each row of the matrix combine, then choose the figure that replaces the question mark (?).
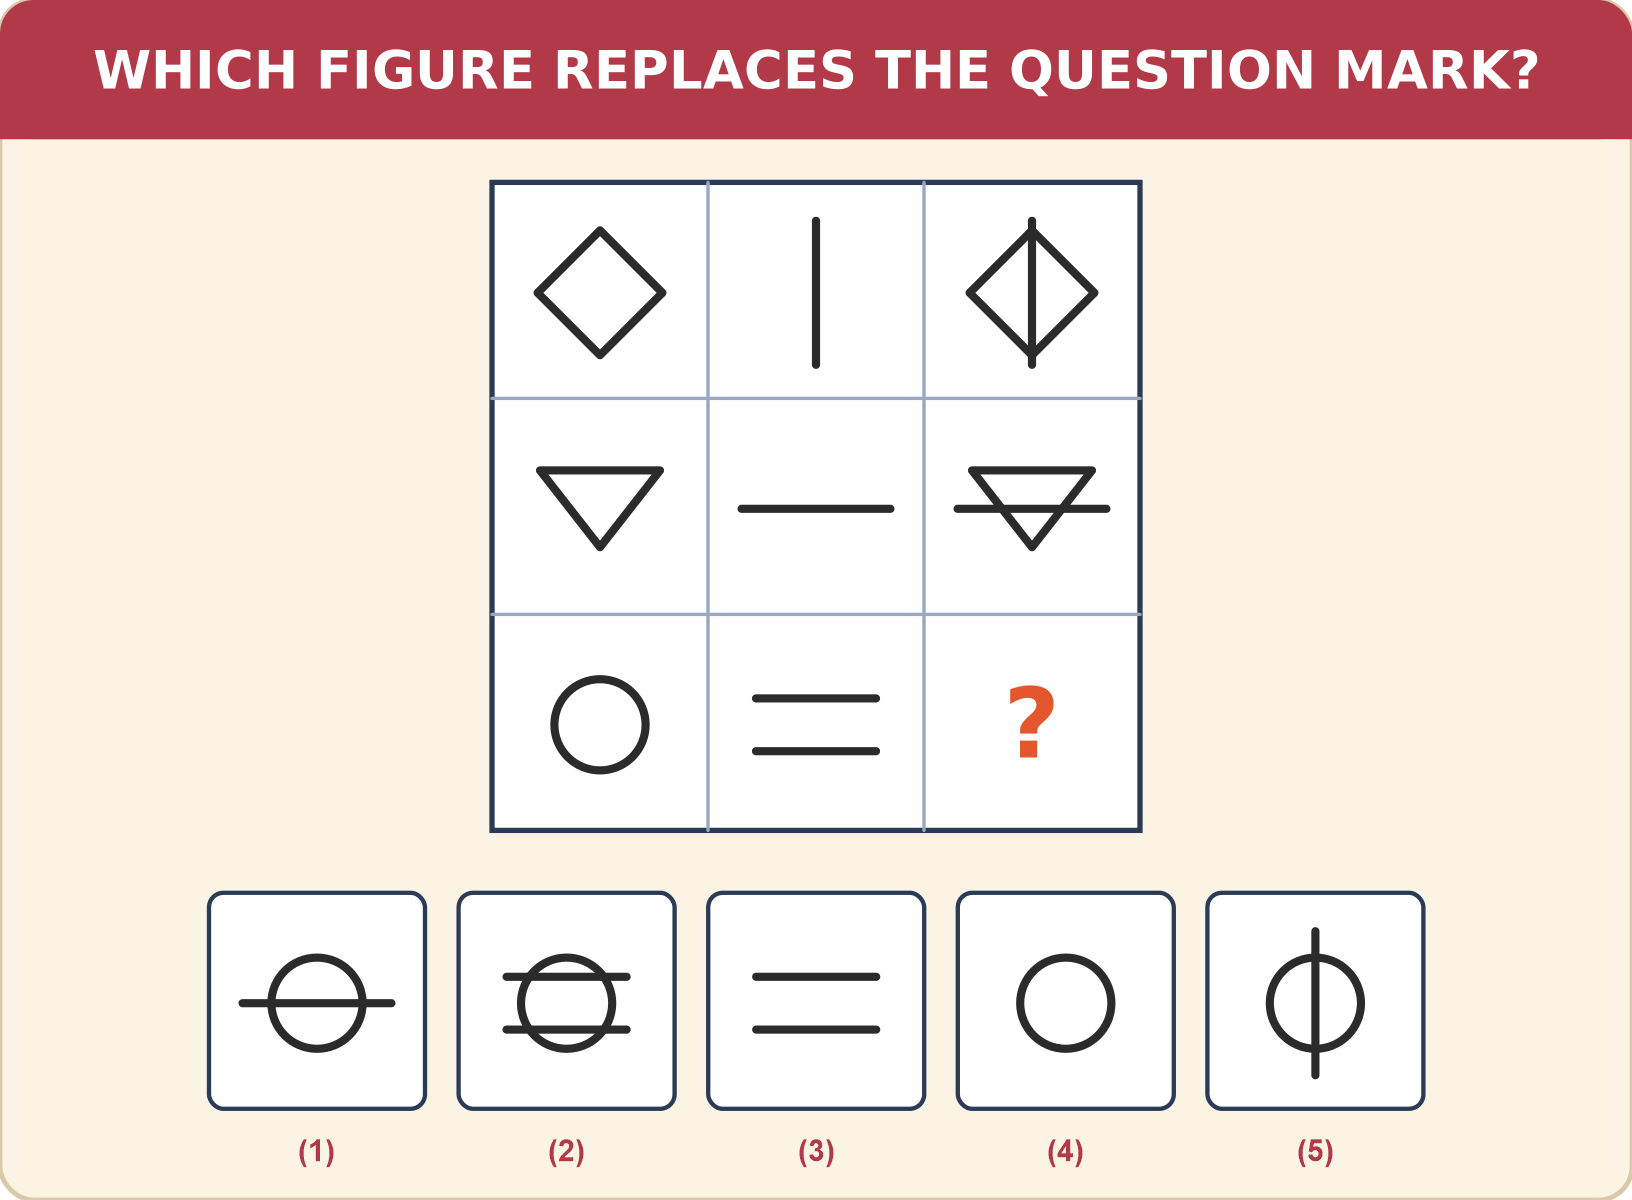
Explanation
In every row the third figure is the first and second figures drawn on top of each other.
Row 1: a diamond and an upright line give a diamond with the line through it. Row 2: a triangle and a horizontal line give the triangle with the line across it.
Row 3: a circle and two horizontal lines give a circle crossed by two horizontal lines.
This is option (2).
Row 1: a diamond and an upright line give a diamond with the line through it. Row 2: a triangle and a horizontal line give the triangle with the line across it.
Row 3: a circle and two horizontal lines give a circle crossed by two horizontal lines.
This is option (2).
Shortcut Method
Rule: third = first + second
Row 3: circle + two horizontal lines = circle crossed by two lines
∴ Option 2 is correct ✓
Row 3: circle + two horizontal lines = circle crossed by two lines
∴ Option 2 is correct ✓
Question 49
Four diamonds each hold a top, a bottom, a left and a right number, and the same rule applies to every diamond. Find the missing number (?).
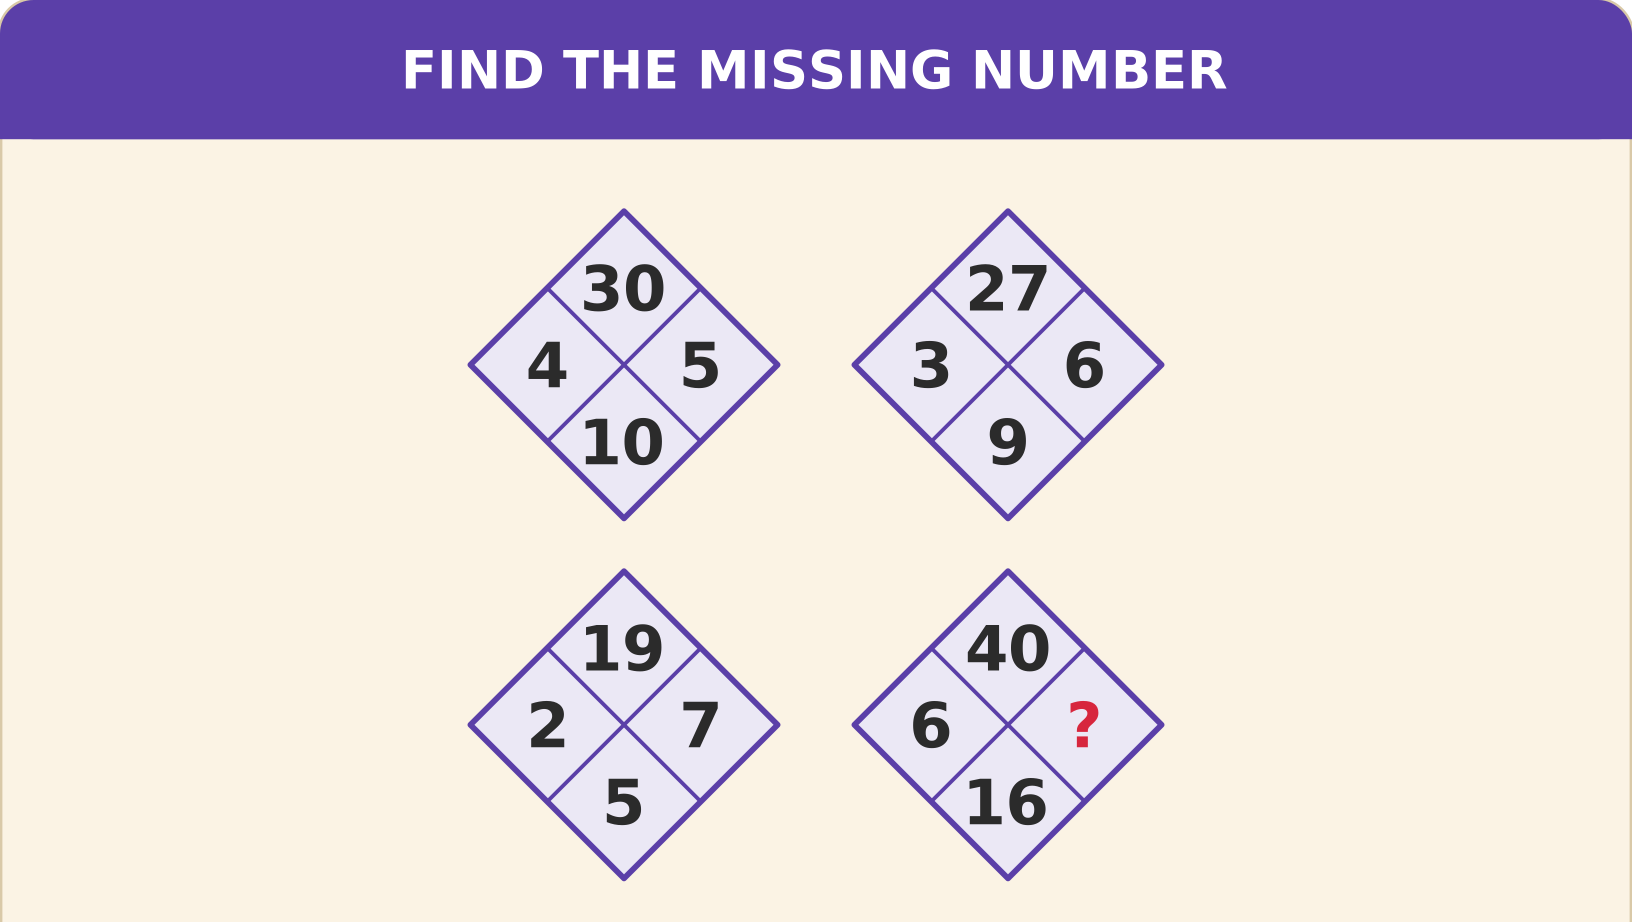
Explanation
In every diamond, top − bottom = left × right.
30 − 10 = 20 = 4 × 5.
27 − 9 = 18 = 3 × 6.
19 − 5 = 14 = 2 × 7.
Last diamond: 40 − 16 = 24 = 6 × ?, so ? = 4.
30 − 10 = 20 = 4 × 5.
27 − 9 = 18 = 3 × 6.
19 − 5 = 14 = 2 × 7.
Last diamond: 40 − 16 = 24 = 6 × ?, so ? = 4.
Shortcut Method
Rule: top − bottom = left × right
40 − 16 = 24 = 6 × ?
∴ ? = 4 ✓
40 − 16 = 24 = 6 × ?
∴ ? = 4 ✓
Question 50
Each number diamond below hides one fixed relationship between its four numbers. Work it out and find the number that replaces the question mark (?).
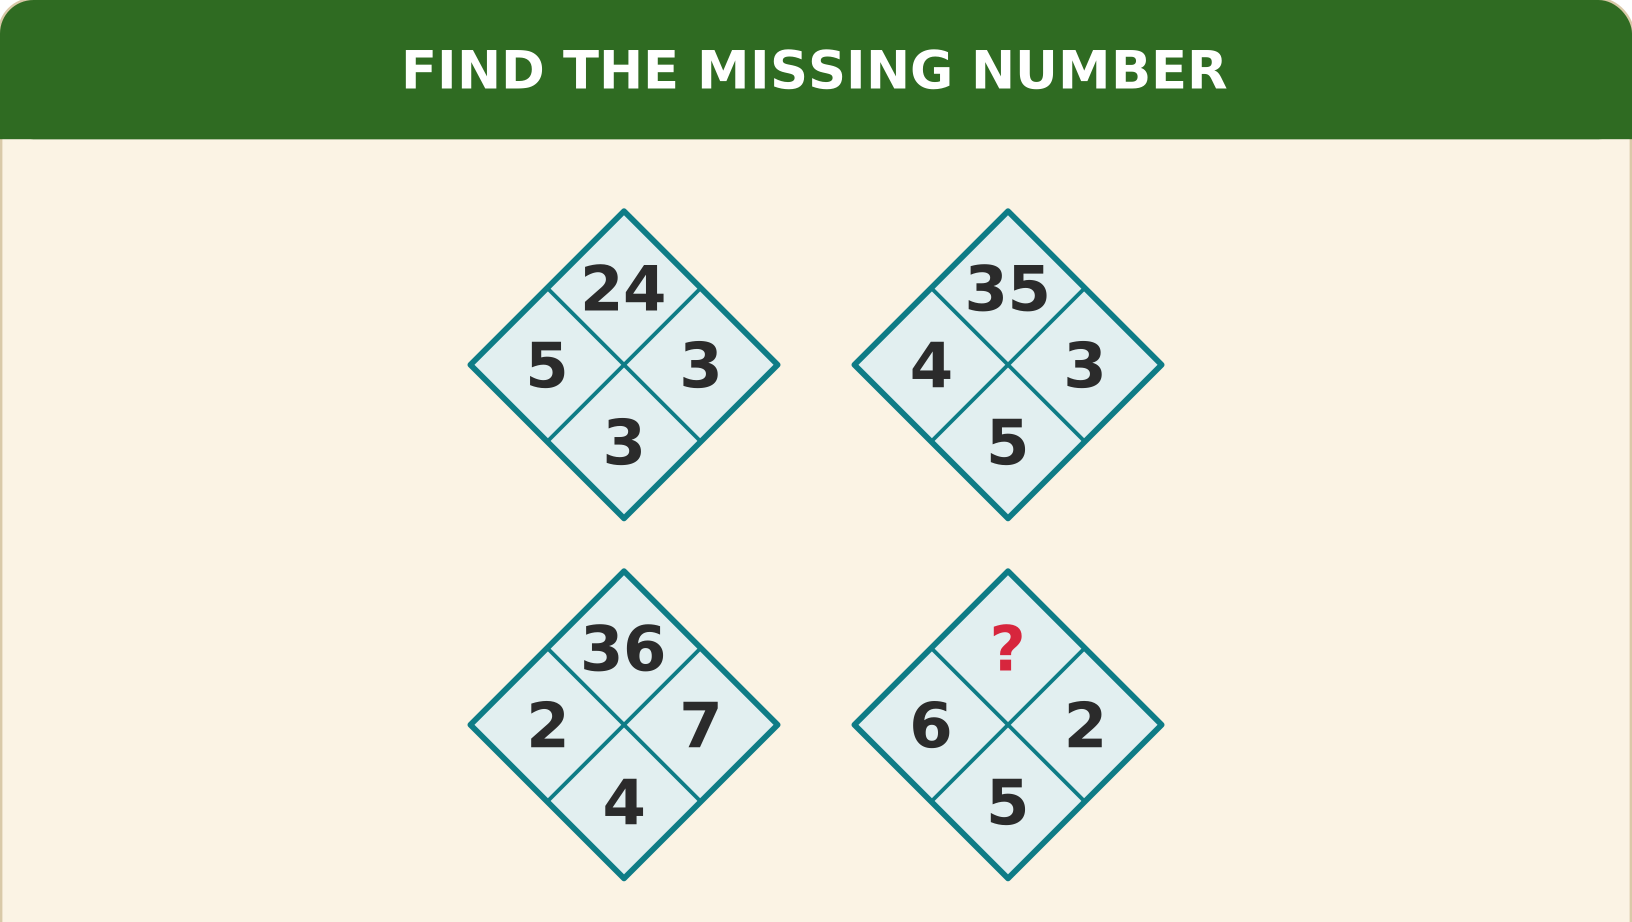
Explanation
In every diamond, top = (left + right) × bottom.
(5 + 3) × 3 = 24.
(4 + 3) × 5 = 35.
(2 + 7) × 4 = 36.
Last diamond: (6 + 2) × 5 = 40.
(5 + 3) × 3 = 24.
(4 + 3) × 5 = 35.
(2 + 7) × 4 = 36.
Last diamond: (6 + 2) × 5 = 40.
Shortcut Method
Rule: top = (left + right) × bottom
(6 + 2) × 5 = 40
∴ ? = 40 ✓
(6 + 2) × 5 = 40
∴ ? = 40 ✓
Question 51
Each group of five diamonds has a number in the middle that depends on the four numbers around it. Find the missing number (?) in the last group.
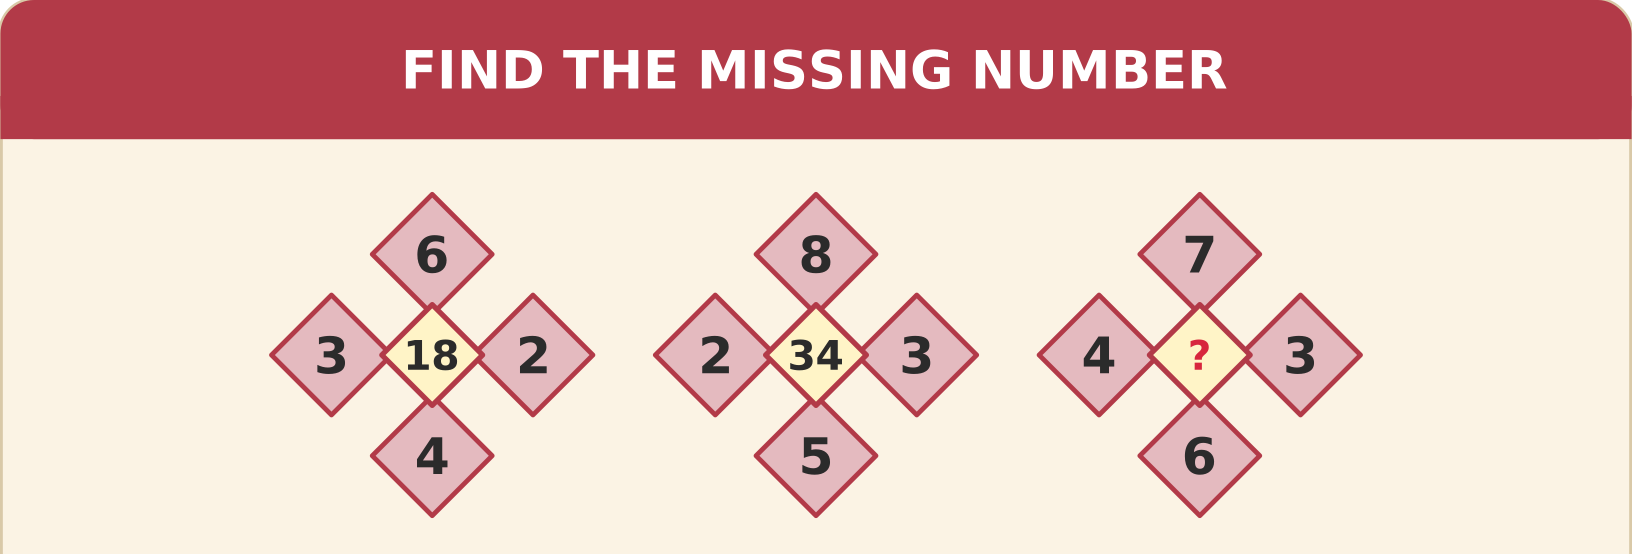
Explanation
In every group, centre = (top × bottom) − (left × right).
6 × 4 − 3 × 2 = 24 − 6 = 18.
8 × 5 − 2 × 3 = 40 − 6 = 34.
Last group: 7 × 6 − 4 × 3 = 42 − 12 = 30.
6 × 4 − 3 × 2 = 24 − 6 = 18.
8 × 5 − 2 × 3 = 40 − 6 = 34.
Last group: 7 × 6 − 4 × 3 = 42 − 12 = 30.
Shortcut Method
Rule: centre = (top × bottom) − (left × right)
7 × 6 − 4 × 3 = 42 − 12
∴ ? = 30 ✓
7 × 6 − 4 × 3 = 42 − 12
∴ ? = 30 ✓
Question 52
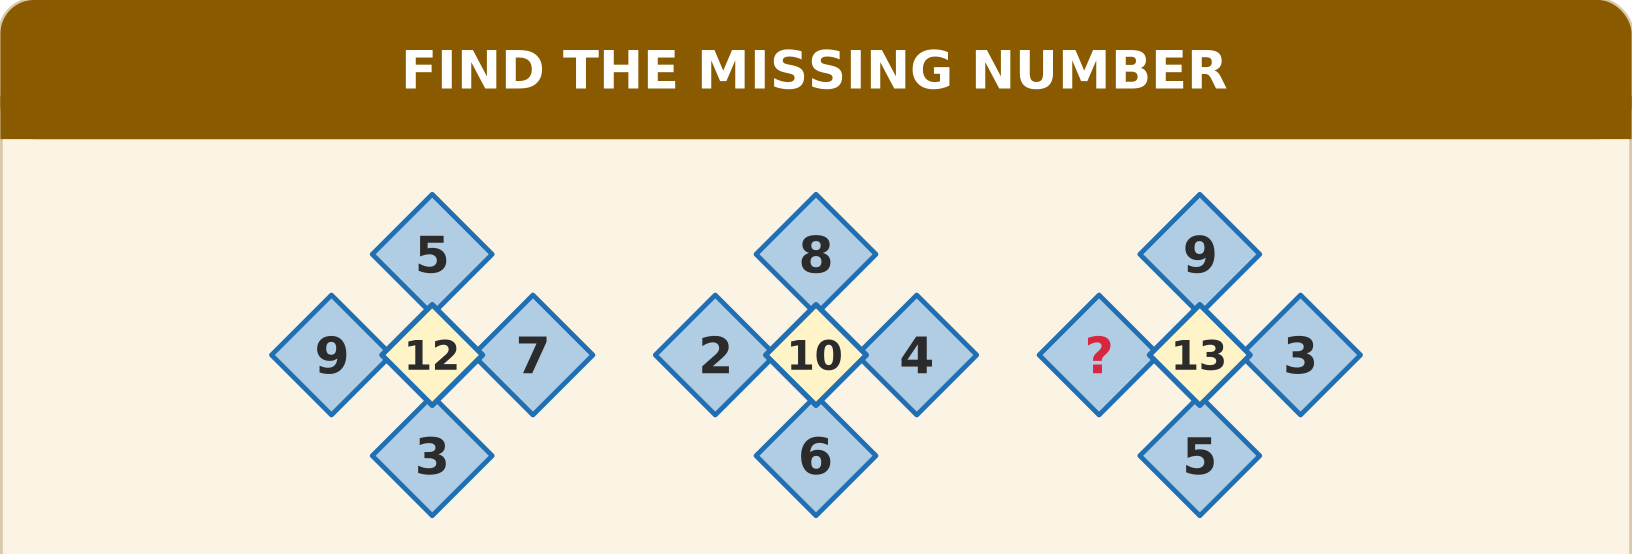
In each cluster of diamonds the centre number is linked to the four outer numbers. Which number replaces the question mark (?) in the third cluster?
Explanation
In every cluster the centre number is half the sum of the four outer numbers.
(5 + 9 + 7 + 3) ÷ 2 = 24 ÷ 2 = 12.
(8 + 2 + 4 + 6) ÷ 2 = 20 ÷ 2 = 10.
Third cluster: the centre is 13, so the four outer numbers add up to 26. 9 + 3 + 5 + ? = 26, so ? = 9.
(5 + 9 + 7 + 3) ÷ 2 = 24 ÷ 2 = 12.
(8 + 2 + 4 + 6) ÷ 2 = 20 ÷ 2 = 10.
Third cluster: the centre is 13, so the four outer numbers add up to 26. 9 + 3 + 5 + ? = 26, so ? = 9.
Shortcut Method
Rule: centre = (sum of the 4 outer numbers) ÷ 2
9 + ? + 3 + 5 = 26
∴ ? = 9 ✓
9 + ? + 3 + 5 = 26
∴ ? = 9 ✓
Question 53
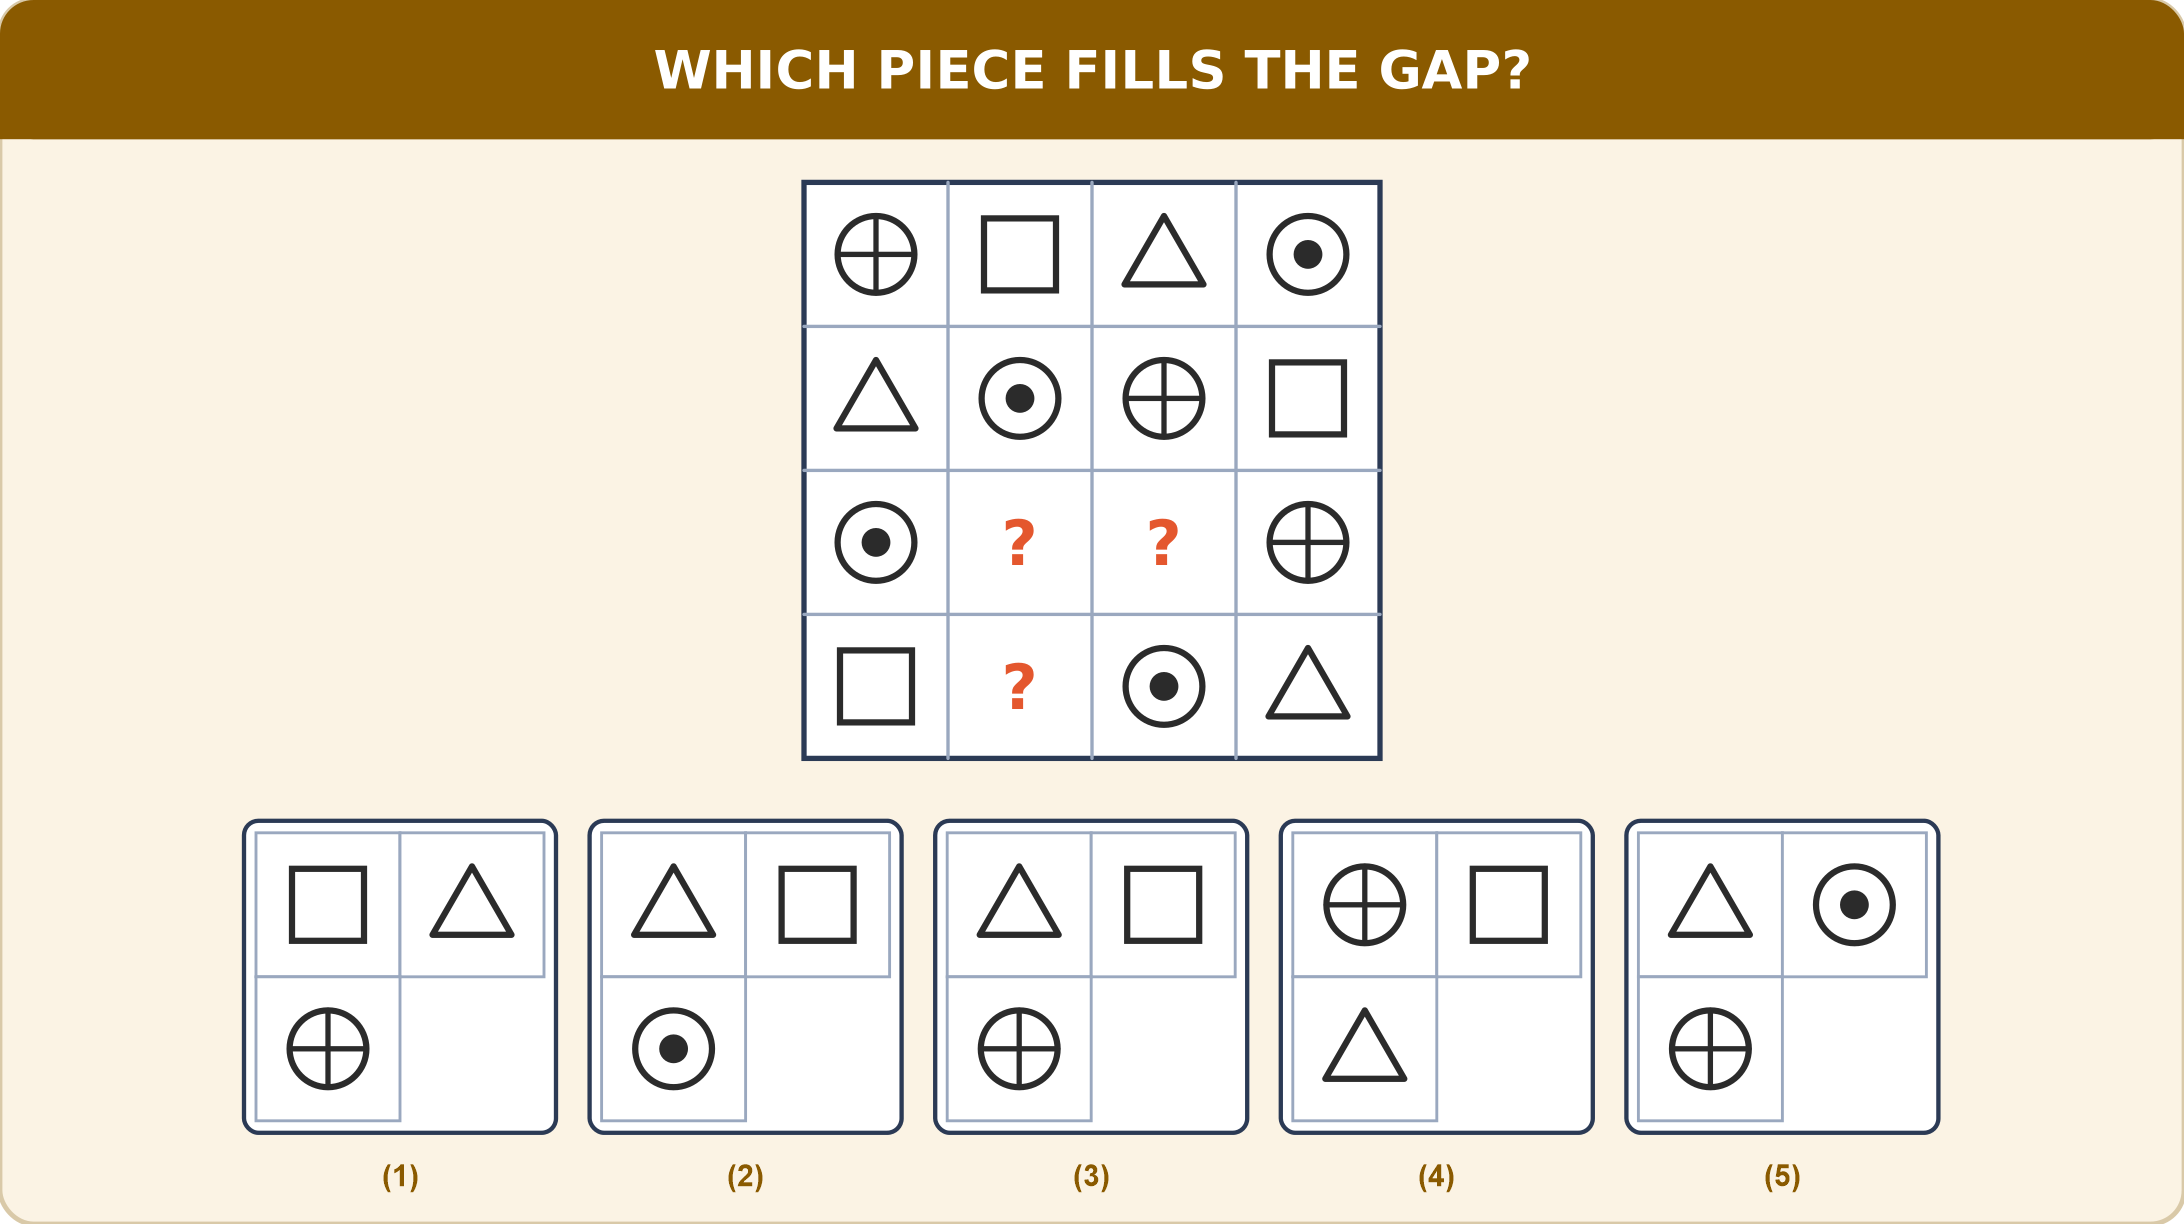
Each row and each column of the 4 × 4 grid below uses the same four symbols. Which of the pieces shown fits the three empty squares (?)?
Explanation
Every row and every column contains each of the four symbols (circle with a cross, square, triangle, circle with a dot) exactly once.
Row 3 already has the dotted circle and the crossed circle, so its two gaps must be the triangle and the square.
Column 3 already has the triangle, the crossed circle and the dotted circle, so the gap in row 3, column 3 is the square. That leaves the triangle for row 3, column 2.
Row 4 already has the square, the dotted circle and the triangle, so its gap in column 2 is the circle with a cross.
The piece is: triangle, square, and the crossed circle below the triangle. This is option (3).
Row 3 already has the dotted circle and the crossed circle, so its two gaps must be the triangle and the square.
Column 3 already has the triangle, the crossed circle and the dotted circle, so the gap in row 3, column 3 is the square. That leaves the triangle for row 3, column 2.
Row 4 already has the square, the dotted circle and the triangle, so its gap in column 2 is the circle with a cross.
The piece is: triangle, square, and the crossed circle below the triangle. This is option (3).
Shortcut Method
Rule: each symbol once in every row and column
Gaps: triangle, square, crossed circle
∴ Option 3 is correct ✓
Gaps: triangle, square, crossed circle
∴ Option 3 is correct ✓
Question 54
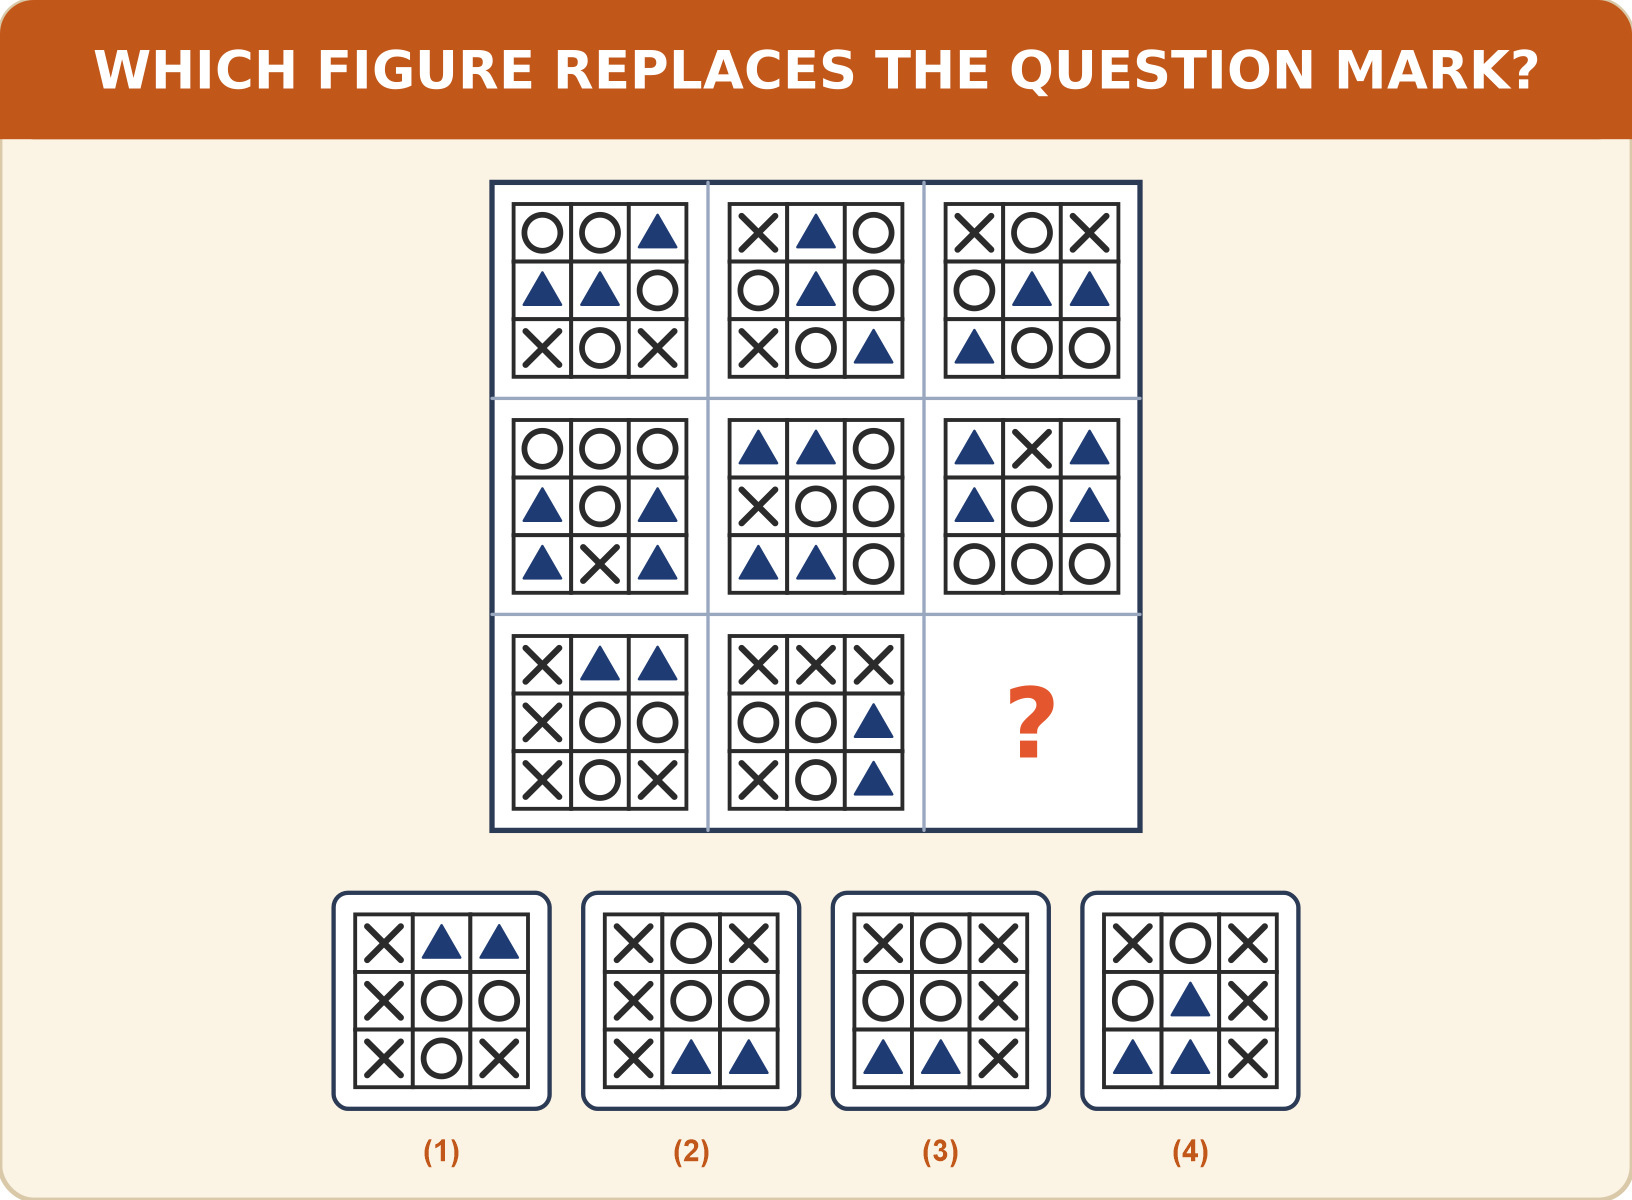
The small grid of symbols changes from one figure to the next along every row. Which figure replaces the question mark (?)?
Explanation
Along each row the whole small grid turns through 90° clockwise from one figure to the next.
Turn the middle figure of row 3 through 90° clockwise. The top row becomes cross, circle, cross; the middle row becomes circle, circle, cross; the bottom row becomes triangle, triangle, cross.
This is option (3).
Turn the middle figure of row 3 through 90° clockwise. The top row becomes cross, circle, cross; the middle row becomes circle, circle, cross; the bottom row becomes triangle, triangle, cross.
This is option (3).
Shortcut Method
Rule: grid turns 90° clockwise along the row
Turn the middle figure of row 3
∴ Option 3 is correct ✓
Turn the middle figure of row 3
∴ Option 3 is correct ✓
Question 55
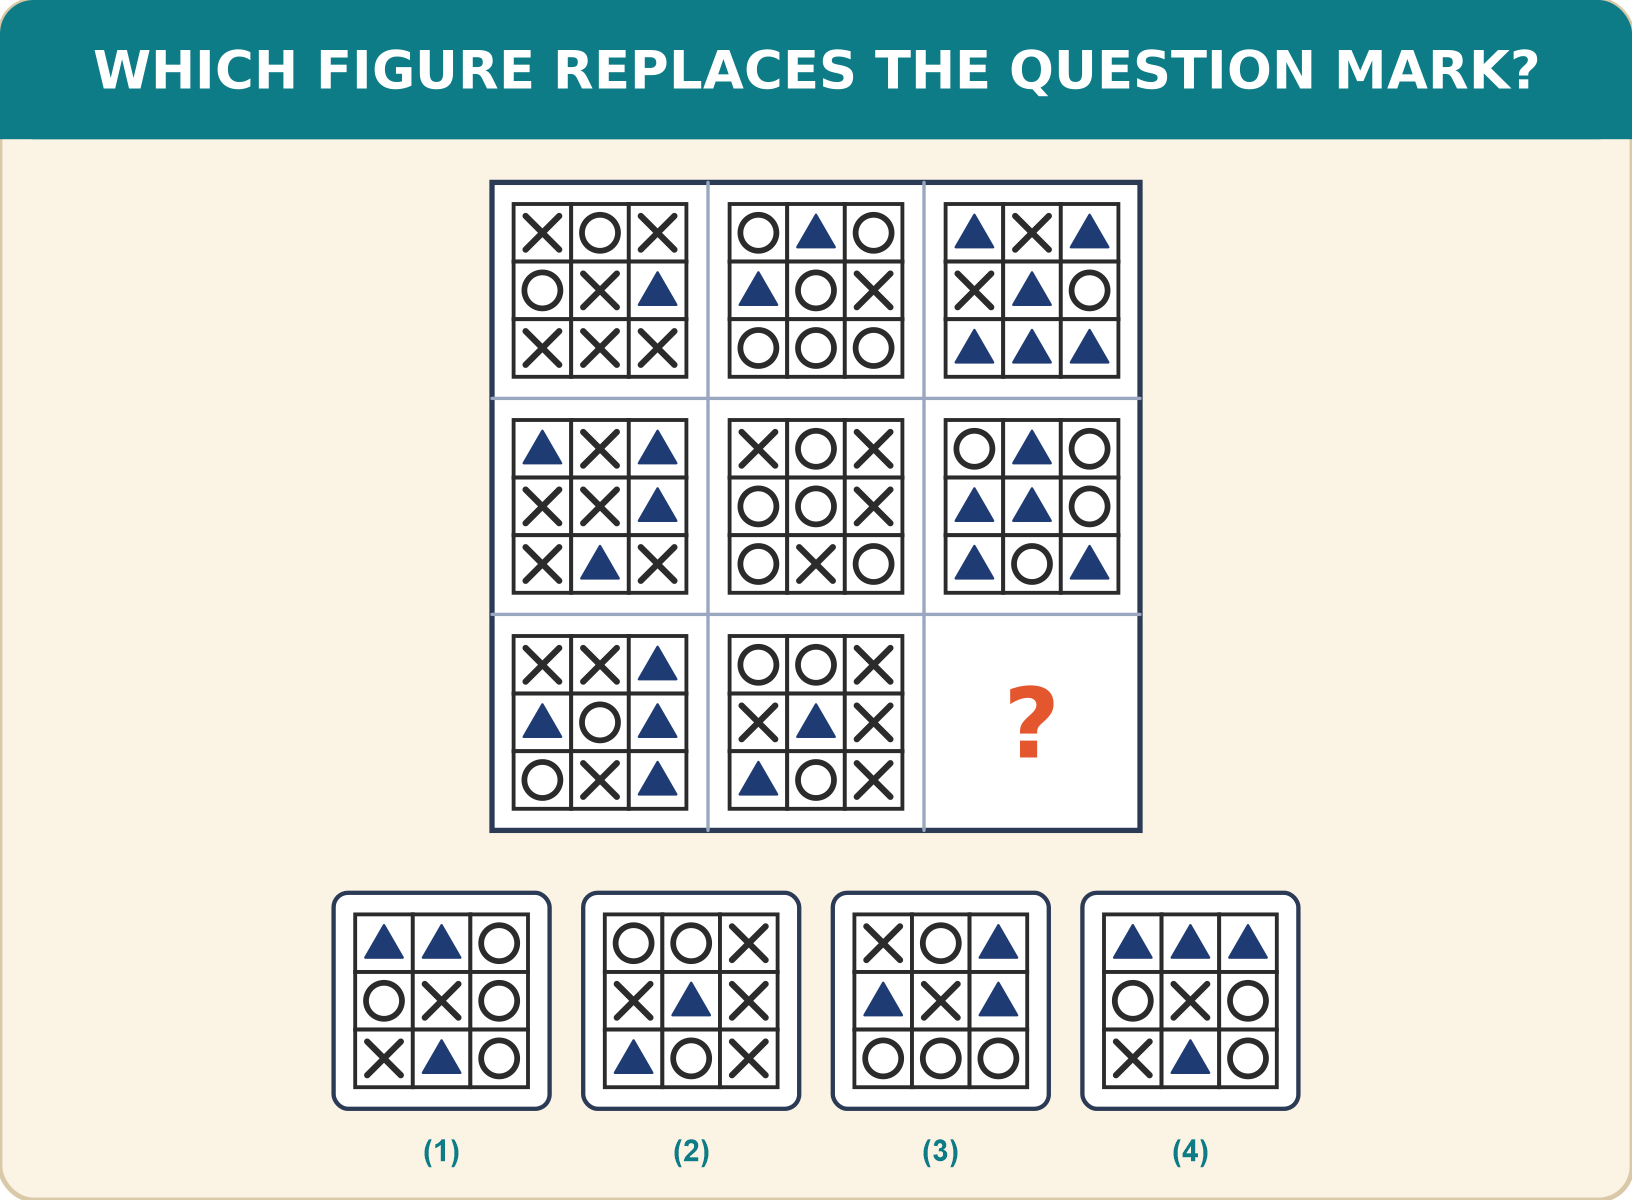
Every symbol in the grids changes into another symbol from one figure to the next along each row. Choose the figure that replaces the question mark (?).
Explanation
Along each row the symbols stay in their squares, but every symbol changes: a cross becomes a circle, a circle becomes a triangle and a triangle becomes a cross.
The middle figure of row 3 is: circle, circle, cross / cross, triangle, cross / triangle, circle, cross.
Applying the change to every square gives: triangle, triangle, circle / circle, cross, circle / cross, triangle, circle.
This is option (1).
The middle figure of row 3 is: circle, circle, cross / cross, triangle, cross / triangle, circle, cross.
Applying the change to every square gives: triangle, triangle, circle / circle, cross, circle / cross, triangle, circle.
This is option (1).
Shortcut Method
Rule: cross → circle → triangle → cross
Change every symbol of the middle figure in row 3
∴ Option 1 is correct ✓
Change every symbol of the middle figure in row 3
∴ Option 1 is correct ✓
Question 56
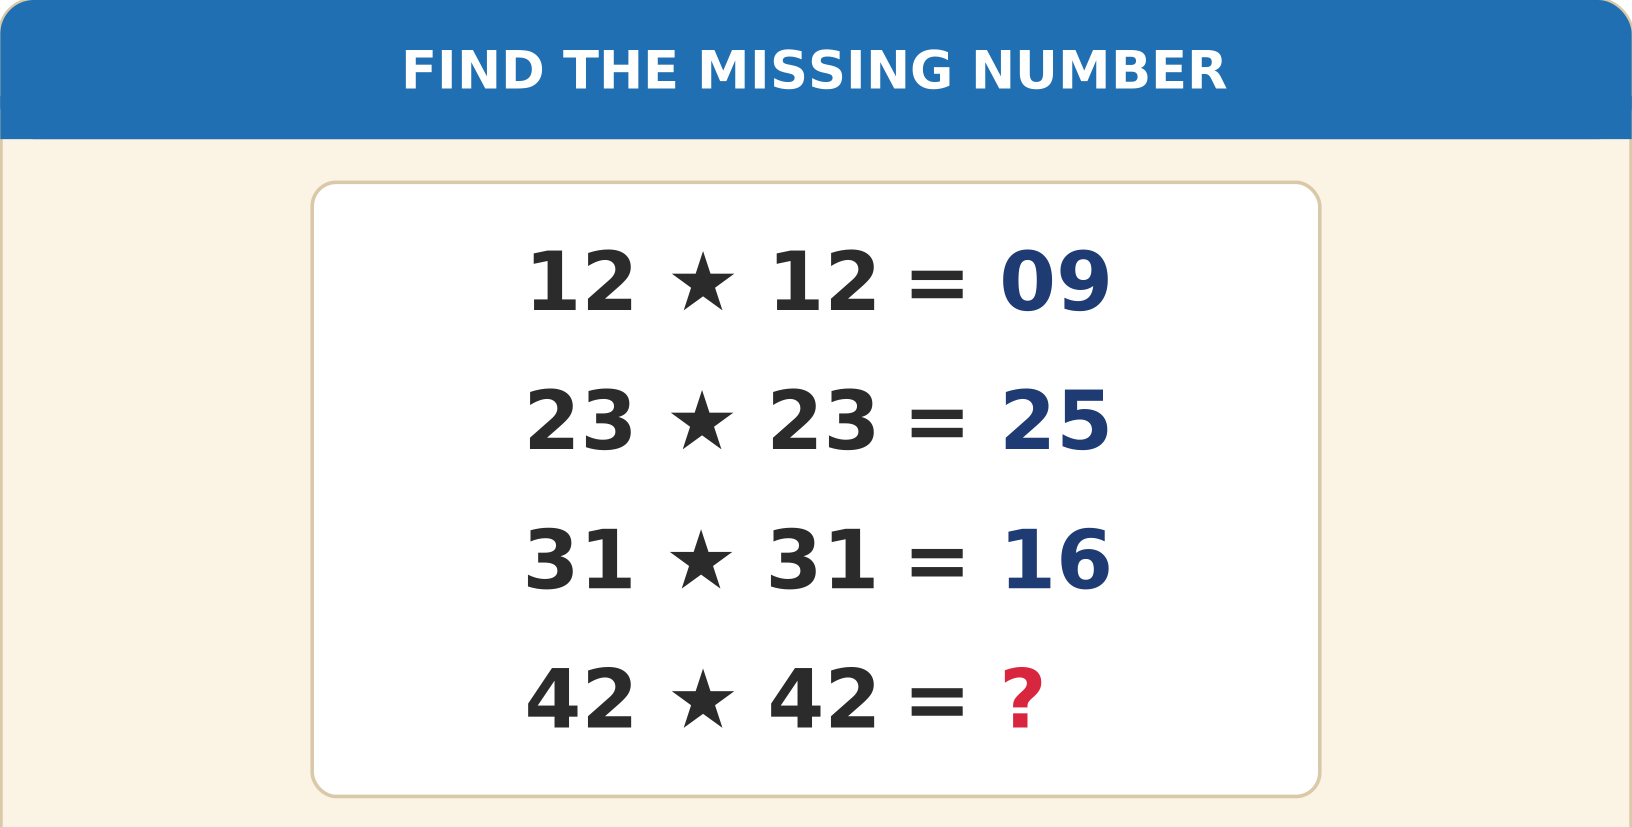
In the code below, the same operation is applied to the digits of each pair of identical numbers. What number replaces the question mark (?)?
Explanation
Treat each number as a two-digit number, add its two digits and square the sum.
12: (1 + 2)² = 9, written 09.
23: (2 + 3)² = 25.
31: (3 + 1)² = 16.
42: (4 + 2)² = 36.
12: (1 + 2)² = 9, written 09.
23: (2 + 3)² = 25.
31: (3 + 1)² = 16.
42: (4 + 2)² = 36.
Shortcut Method
Rule: (sum of the digits)²
42: (4 + 2)² = 36
∴ ? = 36 ✓
42: (4 + 2)² = 36
∴ ? = 36 ✓
Question 57
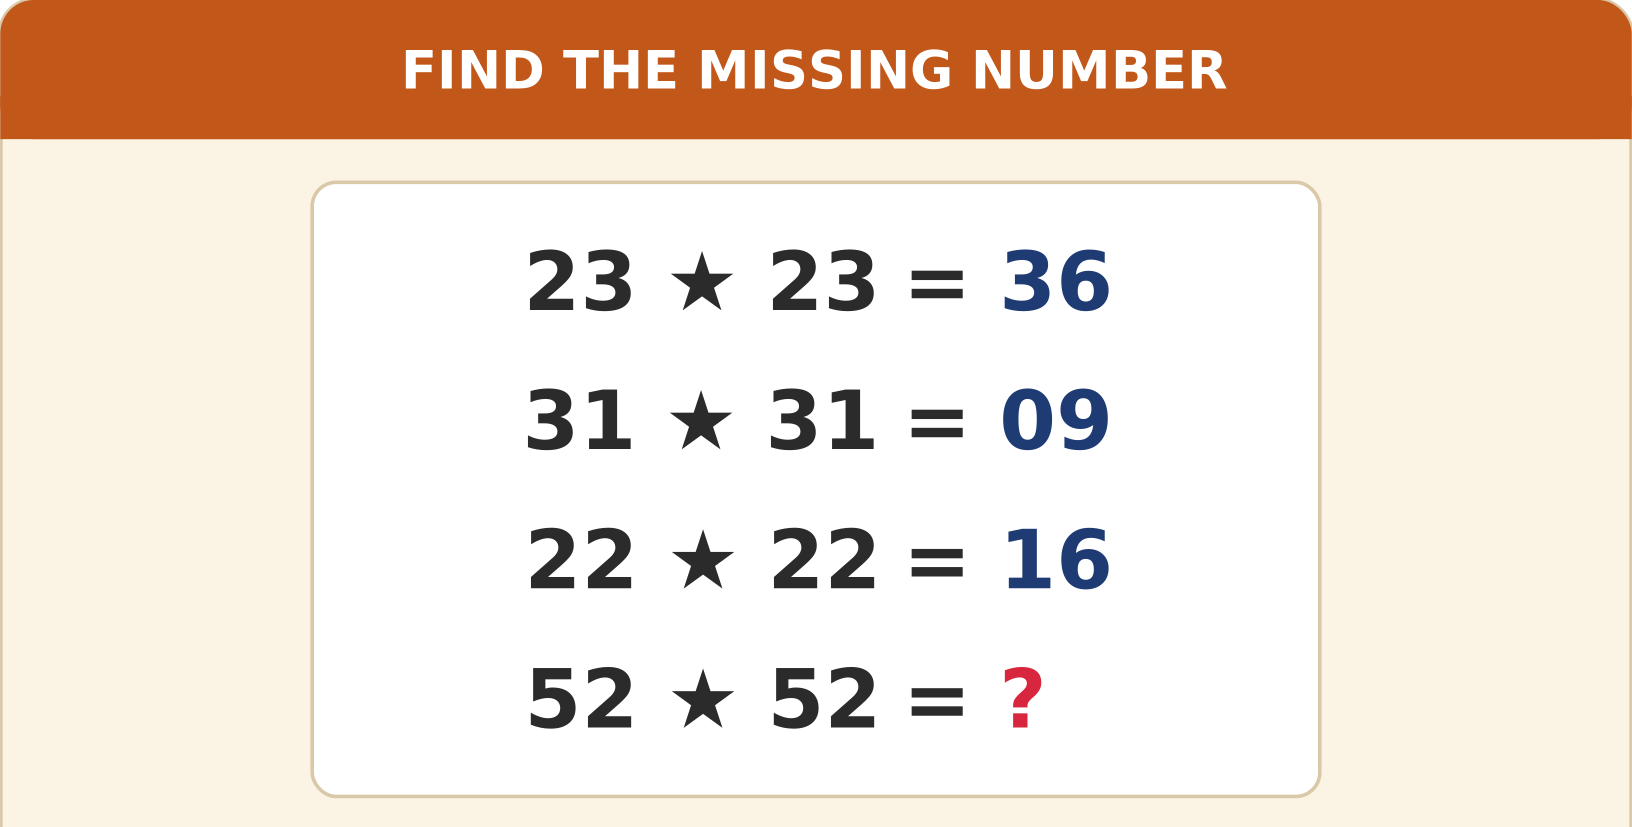
A star sign stands for a hidden operation in these four lines. Use the pattern to find the number that replaces the question mark (?).
Explanation
Treat each number as a two-digit number, multiply its two digits and square the product.
23: (2 × 3)² = 36.
31: (3 × 1)² = 9, written 09.
22: (2 × 2)² = 16.
52: (5 × 2)² = 100.
23: (2 × 3)² = 36.
31: (3 × 1)² = 9, written 09.
22: (2 × 2)² = 16.
52: (5 × 2)² = 100.
Shortcut Method
Rule: (product of the digits)²
52: (5 × 2)² = 100
∴ ? = 100 ✓
52: (5 × 2)² = 100
∴ ? = 100 ✓
Question 58
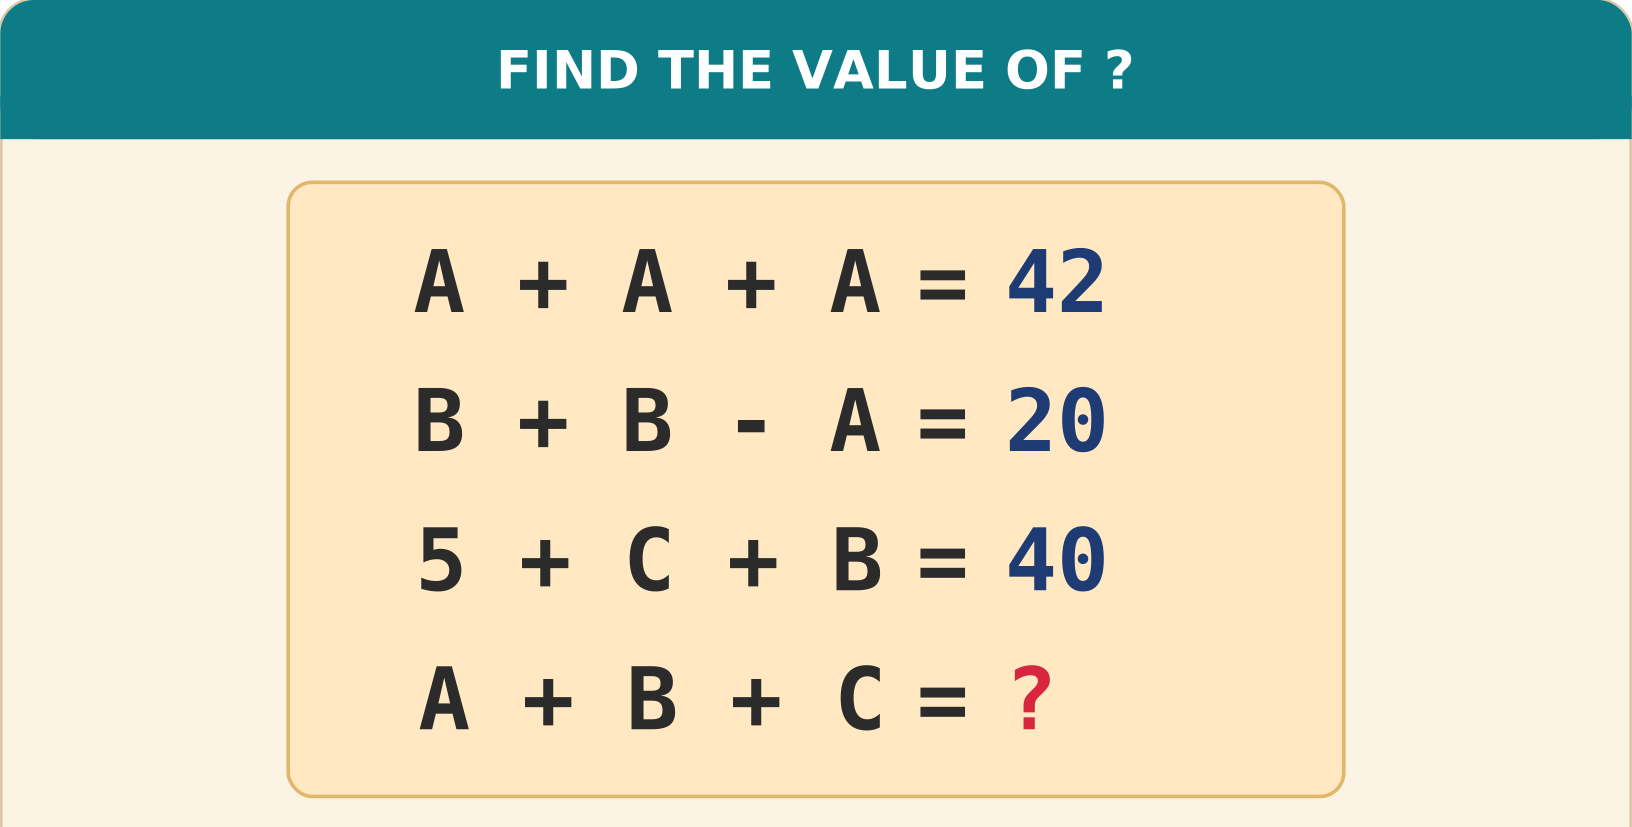
Letters stand for numbers in the equations below. Work out each letter and find the value of the last line.
Explanation
A + A + A = 42, so A = 14.
B + B − A = 20, so 2B = 34 and B = 17.
5 + C + B = 40, so C = 40 − 5 − 17 = 18.
A + B + C = 14 + 17 + 18 = 49.
B + B − A = 20, so 2B = 34 and B = 17.
5 + C + B = 40, so C = 40 − 5 − 17 = 18.
A + B + C = 14 + 17 + 18 = 49.
Shortcut Method
A = 14, B = 17, C = 18
14 + 17 + 18 = 49
∴ ? = 49 ✓
14 + 17 + 18 = 49
∴ ? = 49 ✓
Question 59
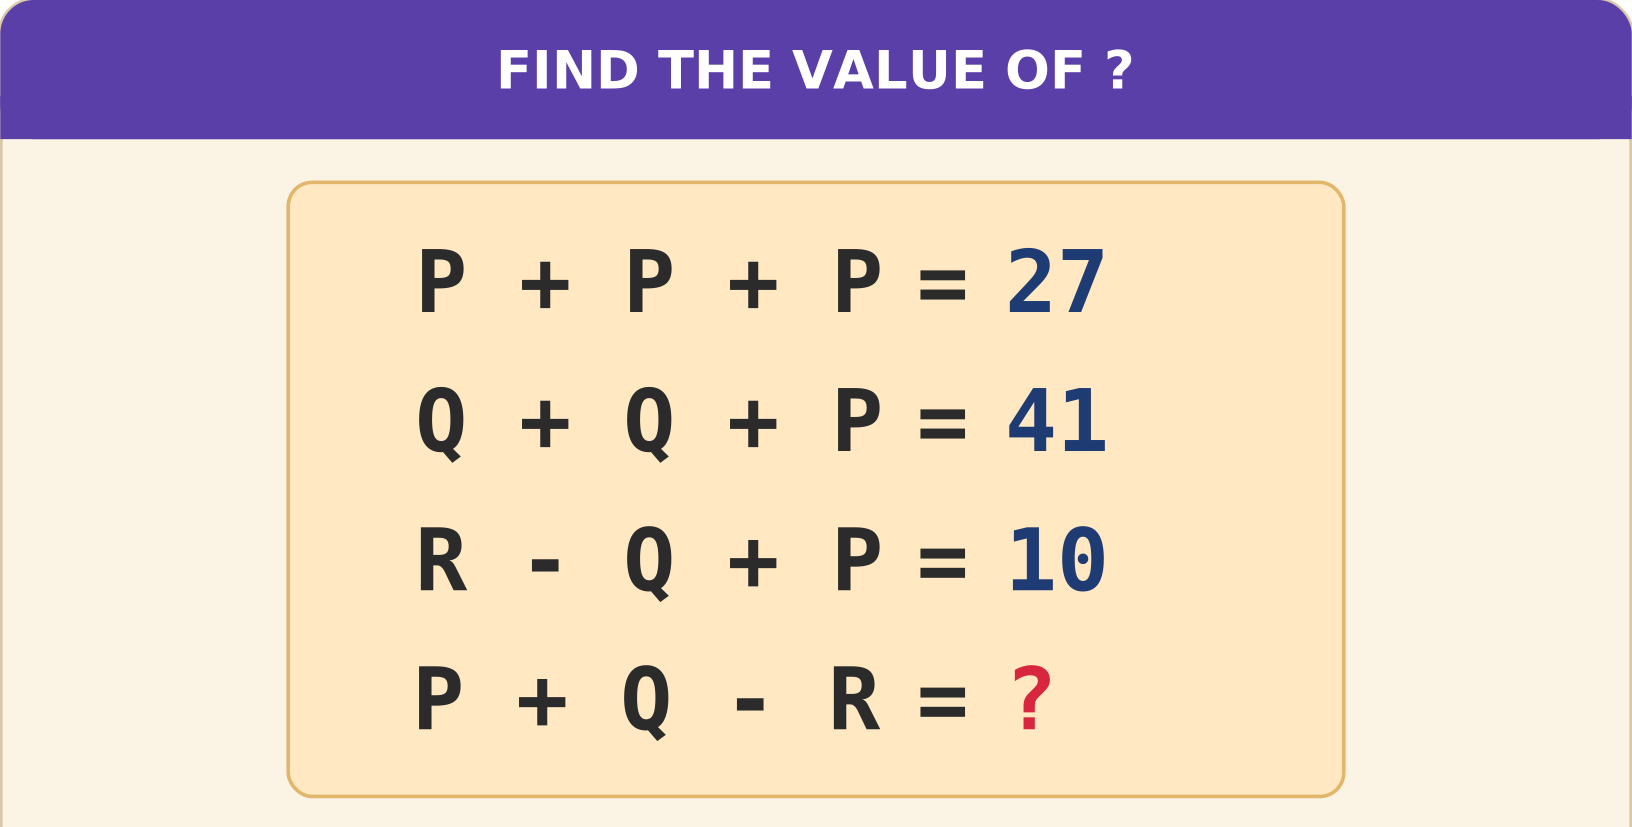
Each letter below has a fixed value. Using the first three lines, find the value of the last line (?).
Explanation
P + P + P = 27, so P = 9.
Q + Q + P = 41, so 2Q = 32 and Q = 16.
R − Q + P = 10, so R = 10 + 16 − 9 = 17.
P + Q − R = 9 + 16 − 17 = 8.
Q + Q + P = 41, so 2Q = 32 and Q = 16.
R − Q + P = 10, so R = 10 + 16 − 9 = 17.
P + Q − R = 9 + 16 − 17 = 8.
Shortcut Method
P = 9, Q = 16, R = 17
9 + 16 − 17 = 8
∴ ? = 8 ✓
9 + 16 − 17 = 8
∴ ? = 8 ✓
Question 60
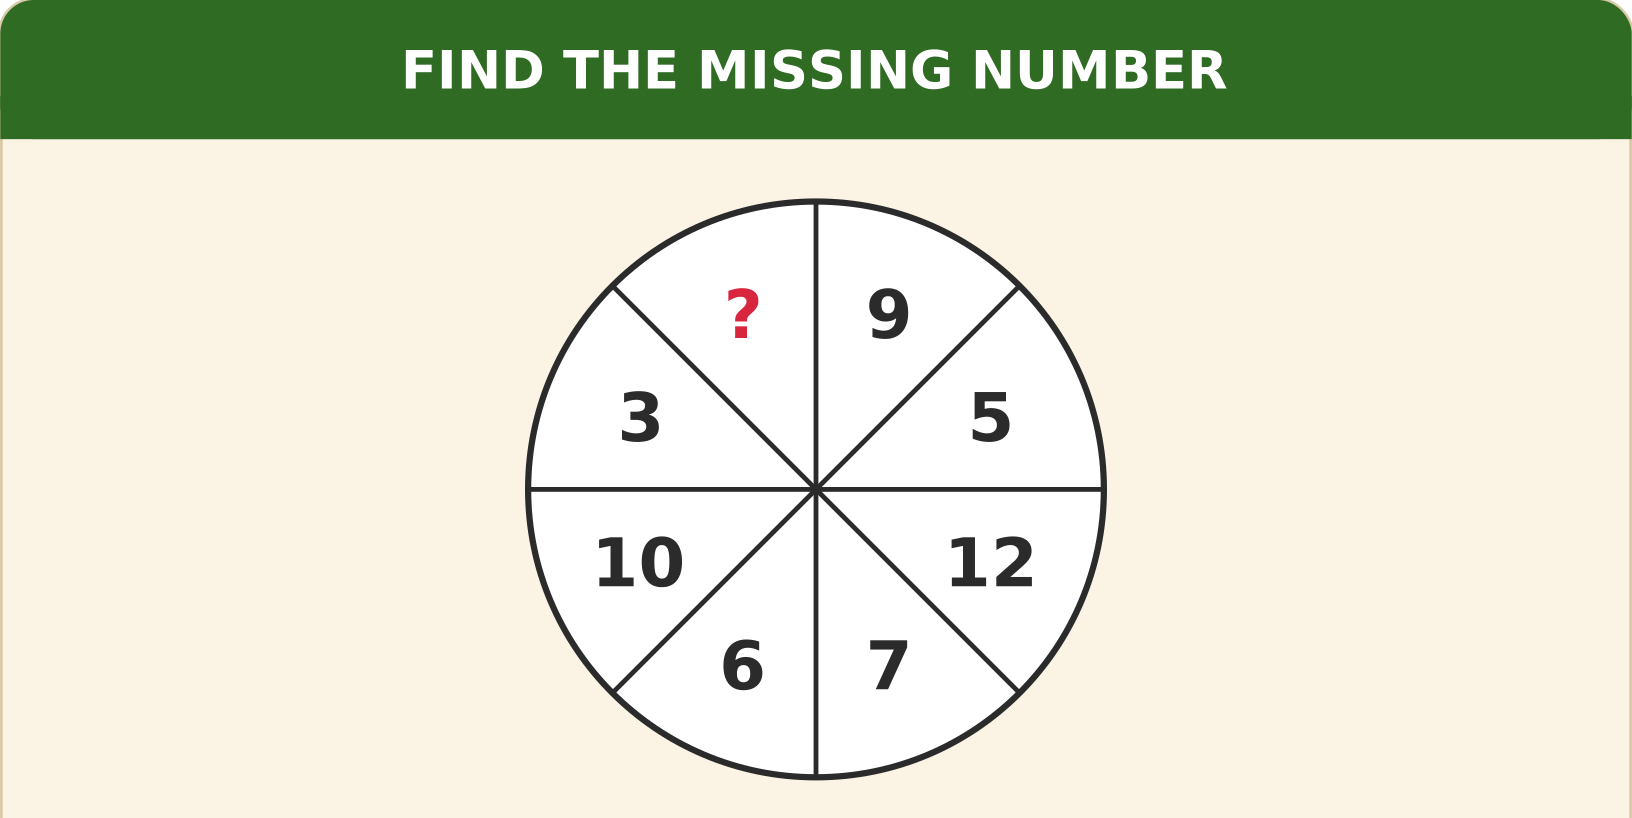
Look at how the numbers in opposite sectors of the circle are related, then find the missing number (?).
Explanation
The numbers in opposite sectors always add up to 15: 9 + 6, 5 + 10 and 12 + 3.
The sector opposite the question mark holds 7, so ? = 15 − 7 = 8.
The sector opposite the question mark holds 7, so ? = 15 − 7 = 8.
Shortcut Method
Rule: opposite sectors add up to 15
? + 7 = 15
∴ ? = 8 ✓
? + 7 = 15
∴ ? = 8 ✓
Question 61
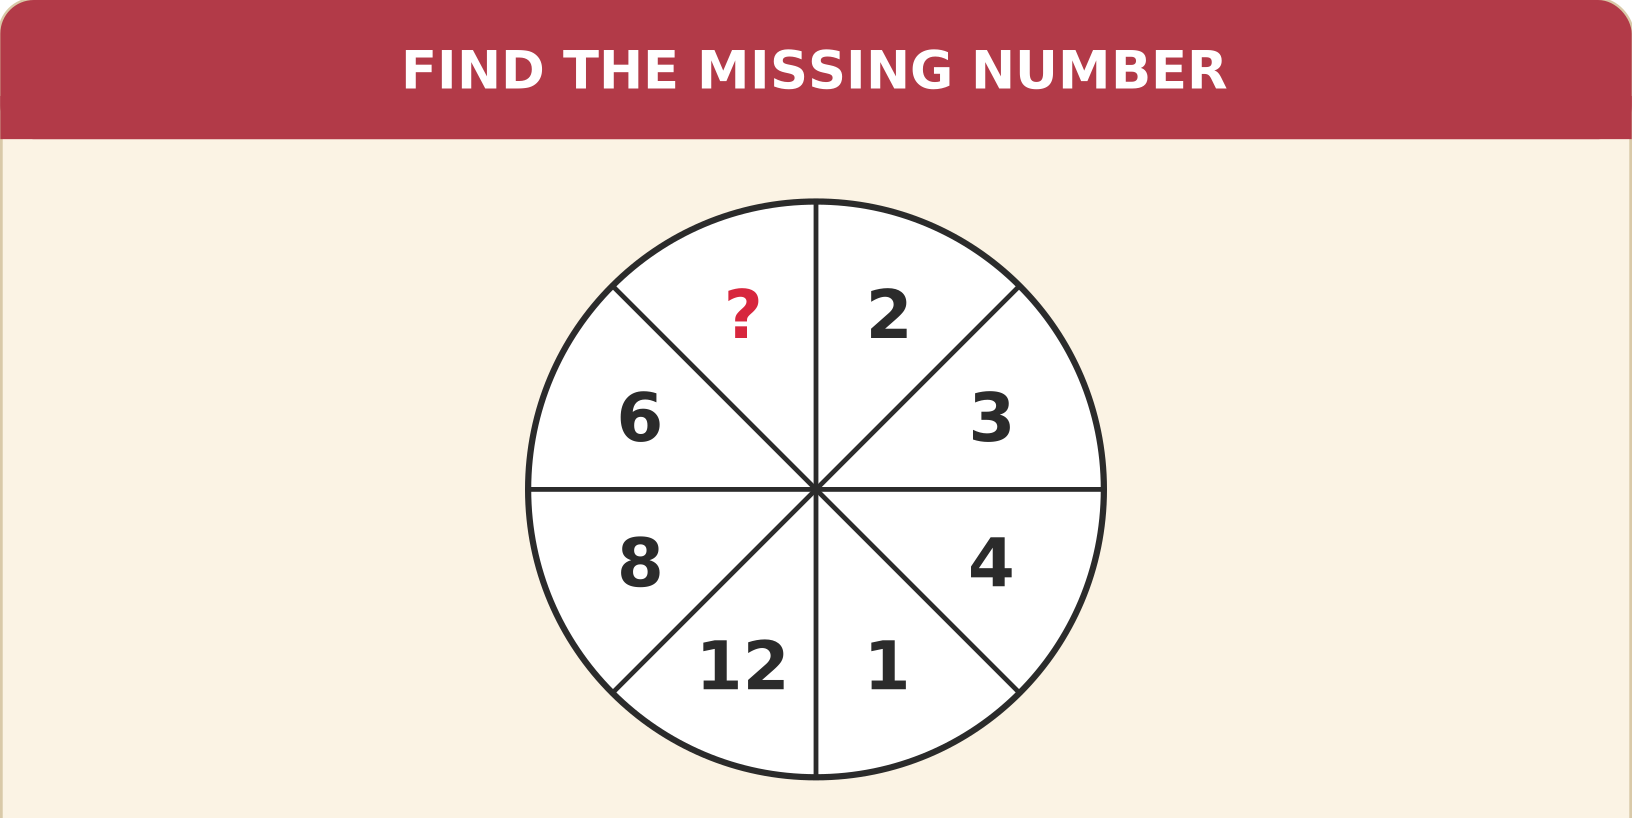
Numbers in the eight sectors of this wheel are paired off across the centre. Which number replaces the question mark (?)?
Explanation
The numbers in opposite sectors always multiply to 24: 2 × 12, 3 × 8 and 4 × 6.
The sector opposite the question mark holds 1, so ? = 24 ÷ 1 = 24.
The sector opposite the question mark holds 1, so ? = 24 ÷ 1 = 24.
Shortcut Method
Rule: opposite sectors multiply to 24
? × 1 = 24
∴ ? = 24 ✓
? × 1 = 24
∴ ? = 24 ✓
Question 62
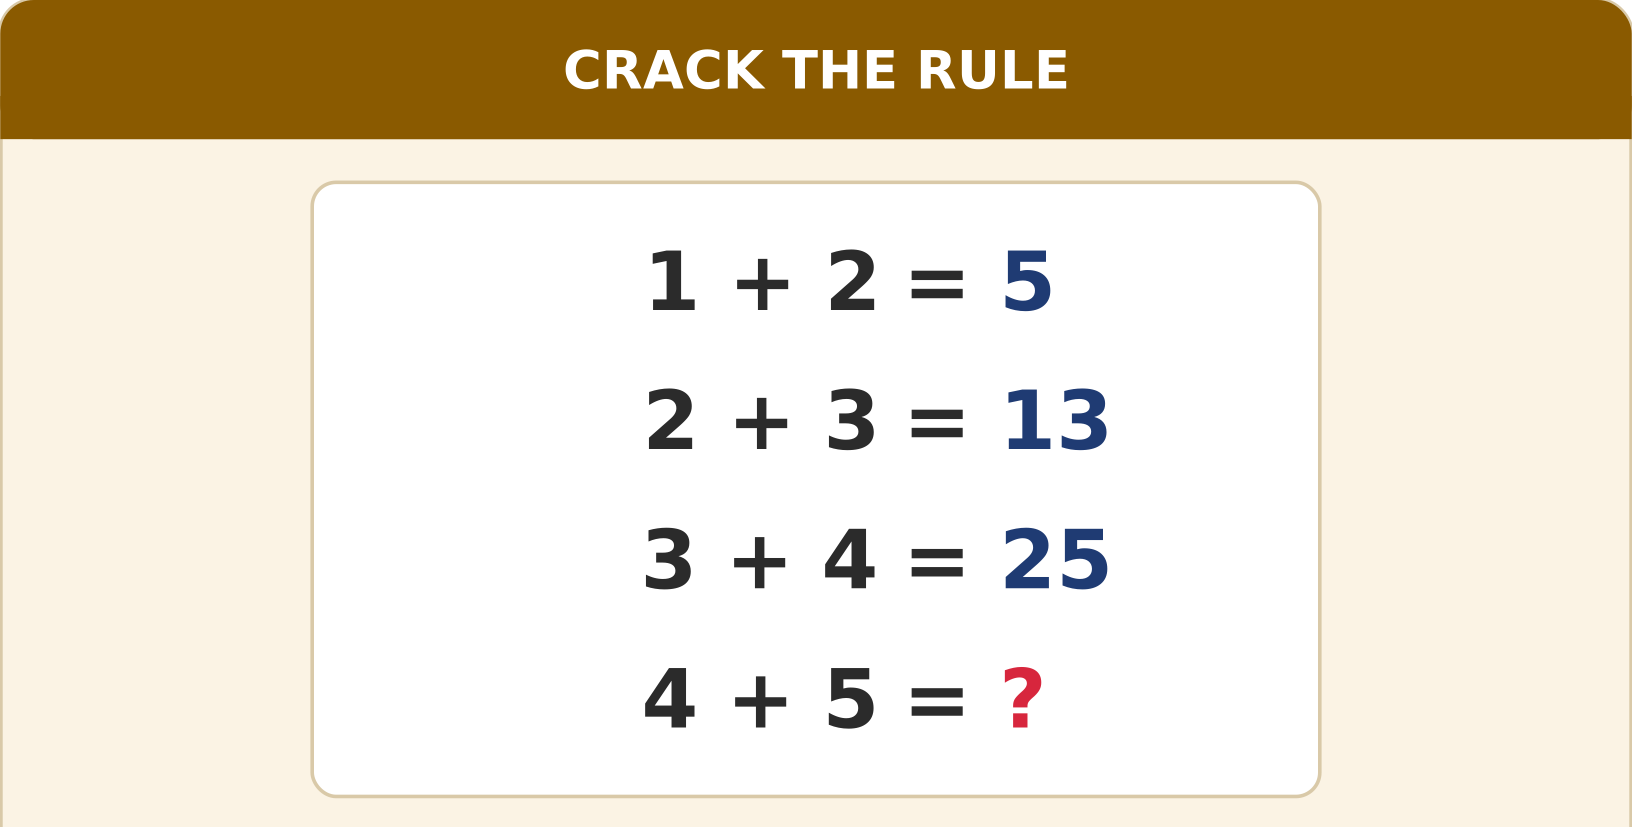
A secret rule has been used for the plus sign in these sums. Using the same rule, find the missing number.
Explanation
Here a + b means a² + b².
1 + 2 = 1 + 4 = 5.
2 + 3 = 4 + 9 = 13.
3 + 4 = 9 + 16 = 25.
So 4 + 5 = 16 + 25 = 41.
1 + 2 = 1 + 4 = 5.
2 + 3 = 4 + 9 = 13.
3 + 4 = 9 + 16 = 25.
So 4 + 5 = 16 + 25 = 41.
Shortcut Method
Rule: a + b means a² + b²
4² + 5² = 16 + 25
∴ ? = 41 ✓
4² + 5² = 16 + 25
∴ ? = 41 ✓
Question 63
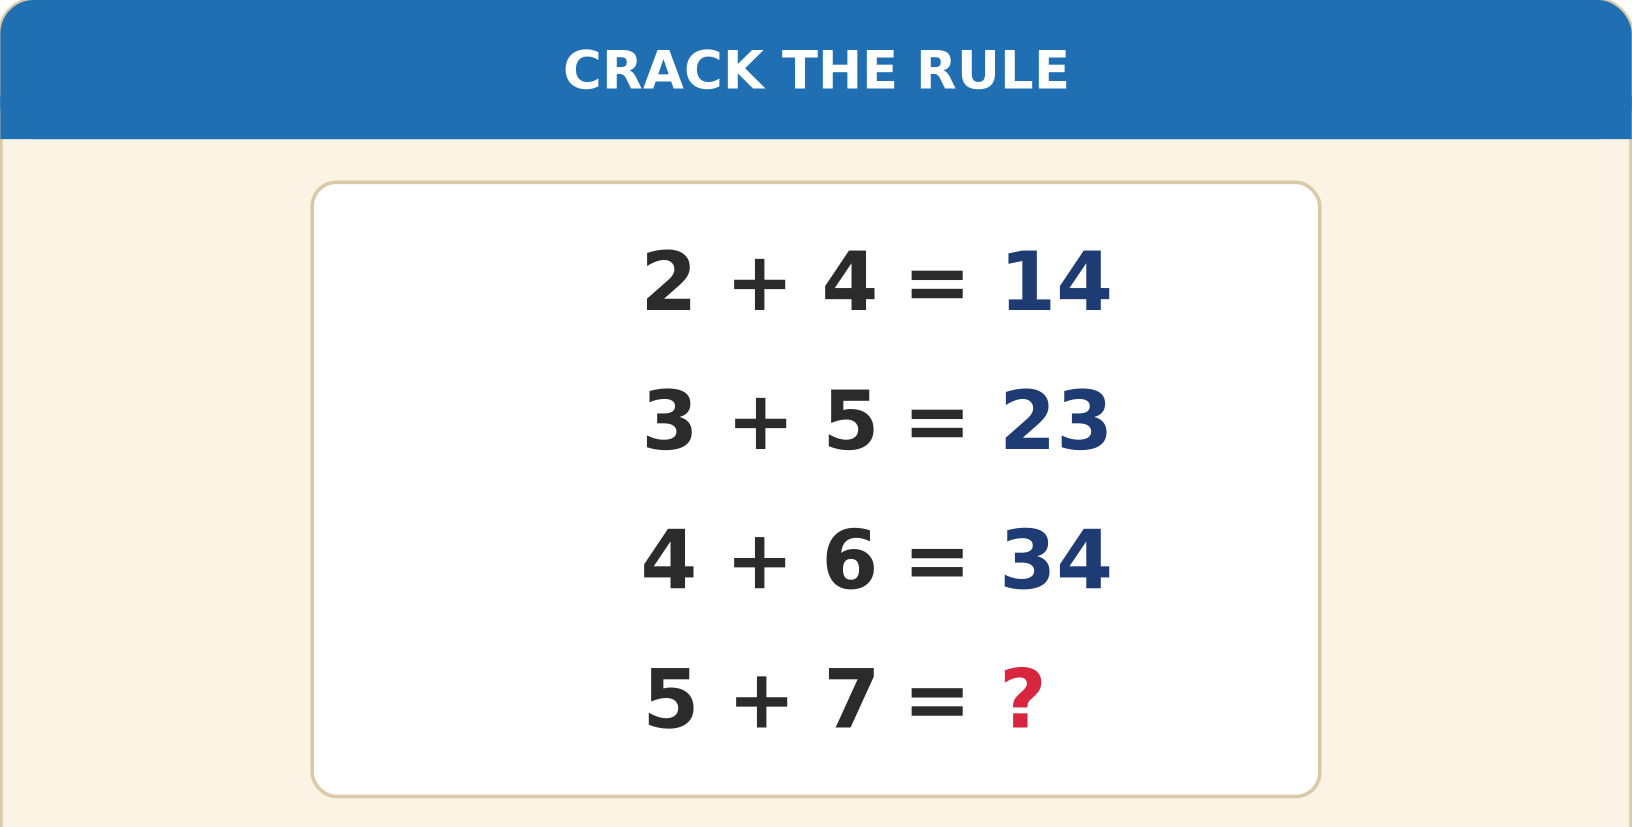
The plus sign below does not mean ordinary addition. Using the same rule, find the number that replaces the question mark (?).
Explanation
Here a + b means (a × b) + (a + b).
2 + 4 = 8 + 6 = 14.
3 + 5 = 15 + 8 = 23.
4 + 6 = 24 + 10 = 34.
So 5 + 7 = 35 + 12 = 47.
2 + 4 = 8 + 6 = 14.
3 + 5 = 15 + 8 = 23.
4 + 6 = 24 + 10 = 34.
So 5 + 7 = 35 + 12 = 47.
Shortcut Method
Rule: a + b means (a × b) + (a + b)
35 + 12
∴ ? = 47 ✓
35 + 12
∴ ? = 47 ✓
Question 64
Every shape in the grid stands for a number, and the totals of the rows and columns are given. Find the missing total (?).
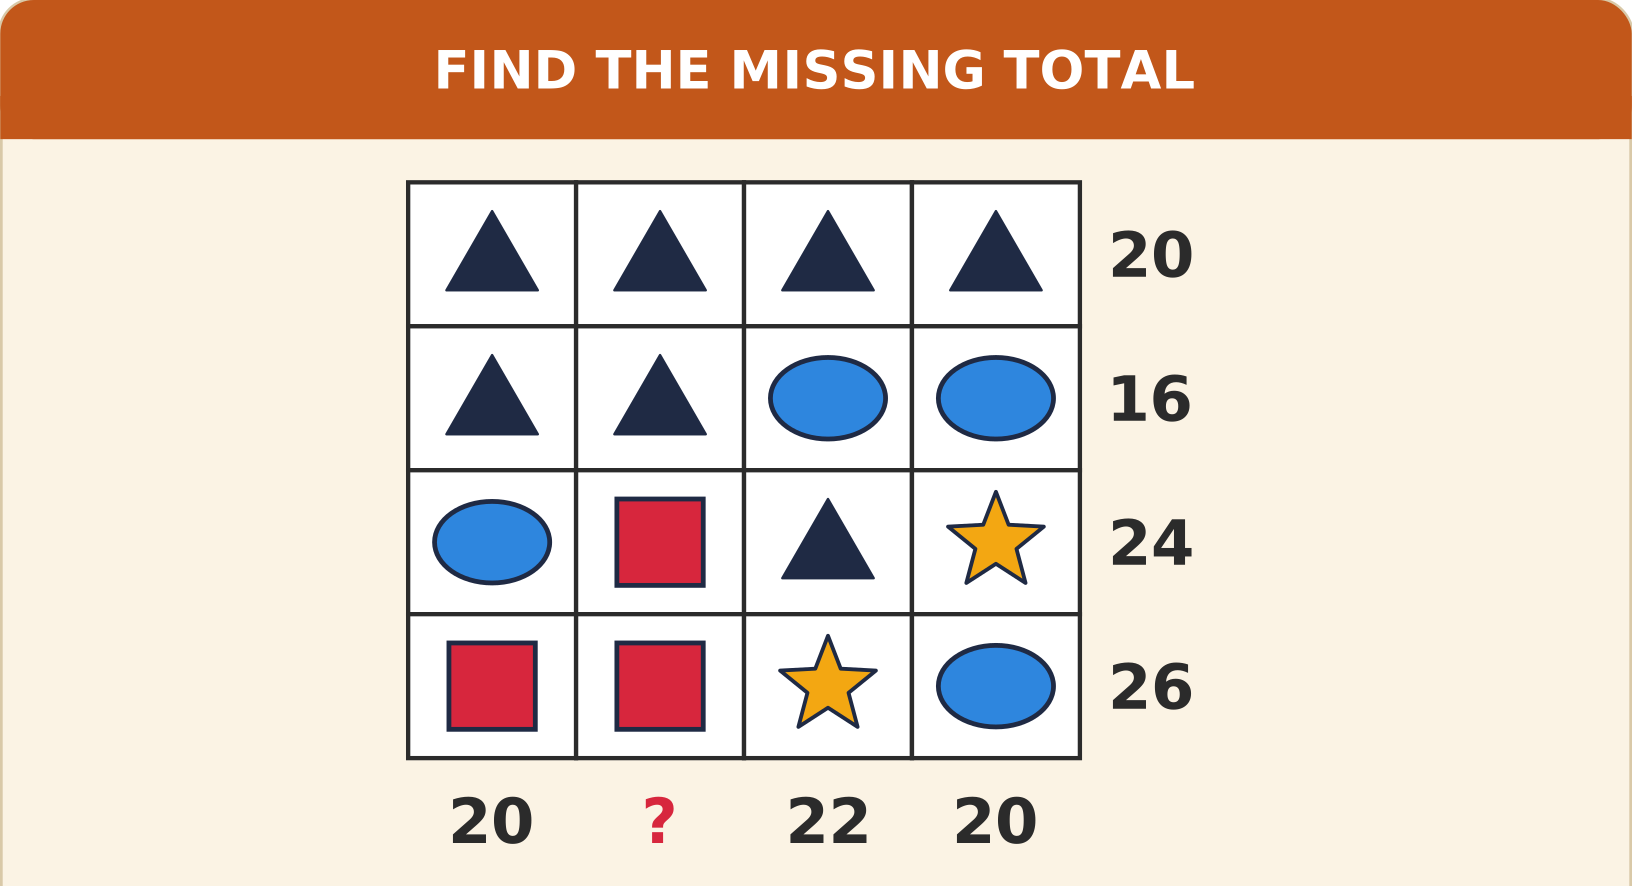
Explanation
Row 1: four triangles = 20, so a triangle = 5.
Row 2: 5 + 5 + oval + oval = 16, so an oval = 3.
Row 3: 3 + square + 5 + star = 24, so square + star = 16.
Row 4: square + square + star + 3 = 26, so square + square + star = 23. Subtracting gives square = 7 and star = 9.
Column 2 = 5 + 5 + 7 + 7 = 24.
Row 2: 5 + 5 + oval + oval = 16, so an oval = 3.
Row 3: 3 + square + 5 + star = 24, so square + star = 16.
Row 4: square + square + star + 3 = 26, so square + square + star = 23. Subtracting gives square = 7 and star = 9.
Column 2 = 5 + 5 + 7 + 7 = 24.
Shortcut Method
Triangle = 5, oval = 3, square = 7, star = 9
Column 2: 5 + 5 + 7 + 7
∴ ? = 24 ✓
Column 2: 5 + 5 + 7 + 7
∴ ? = 24 ✓
Question 65
Each shape in the grid below has a fixed value. The totals of the rows are shown on the right and the totals of the columns at the bottom. Which number replaces the question mark (?)?
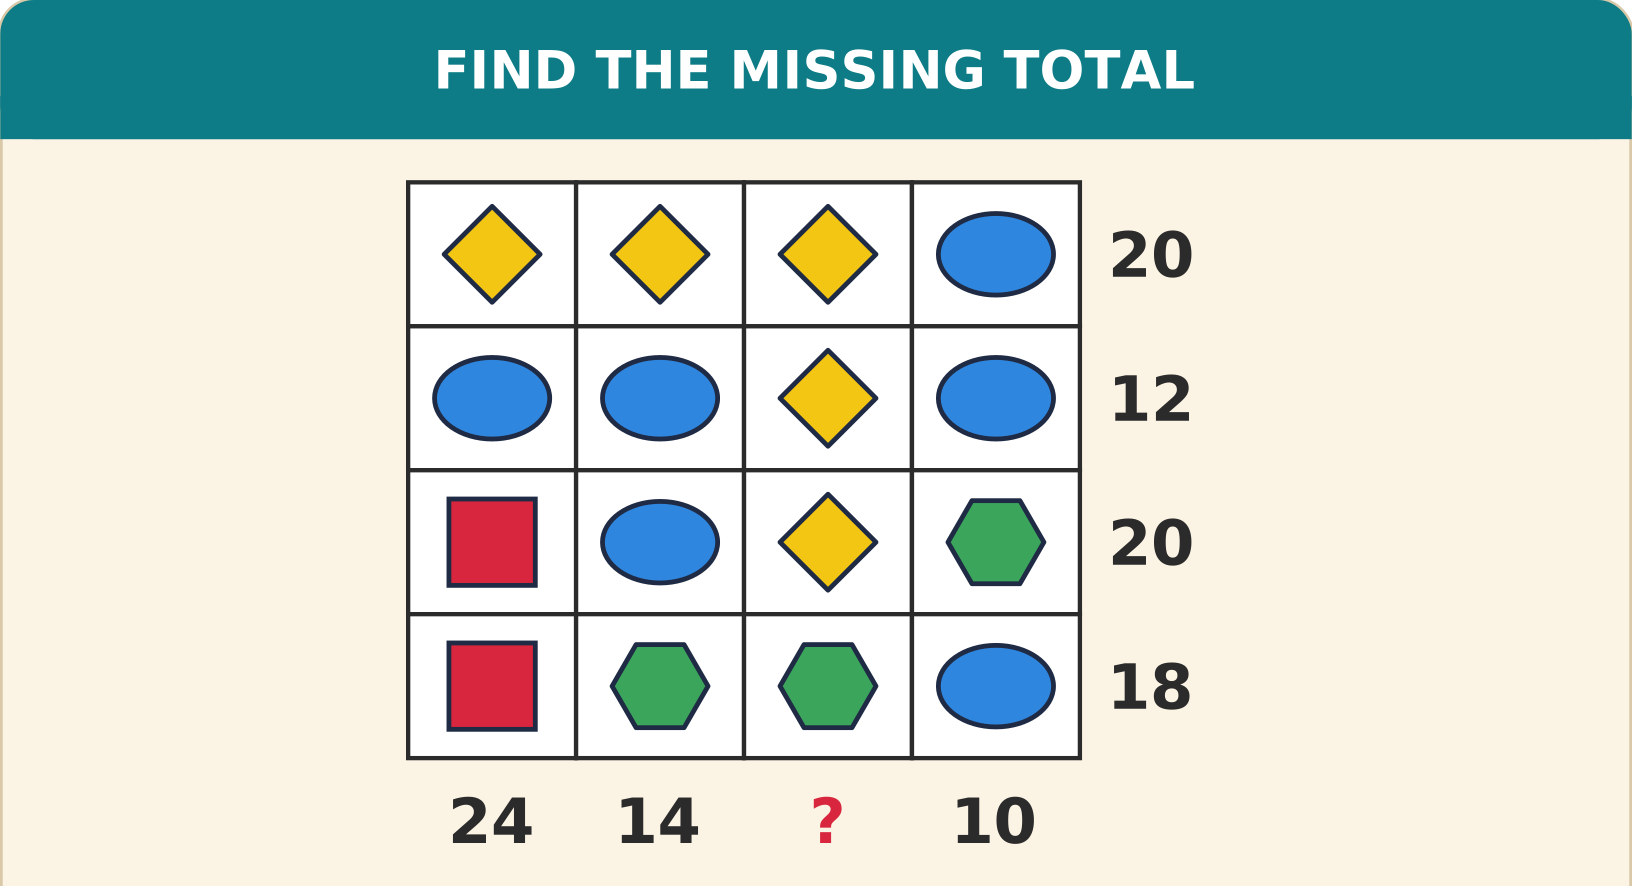
Explanation
Row 1: 3 diamonds + 1 oval = 20. Row 2: 3 ovals + 1 diamond = 12. Solving gives diamond = 6 and oval = 2.
Row 3: square + 2 + 6 + hexagon = 20, so square + hexagon = 12.
Row 4: square + 2 hexagons + 2 = 18, so square + 2 hexagons = 16. Subtracting gives hexagon = 4 and square = 8.
Column 3 = 6 + 6 + 6 + 4 = 22.
Row 3: square + 2 + 6 + hexagon = 20, so square + hexagon = 12.
Row 4: square + 2 hexagons + 2 = 18, so square + 2 hexagons = 16. Subtracting gives hexagon = 4 and square = 8.
Column 3 = 6 + 6 + 6 + 4 = 22.
Shortcut Method
Diamond = 6, oval = 2, square = 8, hexagon = 4
Column 3: 6 + 6 + 6 + 4
∴ ? = 22 ✓
Column 3: 6 + 6 + 6 + 4
∴ ? = 22 ✓
Question 66
In this code, each sum is written as one number. Crack the code and find the number that replaces the question mark (?).
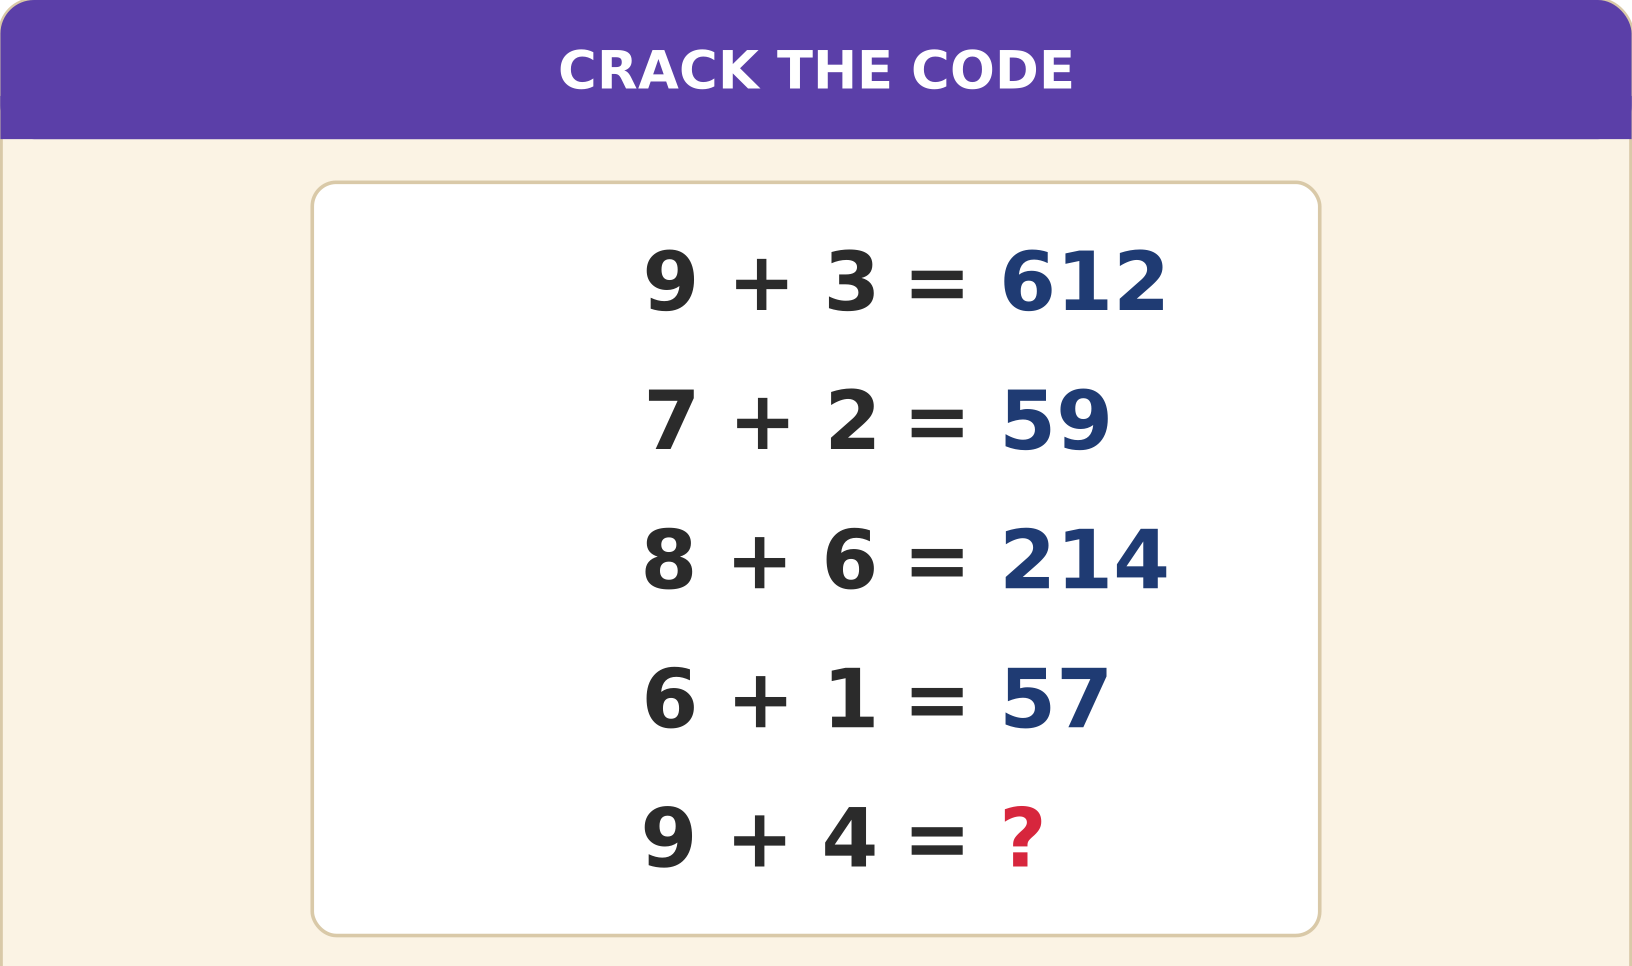
Explanation
The answer is the difference of the two numbers written first, then their sum.
9 + 3: 9 − 3 = 6 and 9 + 3 = 12, so 612.
7 + 2: 5 and 9, so 59.
8 + 6: 2 and 14, so 214.
6 + 1: 5 and 7, so 57.
So 9 + 4: 5 and 13, giving 513.
9 + 3: 9 − 3 = 6 and 9 + 3 = 12, so 612.
7 + 2: 5 and 9, so 59.
8 + 6: 2 and 14, so 214.
6 + 1: 5 and 7, so 57.
So 9 + 4: 5 and 13, giving 513.
Shortcut Method
Rule: (difference) then (sum)
9 − 4 = 5 and 9 + 4 = 13
∴ ? = 513 ✓
9 − 4 = 5 and 9 + 4 = 13
∴ ? = 513 ✓
Question 67
Another code writes each pair of numbers as a single number. Using the same code, find the missing number.
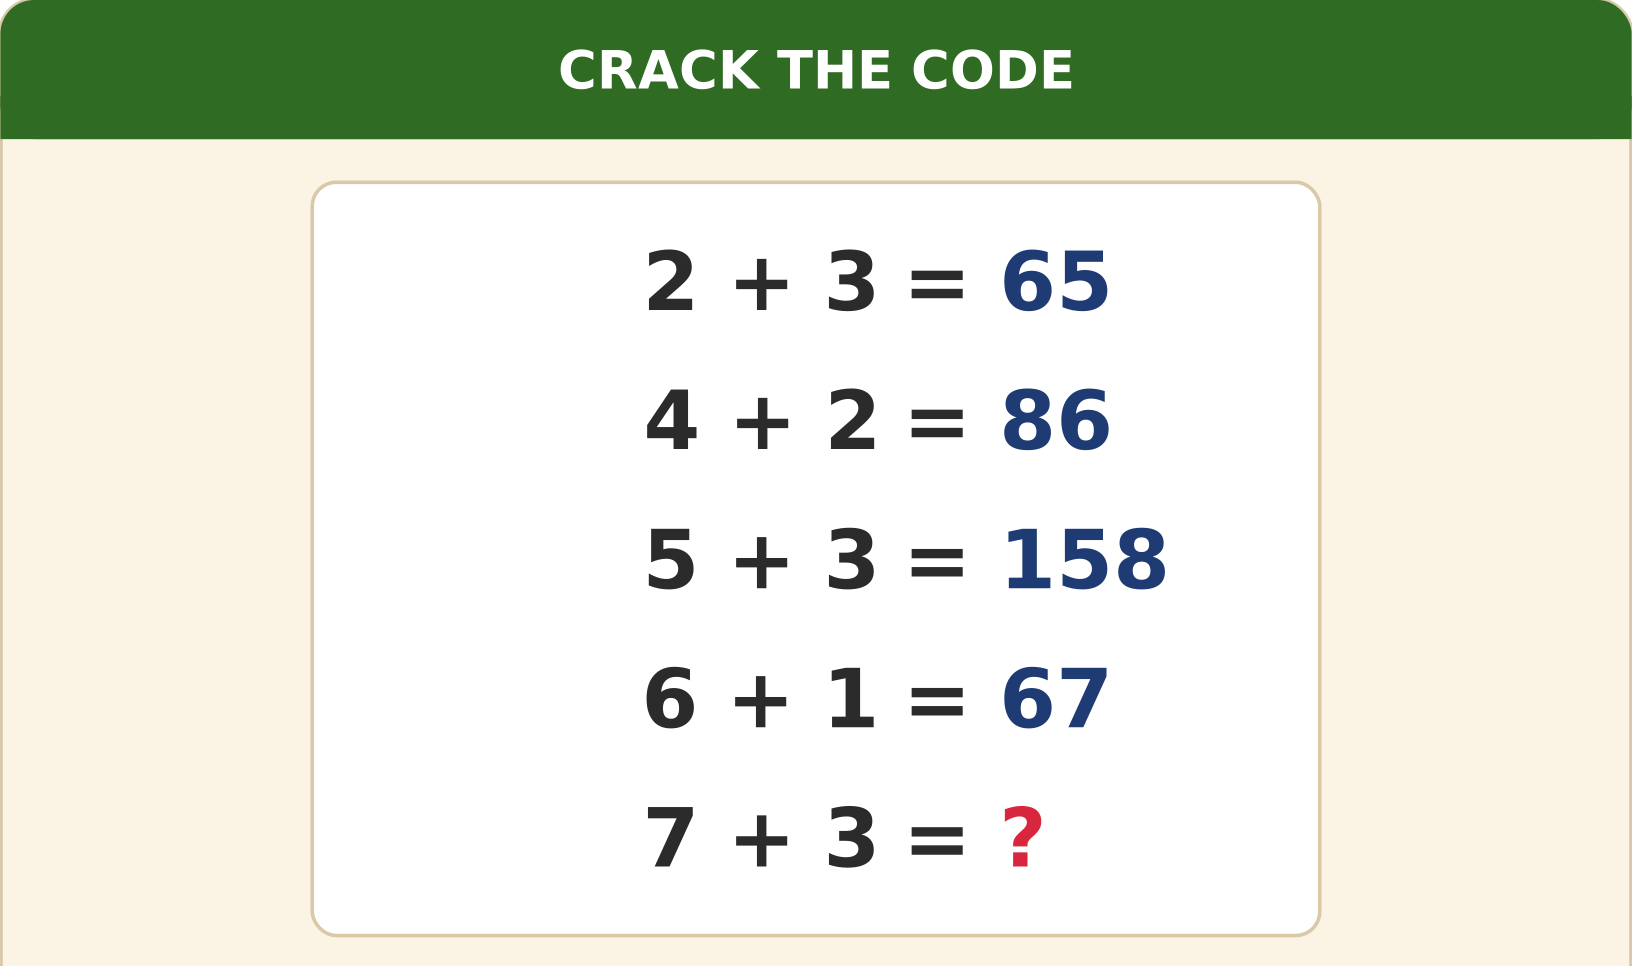
Explanation
The answer is the product of the two numbers written first, then their sum.
2 + 3: 2 × 3 = 6 and 2 + 3 = 5, so 65.
4 + 2: 8 and 6, so 86.
5 + 3: 15 and 8, so 158.
6 + 1: 6 and 7, so 67.
So 7 + 3: 21 and 10, giving 2110.
2 + 3: 2 × 3 = 6 and 2 + 3 = 5, so 65.
4 + 2: 8 and 6, so 86.
5 + 3: 15 and 8, so 158.
6 + 1: 6 and 7, so 67.
So 7 + 3: 21 and 10, giving 2110.
Shortcut Method
Rule: (product) then (sum)
7 × 3 = 21 and 7 + 3 = 10
∴ ? = 2110 ✓
7 × 3 = 21 and 7 + 3 = 10
∴ ? = 2110 ✓
Question 68
The plus sign in these lines stands for a different operation. Using the same rule, find the missing number (?).
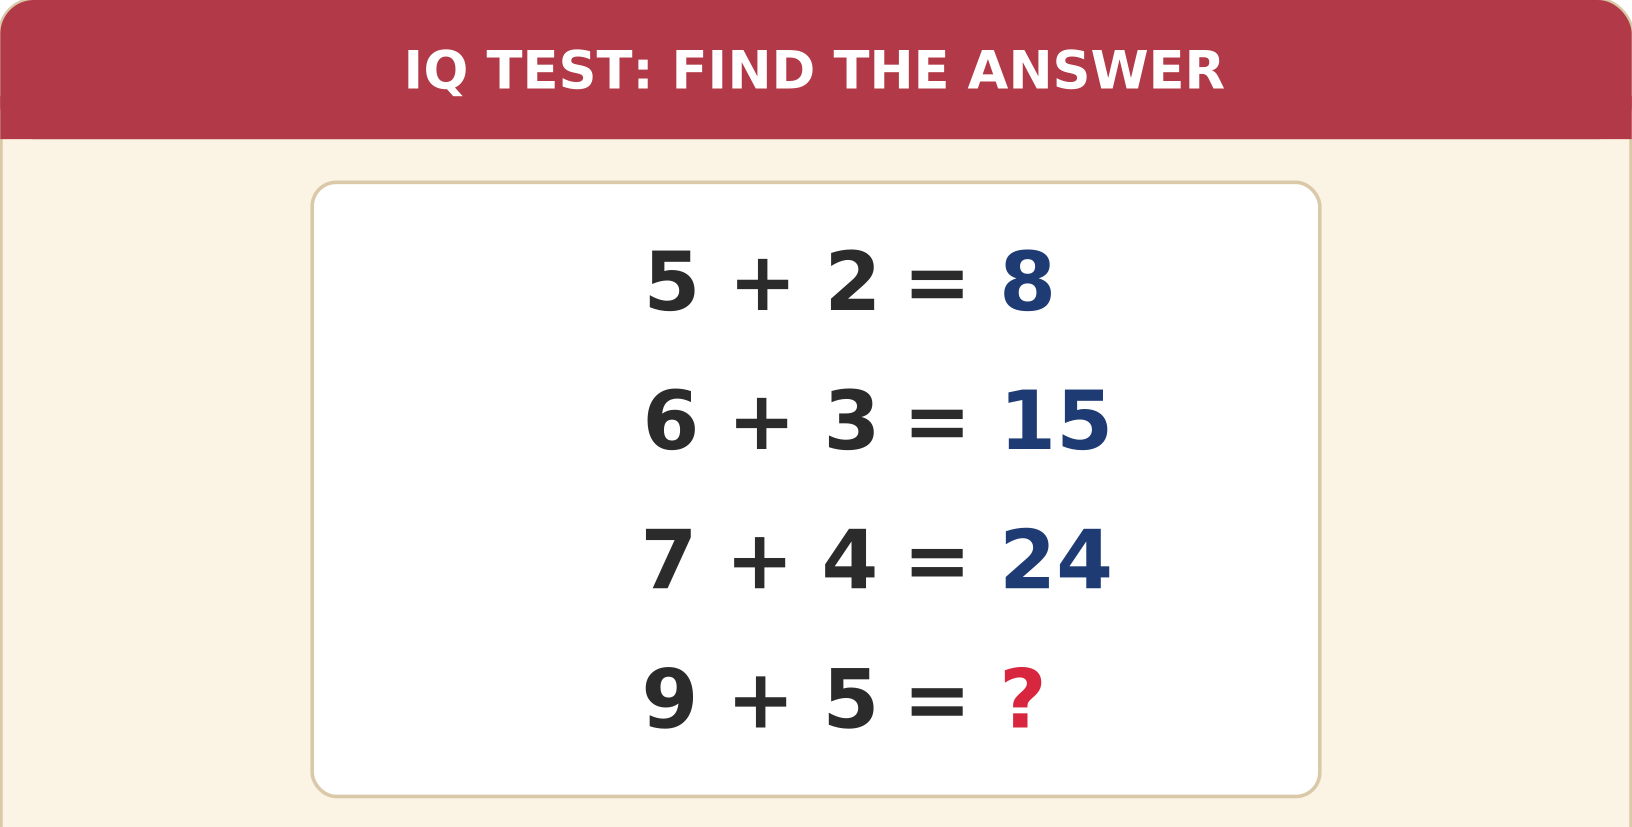
Explanation
Here a + b means (a × b) − b.
5 + 2 = 10 − 2 = 8.
6 + 3 = 18 − 3 = 15.
7 + 4 = 28 − 4 = 24.
So 9 + 5 = 45 − 5 = 40.
5 + 2 = 10 − 2 = 8.
6 + 3 = 18 − 3 = 15.
7 + 4 = 28 − 4 = 24.
So 9 + 5 = 45 − 5 = 40.
Shortcut Method
Rule: a + b means (a × b) − b
9 × 5 − 5
∴ ? = 40 ✓
9 × 5 − 5
∴ ? = 40 ✓
Question 69
These lines use a hidden rule instead of ordinary addition. Find the number that replaces the question mark (?).
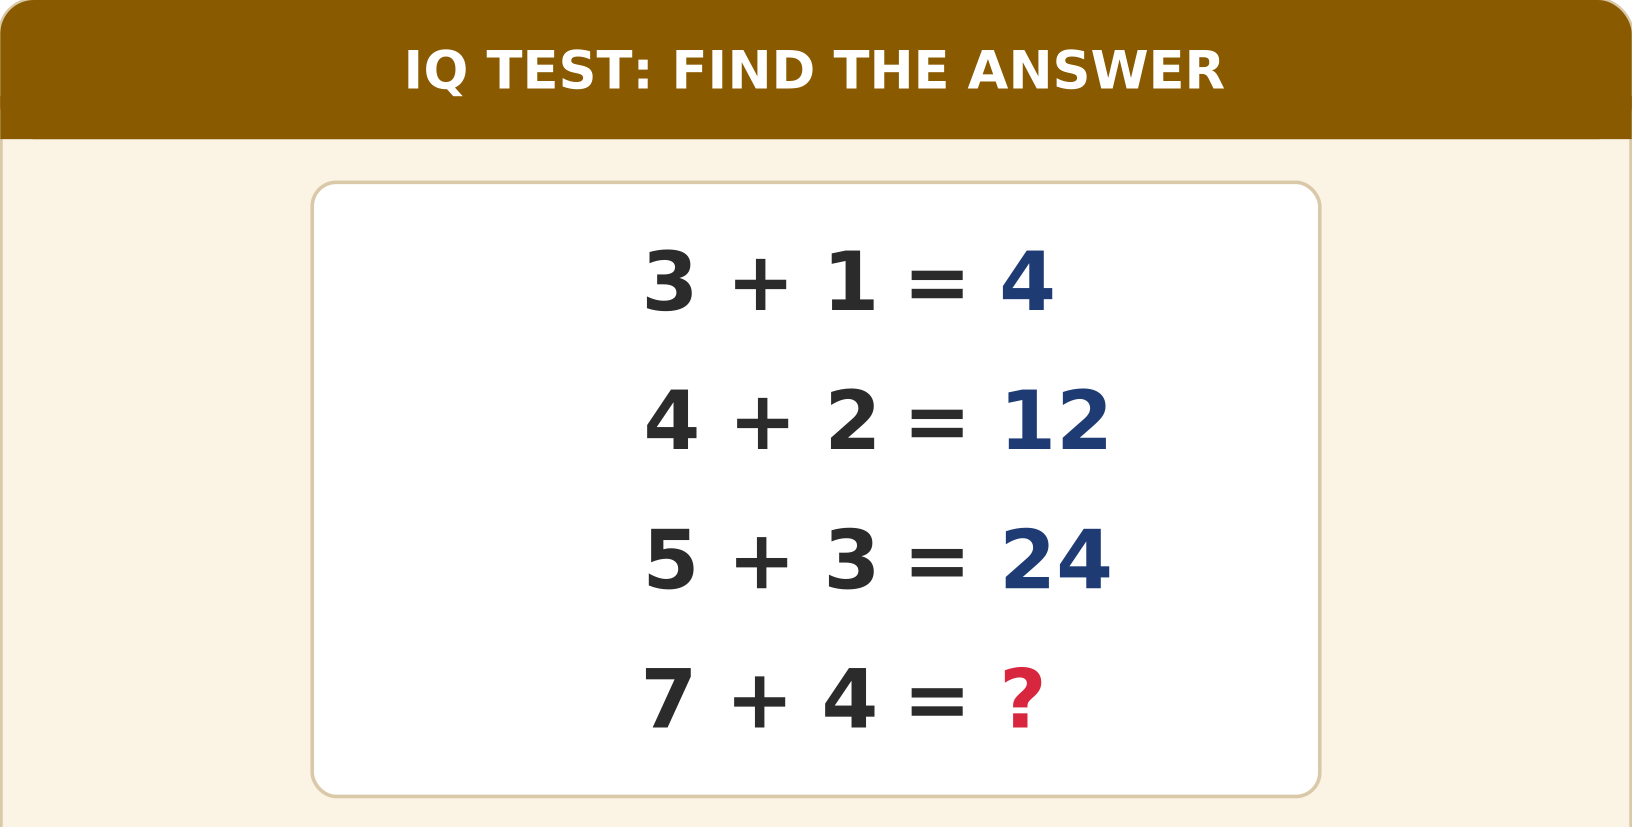
Explanation
Here a + b means (a + b) × b.
3 + 1 = 4 × 1 = 4.
4 + 2 = 6 × 2 = 12.
5 + 3 = 8 × 3 = 24.
So 7 + 4 = 11 × 4 = 44.
3 + 1 = 4 × 1 = 4.
4 + 2 = 6 × 2 = 12.
5 + 3 = 8 × 3 = 24.
So 7 + 4 = 11 × 4 = 44.
Shortcut Method
Rule: a + b means (a + b) × b
(7 + 4) × 4 = 11 × 4
∴ ? = 44 ✓
(7 + 4) × 4 = 11 × 4
∴ ? = 44 ✓
Question 70
Two equations connect A and B in the figure below. Use them to find A ÷ B.
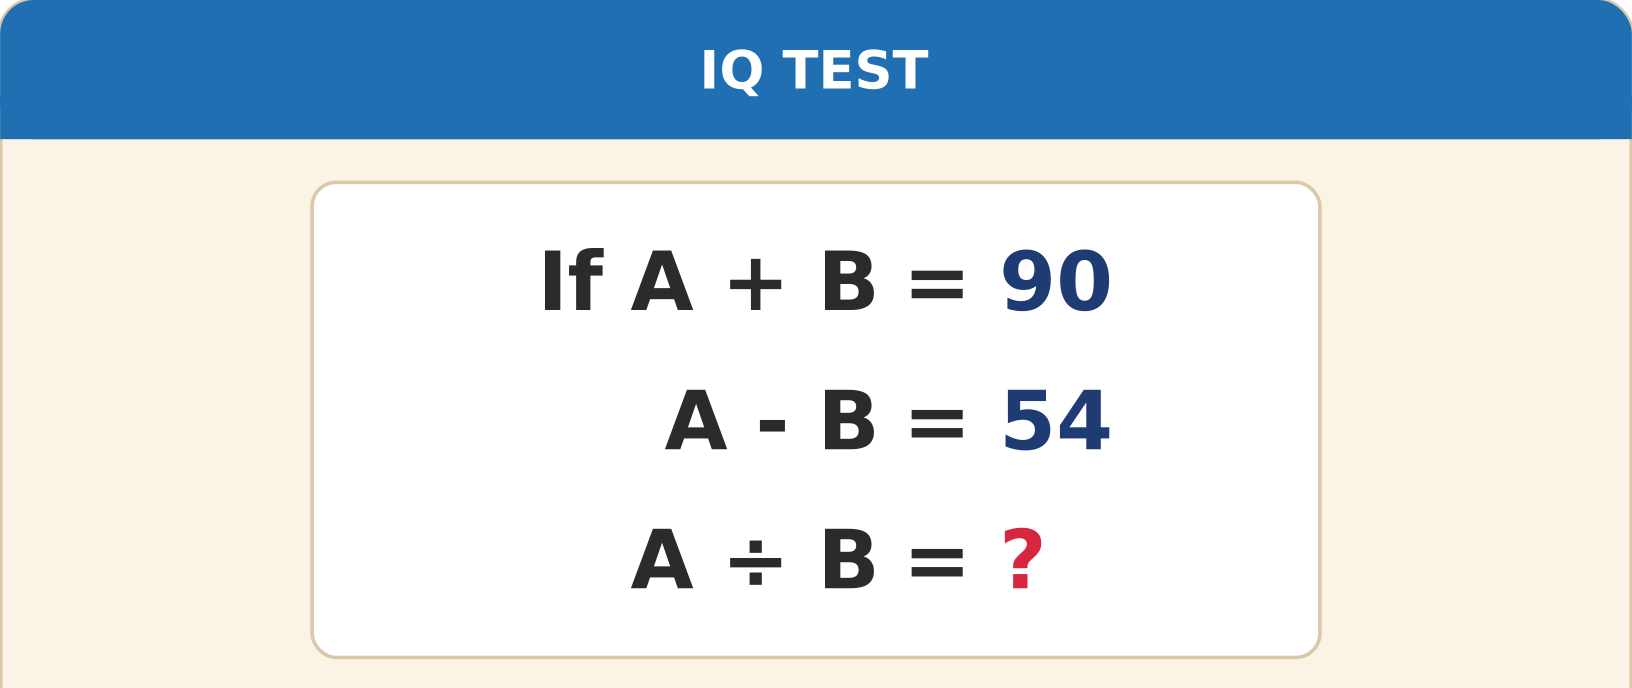
Explanation
A + B = 90 and A − B = 54.
Adding the two equations gives 2A = 144, so A = 72. Then B = 90 − 72 = 18.
A ÷ B = 72 ÷ 18 = 4.
Adding the two equations gives 2A = 144, so A = 72. Then B = 90 − 72 = 18.
A ÷ B = 72 ÷ 18 = 4.
Shortcut Method
2A = 90 + 54 = 144, so A = 72 and B = 18
72 ÷ 18
∴ ? = 4 ✓
72 ÷ 18
∴ ? = 4 ✓
Question 71
The figure gives the product and the quotient of A and B. Find A + B (take A and B as positive numbers).
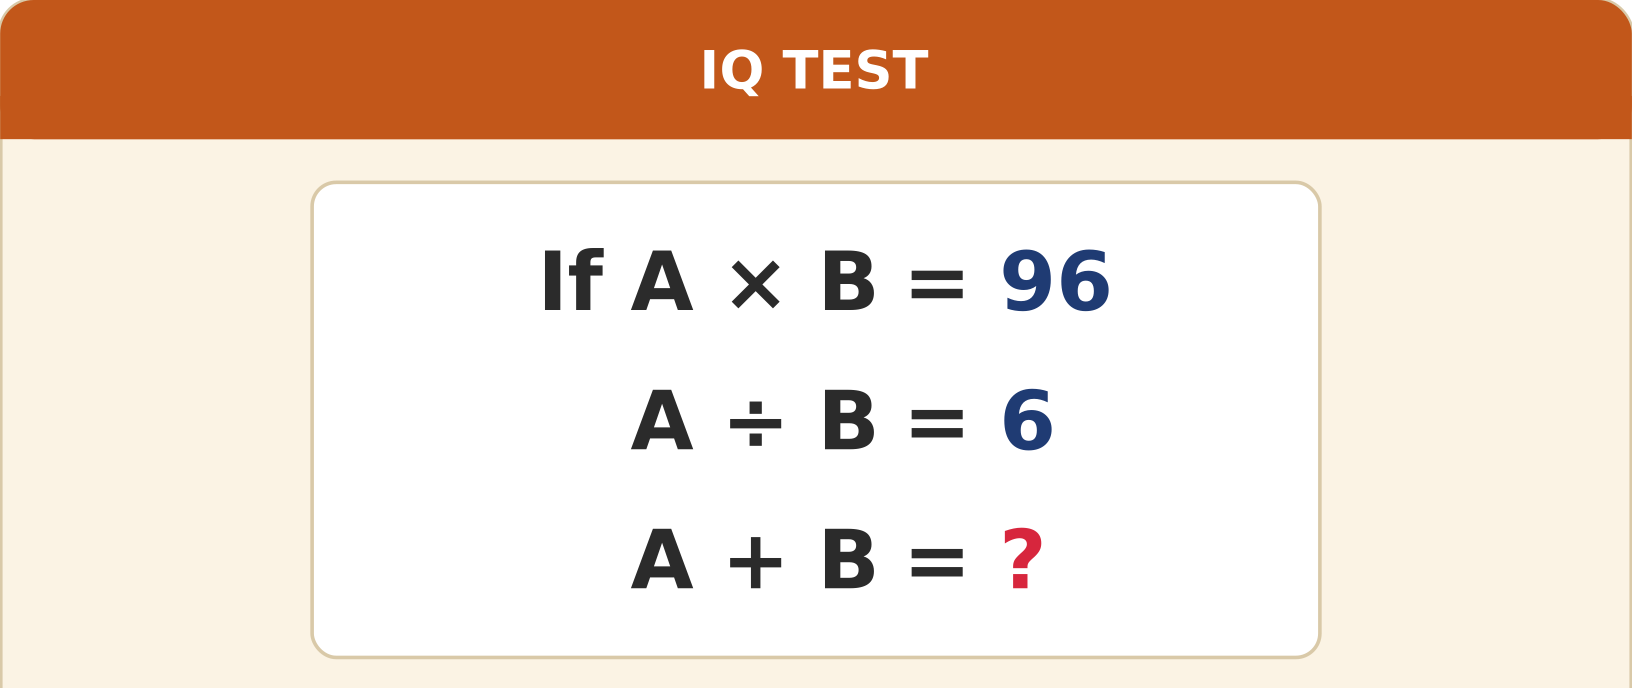
Explanation
A ÷ B = 6, so A = 6B.
A × B = 96, so 6B × B = 96, B² = 16 and B = 4 (positive).
A = 24, so A + B = 24 + 4 = 28.
A × B = 96, so 6B × B = 96, B² = 16 and B = 4 (positive).
A = 24, so A + B = 24 + 4 = 28.
Shortcut Method
A = 6B, so 6B² = 96, B = 4, A = 24
24 + 4
∴ ? = 28 ✓
24 + 4
∴ ? = 28 ✓
Question 72
Each circle is split into three parts and every circle follows the same rule. Find the missing number (?) in the third circle.
Explanation
In every circle the top-right number is the square of the top-left number, and the bottom number is the sum of all the digits in the two top numbers.
14 and 196: 1 + 4 + 1 + 9 + 6 = 21.
15 and 225: 1 + 5 + 2 + 2 + 5 = 15.
16 and 256: 1 + 6 + 2 + 5 + 6 = 20.
14 and 196: 1 + 4 + 1 + 9 + 6 = 21.
15 and 225: 1 + 5 + 2 + 2 + 5 = 15.
16 and 256: 1 + 6 + 2 + 5 + 6 = 20.
Shortcut Method
Rule: top-right = (top-left)²; bottom = sum of all the digits above
1 + 6 + 2 + 5 + 6 = 20
∴ ? = 20 ✓
1 + 6 + 2 + 5 + 6 = 20
∴ ? = 20 ✓
Question 73
Three circles are each divided into three parts, with the same relationship between the parts in every circle. Which number replaces the question mark (?)?
Explanation
In every circle the top-right number is the square of the top-left number, and the bottom number is the top-right number minus the top-left number.
49 − 7 = 42.
81 − 9 = 72.
So 144 − 12 = 132.
49 − 7 = 42.
81 − 9 = 72.
So 144 − 12 = 132.
Shortcut Method
Rule: bottom = (top-left)² − top-left
144 − 12
∴ ? = 132 ✓
144 − 12
∴ ? = 132 ✓
Question 74
The scale in the picture is perfectly balanced and every red ball has the same weight. What is the weight of one red ball?
Explanation
The scale is balanced, so 4 balls + 3 kg = 2 balls + 9 kg.
Take away 2 balls and 3 kg from both pans: 2 balls = 6 kg.
So one ball weighs 3 kg.
Take away 2 balls and 3 kg from both pans: 2 balls = 6 kg.
So one ball weighs 3 kg.
Shortcut Method
4b + 3 = 2b + 9
2b = 6
∴ b = 3 kg ✓
2b = 6
∴ b = 3 kg ✓
Question 75
How much does one red ball weigh if the two pans of this balance hold exactly the same weight?
Explanation
The pans balance, so 5 balls + 2 kg = 2 balls + 14 kg.
Take away 2 balls and 2 kg from both pans: 3 balls = 12 kg.
So one ball weighs 4 kg.
Take away 2 balls and 2 kg from both pans: 3 balls = 12 kg.
So one ball weighs 4 kg.
Shortcut Method
5b + 2 = 2b + 14
3b = 12
∴ b = 4 kg ✓
3b = 12
∴ b = 4 kg ✓
Question 76
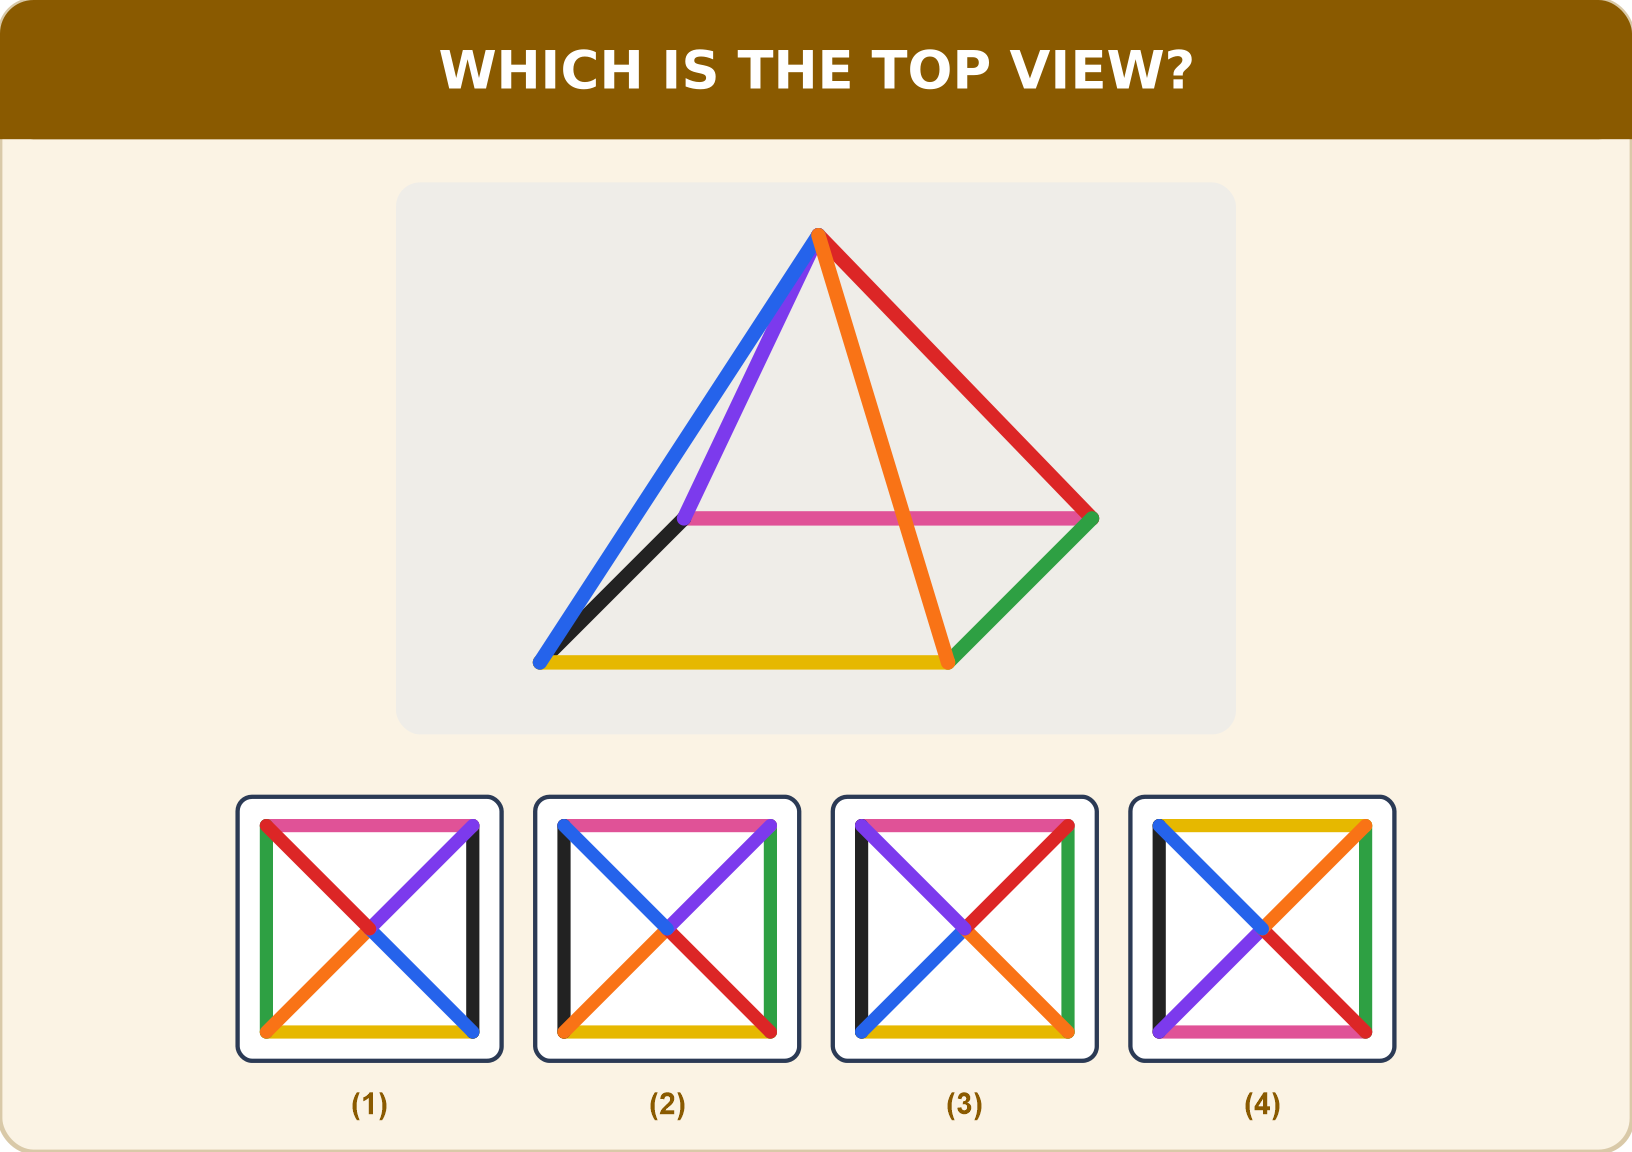
A pyramid with a square base is drawn with every edge in a different colour. Which figure shows the pyramid as seen from directly above?
Explanation
Seen from above, the base becomes the outer square with its front edge at the bottom: front = yellow (bottom), right = green, back = pink (top), left = black.
The four sloping edges run from each corner to the centre: front-left corner blue, front-right orange, back-right red, back-left purple.
Only option (3) matches. Option (1) is the left-right mirror image, option (2) has the sloping colours moved one corner round, and option (4) swaps front and back.
The four sloping edges run from each corner to the centre: front-left corner blue, front-right orange, back-right red, back-left purple.
Only option (3) matches. Option (1) is the left-right mirror image, option (2) has the sloping colours moved one corner round, and option (4) swaps front and back.
Shortcut Method
Base edges: front yellow, right green, back pink, left black
Sloping edges: blue, orange, red, purple from the front-left corner round
∴ Option 3 is correct ✓
Sloping edges: blue, orange, red, purple from the front-left corner round
∴ Option 3 is correct ✓
Question 77
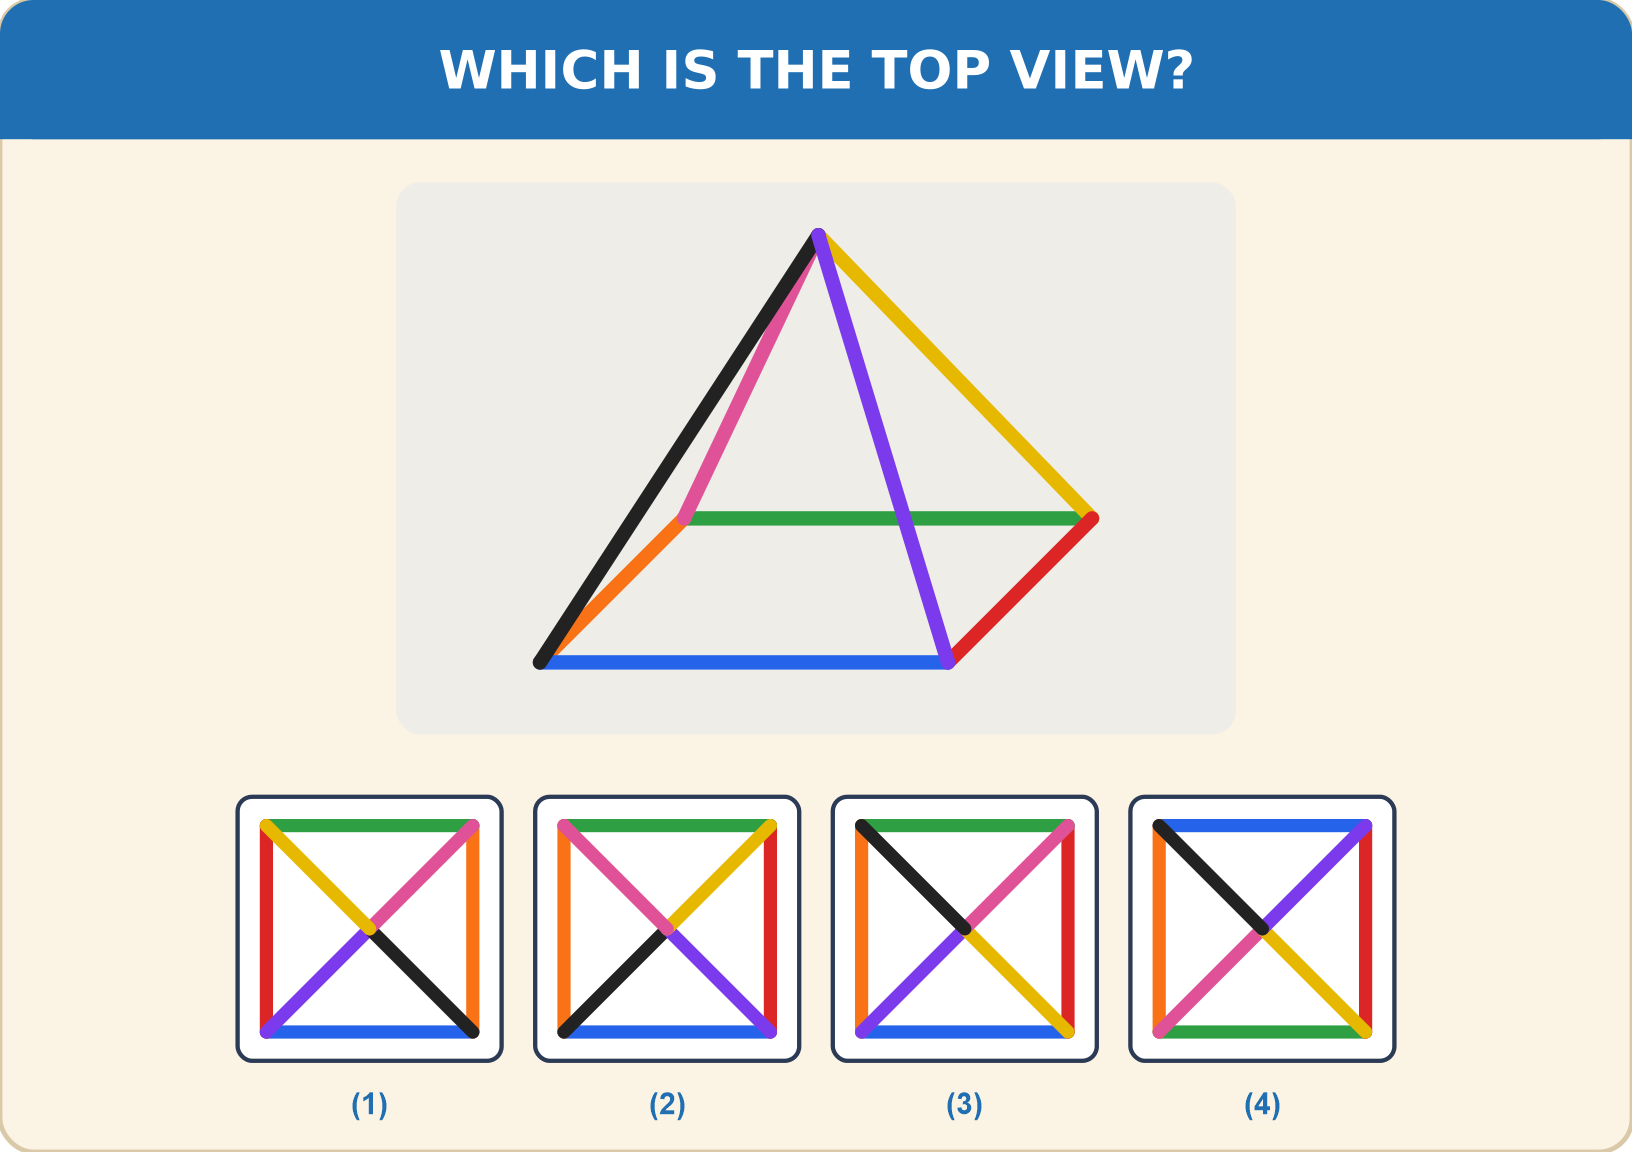
Different coloured edges are drawn on this square pyramid. Choose the figure that shows its view from directly above.
Explanation
From above, the base edges form the outer square with the front edge at the bottom: front = blue, right = red, back = green, left = orange.
The sloping edges run from each corner to the centre: front-left black, front-right purple, back-right yellow, back-left pink.
Option (2) matches. Option (1) is a left-right mirror image, option (3) has the sloping colours turned one corner round, and option (4) swaps front and back.
The sloping edges run from each corner to the centre: front-left black, front-right purple, back-right yellow, back-left pink.
Option (2) matches. Option (1) is a left-right mirror image, option (3) has the sloping colours turned one corner round, and option (4) swaps front and back.
Shortcut Method
Base edges: front blue, right red, back green, left orange
Sloping edges: black, purple, yellow, pink from the front-left corner round
∴ Option 2 is correct ✓
Sloping edges: black, purple, yellow, pink from the front-left corner round
∴ Option 2 is correct ✓
Question 78
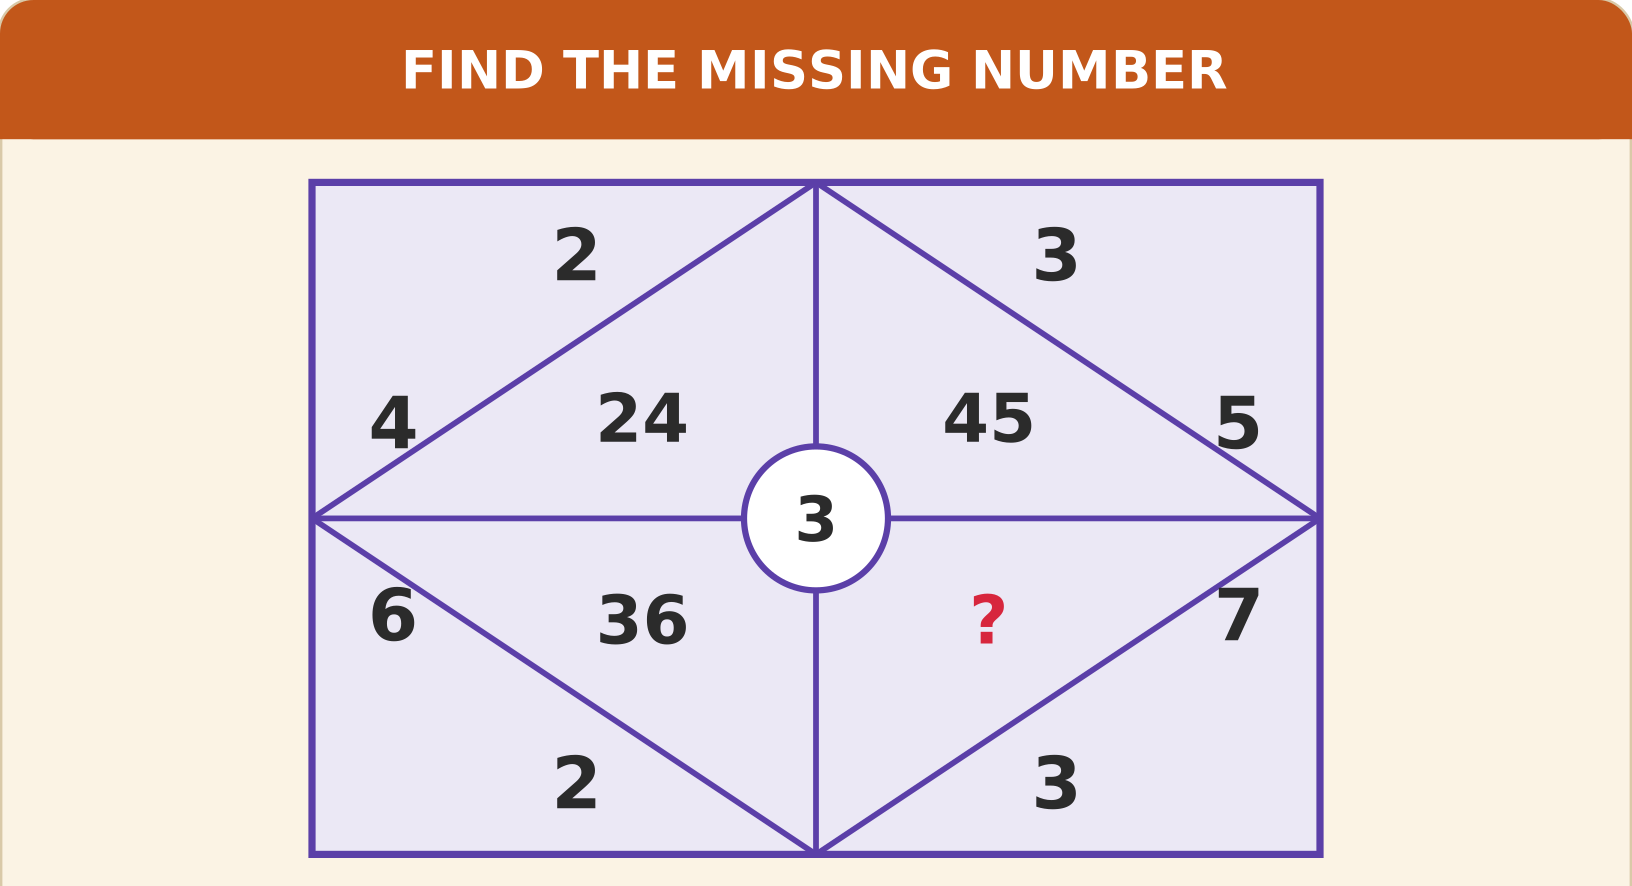
Each quarter of the rectangle holds two outer numbers and one inner number, and the number in the centre circle is used by all four quarters. Find the missing number (?).
Explanation
In each quarter, the inner number = outer number × outer number × the centre number (3).
2 × 4 × 3 = 24.
3 × 5 × 3 = 45.
6 × 2 × 3 = 36.
So 7 × 3 × 3 = 63.
2 × 4 × 3 = 24.
3 × 5 × 3 = 45.
6 × 2 × 3 = 36.
So 7 × 3 × 3 = 63.
Shortcut Method
Rule: inner = outer × outer × centre
7 × 3 × 3
∴ ? = 63 ✓
7 × 3 × 3
∴ ? = 63 ✓
Question 79
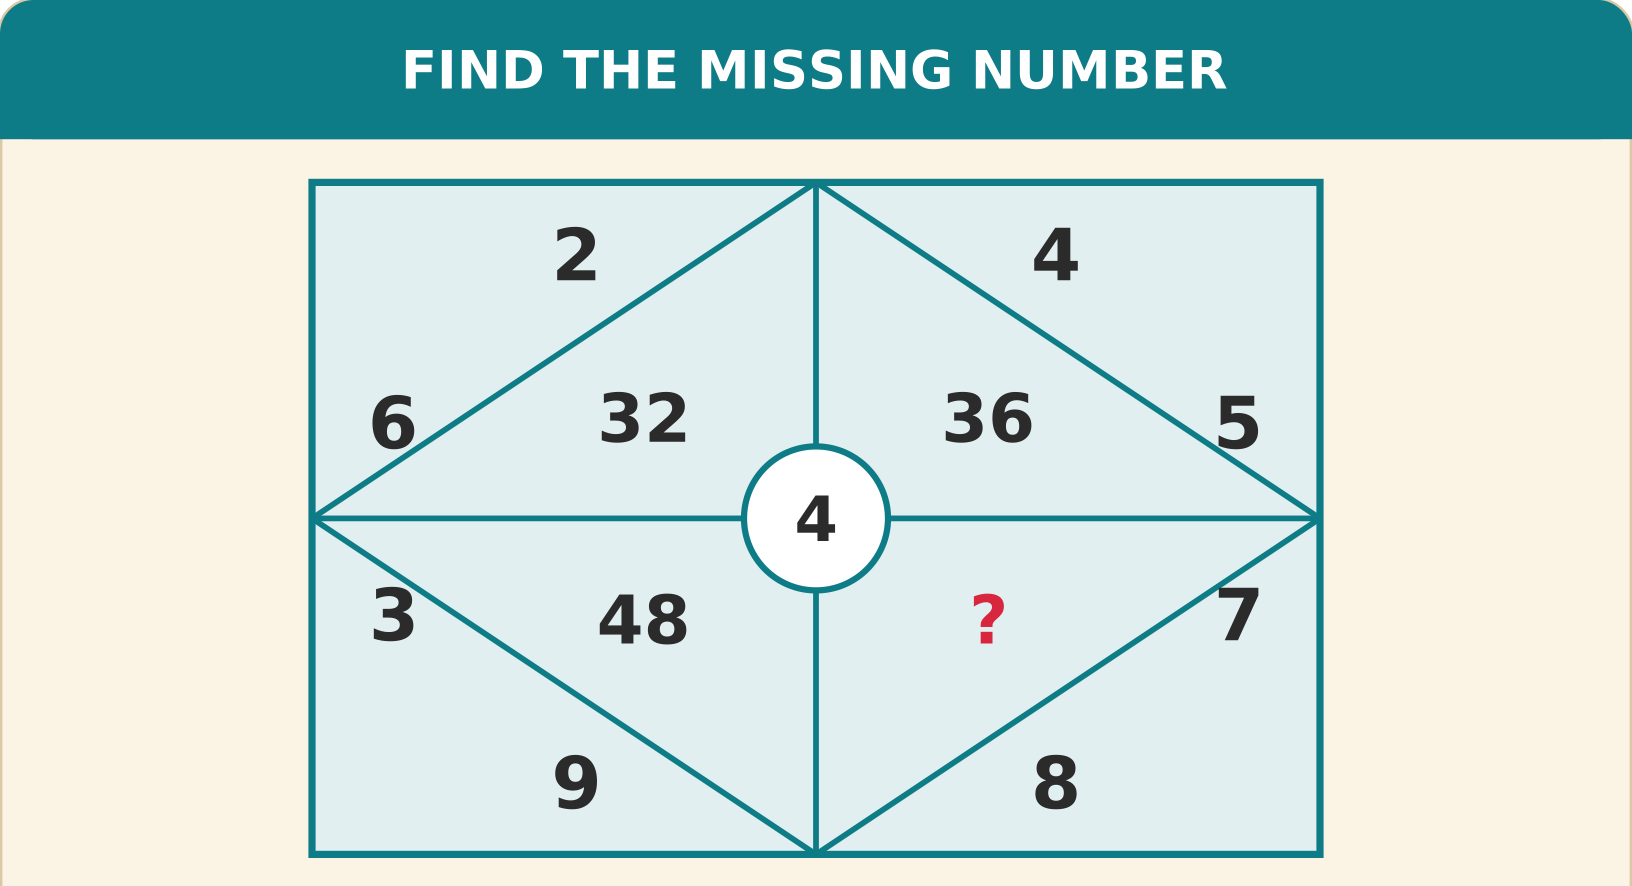
The same centre number works with the outer numbers of each quarter to give the inner number. Find the number that replaces the question mark (?).
Explanation
In each quarter, the inner number = (sum of the two outer numbers) × the centre number (4).
(2 + 6) × 4 = 32.
(4 + 5) × 4 = 36.
(3 + 9) × 4 = 48.
So (8 + 7) × 4 = 60.
(2 + 6) × 4 = 32.
(4 + 5) × 4 = 36.
(3 + 9) × 4 = 48.
So (8 + 7) × 4 = 60.
Shortcut Method
Rule: inner = (outer + outer) × centre
(8 + 7) × 4
∴ ? = 60 ✓
(8 + 7) × 4
∴ ? = 60 ✓
Question 80
Each of the four squares has corner numbers and a shaded number beside the centre. All the squares follow one rule. Find the missing number (?).
Explanation
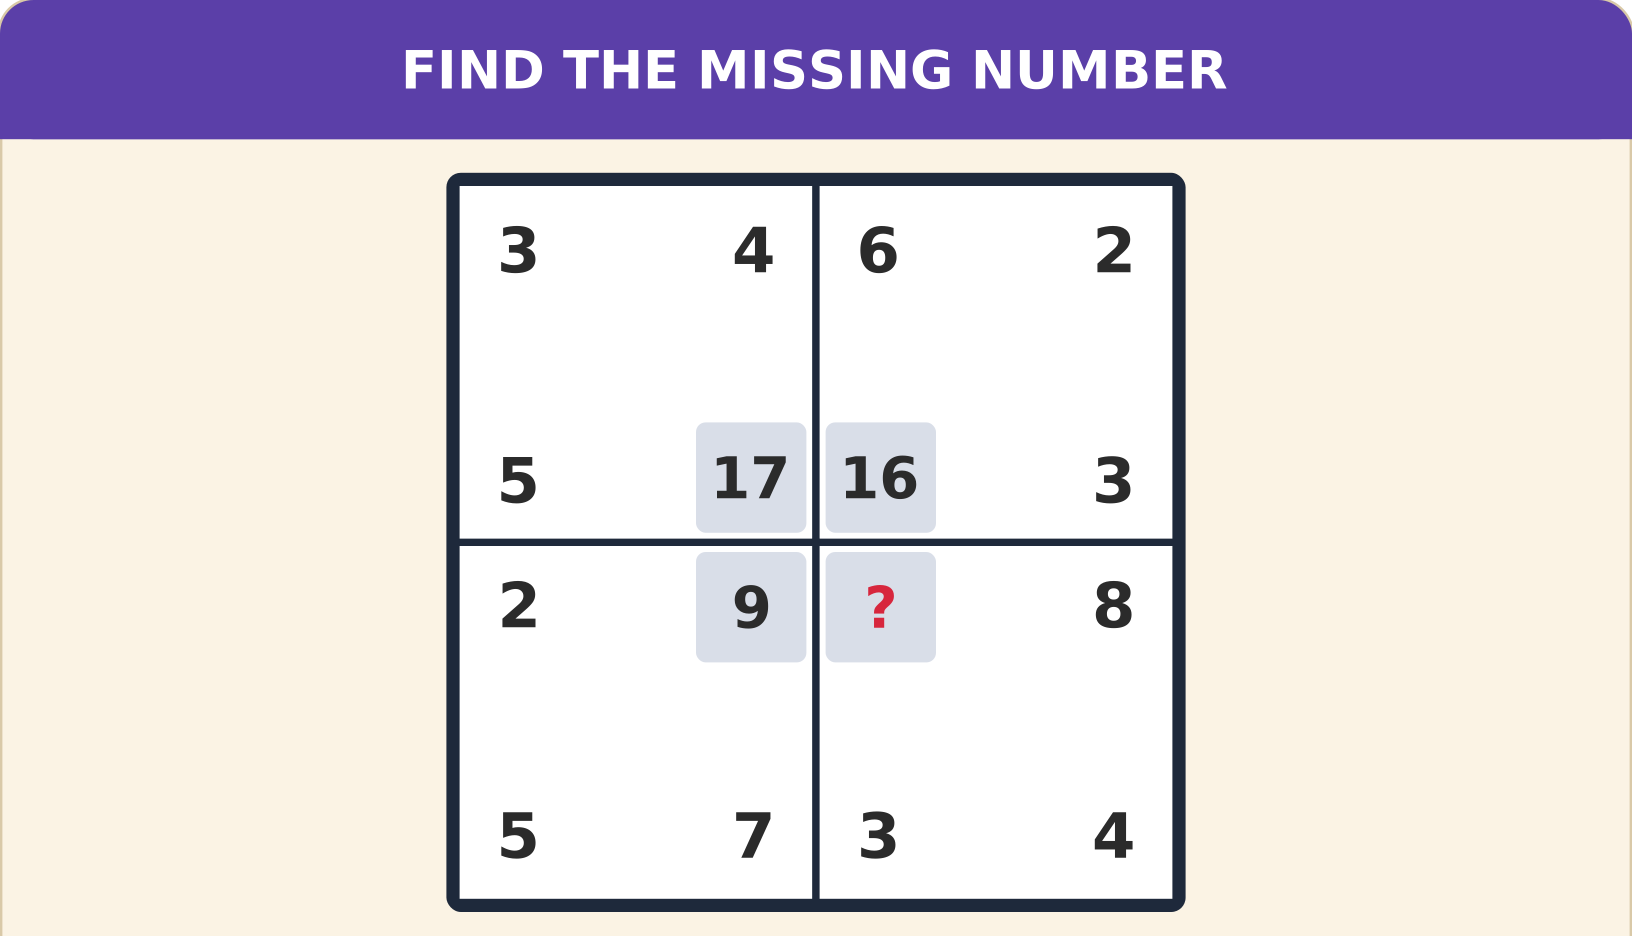
In every square the shaded number = (product of the two side corner numbers) − (the outer corner number).
4 × 5 − 3 = 17.
6 × 3 − 2 = 16.
7 × 2 − 5 = 9.
Last square: 3 × 8 − 4 = 20.
4 × 5 − 3 = 17.
6 × 3 − 2 = 16.
7 × 2 − 5 = 9.
Last square: 3 × 8 − 4 = 20.
Shortcut Method
Rule: shaded = (side × side) − outer
3 × 8 − 4 = 24 − 4
∴ ? = 20 ✓
3 × 8 − 4 = 24 − 4
∴ ? = 20 ✓
Question 81
In every square the shaded number comes from the three corner numbers around it in the same way. Which number replaces the question mark (?)?
Explanation
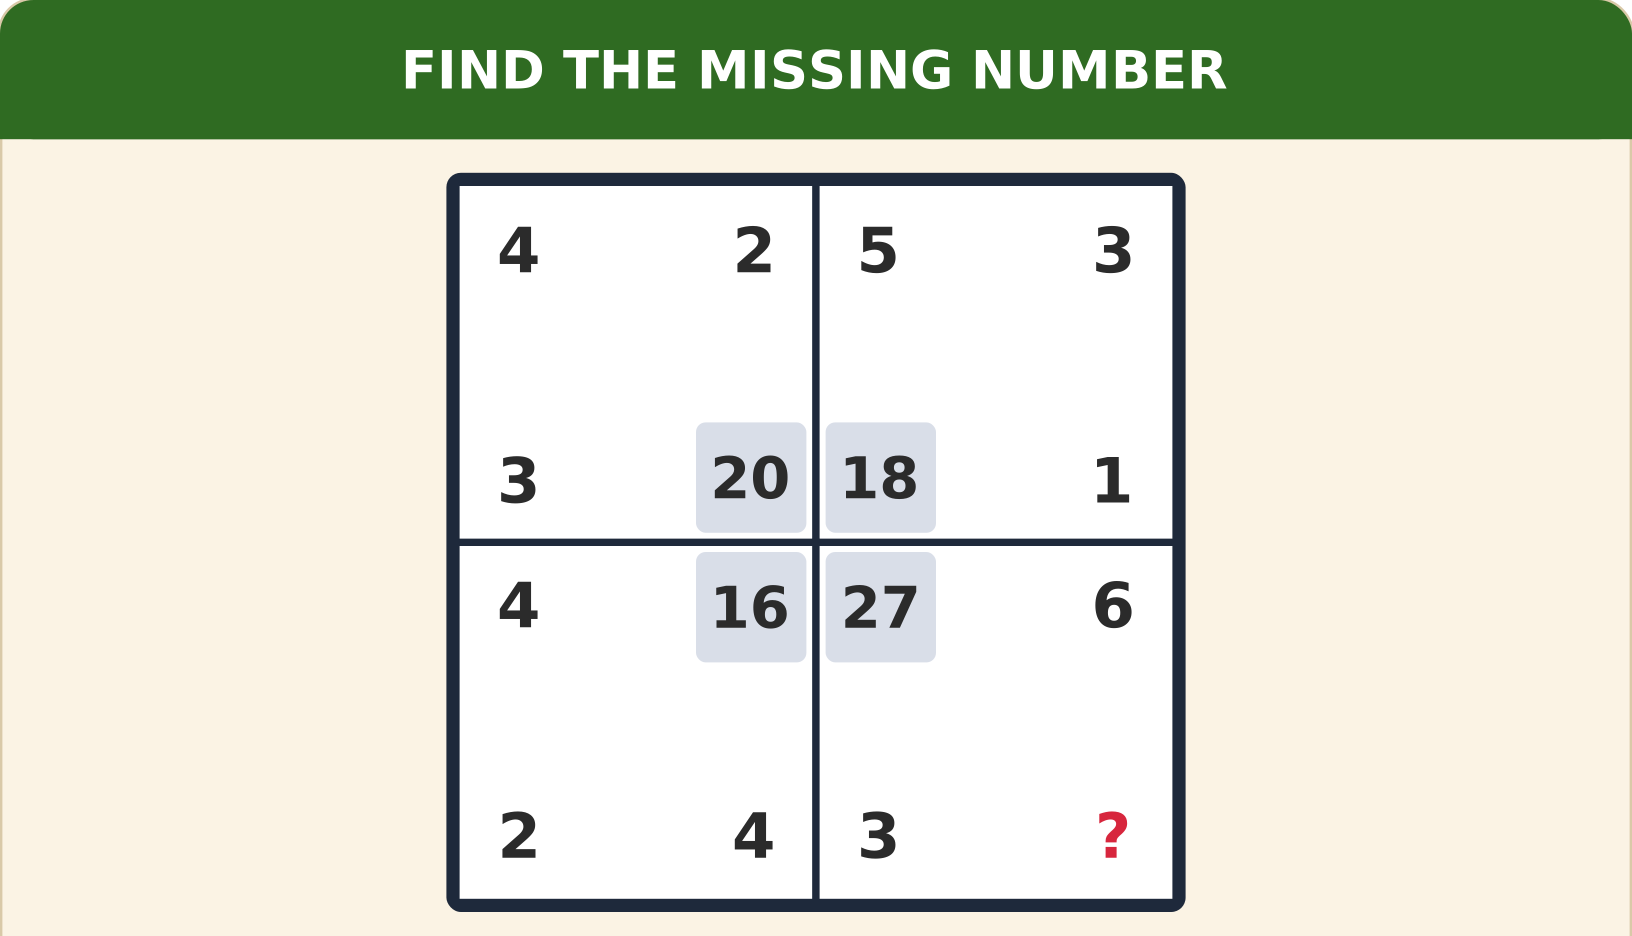
In every square the shaded number = (sum of the two side corner numbers) × (the outer corner number).
(2 + 3) × 4 = 20.
(5 + 1) × 3 = 18.
(4 + 4) × 2 = 16.
Last square: (3 + 6) × ? = 27, so ? = 27 ÷ 9 = 3.
(2 + 3) × 4 = 20.
(5 + 1) × 3 = 18.
(4 + 4) × 2 = 16.
Last square: (3 + 6) × ? = 27, so ? = 27 ÷ 9 = 3.
Shortcut Method
Rule: shaded = (side + side) × outer
(3 + 6) × ? = 27
∴ ? = 3 ✓
(3 + 6) × ? = 27
∴ ? = 3 ✓
Question 82
Two rows of digits are shown in the figure. Find the two digits that replace the question marks (top digit first, then bottom digit).
Explanation
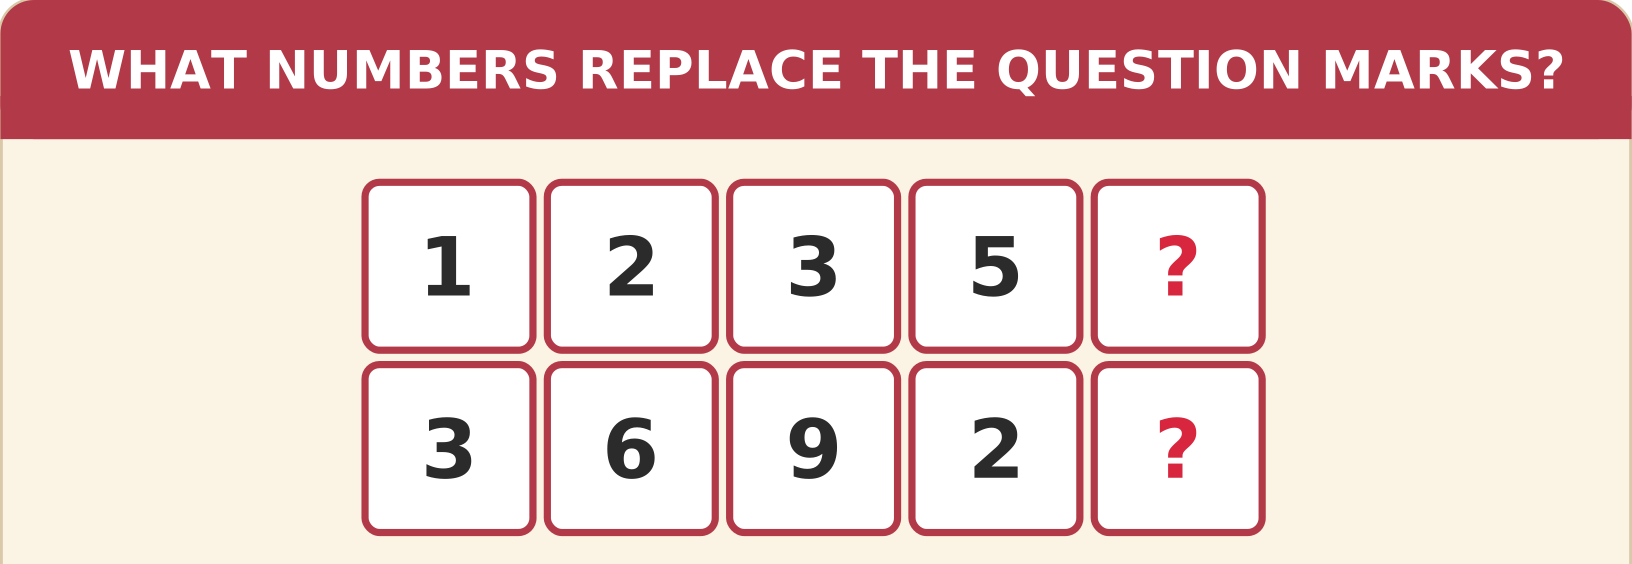
Read each column from top to bottom as a two-digit number: 13, 26, 39, 52.
The numbers go up by 13 each time, so the next one is 65.
The top digit is 6 and the bottom digit is 5.
The numbers go up by 13 each time, so the next one is 65.
The top digit is 6 and the bottom digit is 5.
Shortcut Method
Columns: 13, 26, 39, 52 (add 13 each time)
Next = 65
∴ 6 and 5 ✓
Next = 65
∴ 6 and 5 ✓
Question 83
Look at the two rows of digits and the way each column reads from top to bottom. What numbers replace the two question marks?
Explanation
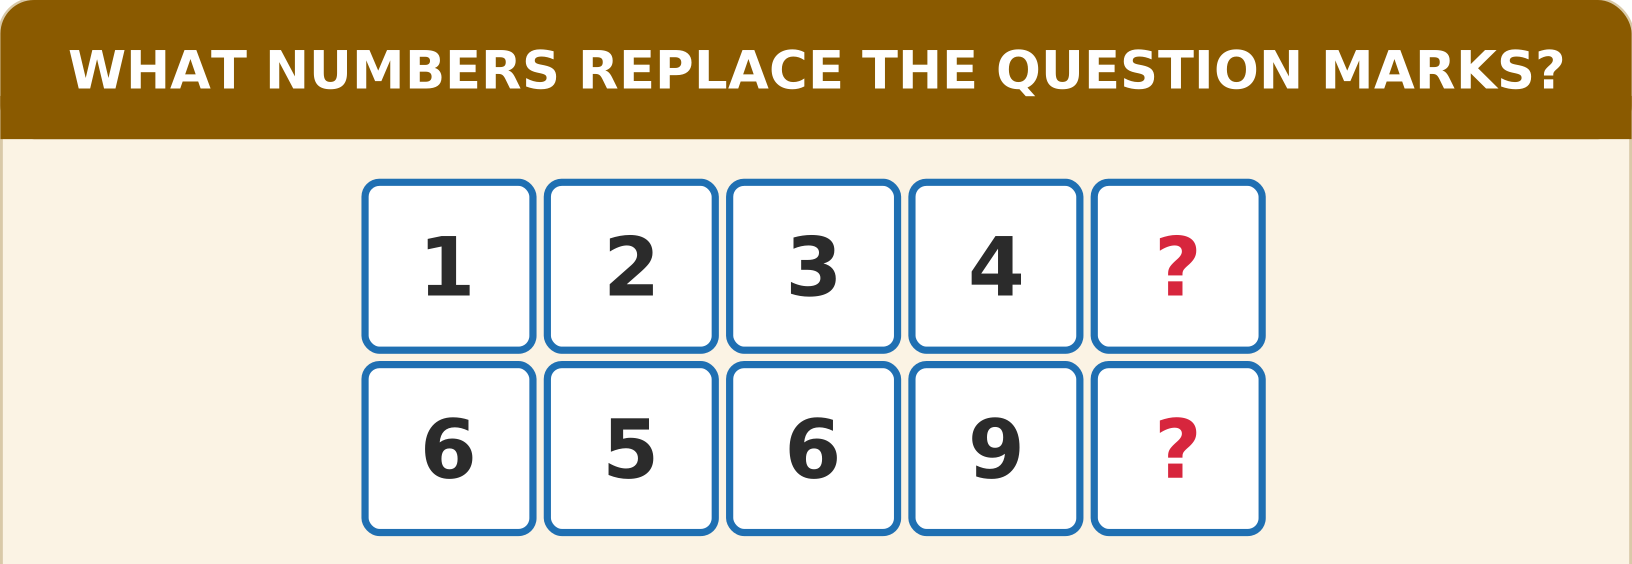
Read each column from top to bottom as a two-digit number: 16, 25, 36, 49.
These are the squares of 4, 5, 6 and 7, so the next number is 8 × 8 = 64.
The top digit is 6 and the bottom digit is 4.
These are the squares of 4, 5, 6 and 7, so the next number is 8 × 8 = 64.
The top digit is 6 and the bottom digit is 4.
Shortcut Method
Columns: 16, 25, 36, 49 are 4², 5², 6², 7²
Next = 8² = 64
∴ 6 and 4 ✓
Next = 8² = 64
∴ 6 and 4 ✓
Question 84
Every row, column and diagonal of this 3 × 3 square follows the same pattern. Find the missing number (?).
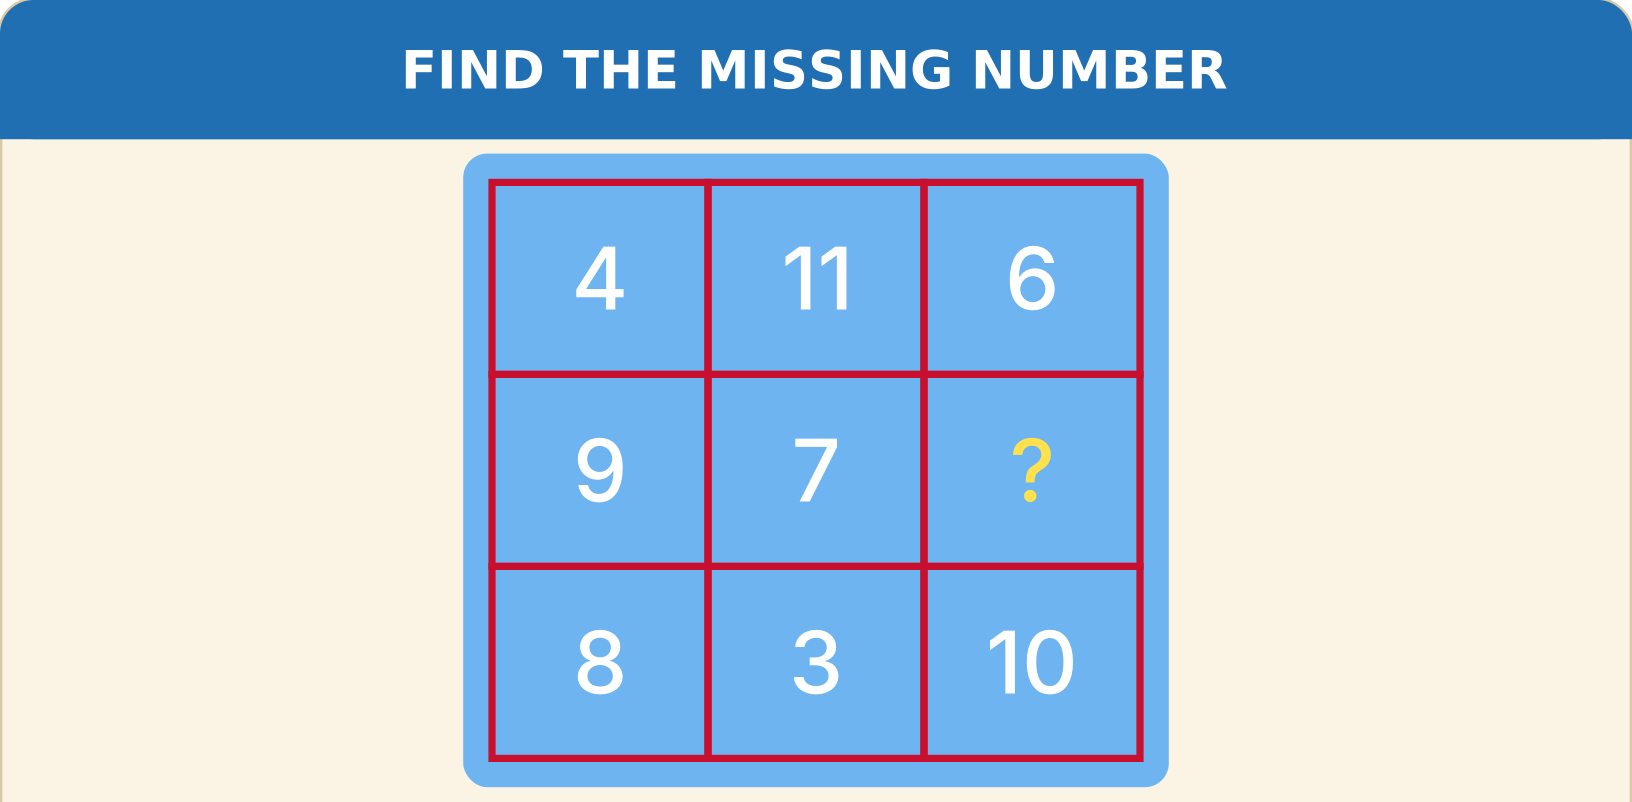
Explanation
Every row, every column and both diagonals add up to 21.
4 + 11 + 6 = 21, 4 + 9 + 8 = 21 and 4 + 7 + 10 = 21.
Row 2: 9 + 7 + ? = 21, so ? = 5.
4 + 11 + 6 = 21, 4 + 9 + 8 = 21 and 4 + 7 + 10 = 21.
Row 2: 9 + 7 + ? = 21, so ? = 5.
Shortcut Method
Every line adds up to 21
9 + 7 + ? = 21
∴ ? = 5 ✓
9 + 7 + ? = 21
∴ ? = 5 ✓
Question 85
A 3 × 3 grid of numbers hides one common pattern in its lines. What number replaces the question mark (?)?
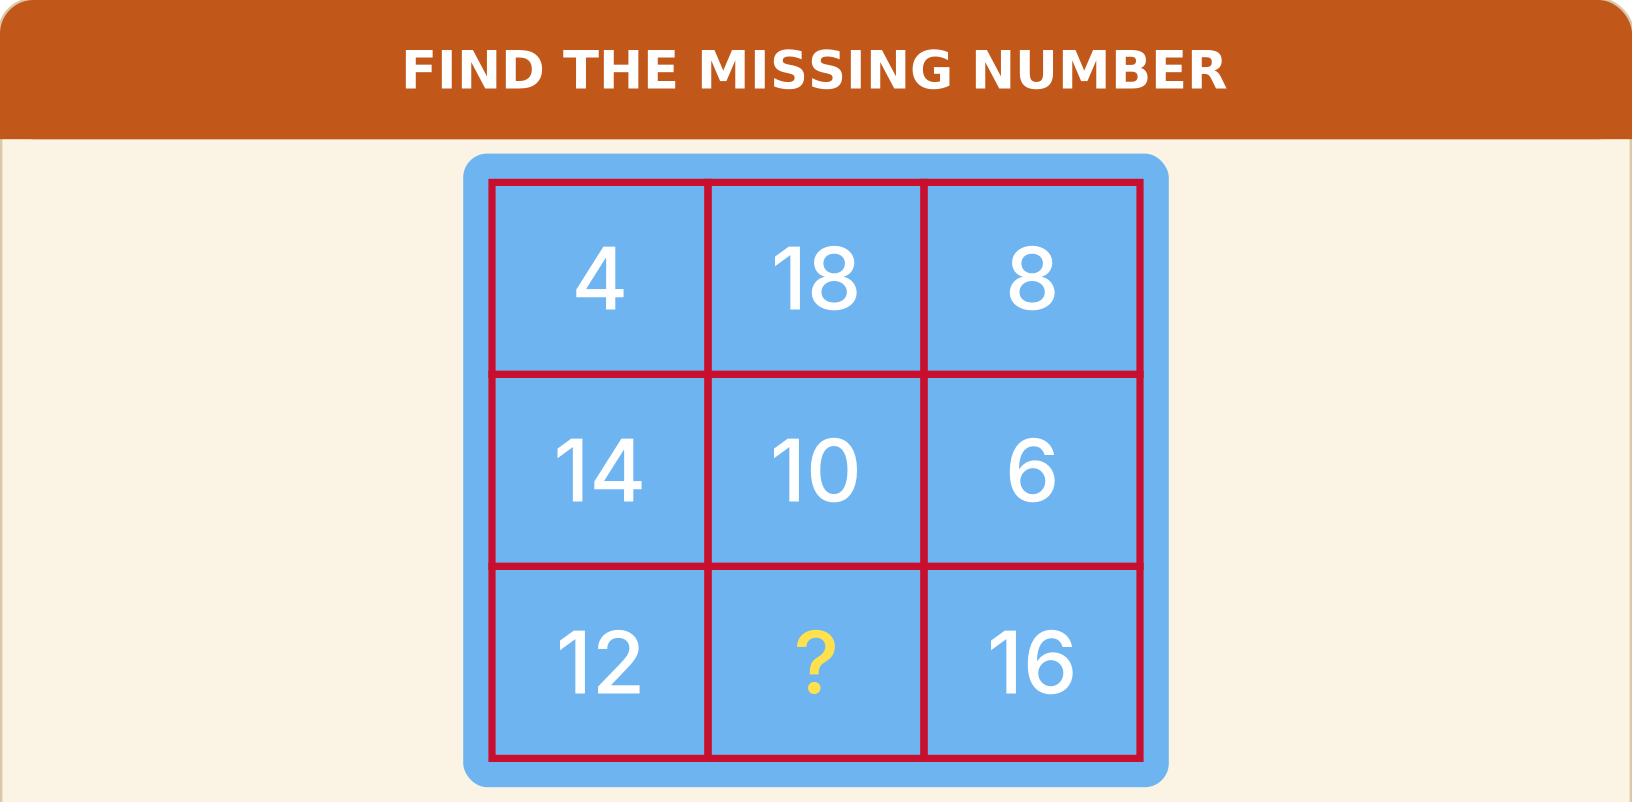
Explanation
Every row, column and diagonal adds up to 30.
4 + 18 + 8 = 30 and 4 + 10 + 16 = 30.
Bottom row: 12 + ? + 16 = 30, so ? = 2. Check with column 2: 18 + 10 + 2 = 30.
4 + 18 + 8 = 30 and 4 + 10 + 16 = 30.
Bottom row: 12 + ? + 16 = 30, so ? = 2. Check with column 2: 18 + 10 + 2 = 30.
Shortcut Method
Every line adds up to 30
12 + ? + 16 = 30
∴ ? = 2 ✓
12 + ? + 16 = 30
∴ ? = 2 ✓
Question 86
The numbers around the points of the star grow by a fixed rule, starting from the top and moving clockwise. Find the missing number (?).
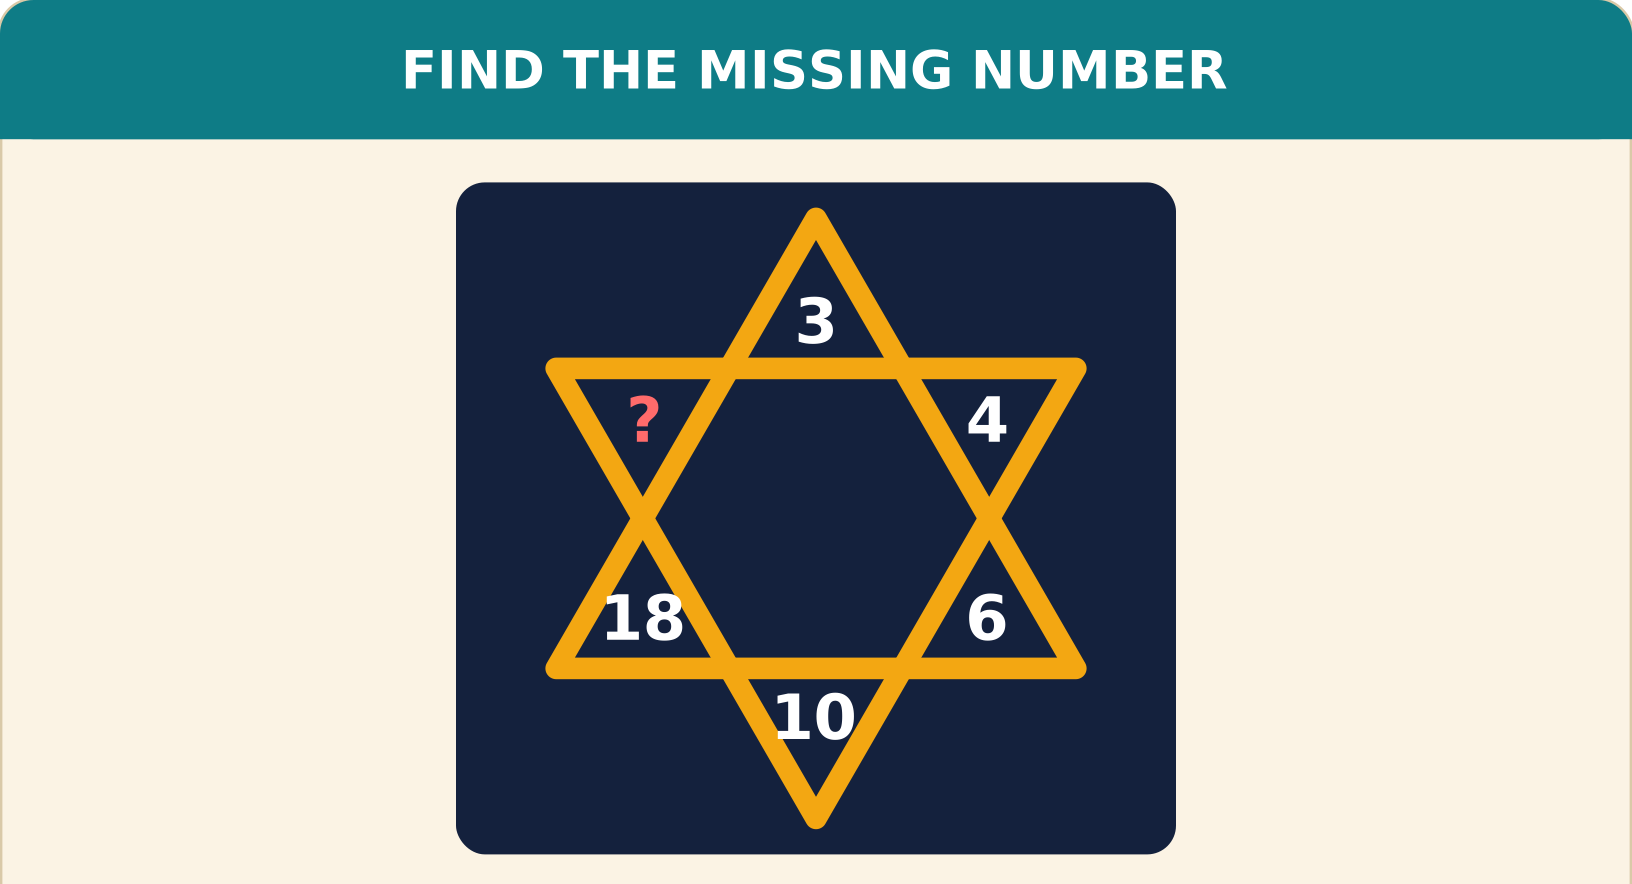
Explanation
Going clockwise from the top point the numbers are 3, 4, 6, 10, 18, ?.
Each number is double the one before it, minus 2: 3 × 2 − 2 = 4, 4 × 2 − 2 = 6, 6 × 2 − 2 = 10, 10 × 2 − 2 = 18.
So 18 × 2 − 2 = 34.
Each number is double the one before it, minus 2: 3 × 2 − 2 = 4, 4 × 2 − 2 = 6, 6 × 2 − 2 = 10, 10 × 2 − 2 = 18.
So 18 × 2 − 2 = 34.
Shortcut Method
Rule: next = (previous × 2) − 2
18 × 2 − 2
∴ ? = 34 ✓
18 × 2 − 2
∴ ? = 34 ✓
Question 87
Starting at the top point of this star and going clockwise, each number is made from the one before it. Which number replaces the question mark (?)?
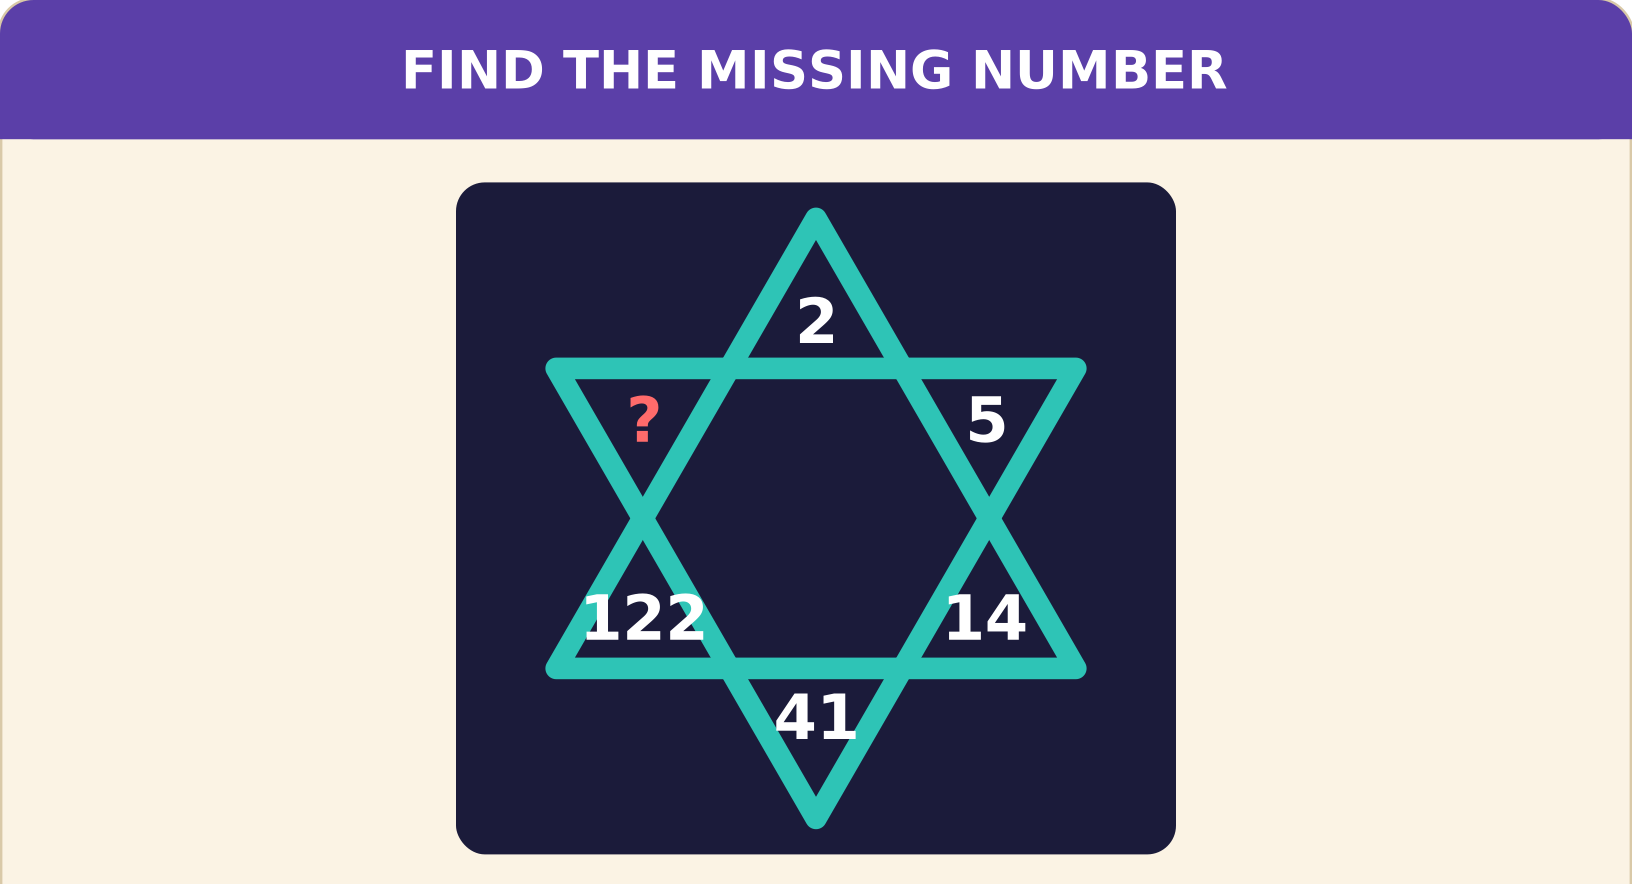
Explanation
Going clockwise from the top point the numbers are 2, 5, 14, 41, 122, ?.
Each number is three times the one before it, minus 1: 2 × 3 − 1 = 5, 5 × 3 − 1 = 14, 14 × 3 − 1 = 41, 41 × 3 − 1 = 122.
So 122 × 3 − 1 = 365.
Each number is three times the one before it, minus 1: 2 × 3 − 1 = 5, 5 × 3 − 1 = 14, 14 × 3 − 1 = 41, 41 × 3 − 1 = 122.
So 122 × 3 − 1 = 365.
Shortcut Method
Rule: next = (previous × 3) − 1
122 × 3 − 1
∴ ? = 365 ✓
122 × 3 − 1
∴ ? = 365 ✓
Question 88
The first three lines are worked out by a rule, and the last line has to follow the same rule. Find the value of the last line (?).
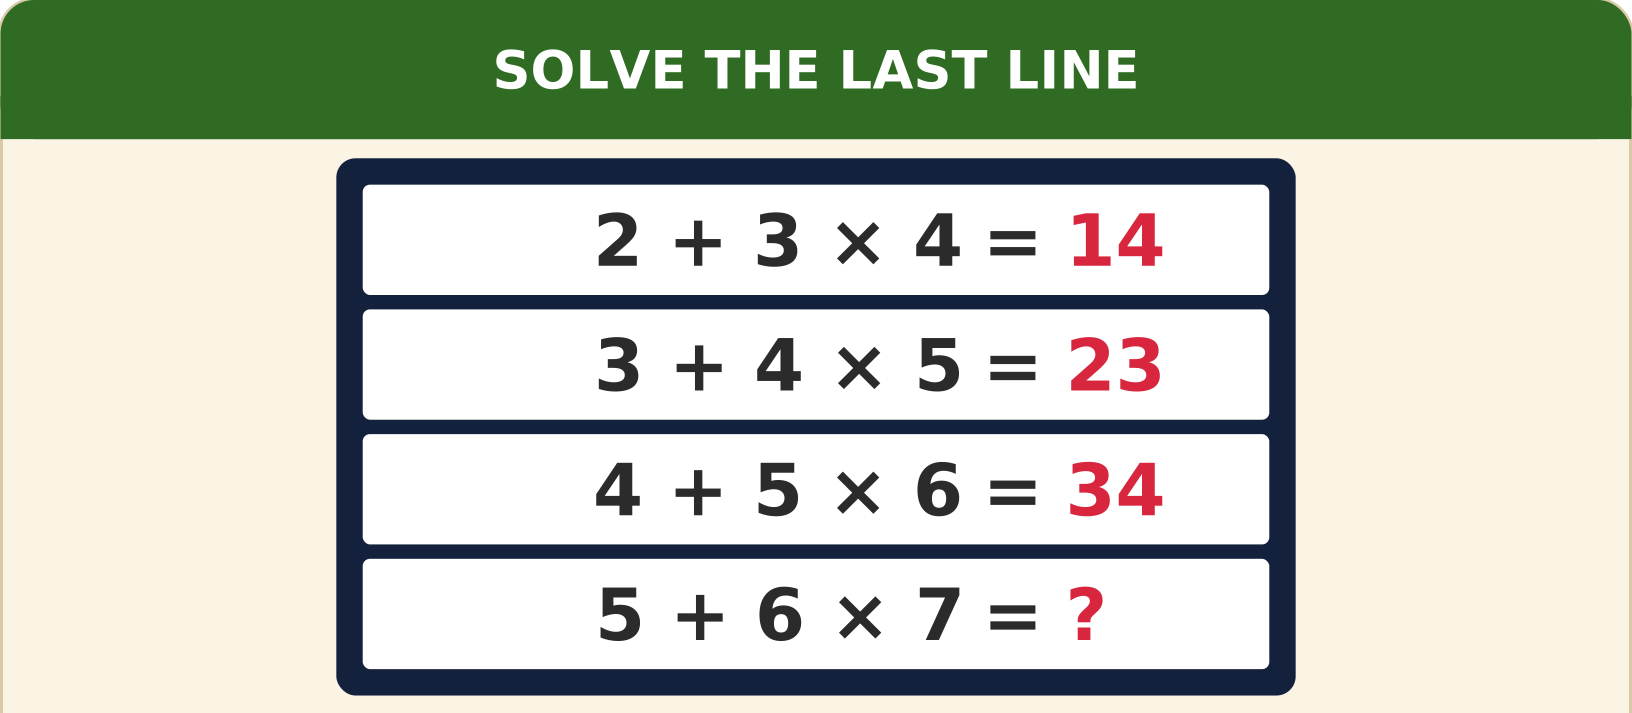
Explanation
Multiplication is done before addition (BODMAS).
2 + 3 × 4 = 2 + 12 = 14.
3 + 4 × 5 = 3 + 20 = 23.
4 + 5 × 6 = 4 + 30 = 34.
So 5 + 6 × 7 = 5 + 42 = 47 (not 11 × 7 = 77).
2 + 3 × 4 = 2 + 12 = 14.
3 + 4 × 5 = 3 + 20 = 23.
4 + 5 × 6 = 4 + 30 = 34.
So 5 + 6 × 7 = 5 + 42 = 47 (not 11 × 7 = 77).
Shortcut Method
Multiply first, then add
5 + 6 × 7 = 5 + 42
∴ ? = 47 ✓
5 + 6 × 7 = 5 + 42
∴ ? = 47 ✓
Question 89
Solve the last line of the figure using the order of operations that the first three lines follow.
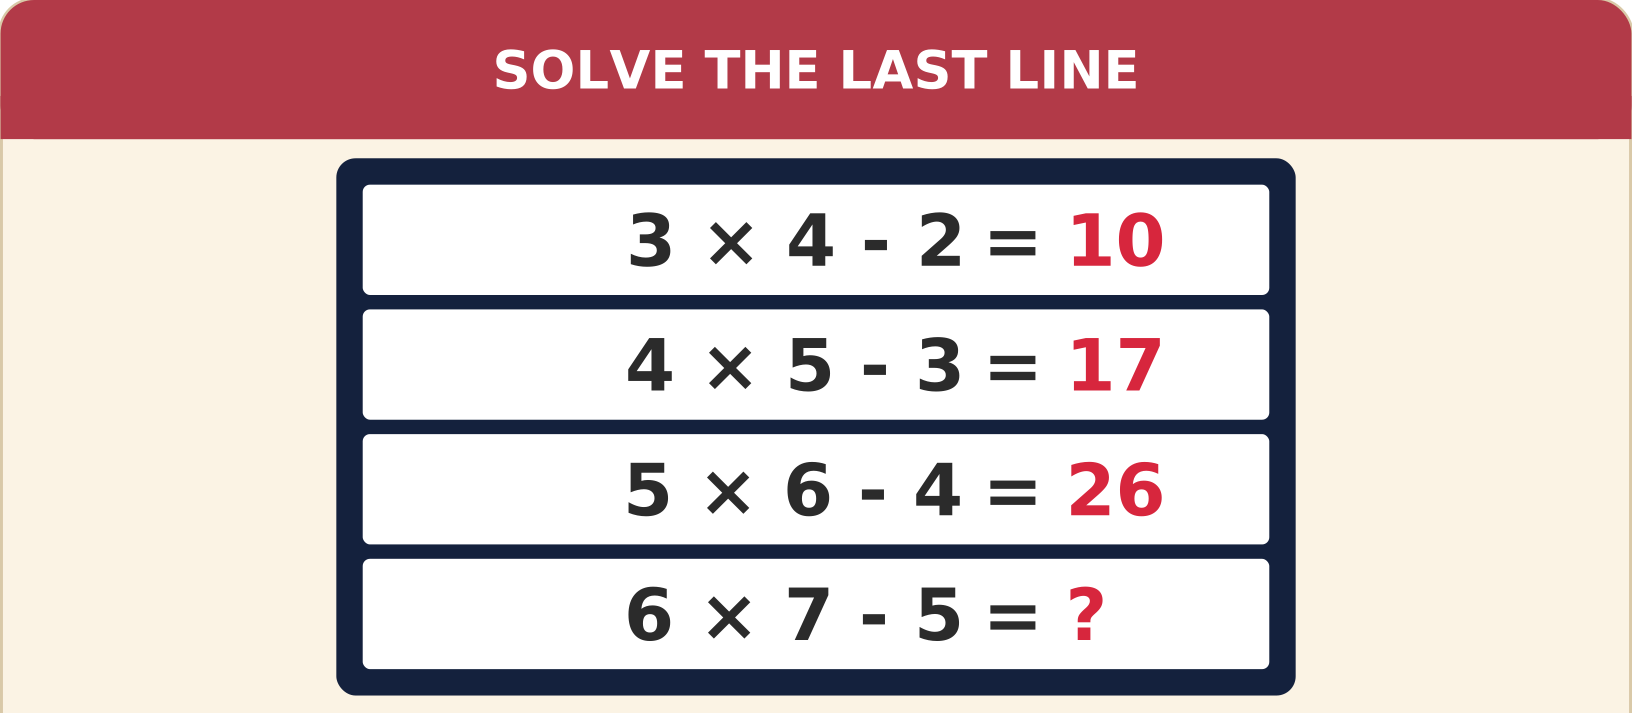
Explanation
Multiply first, then subtract.
3 × 4 − 2 = 12 − 2 = 10.
4 × 5 − 3 = 20 − 3 = 17.
5 × 6 − 4 = 30 − 4 = 26.
So 6 × 7 − 5 = 42 − 5 = 37.
3 × 4 − 2 = 12 − 2 = 10.
4 × 5 − 3 = 20 − 3 = 17.
5 × 6 − 4 = 30 − 4 = 26.
So 6 × 7 − 5 = 42 − 5 = 37.
Shortcut Method
Multiply first, then subtract
6 × 7 − 5 = 42 − 5
∴ ? = 37 ✓
6 × 7 − 5 = 42 − 5
∴ ? = 37 ✓
Question 90
A pattern of straight lines runs through every row of the grid. Which of the figures completes it?
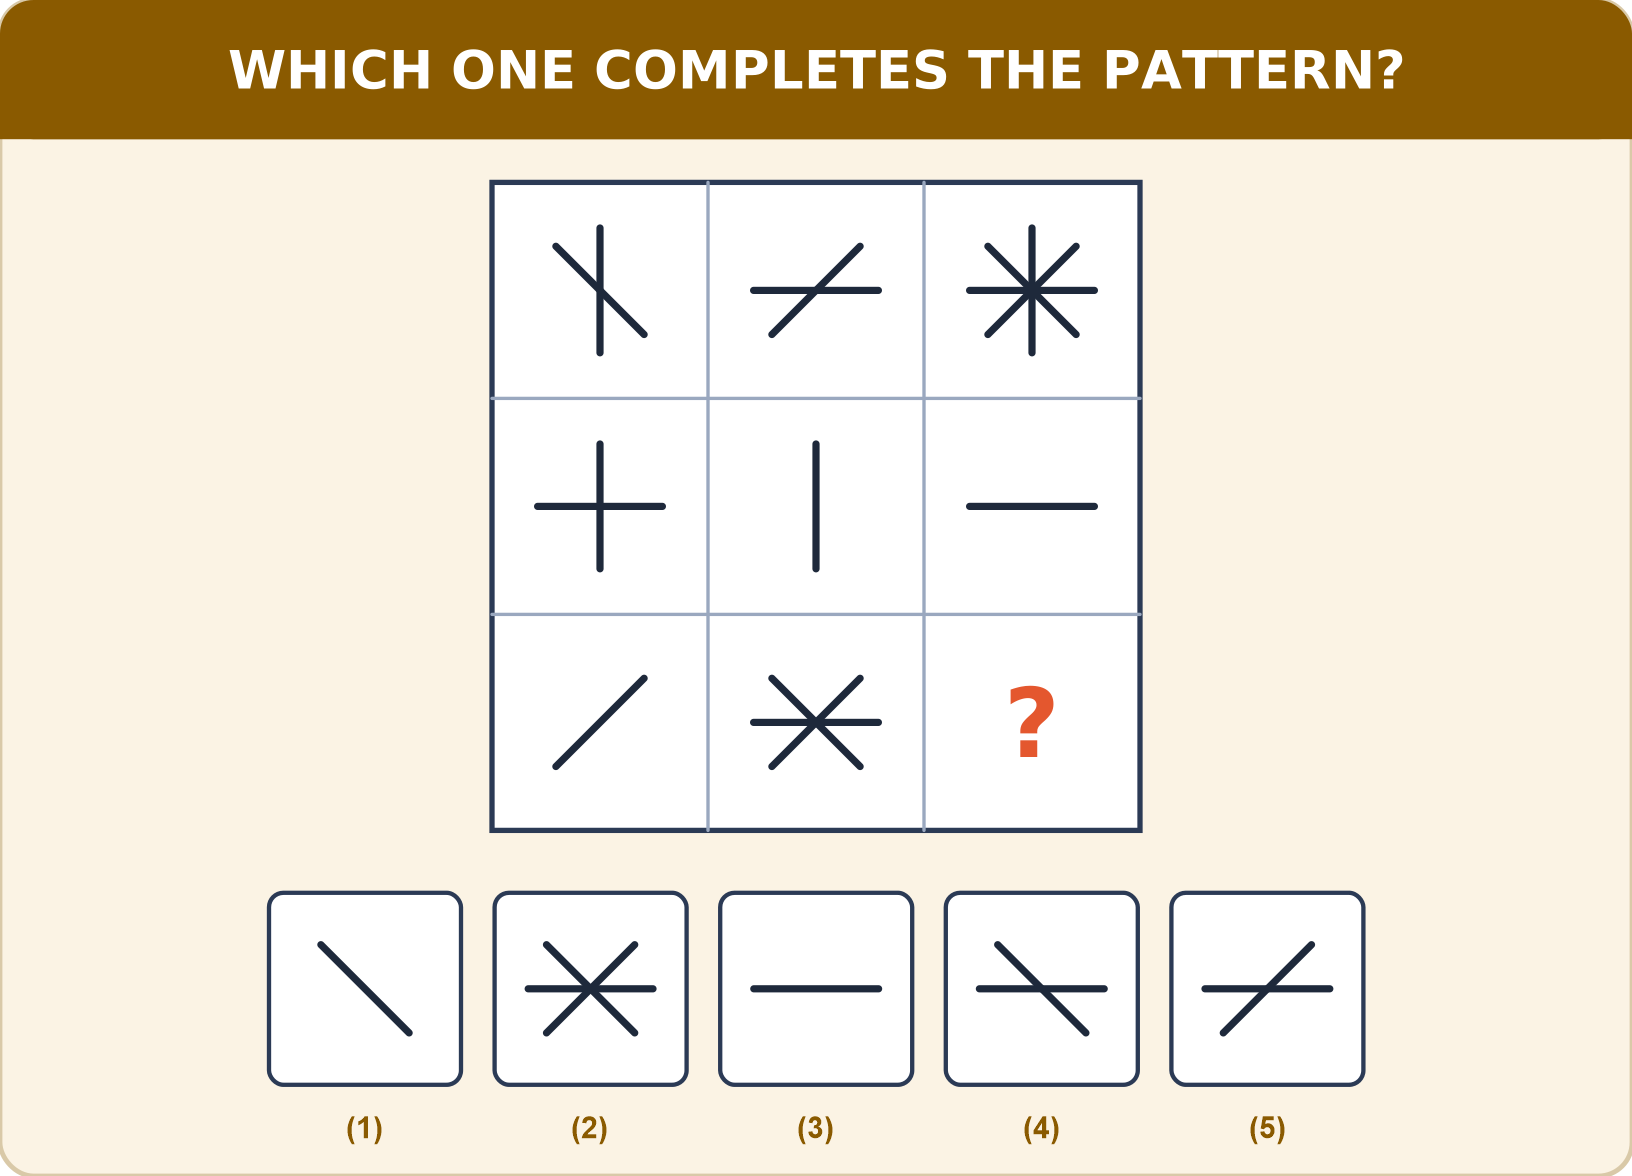
Explanation
In every row, put the first two figures together: a line that is in both figures disappears and every other line stays.
Row 1: the upright line with a backslash and the horizontal line with a slash have no line in common, so all four lines appear. Row 2: the cross and the upright line share the upright line, leaving the horizontal line.
Row 3: the slash and the figure made of a horizontal line, a slash and a backslash share the slash, leaving a backslash and a horizontal line.
This is option (4).
Row 1: the upright line with a backslash and the horizontal line with a slash have no line in common, so all four lines appear. Row 2: the cross and the upright line share the upright line, leaving the horizontal line.
Row 3: the slash and the figure made of a horizontal line, a slash and a backslash share the slash, leaving a backslash and a horizontal line.
This is option (4).
Shortcut Method
Rule: a line in both figures disappears
Row 3: slash cancels, leaving backslash + horizontal
∴ Option 4 is correct ✓
Row 3: slash cancels, leaving backslash + horizontal
∴ Option 4 is correct ✓
Question 91
Each row of this grid follows one rule about the arms that its figures share. Which one completes the pattern?
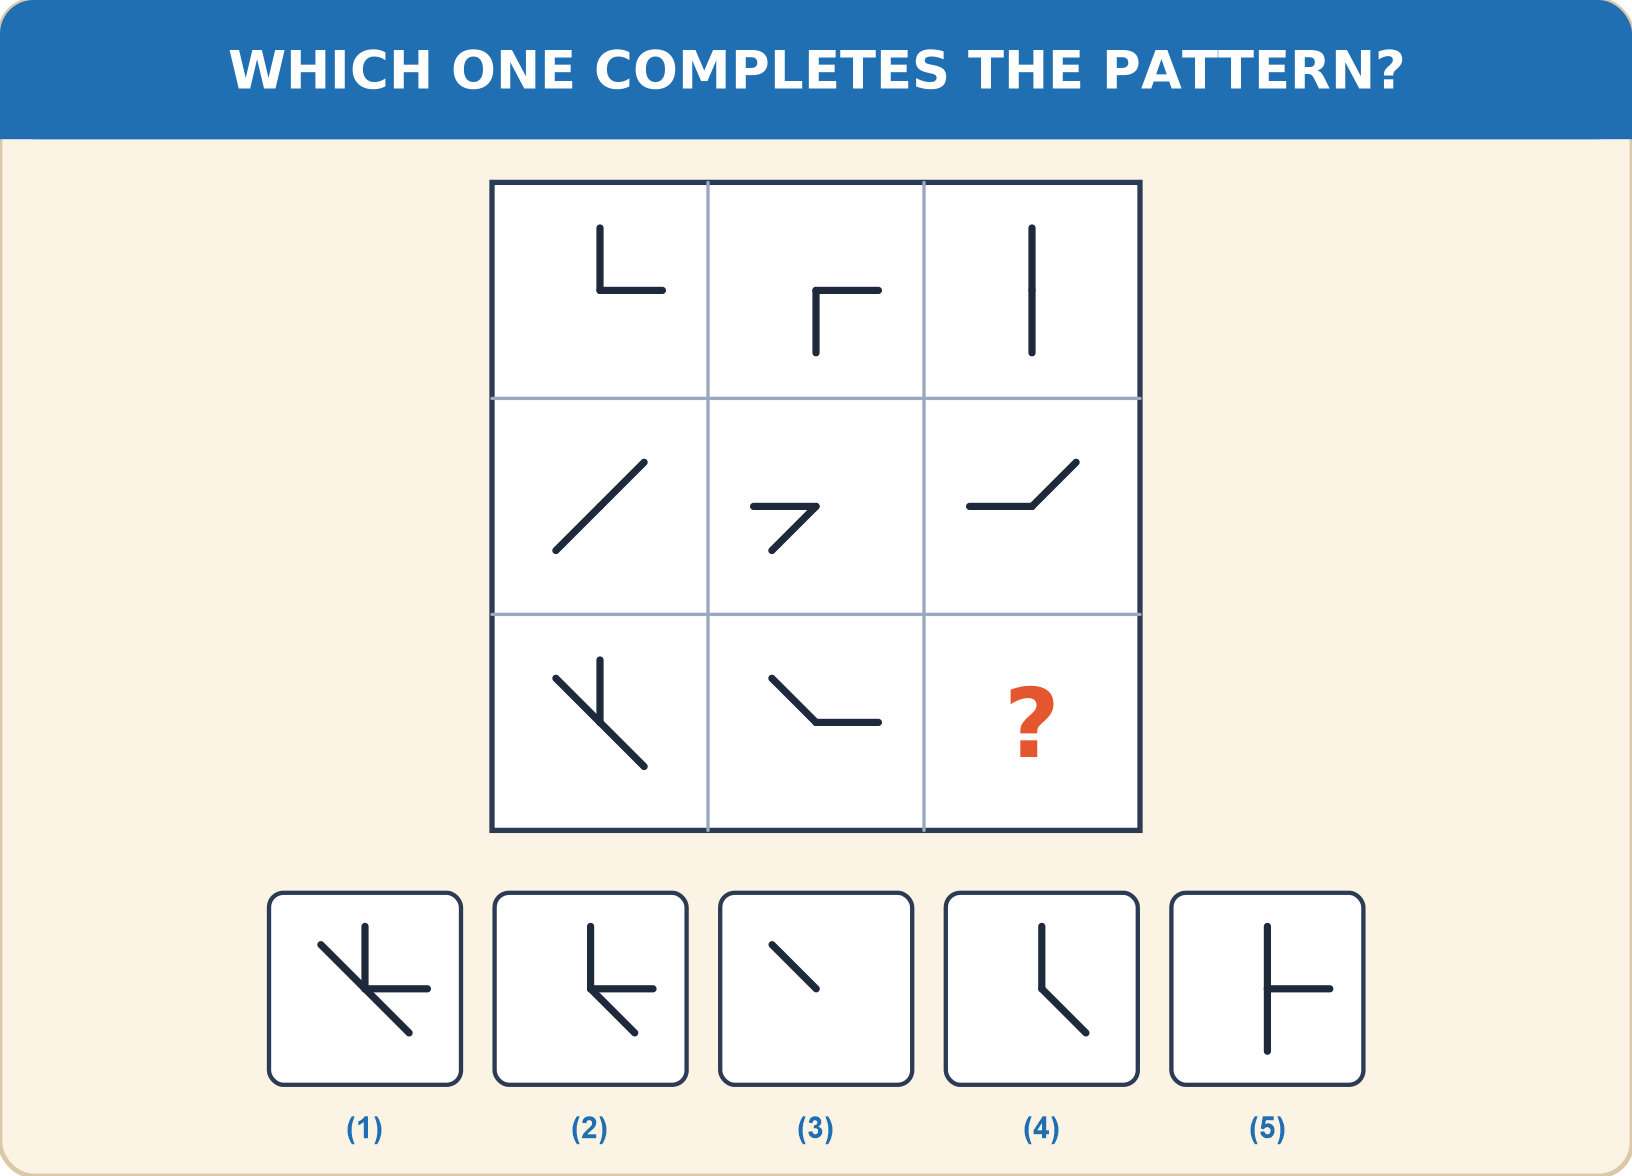
Explanation
In every row the third figure keeps the arms that appear in only one of the first two figures; an arm that appears in both figures disappears.
Row 3: the first figure has an upward arm and a line running from top-left to bottom-right, and the second has a top-left arm and a right arm. The top-left arm is in both, so it disappears, leaving an upward arm, a down-right arm and a right arm.
This is option (2).
Row 3: the first figure has an upward arm and a line running from top-left to bottom-right, and the second has a top-left arm and a right arm. The top-left arm is in both, so it disappears, leaving an upward arm, a down-right arm and a right arm.
This is option (2).
Shortcut Method
Rule: arms in both figures disappear, the rest stay
Row 3: up, down-right and right arms remain
∴ Option 2 is correct ✓
Row 3: up, down-right and right arms remain
∴ Option 2 is correct ✓
Question 92
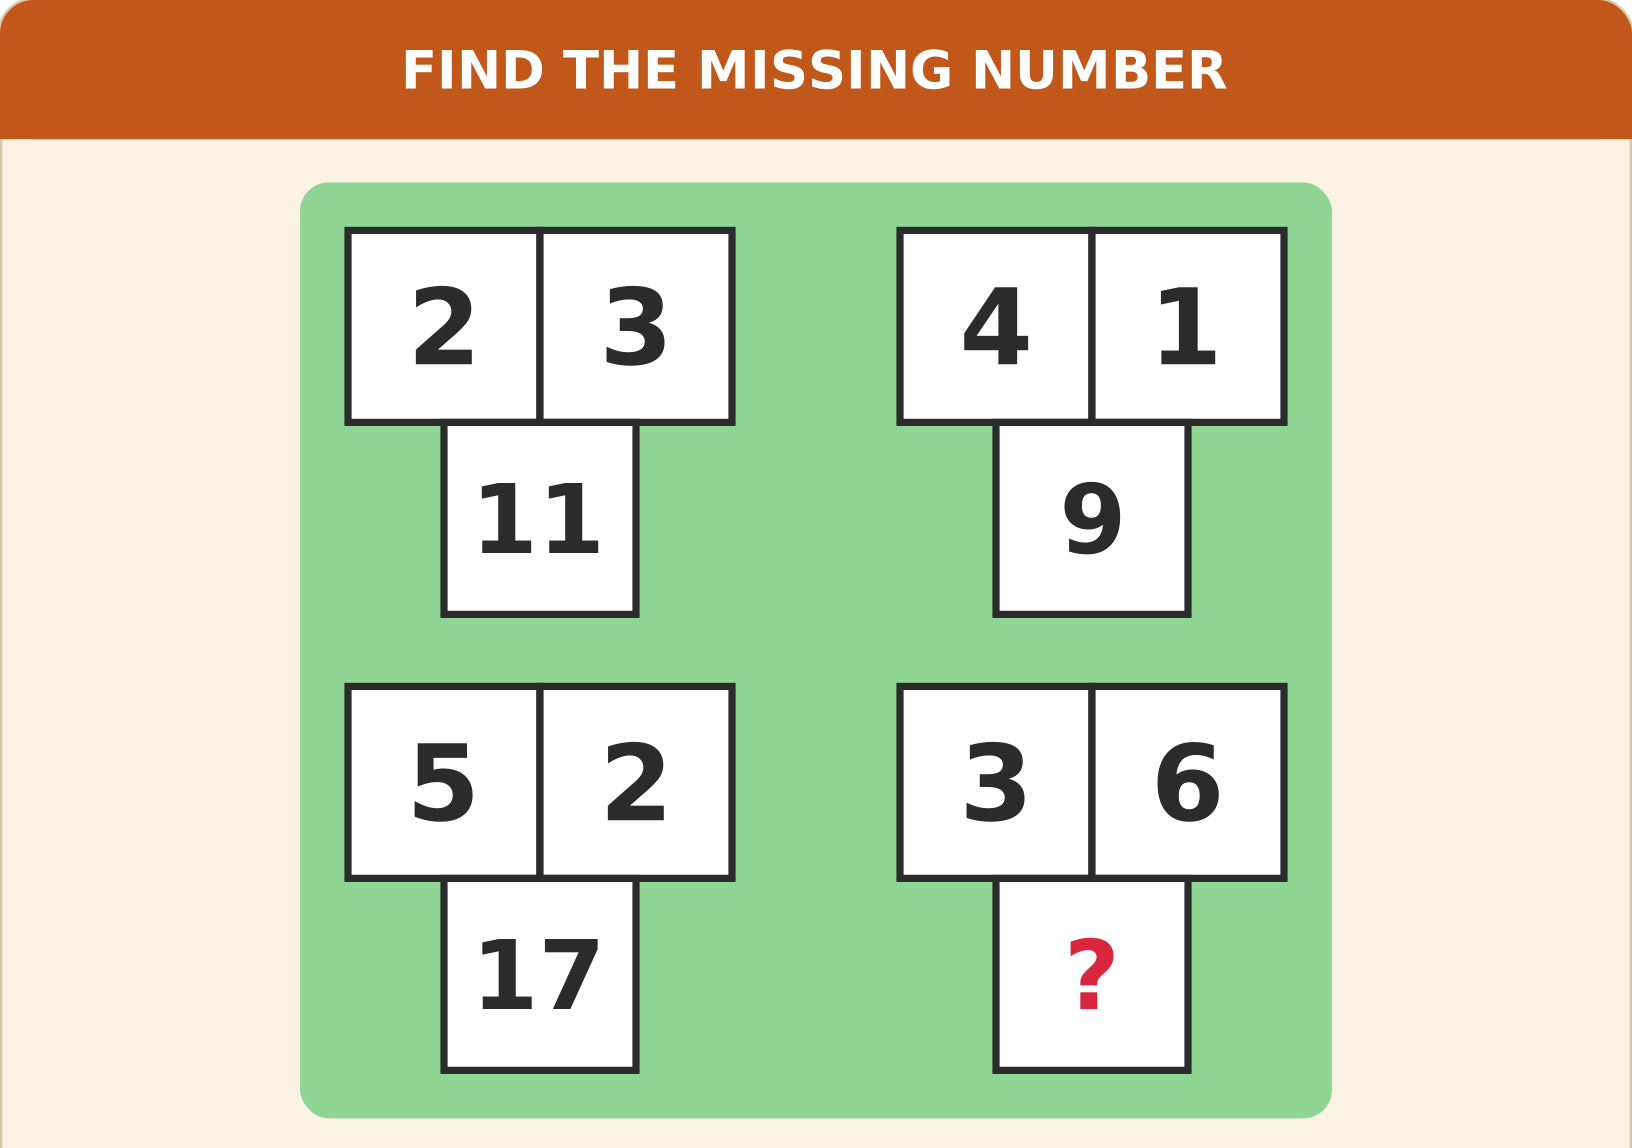
In each group, the number in the lower box comes from the two upper boxes by the same rule. Find the missing number (?).
Explanation
In every group the lower number = (left × right) + left + right.
2 and 3: 6 + 2 + 3 = 11.
4 and 1: 4 + 4 + 1 = 9.
5 and 2: 10 + 5 + 2 = 17.
So 3 and 6: 18 + 3 + 6 = 27.
2 and 3: 6 + 2 + 3 = 11.
4 and 1: 4 + 4 + 1 = 9.
5 and 2: 10 + 5 + 2 = 17.
So 3 and 6: 18 + 3 + 6 = 27.
Shortcut Method
Rule: lower = (left × right) + left + right
18 + 3 + 6
∴ ? = 27 ✓
18 + 3 + 6
∴ ? = 27 ✓
Question 93
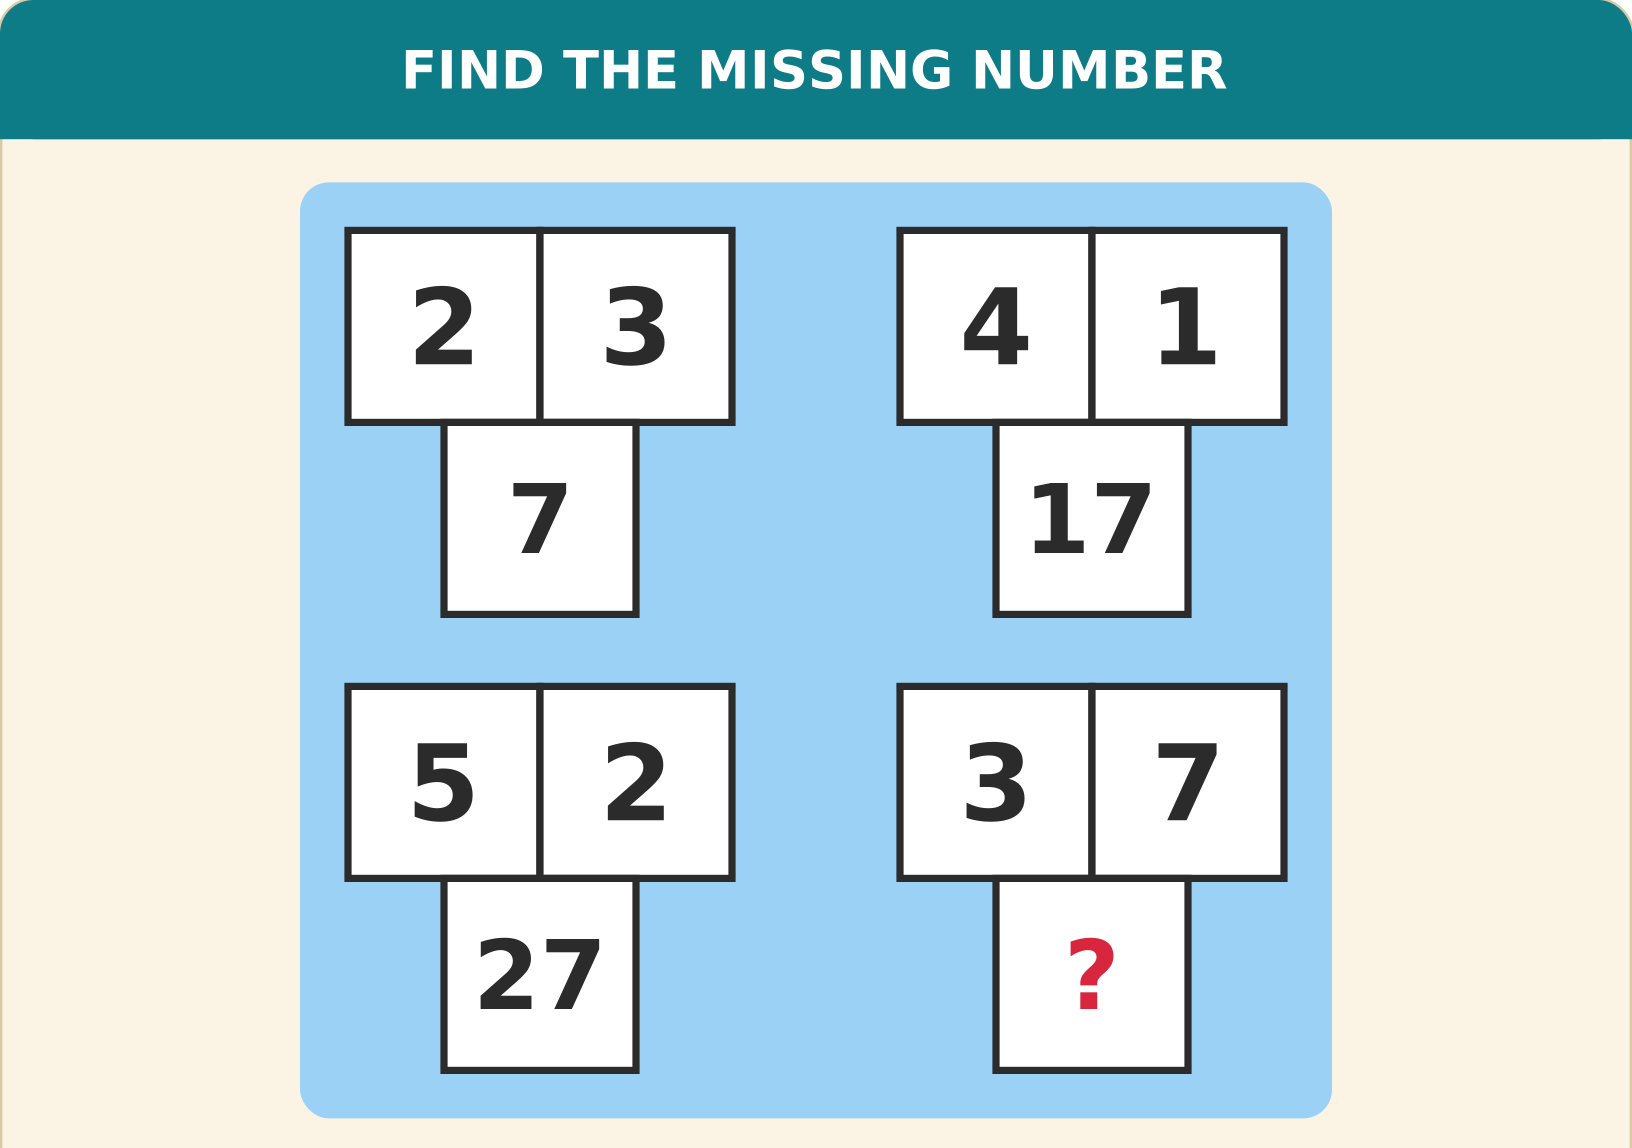
Two boxes sit above a third box in every group. Using the same relationship in each group, which number replaces the question mark (?)?
Explanation
In every group the lower number = (left × left) + right.
2 and 3: 4 + 3 = 7.
4 and 1: 16 + 1 = 17.
5 and 2: 25 + 2 = 27.
So 3 and 7: 9 + 7 = 16.
2 and 3: 4 + 3 = 7.
4 and 1: 16 + 1 = 17.
5 and 2: 25 + 2 = 27.
So 3 and 7: 9 + 7 = 16.
Shortcut Method
Rule: lower = (left)² + right
3² + 7 = 9 + 7
∴ ? = 16 ✓
3² + 7 = 9 + 7
∴ ? = 16 ✓
Question 94
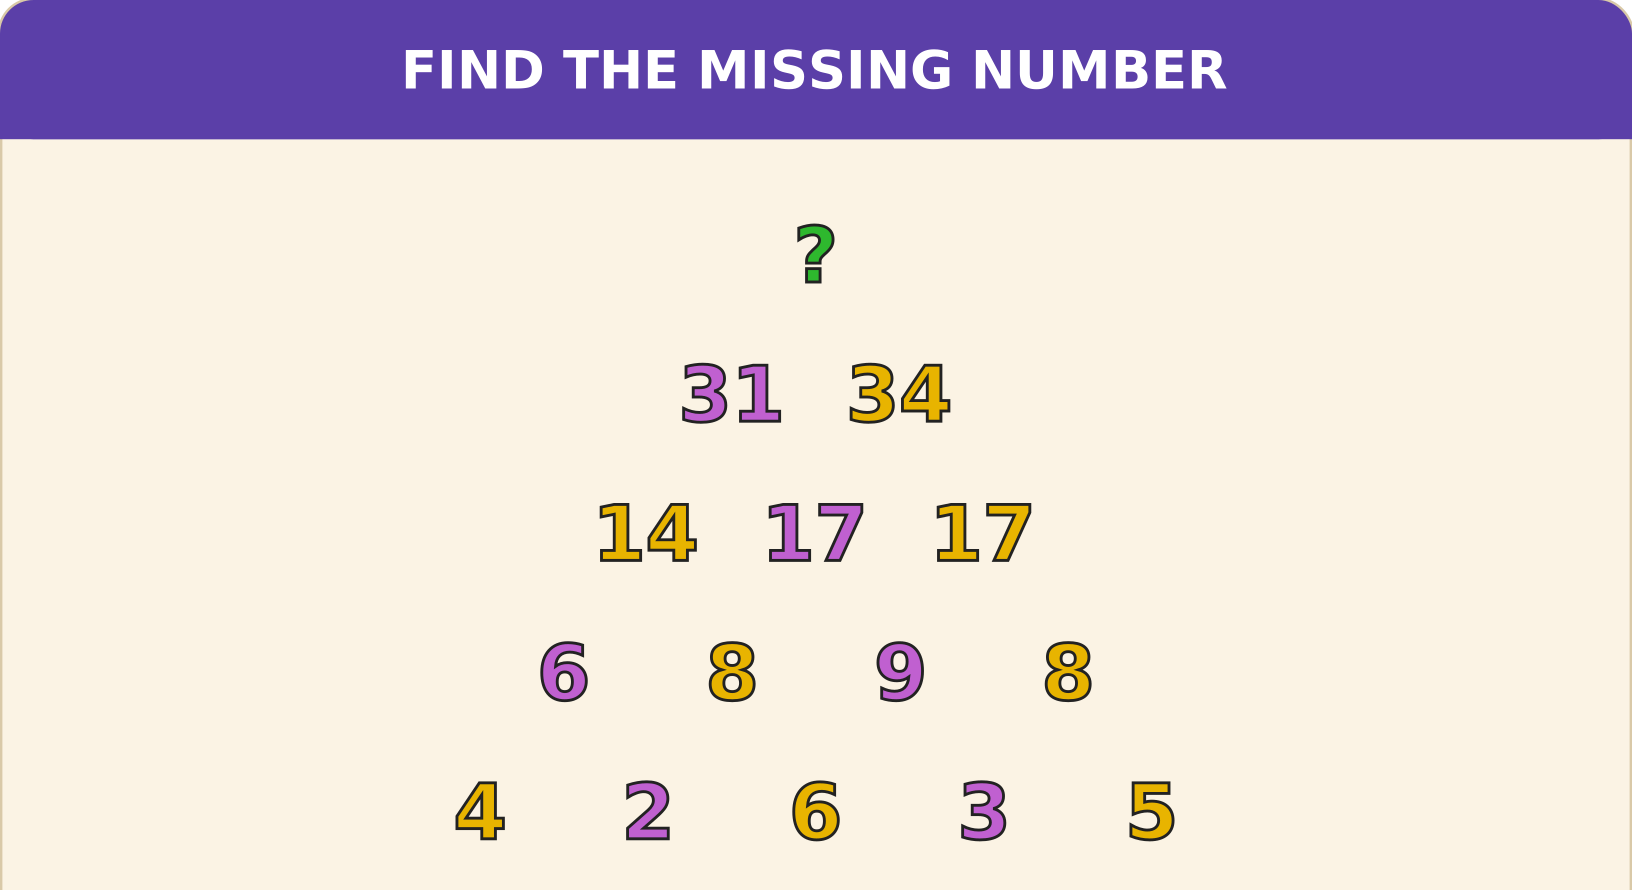
In the number pyramid every number is built from the numbers just below it. Find the number at the top (?).
Explanation
Each number is the sum of the two numbers just below it.
Bottom row 4, 2, 6, 3, 5 gives 6, 8, 9, 8.
Then 14, 17, 17, then 31 and 34.
The top number is 31 + 34 = 65.
Bottom row 4, 2, 6, 3, 5 gives 6, 8, 9, 8.
Then 14, 17, 17, then 31 and 34.
The top number is 31 + 34 = 65.
Shortcut Method
Each number = sum of the two below it
31 + 34
∴ ? = 65 ✓
31 + 34
∴ ? = 65 ✓
Question 95
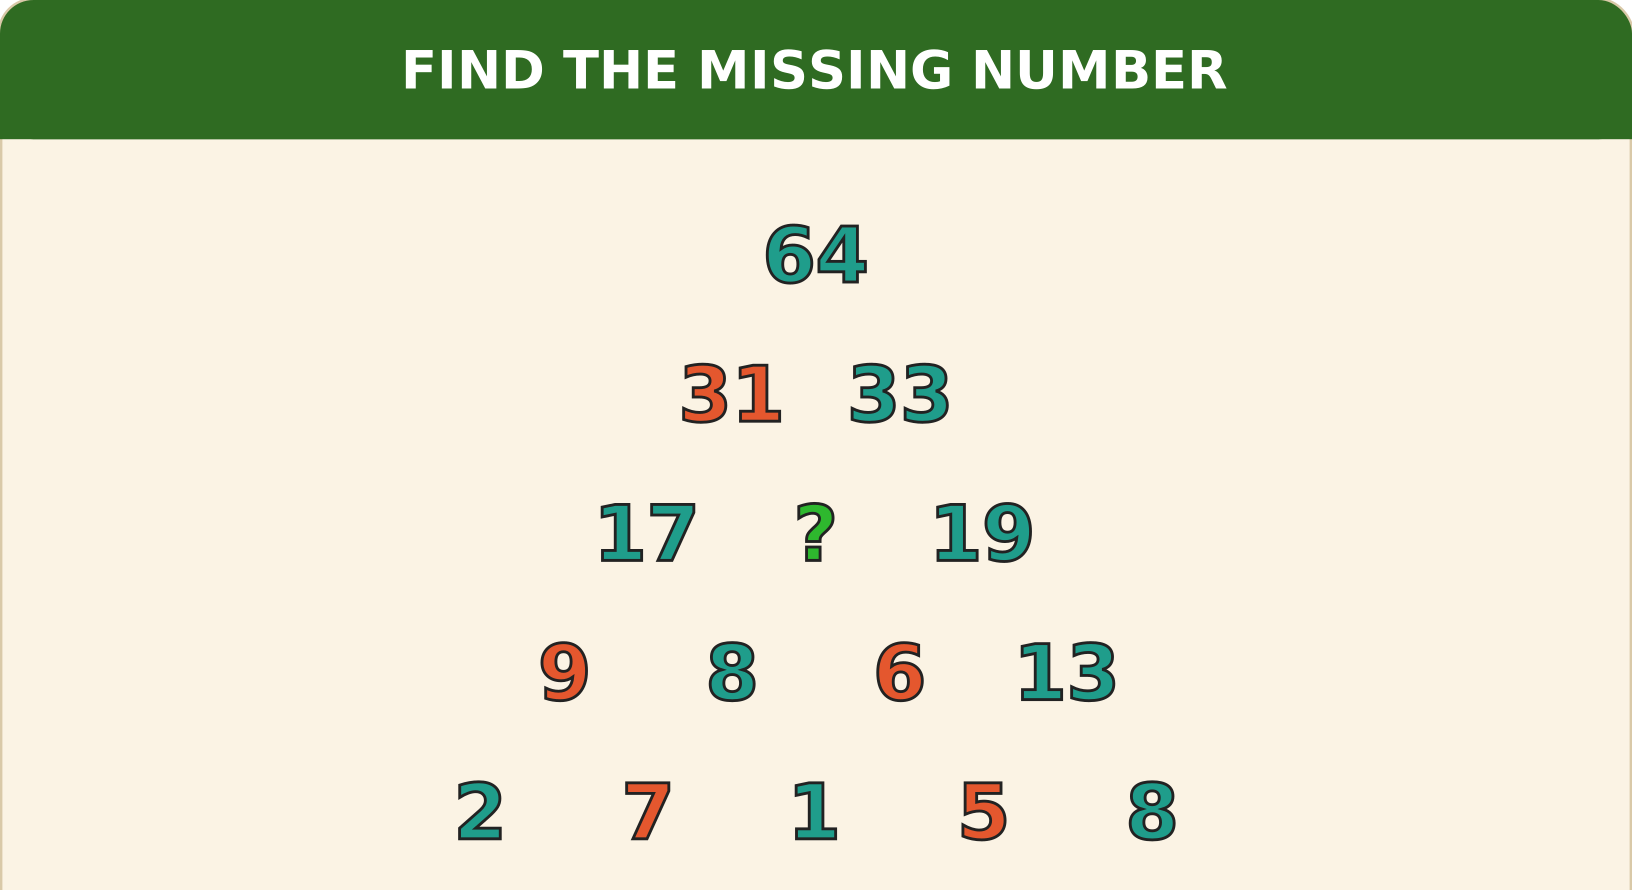
Each number in this pyramid depends on the two numbers beneath it. Find the missing number (?).
Explanation
Each number is the sum of the two numbers just below it.
Bottom row 2, 7, 1, 5, 8 gives 9, 8, 6, 13. The row above starts 17 (9 + 8), then ?, then 19 (6 + 13).
The ? is the sum of 8 and 6, so ? = 14. Check: 17 + 14 = 31 and 14 + 19 = 33, and 31 + 33 = 64.
Bottom row 2, 7, 1, 5, 8 gives 9, 8, 6, 13. The row above starts 17 (9 + 8), then ?, then 19 (6 + 13).
The ? is the sum of 8 and 6, so ? = 14. Check: 17 + 14 = 31 and 14 + 19 = 33, and 31 + 33 = 64.
Shortcut Method
Each number = sum of the two below it
? = 8 + 6
∴ ? = 14 ✓
? = 8 + 6
∴ ? = 14 ✓
Question 96
Fill in the empty circles so that every row (left to right) and every column (top to bottom) is a correct sum. What number goes in the yellow circle (?)?
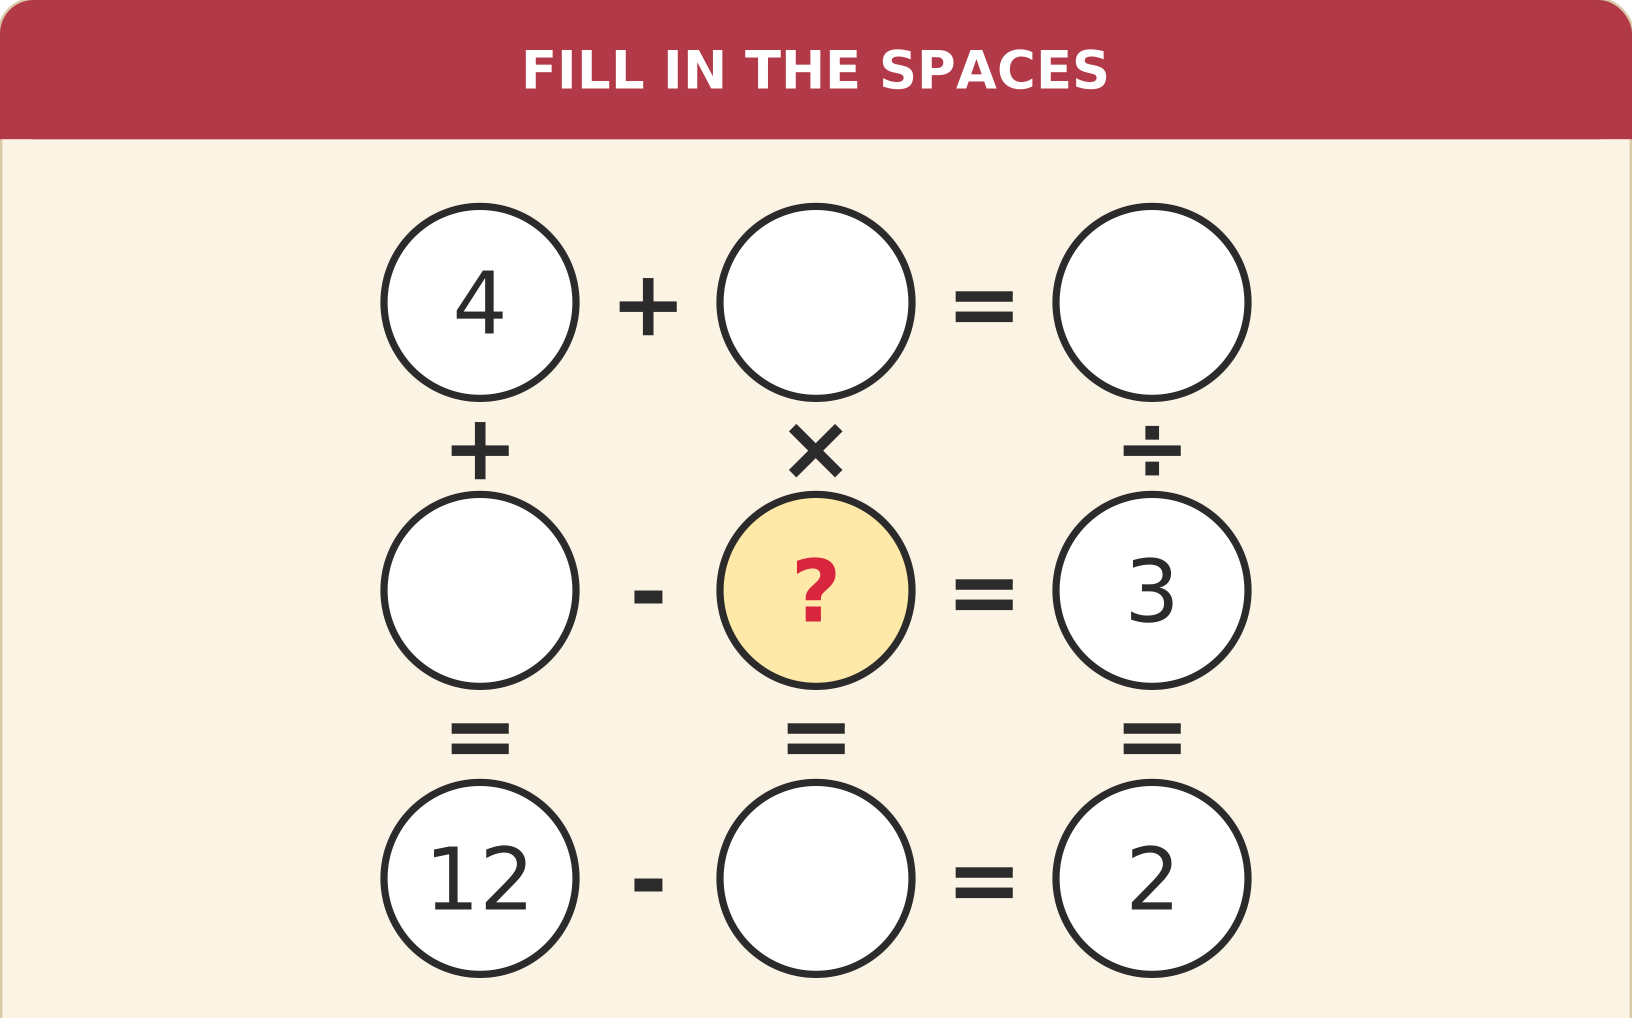
Explanation
Column 1: 4 + ? = 12, so the circle in the middle of the left column is 8.
Column 3: ? ÷ 3 = 2, so the top-right circle is 6. Row 1: 4 + ? = 6, so the top-middle circle is 2.
Row 3: 12 − ? = 2, so the bottom-middle circle is 10. Column 2: 2 × ? = 10, so the yellow circle is 5.
Check row 2: 8 − 5 = 3.
Column 3: ? ÷ 3 = 2, so the top-right circle is 6. Row 1: 4 + ? = 6, so the top-middle circle is 2.
Row 3: 12 − ? = 2, so the bottom-middle circle is 10. Column 2: 2 × ? = 10, so the yellow circle is 5.
Check row 2: 8 − 5 = 3.
Shortcut Method
Column 1: 4 + 8 = 12
Row 2: 8 − ? = 3
∴ ? = 5 ✓
Row 2: 8 − ? = 3
∴ ? = 5 ✓
Question 97
Complete the circles so that all three rows and all three columns work out correctly. Which number belongs in the yellow circle?
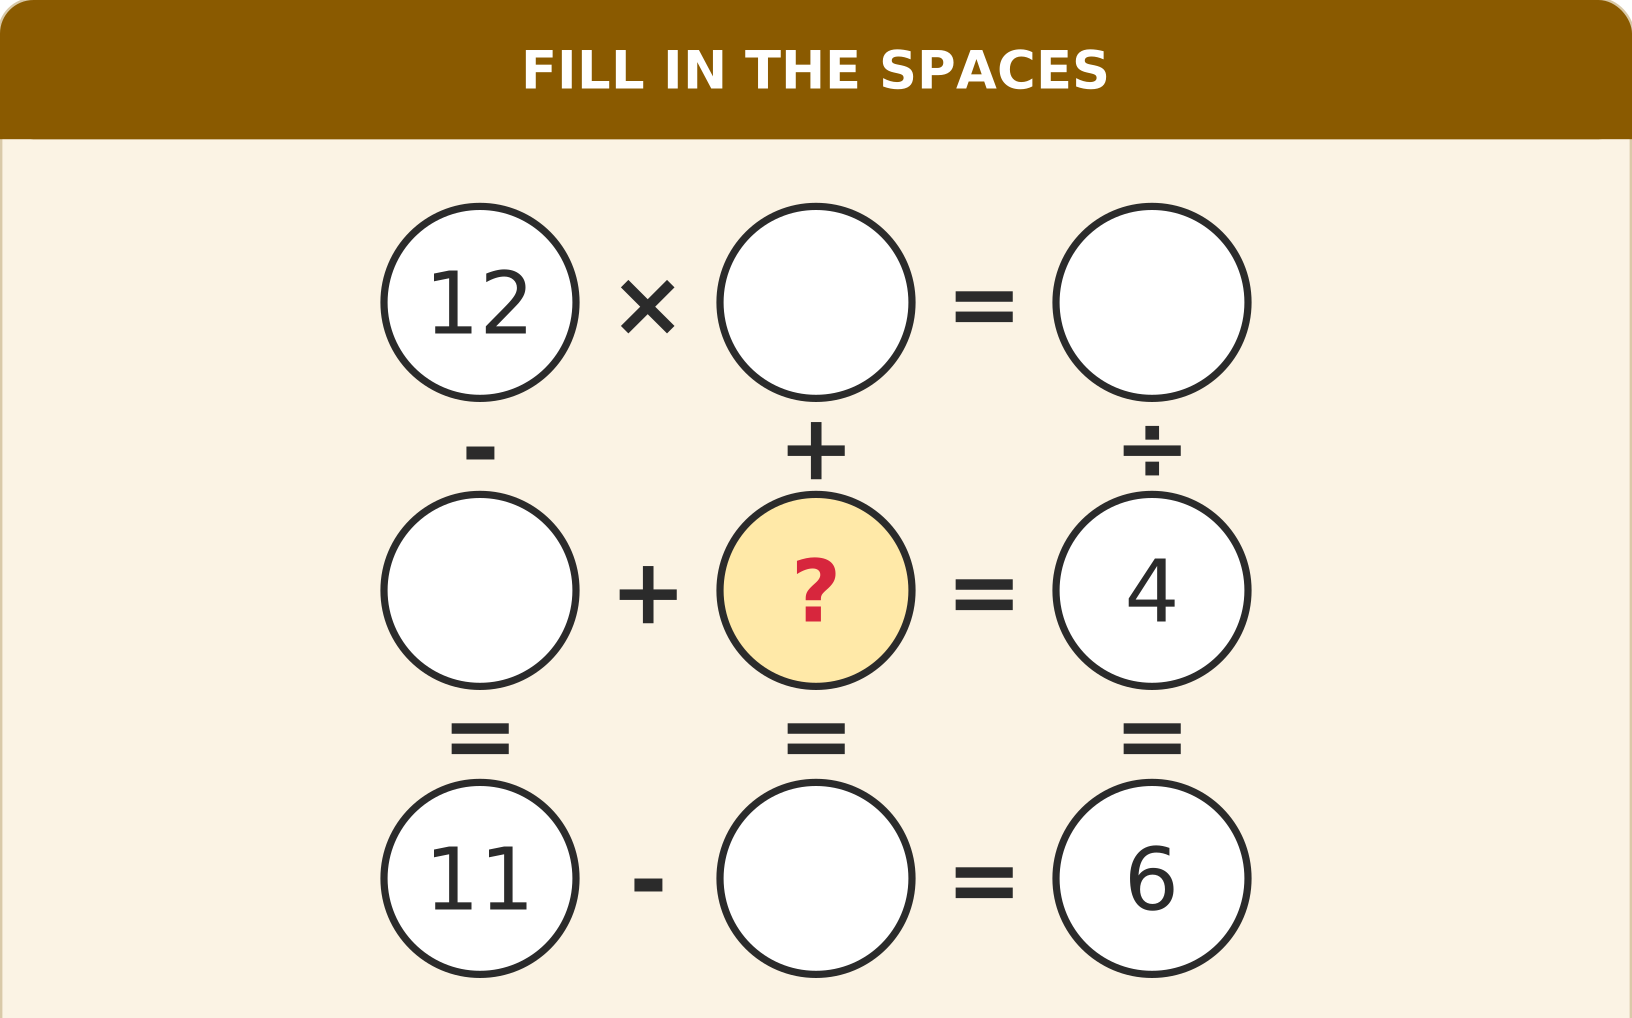
Explanation
Column 1: 12 − ? = 11, so the circle in the middle of the left column is 1.
Row 3: 11 − ? = 6, so the bottom-middle circle is 5. Column 3: ? ÷ 4 = 6, so the top-right circle is 24. Row 1: 12 × ? = 24, so the top-middle circle is 2.
Column 2: 2 + ? = 5, so the yellow circle is 3.
Check row 2: 1 + 3 = 4.
Row 3: 11 − ? = 6, so the bottom-middle circle is 5. Column 3: ? ÷ 4 = 6, so the top-right circle is 24. Row 1: 12 × ? = 24, so the top-middle circle is 2.
Column 2: 2 + ? = 5, so the yellow circle is 3.
Check row 2: 1 + 3 = 4.
Shortcut Method
Column 1: 12 − 1 = 11
Column 2: 2 + ? = 5
∴ ? = 3 ✓
Column 2: 2 + ? = 5
∴ ? = 3 ✓