Practice Non Verbal Reasoning questions on Series, covering figure sequences, pattern identification, changes in shape, position, direction, and arrangement to find the missing or next figure. Takes about 20-25 minutes. Each question shows five figures marked A, B, C, D and E, called the Problem Figures, followed by five figures marked 1, 2, 3, 4 and 5, called the Answer Figures. Find the pattern the Problem Figures follow, then select the Answer Figure that continues the same series.
Question 1
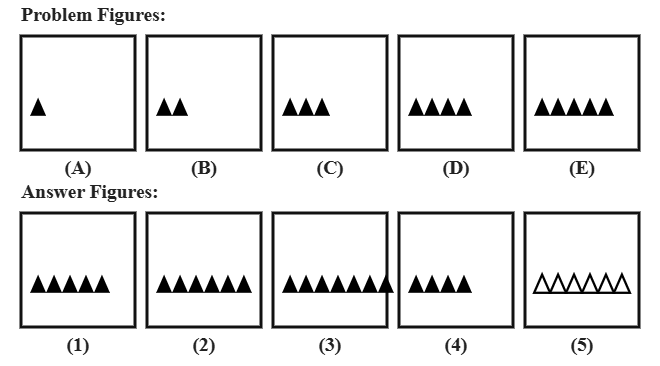
Select a figure from amongst the Answer Figures which will continue the same series as established by the five Problem Figures shown below.
Explanation
In the Problem Figures, the number of solid triangles increases by exactly one at every step: A has 1, B has 2, C has 3, D has 4, and E has 5. Continuing the same rule, the next figure must have 6 solid triangles.
Option 1 has only 5 triangles, simply repeating Problem Figure E.
Option 3 has 7 triangles, jumping two steps ahead instead of one.
Option 4 has 4 triangles, going backwards instead of forwards.
Option 5 has the correct count of 6, but the triangles are drawn as outlines instead of solid black, which does not match the solid-triangle rule established by A to E.
Option 2 correctly shows 6 solid triangles, so it is the right answer.
Option 1 has only 5 triangles, simply repeating Problem Figure E.
Option 3 has 7 triangles, jumping two steps ahead instead of one.
Option 4 has 4 triangles, going backwards instead of forwards.
Option 5 has the correct count of 6, but the triangles are drawn as outlines instead of solid black, which does not match the solid-triangle rule established by A to E.
Option 2 correctly shows 6 solid triangles, so it is the right answer.
Shortcut Method
Rule: triangle count increases by 1 each step → after E (5) comes 6
∴ Option 2 is correct ✓
∴ Option 2 is correct ✓
Question 2
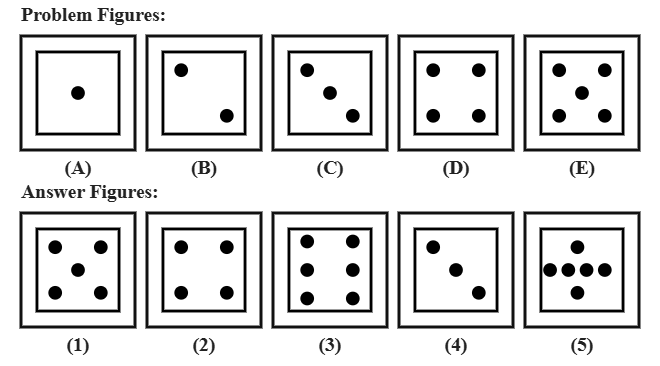
Study the five Problem Figures (A to E) given below and select the Answer Figure that continues the same series.
Explanation
In the Problem Figures, the number of dots inside the box increases by exactly one at every step, arranged in the standard dice-face pattern: A has 1 dot, B has 2, C has 3, D has 4, and E has 5. Continuing the same rule, the next figure must have 6 dots in the standard six-dot dice pattern (two columns of three).
Option 1 has only 5 dots, simply repeating Problem Figure E.
Option 2 has 4 dots, going backwards.
Option 4 has just 3 dots, going even further backwards.
Option 5 has the correct count of 6 dots, but arranged in a single crowded row-and-cross pattern instead of the standard two-column dice layout used throughout A to E.
Option 3 correctly shows 6 dots in the standard dice arrangement, so it is the right answer.
Option 1 has only 5 dots, simply repeating Problem Figure E.
Option 2 has 4 dots, going backwards.
Option 4 has just 3 dots, going even further backwards.
Option 5 has the correct count of 6 dots, but arranged in a single crowded row-and-cross pattern instead of the standard two-column dice layout used throughout A to E.
Option 3 correctly shows 6 dots in the standard dice arrangement, so it is the right answer.
Shortcut Method
Rule: dot count increases by 1 each step, standard dice layout → after E (5) comes 6
∴ Option 3 is correct ✓
∴ Option 3 is correct ✓
Question 3
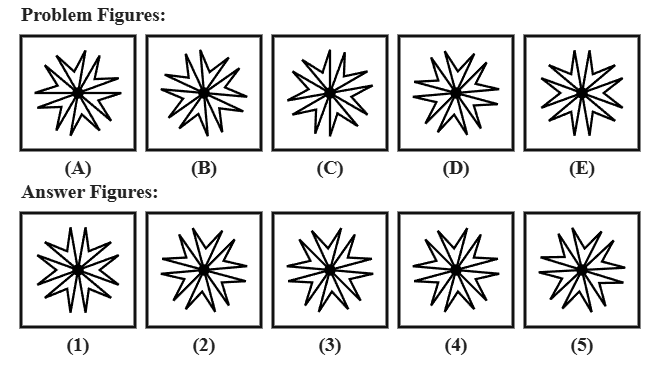
The five Problem Figures below (A to E) form a series. Which of the five Answer Figures will continue that series?
Explanation
In the Problem Figures, the six-bladed pinwheel rotates 25 degrees further at every step (0, 25, 50, 75, 100 degrees from A to E). Continuing the same rule, the next figure must show the pinwheel rotated to 125 degrees.
Option 1 simply repeats Problem Figure E (100 degrees) instead of advancing.
Option 2 shows the mirror image of the correct pinwheel.
Option 3 shows the pinwheel over-rotated well past the correct position.
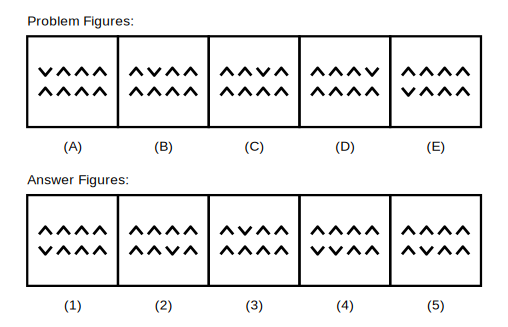
Option 5 shows the pinwheel over-rotated by a smaller amount, 12 degrees beyond the correct position.
Option 4 correctly continues the 25-degree rotation, so it is the right answer.
Option 1 simply repeats Problem Figure E (100 degrees) instead of advancing.
Option 2 shows the mirror image of the correct pinwheel.
Option 3 shows the pinwheel over-rotated well past the correct position.
Option 5 shows the pinwheel over-rotated by a smaller amount, 12 degrees beyond the correct position.
Option 4 correctly continues the 25-degree rotation, so it is the right answer.
Shortcut Method
Rule: rotate 25° each step → after E (100°) comes 125°
∴ Option 4 is correct ✓
∴ Option 4 is correct ✓
Question 4
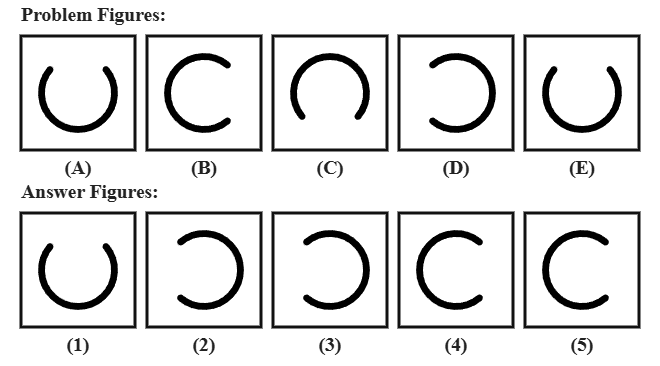
Observe the five Problem Figures (A to E) shown below, then select the Answer Figure that correctly continues the series.
Explanation
In the Problem Figures, the open arc rotates 90 degrees further at every step (0, 90, 180, 270 degrees from A to D, back to 0 degrees at E since a 360-degree turn returns to the start). Continuing the same 90-degree step from E, the next figure must show the arc rotated to 90 degrees, the same orientation as Problem Figure B.
Option 1 simply repeats Problem Figure E (0 degrees, the same orientation as A).
Option 2 shows the arc matching Problem Figure C's orientation (180 degrees) instead of continuing forward.
Option 3 shows the arc matching Problem Figure D's orientation (270 degrees), going backwards instead of forward.
Option 4 shows the arc rotated only 45 degrees, landing at a diagonal orientation that does not match the 90-degree-step pattern established by A to E.
Option 5 correctly shows the arc rotated to 90 degrees, continuing the established rotation, so it is the right answer.
Option 1 simply repeats Problem Figure E (0 degrees, the same orientation as A).
Option 2 shows the arc matching Problem Figure C's orientation (180 degrees) instead of continuing forward.
Option 3 shows the arc matching Problem Figure D's orientation (270 degrees), going backwards instead of forward.
Option 4 shows the arc rotated only 45 degrees, landing at a diagonal orientation that does not match the 90-degree-step pattern established by A to E.
Option 5 correctly shows the arc rotated to 90 degrees, continuing the established rotation, so it is the right answer.
Shortcut Method
Rule: rotate 90° each step, repeats every 4 steps → after E (0°, same as A) comes 90° (same as B)
∴ Option 5 is correct ✓
∴ Option 5 is correct ✓
Question 5
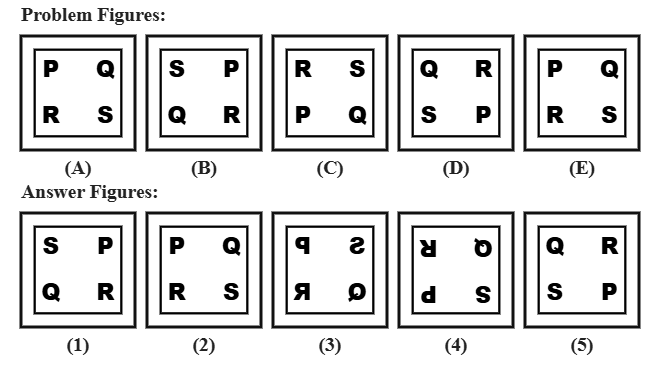
In the five Problem Figures below (A to E), the four letters keep changing position. Select the Answer Figure that continues the same series.
Explanation
In the Problem Figures, the four letters P, Q, R and S shift one corner clockwise at every step, returning to the starting arrangement every 4 steps (A and E show the same arrangement). Continuing the same rule from E, the next figure must show the arrangement matching Problem Figure B.
Option 2 simply repeats Problem Figure E instead of advancing.
Option 3 shows the mirror image of the correct arrangement.
Option 4 shows the arrangement rotated a further 180 degrees past the correct answer.
Option 5 shows the letters shifted two corners instead of one.
Option 1 correctly shows the letters shifted one more corner clockwise, so it is the right answer.
Option 2 simply repeats Problem Figure E instead of advancing.
Option 3 shows the mirror image of the correct arrangement.
Option 4 shows the arrangement rotated a further 180 degrees past the correct answer.
Option 5 shows the letters shifted two corners instead of one.
Option 1 correctly shows the letters shifted one more corner clockwise, so it is the right answer.
Shortcut Method
Rule: letters shift one corner clockwise each step, cycle repeats every 4 steps
∴ Option 1 is correct ✓
∴ Option 1 is correct ✓
Question 6
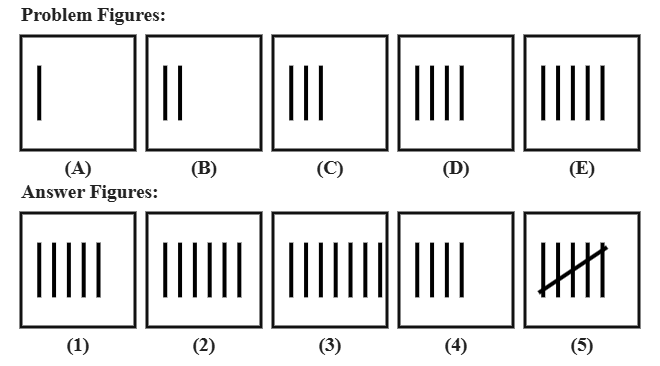
A series of tally-mark figures is shown below as Problem Figures A to E. Choose the Answer Figure that continues the series.
Explanation
In the Problem Figures, the number of vertical tally lines increases by exactly one at every step: A has 1, B has 2, C has 3, D has 4, and E has 5. Continuing the same rule, the next figure must have 6 plain vertical lines.
Option 1 has only 5 lines, simply repeating Problem Figure E.
Option 3 has 7 lines, jumping two steps ahead.
Option 4 has 4 lines, going backwards.
Option 5 shows the traditional tally-counting bundle of 5 lines with a diagonal strike-through (representing "5"), which does not match the plain-line rule established by A to E.
Option 2 correctly shows 6 plain vertical lines, so it is the right answer.
Option 1 has only 5 lines, simply repeating Problem Figure E.
Option 3 has 7 lines, jumping two steps ahead.
Option 4 has 4 lines, going backwards.
Option 5 shows the traditional tally-counting bundle of 5 lines with a diagonal strike-through (representing "5"), which does not match the plain-line rule established by A to E.
Option 2 correctly shows 6 plain vertical lines, so it is the right answer.
Shortcut Method
Rule: tally-line count increases by 1 each step → after E (5) comes 6
∴ Option 2 is correct ✓
∴ Option 2 is correct ✓
Question 7
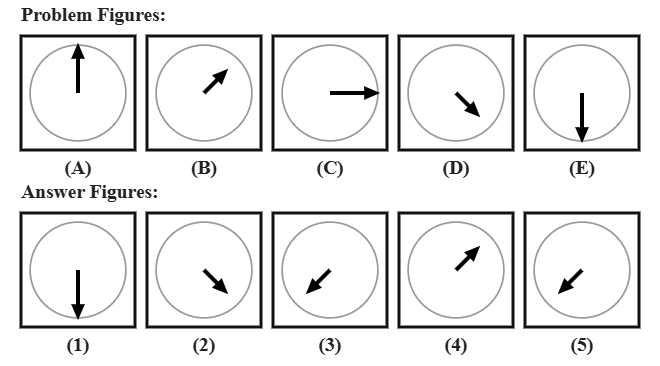
Each Problem Figure below (A to E) shows a compass-style arrow that changes at every step. Select the Answer Figure that continues the series.
Explanation
In the Problem Figures, the arrow rotates 45 degrees clockwise at every step AND its length alternates: long in A, short in B, long in C, short in D, long in E. Continuing both rules together, the next figure must show the arrow rotated a further 45 degrees with a SHORT length.
Option 1 simply repeats Problem Figure E (same angle, long length) instead of advancing.
Option 2 shows the mirror image of the correct arrow.
Option 4 shows the arrow rotated a further 180 degrees past the correct answer.
Option 5 has the correct rotation angle but the wrong length (long instead of short), breaking the alternating-length rule.
Option 3 correctly continues both the rotation and the alternating length, so it is the right answer.
Option 1 simply repeats Problem Figure E (same angle, long length) instead of advancing.
Option 2 shows the mirror image of the correct arrow.
Option 4 shows the arrow rotated a further 180 degrees past the correct answer.
Option 5 has the correct rotation angle but the wrong length (long instead of short), breaking the alternating-length rule.
Option 3 correctly continues both the rotation and the alternating length, so it is the right answer.
Shortcut Method
Two rules together: rotate 45° each step AND alternate long/short length
∴ Option 3 is correct ✓
∴ Option 3 is correct ✓
Question 8
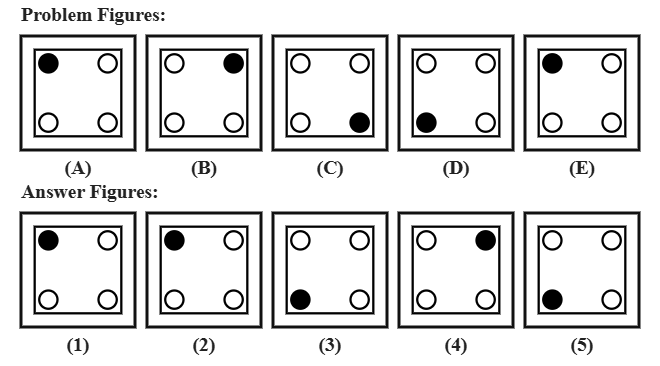
The five Problem Figures below (A to E) show a square with one corner marked black. Select the Answer Figure that continues the same series.
Explanation
In the Problem Figures, the filled corner moves one position clockwise at every step, returning to the starting corner every 4 steps (A and E show the filled corner in the same place). Continuing the same rule from E, the next figure must show the filled corner matching Problem Figure B.
Option 1 simply repeats Problem Figure E instead of advancing.
Option 2 shows two corners marked instead of just one.
Option 3 correctly marks the right corner, but uses a filled square instead of the circular marker used throughout A to E.
Option 5 shows the filled corner shifted two positions instead of one.
Option 4 correctly shows the filled corner moved one more position clockwise, so it is the right answer.
Option 1 simply repeats Problem Figure E instead of advancing.
Option 2 shows two corners marked instead of just one.
Option 3 correctly marks the right corner, but uses a filled square instead of the circular marker used throughout A to E.
Option 5 shows the filled corner shifted two positions instead of one.
Option 4 correctly shows the filled corner moved one more position clockwise, so it is the right answer.
Shortcut Method
Rule: filled corner moves one position clockwise each step, cycle repeats every 4 steps
∴ Option 4 is correct ✓
∴ Option 4 is correct ✓
Question 9
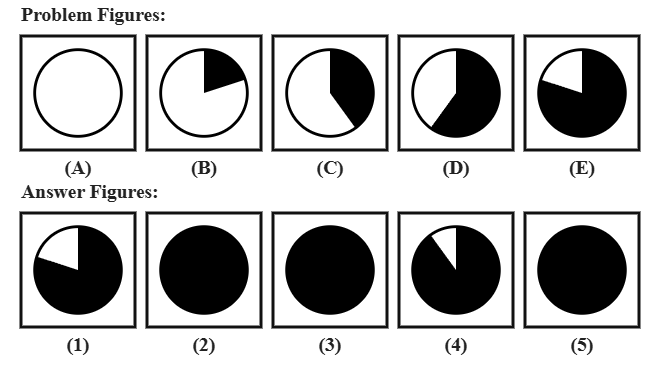
The five Problem Figures (A to E) below show a circle that fills in more with each step. Which Answer Figure continues this series?
Explanation
In the Problem Figures, the circle fills in by an extra 20 percent at every step: A is empty (0%), B is 20% filled, C is 40%, D is 60%, and E is 80%. Continuing the same rule, the next figure must be completely filled (100%).
Option 1 shows 80% filled, simply repeating Problem Figure E.
Option 2 shows only 60% filled, well short of the correct amount.
Option 3 shows only 70% filled, still short of the correct amount.
Option 4 shows 90% filled, not the full 100% required by the rule.
Option 5 correctly shows the circle completely filled (100%), so it is the right answer.
Option 1 shows 80% filled, simply repeating Problem Figure E.
Option 2 shows only 60% filled, well short of the correct amount.
Option 3 shows only 70% filled, still short of the correct amount.
Option 4 shows 90% filled, not the full 100% required by the rule.
Option 5 correctly shows the circle completely filled (100%), so it is the right answer.
Shortcut Method
Rule: fill increases by 20% each step → after E (80%) comes 100% (fully filled)
∴ Option 5 is correct ✓
∴ Option 5 is correct ✓
Question 10
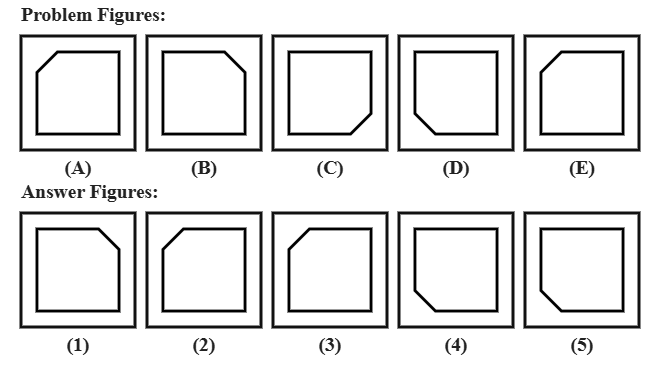
Each of the five Problem Figures below (A to E) shows a square with one corner cut off. Select the Answer Figure that continues the same series.
Explanation
In the Problem Figures, the cut corner moves one position clockwise at every step, returning to the starting corner every 4 steps (A and E show the cut in the same corner). Continuing the same rule from E, the next figure must show the cut corner matching Problem Figure B.
Option 2 simply repeats Problem Figure E instead of advancing.
Option 3 shows two corners cut instead of just one.
Option 4 correctly cuts the right corner, but the cut is noticeably larger than the size used throughout A to E.
Option 5 shows the cut corner shifted two positions instead of one.
Option 1 correctly shows the cut corner moved one more position clockwise, so it is the right answer.
Option 2 simply repeats Problem Figure E instead of advancing.
Option 3 shows two corners cut instead of just one.
Option 4 correctly cuts the right corner, but the cut is noticeably larger than the size used throughout A to E.
Option 5 shows the cut corner shifted two positions instead of one.
Option 1 correctly shows the cut corner moved one more position clockwise, so it is the right answer.
Shortcut Method
Rule: cut corner moves one position clockwise each step, cycle repeats every 4 steps
∴ Option 1 is correct ✓
∴ Option 1 is correct ✓
Question 11
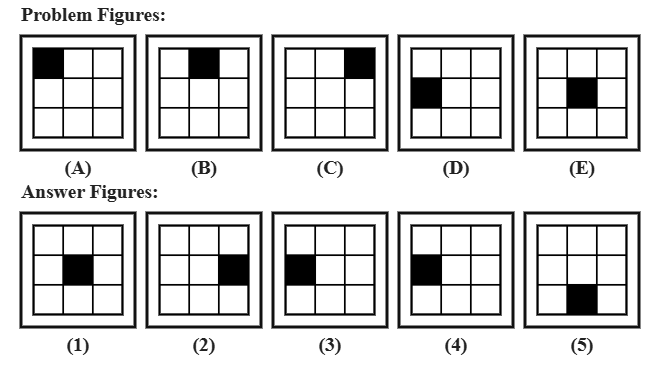
The five Problem Figures below (A to E) show a 3x3 grid with one shaded cell. Select the Answer Figure that continues the same series.
Explanation
In the Problem Figures, the shaded cell moves one position at a time, left to right along each row before dropping to the start of the next row: A is cell 1, B is cell 2, C is cell 3, D is cell 4 (start of row 2), and E is cell 5. Continuing the same rule, the next figure must show cell 6 shaded (the last cell of row 2).
Option 1 simply repeats Problem Figure E (cell 5) instead of advancing.
Option 3 shows the mirror image of the correct grid (shaded cell on the opposite side).
Option 4 shades a cell that does not follow the established left-to-right path at all.
Option 5 shows cell 9 shaded, skipping too far ahead.
Option 2 correctly shows the shaded cell advanced by exactly one more position, so it is the right answer.
Option 1 simply repeats Problem Figure E (cell 5) instead of advancing.
Option 3 shows the mirror image of the correct grid (shaded cell on the opposite side).
Option 4 shades a cell that does not follow the established left-to-right path at all.
Option 5 shows cell 9 shaded, skipping too far ahead.
Option 2 correctly shows the shaded cell advanced by exactly one more position, so it is the right answer.
Shortcut Method
Rule: shaded cell advances by one position each step, left to right, row by row
∴ Option 2 is correct ✓
∴ Option 2 is correct ✓
Question 12
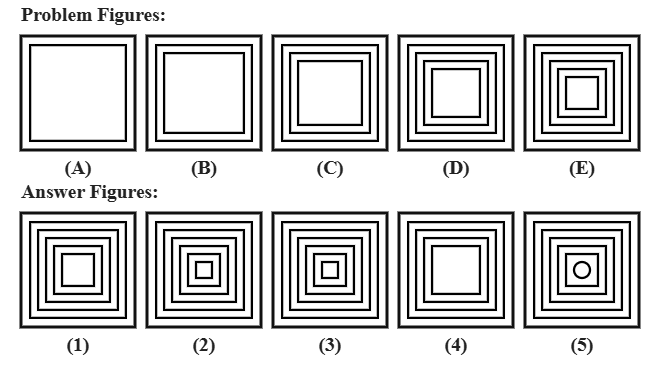
A series of nested squares is shown below as Problem Figures A to E. Choose the Answer Figure that continues the series.
Explanation
In the Problem Figures, one more nested square ring is added at every step: A has 1 ring, B has 2, C has 3, D has 4, and E has 5. Continuing the same rule, the next figure must have 6 nested square rings.
Option 1 has only 5 rings, simply repeating Problem Figure E.
Option 2 has 7 rings, jumping two steps ahead.
Option 4 has 4 rings, going backwards.
Option 5 has the correct count of 6 rings, but the innermost ring is drawn as a circle instead of a square, which does not match the all-square rule established by A to E.
Option 3 correctly shows 6 nested square rings, so it is the right answer.
Option 1 has only 5 rings, simply repeating Problem Figure E.
Option 2 has 7 rings, jumping two steps ahead.
Option 4 has 4 rings, going backwards.
Option 5 has the correct count of 6 rings, but the innermost ring is drawn as a circle instead of a square, which does not match the all-square rule established by A to E.
Option 3 correctly shows 6 nested square rings, so it is the right answer.
Shortcut Method
Rule: one more square ring added each step → after E (5 rings) comes 6
∴ Option 3 is correct ✓
∴ Option 3 is correct ✓
Question 13
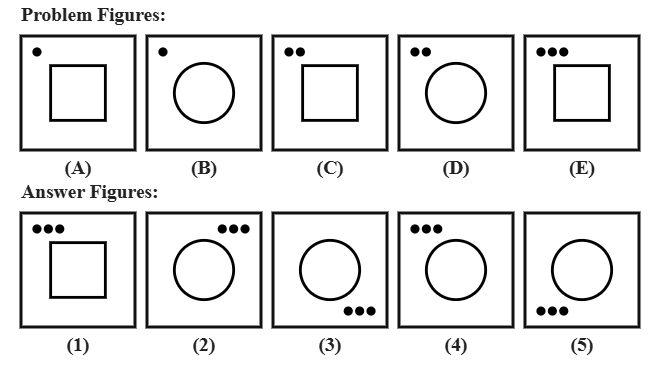
Each of the five Problem Figures below (A to E) combines a shape with a row of small dots. Select the Answer Figure that continues the series.
Explanation
In the Problem Figures, two rules act together: the shape alternates square, circle, square, circle, square across A to E, and the row of dots above it grows by one dot every two steps (1 dot for A-B, 2 dots for C-D, so E also has... continuing: since E is the 5th figure with a square, the count has grown to 3 dots). Continuing both rules from E (square, 3 dots), the next figure must show a CIRCLE with 3 dots.
Option 1 simply repeats Problem Figure E (square, 3 dots) instead of alternating the shape.
Option 2 shows the mirror image of the correct figure.
Option 3 shows the correct figure rotated 180 degrees.
Option 5 shows the correct figure flipped vertically.
Option 4 correctly shows a circle with 3 dots, continuing both rules together, so it is the right answer.
Option 1 simply repeats Problem Figure E (square, 3 dots) instead of alternating the shape.
Option 2 shows the mirror image of the correct figure.
Option 3 shows the correct figure rotated 180 degrees.
Option 5 shows the correct figure flipped vertically.
Option 4 correctly shows a circle with 3 dots, continuing both rules together, so it is the right answer.
Shortcut Method
Two rules together: shape alternates square/circle, dot count grows by 1 every 2 steps
∴ Option 4 is correct ✓
∴ Option 4 is correct ✓
Question 14
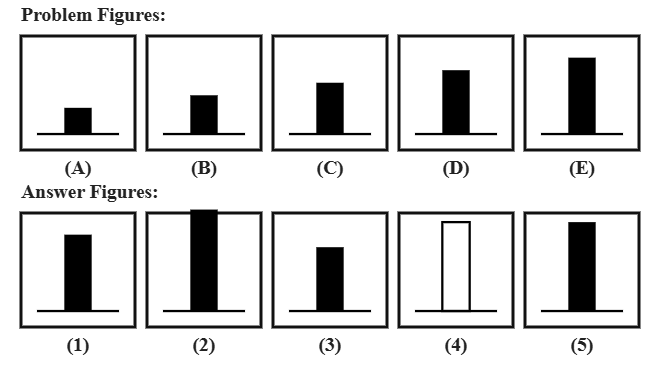
The five Problem Figures below (A to E) show a single bar growing taller. Which Answer Figure continues this series?
Explanation
In the Problem Figures, the bar grows taller by the same fixed amount at every step, from A (shortest) to E (tallest so far). Continuing the same growth step, the next figure must show a bar taller still than Problem Figure E.
Option 1 shows the same height as Problem Figure E, simply repeating it.
Option 2 shows a bar two growth-steps taller than E, overshooting the rule.
Option 3 shows a bar shorter than D, going backwards.
Option 4 shows the correct height, but drawn as a hollow outline instead of a solid black bar, which does not match the solid-bar rule established by A to E.
Option 5 correctly shows a solid bar one growth-step taller than E, so it is the right answer.
Option 1 shows the same height as Problem Figure E, simply repeating it.
Option 2 shows a bar two growth-steps taller than E, overshooting the rule.
Option 3 shows a bar shorter than D, going backwards.
Option 4 shows the correct height, but drawn as a hollow outline instead of a solid black bar, which does not match the solid-bar rule established by A to E.
Option 5 correctly shows a solid bar one growth-step taller than E, so it is the right answer.
Shortcut Method
Rule: bar height increases by a fixed amount each step
∴ Option 5 is correct ✓
∴ Option 5 is correct ✓
Question 15
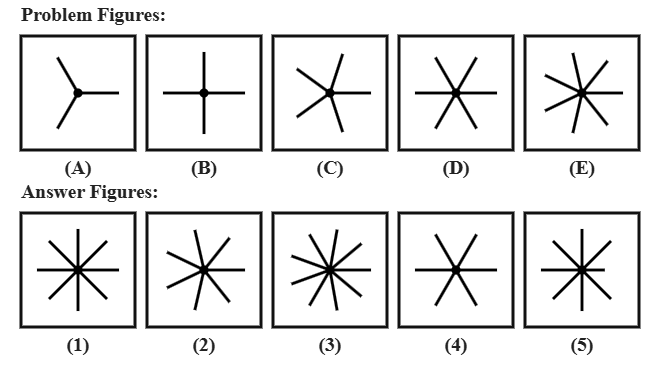
A series of star figures is shown below as Problem Figures A to E. Choose the Answer Figure that continues the series.
Explanation
In the Problem Figures, the star gains one more ray at every step: A has 3 rays, B has 4, C has 5, D has 6, and E has 7. Continuing the same rule, the next figure must have 8 evenly-spaced rays.
Option 2 has only 7 rays, simply repeating Problem Figure E.
Option 3 has 9 rays, jumping two steps ahead.
Option 4 has 6 rays, going backwards.
Option 5 has the correct count of 8 rays, but one ray is noticeably shorter than the rest, which does not match the even-rays rule established by A to E.
Option 1 correctly shows 8 evenly-spaced rays, so it is the right answer.
Option 2 has only 7 rays, simply repeating Problem Figure E.
Option 3 has 9 rays, jumping two steps ahead.
Option 4 has 6 rays, going backwards.
Option 5 has the correct count of 8 rays, but one ray is noticeably shorter than the rest, which does not match the even-rays rule established by A to E.
Option 1 correctly shows 8 evenly-spaced rays, so it is the right answer.
Shortcut Method
Rule: one more ray added each step → after E (7 rays) comes 8
∴ Option 1 is correct ✓
∴ Option 1 is correct ✓
Question 16
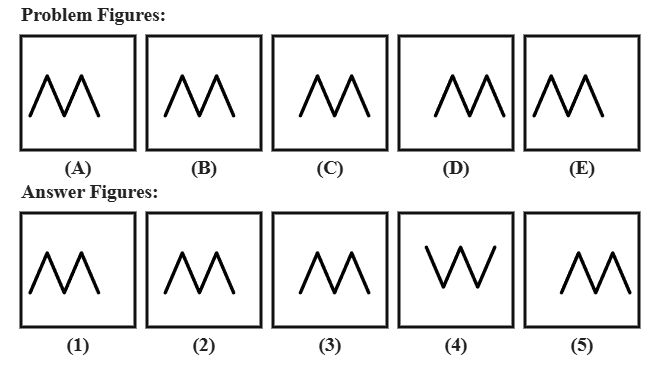
The five Problem Figures below (A to E) show a single peak shifting position along a baseline. Select the Answer Figure that continues the same series.
Explanation
In the Problem Figures, the single peak shifts to the right by the same fixed amount at every step, wrapping back to its starting position every 4 steps (A and E show the peak in the same position). Continuing the same rule from E, the next figure must show the peak matching the position seen in Problem Figure B.
Option 1 simply repeats Problem Figure E (the starting position) instead of advancing.
Option 3 shows the peak shifted two steps ahead instead of one.
Option 4 shows the peak shifted three steps ahead, even further off.
Option 5 shows two peaks instead of one, at roughly the right position but the wrong shape.
Option 2 correctly shows the peak shifted one more step to the right, so it is the right answer.
Option 1 simply repeats Problem Figure E (the starting position) instead of advancing.
Option 3 shows the peak shifted two steps ahead instead of one.
Option 4 shows the peak shifted three steps ahead, even further off.
Option 5 shows two peaks instead of one, at roughly the right position but the wrong shape.
Option 2 correctly shows the peak shifted one more step to the right, so it is the right answer.
Shortcut Method
Rule: peak shifts right by a fixed amount each step, position repeats every 4 steps
∴ Option 2 is correct ✓
∴ Option 2 is correct ✓
Question 17
A series of polygons is shown below as Problem Figures A to E. Choose the Answer Figure that continues the series.
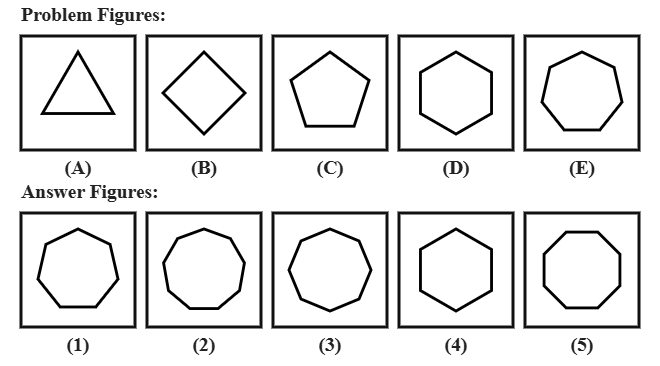
Explanation
In the Problem Figures, the regular polygon gains one more side at every step: A is a triangle (3 sides), B a quadrilateral (4), C a pentagon (5), D a hexagon (6), and E a heptagon (7). Continuing the same rule, the next figure must be a regular octagon (8 sides).
Option 1 has only 7 sides, simply repeating Problem Figure E.
Option 2 has 9 sides, jumping two steps ahead.
Option 4 has 6 sides, going backwards.
Option 5 has the correct count of 8 sides, but the octagon is tilted compared to the upright orientation used throughout A to E.
Option 3 correctly shows an upright regular octagon, so it is the right answer.
Option 1 has only 7 sides, simply repeating Problem Figure E.
Option 2 has 9 sides, jumping two steps ahead.
Option 4 has 6 sides, going backwards.
Option 5 has the correct count of 8 sides, but the octagon is tilted compared to the upright orientation used throughout A to E.
Option 3 correctly shows an upright regular octagon, so it is the right answer.
Shortcut Method
Rule: one more side added each step → after E (heptagon, 7 sides) comes octagon (8 sides)
∴ Option 3 is correct ✓
∴ Option 3 is correct ✓
Question 18
The five Problem Figures below (A to E) show an arrow growing longer. Which Answer Figure continues this series?
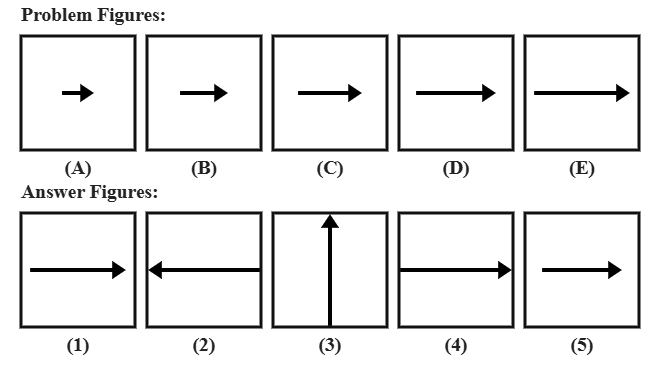
Explanation
In the Problem Figures, the rightward-pointing arrow grows longer by the same fixed amount at every step, from A (shortest) to E (longest so far). Continuing the same growth step, the next figure must show an arrow longer still than Problem Figure E, still pointing right.
Option 1 shows the same length as Problem Figure E, simply repeating it.
Option 2 shows the mirror image of the correct arrow (pointing left instead of right).
Option 3 shows the correct length, but pointing straight up instead of continuing to point right.
Option 5 shows a shorter arrow than D, going backwards.
Option 4 correctly shows a longer arrow still pointing right, so it is the right answer.
Option 1 shows the same length as Problem Figure E, simply repeating it.
Option 2 shows the mirror image of the correct arrow (pointing left instead of right).
Option 3 shows the correct length, but pointing straight up instead of continuing to point right.
Option 5 shows a shorter arrow than D, going backwards.
Option 4 correctly shows a longer arrow still pointing right, so it is the right answer.
Shortcut Method
Rule: arrow length increases by a fixed amount each step, direction stays the same
∴ Option 4 is correct ✓
∴ Option 4 is correct ✓
Question 19
Each of the five Problem Figures below (A to E) shows a half-shaded circle in a different orientation. Select the Answer Figure that continues the same series.
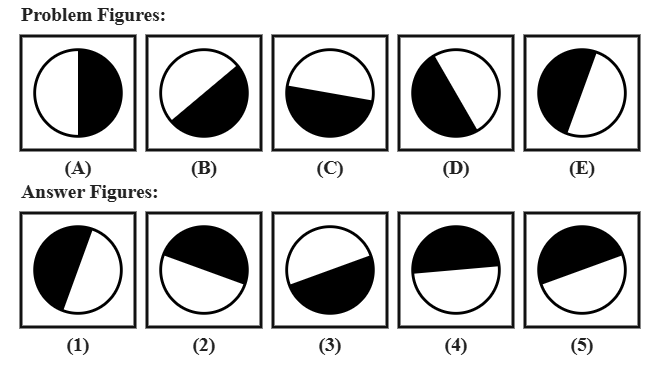
Explanation
In the Problem Figures, the half-shaded circle rotates 50 degrees further at every step (0, 50, 100, 150, 200 degrees from A to E). Continuing the same rule, the next figure must show the shaded half rotated to 250 degrees.
Option 1 simply repeats Problem Figure E (200 degrees) instead of advancing.
Option 2 shows the mirror image of the correct figure.
Option 3 shows the figure rotated a further 180 degrees past the correct answer.
Option 4 shows the figure over-rotated by an extra 15 degrees beyond the correct position.
Option 5 correctly continues the 50-degree rotation, so it is the right answer.
Option 1 simply repeats Problem Figure E (200 degrees) instead of advancing.
Option 2 shows the mirror image of the correct figure.
Option 3 shows the figure rotated a further 180 degrees past the correct answer.
Option 4 shows the figure over-rotated by an extra 15 degrees beyond the correct position.
Option 5 correctly continues the 50-degree rotation, so it is the right answer.
Shortcut Method
Rule: rotate 50° each step → after E (200°) comes 250°
∴ Option 5 is correct ✓
∴ Option 5 is correct ✓
Question 20
The following question consists of some Problem Figures followed by other figures marked 1, 2, 3, 4 called the Answer Figures.
Find out the correct answer figure that should come next in the sequence of problem figures. (five shapes series)
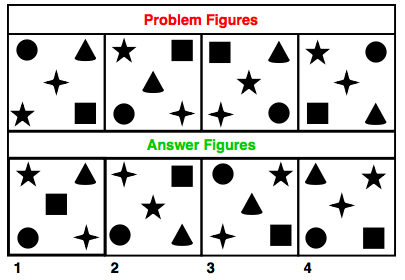
Find out the correct answer figure that should come next in the sequence of problem figures. (five shapes series)
Explanation
The circle moves top-left, bottom-left, bottom-right and top-right in successive figures, and the square moves bottom-right, top-right, top-left and bottom-left. In the next figure the circle is back at the top-left and the square at the bottom-right. Only answer figure 3 has both in these positions.
Question 21
The following question consists of some Problem Figures followed by other figures marked 1, 2, 3, 4 called the Answer Figures.
Find out the correct answer figure that should come next in the sequence of problem figures. (smiley series)
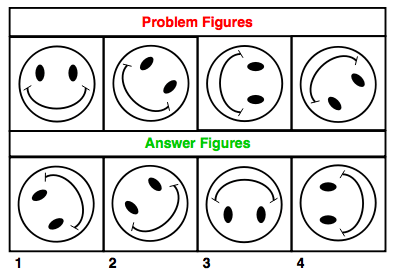
Find out the correct answer figure that should come next in the sequence of problem figures. (smiley series)
Explanation
The smile turns 45 degrees clockwise in each step: bottom, bottom-left, left and top-left. The next figure has the smile at the top, with the eyes below, which is answer figure 3.
Question 22
Each of the following questions consists of five figures marked A, B, C, D and E called the Problem Figures, followed by five Answer Figures marked 1, 2, 3, 4 and 5. Select the Answer Figure that continues the same series as established by the Problem Figures.
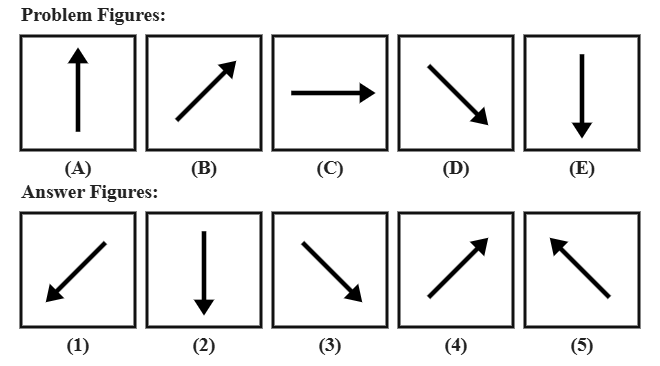
Explanation
In the Problem Figures, the arrow rotates 45 degrees clockwise at every step: A points up, B points up-right, C points right, D points down-right, and E points straight down. Continuing the same 45-degree clockwise step from E gives an arrow pointing down-left.
Option 2 simply repeats Problem Figure E (down) instead of advancing to the next step.
Option 3 shows the mirror image of the correct arrow (down-right instead of down-left).
Option 4 shows the arrow rotated a further 180 degrees past the correct answer (up-right).
Option 5 shows the arrow flipped vertically from the correct answer (up-left).
Option 1 correctly continues the 45-degree clockwise rotation, so it is the right answer.
Option 2 simply repeats Problem Figure E (down) instead of advancing to the next step.
Option 3 shows the mirror image of the correct arrow (down-right instead of down-left).
Option 4 shows the arrow rotated a further 180 degrees past the correct answer (up-right).
Option 5 shows the arrow flipped vertically from the correct answer (up-left).
Option 1 correctly continues the 45-degree clockwise rotation, so it is the right answer.
Shortcut Method
Rule: rotate 45° clockwise each step → after E (180°) comes 225° (down-left)
∴ Option 1 is correct ✓
∴ Option 1 is correct ✓
Question 23
The following question consists of some Problem Figures followed by other figures marked 1, 2, 3, 4 called the Answer Figures.
Find out the correct answer figure that should come next in the sequence of problem figures. (symbol column series)
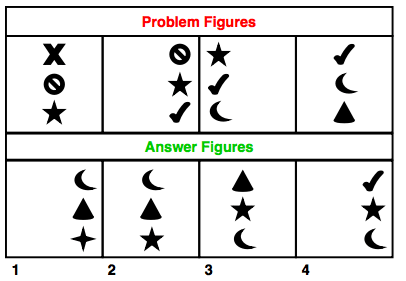
Find out the correct answer figure that should come next in the sequence of problem figures. (symbol column series)
Explanation
The symbols follow the fixed order: cross, slashed circle, star, tick, crescent, cone, four-point star. Each figure shows three consecutive symbols, and the window shifts by one each time. The last figure shows tick, crescent and cone, so the next figure shows crescent, cone and four-point star, which is answer figure 1.
Question 24
The following question consists of some Problem Figures followed by other figures marked 1, 2, 3, 4 called the Answer Figures.
Find out the correct answer figure that should come next in the sequence of problem figures. (symbols in corners series)
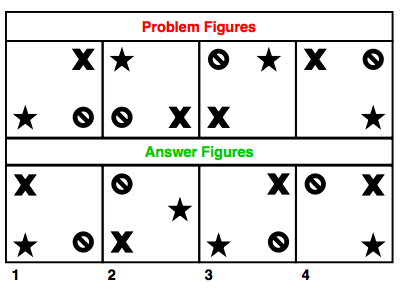
Find out the correct answer figure that should come next in the sequence of problem figures. (symbols in corners series)
Explanation
Each symbol moves one corner in each step. The cross moves top-right, bottom-right, bottom-left, top-left. The star moves bottom-left, top-left, top-right, bottom-right. The slashed circle moves bottom-right, bottom-left, top-left, top-right. After four steps they return to the first arrangement: cross at top-right, star at bottom-left and slashed circle at bottom-right, which is answer figure 3.
Question 25
The following question consists of some Problem Figures followed by other figures marked 1, 2, 3, 4 called the Answer Figures.
Find out the correct answer figure that should come next in the sequence of problem figures. (star and cross series)
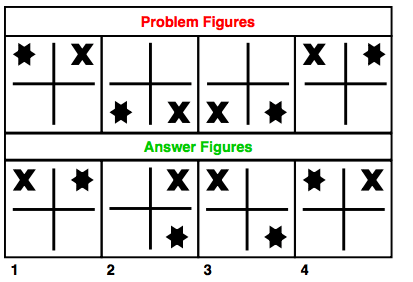
Find out the correct answer figure that should come next in the sequence of problem figures. (star and cross series)
Explanation
The six-point star moves top-left, bottom-left, bottom-right, top-right, and the cross moves top-right, bottom-right, bottom-left, top-left. In the next figure they return to the first positions, with the star at top-left and the cross at top-right, which is answer figure 4.
Question 26
The five Problem Figures below (A to E) each show four small arcs arranged in a circle. Work out the pattern and select the Answer Figure that continues the series.
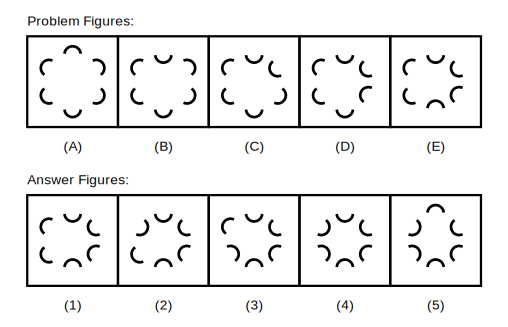
Explanation
Starting from figure A, one additional arc turns over (flips to face the opposite way) at each step, working around the circle clockwise. By figure E, four of the arcs have turned over; the next figure in the series must have the fifth arc turned over as well, with the clockwise order of turning preserved.
Options that turn over the wrong arc, turn over too few or too many arcs, or turn an arc in the wrong direction do not continue the established pattern.
Option 3 correctly shows the fifth arc turned over following the same clockwise order, so it is the right answer.
Options that turn over the wrong arc, turn over too few or too many arcs, or turn an arc in the wrong direction do not continue the established pattern.
Option 3 correctly shows the fifth arc turned over following the same clockwise order, so it is the right answer.
Shortcut Method
Rule: one more arc turns over clockwise each step → after 4 turned, the 5th turns next
∴ Option 3 is correct ✓
∴ Option 3 is correct ✓
Question 27
In each of the five Problem Figures below (A to E), exactly one arc is turned over. Find the pattern and select the Answer Figure that continues the series.
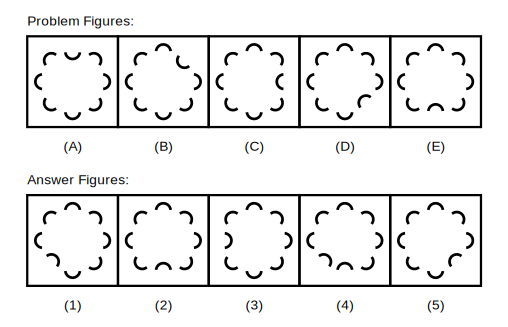
Explanation
At every step, only a single arc is turned over, and that turned arc moves one position clockwise from the previous figure while every other arc returns to its normal, untouched state. Continuing from figure E, the turned arc must move one more position clockwise.
Options with more than one arc turned over, or with the turned arc in the wrong position, break this one-arc-at-a-time pattern.
Option 1 correctly shows exactly one arc turned over, one position further clockwise than in figure E, so it is the right answer.
Options with more than one arc turned over, or with the turned arc in the wrong position, break this one-arc-at-a-time pattern.
Option 1 correctly shows exactly one arc turned over, one position further clockwise than in figure E, so it is the right answer.
Shortcut Method
Rule: exactly one arc is turned over, and it moves one position clockwise each step
∴ Option 1 is correct ✓
∴ Option 1 is correct ✓
Question 28
Study how the arcs change from one Problem Figure to the next below (A to E), then select the Answer Figure that continues the series.
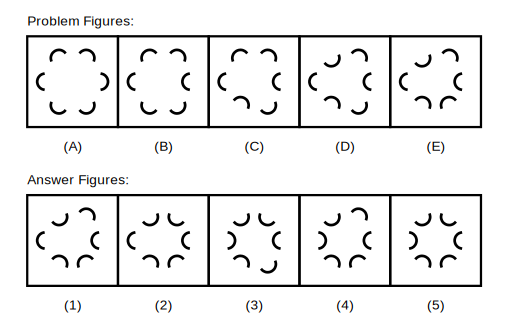
Explanation
One more arc turns over at each step, but not in simple clockwise order -- every second arc turns over first, and the arcs in between are filled in afterwards. Following this skipping order from figure E, the next figure must turn over the one remaining arc that has not yet been flipped.
Options that turn arcs in straightforward clockwise order, or that turn the wrong number of arcs, do not match the skipping pattern shown by A through E.
Option 4 correctly turns over the one arc left untouched by the established skipping order, so it is the right answer.
Options that turn arcs in straightforward clockwise order, or that turn the wrong number of arcs, do not match the skipping pattern shown by A through E.
Option 4 correctly turns over the one arc left untouched by the established skipping order, so it is the right answer.
Shortcut Method
Rule: one more arc turns over each step, in a skip-then-fill-in order, not plain clockwise
∴ Option 4 is correct ✓
∴ Option 4 is correct ✓
Question 29
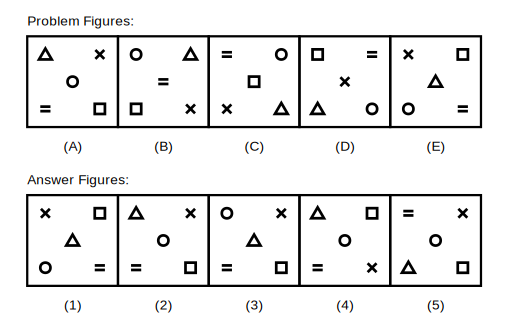
Four symbols occupy fixed positions in each of the five Problem Figures below (A to E). Track how they move and select the Answer Figure that continues the series.
Explanation
Every symbol moves one step along the same five-position path (top-left, top-right, bottom-right, bottom-left, centre, and back to top-left) at each step from A to E. Since the path has exactly five positions, each symbol returns to its original position after five moves -- so the figure following E must look exactly like figure A.
Options that show a different arrangement, or that move the symbols by the wrong amount, overlook that the full cycle has already completed.
Option 2 correctly repeats figure A's arrangement, so it is the right answer.
Options that show a different arrangement, or that move the symbols by the wrong amount, overlook that the full cycle has already completed.
Option 2 correctly repeats figure A's arrangement, so it is the right answer.
Shortcut Method
Rule: each symbol moves one step along a 5-position cycle → after 5 steps (A to E), the next figure = A again
∴ Option 2 is correct ✓
∴ Option 2 is correct ✓
Question 30
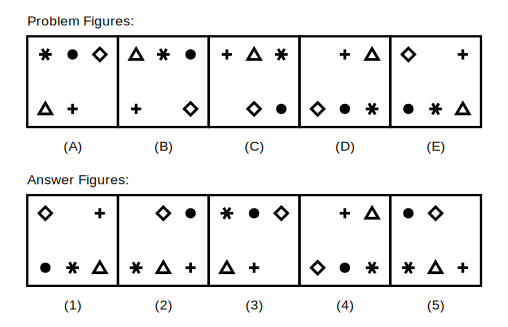
The five Problem Figures below (A to E) arrange several symbols and one empty gap around an edge. Work out the movement rule and select the Answer Figure that continues the series.
Explanation
There are six positions around the edge of the figure, one of which is always empty. Every symbol, and the empty position itself, moves one place clockwise at each step from A to E. Continuing this from E, every symbol and the gap must move one more place clockwise.
Options that leave a symbol or the gap in place, or that move them anticlockwise, do not follow the established clockwise rotation.
Option 5 correctly shows every symbol and the gap shifted one more place clockwise, so it is the right answer.
Options that leave a symbol or the gap in place, or that move them anticlockwise, do not follow the established clockwise rotation.
Option 5 correctly shows every symbol and the gap shifted one more place clockwise, so it is the right answer.
Shortcut Method
Rule: 6 positions, 1 always empty; every symbol and the gap move one place clockwise each step
∴ Option 5 is correct ✓
∴ Option 5 is correct ✓
Question 31
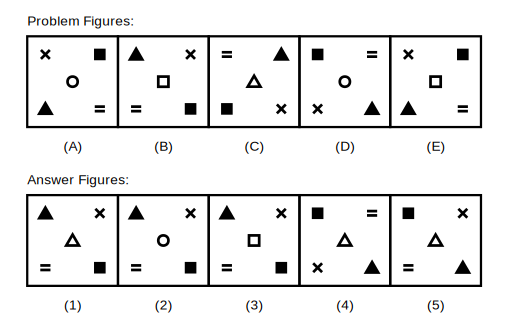
Each Problem Figure below (A to E) has four corner symbols and one centre symbol that change in two different ways. Identify both and select the Answer Figure that continues the series.
Explanation
Two independent changes happen at each step: the four corner symbols all move one position clockwise, and the centre symbol cycles through the fixed order circle, square, triangle, then back to circle. Continuing from figure E, the corner symbols move one more position clockwise, and the centre symbol advances to the next shape in its cycle.
Options that move the corner symbols correctly but use the wrong centre shape, or vice versa, satisfy only one of the two required changes.
Option 1 correctly advances both the corner positions and the centre symbol together, so it is the right answer.
Options that move the corner symbols correctly but use the wrong centre shape, or vice versa, satisfy only one of the two required changes.
Option 1 correctly advances both the corner positions and the centre symbol together, so it is the right answer.
Shortcut Method
Rule: corner symbols move one place clockwise each step AND the centre symbol cycles circle → square → triangle
∴ Option 1 is correct ✓
∴ Option 1 is correct ✓
Question 32
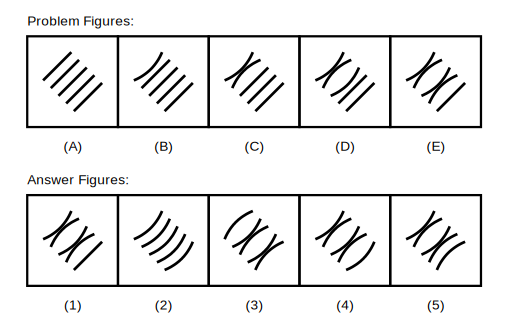
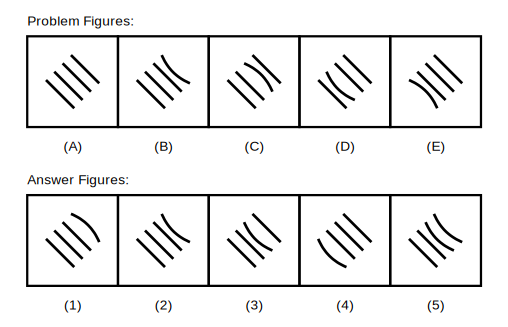
The five Problem Figures below (A to E) show a row of straight lines gradually becoming curved. Work out the pattern and select the Answer Figure that continues the series.
Explanation
At each step, one more line becomes curved, working from left to right, and each newly curved line bends in the opposite direction from the one before it. By figure E, four lines are curved; the next figure must have the fifth (rightmost) line curved too, bending opposite to the fourth.
Options that curve the wrong line, leave a line straight, or bend a curve in the wrong direction do not continue this alternating left-to-right pattern.
Option 4 correctly shows all five lines curved with the alternating bend direction preserved, so it is the right answer.
Options that curve the wrong line, leave a line straight, or bend a curve in the wrong direction do not continue this alternating left-to-right pattern.
Option 4 correctly shows all five lines curved with the alternating bend direction preserved, so it is the right answer.
Shortcut Method
Rule: one more line curves left-to-right each step, bends alternate direction → after 4 curved, the 5th curves next
∴ Option 4 is correct ✓
∴ Option 4 is correct ✓
Question 33
In each of the five Problem Figures below (A to E), only one of the lines is curved. Find the pattern and select the Answer Figure that continues the series.
Explanation
Only a single line is curved at each step. That curved line moves one position along the row (starting over from the first line after reaching the last), and its bend direction changes every time it moves. Continuing from figure E, the curved line moves one more position along (wrapping back to the first line if needed) with its bend direction changed again.
Options with more than one curved line, or with the curve in the wrong position or bending the wrong way, do not match the established pattern.
Option 2 correctly shows exactly one curved line, moved to its next position with the bend direction changed, so it is the right answer.
Options with more than one curved line, or with the curve in the wrong position or bending the wrong way, do not match the established pattern.
Option 2 correctly shows exactly one curved line, moved to its next position with the bend direction changed, so it is the right answer.
Shortcut Method
Rule: only one line is curved; it moves one position along the row and its bend direction changes each step
∴ Option 2 is correct ✓
∴ Option 2 is correct ✓
Question 34
Observe how the curved lines accumulate and change from one Problem Figure to the next below (A to E), then select the Answer Figure that continues the series.
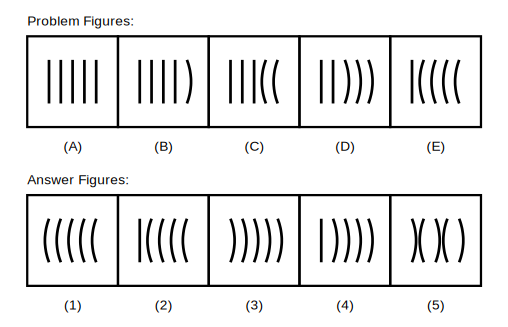
Explanation
At each step, one more line becomes curved, and every line that was already curved flips its bend direction at the same time. Continuing from figure E, one more line becomes curved and every previously curved line flips to bend the opposite way it did in E.
Options that keep an already-curved line's bend direction unchanged, or that curve the wrong number of new lines, do not match this cumulative flipping pattern.
Option 3 correctly shows one more line curved with every other curved line's bend direction flipped, so it is the right answer.
Options that keep an already-curved line's bend direction unchanged, or that curve the wrong number of new lines, do not match this cumulative flipping pattern.
Option 3 correctly shows one more line curved with every other curved line's bend direction flipped, so it is the right answer.
Shortcut Method
Rule: one more line curves each step AND every already-curved line flips its bend direction
∴ Option 3 is correct ✓
∴ Option 3 is correct ✓
Question 35
Each Problem Figure below (A to E) pairs a rotating line figure with two letters. Work out how both change and select the Answer Figure that continues the series.
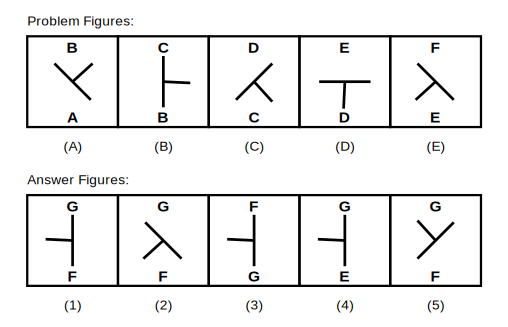
Explanation
The line figure turns 45 degrees clockwise at every step. At the same time, the letter that was at the top moves down to the bottom, and the next letter of the alphabet appears at the top. Figure E has F at the top and E at the bottom, so continuing the pattern turns the line figure a further 45 degrees clockwise, moves F down to the bottom, and places G (the next letter after F) at the top.
Options using the wrong letters, or that do not rotate the line figure by 45 degrees, break one part of the established rule.
Option 1 correctly shows the figure rotated 45 degrees clockwise with G at the top and F at the bottom, so it is the right answer.
Options using the wrong letters, or that do not rotate the line figure by 45 degrees, break one part of the established rule.
Option 1 correctly shows the figure rotated 45 degrees clockwise with G at the top and F at the bottom, so it is the right answer.
Shortcut Method
Rule: rotate 45° clockwise; top letter moves to bottom; next letter of the alphabet appears at top → after F/E comes G/F
∴ Option 1 is correct ✓
∴ Option 1 is correct ✓
Question 36
The line figure and the two letters in each Problem Figure below (A to E) change together by a fixed rule. Work it out and select the Answer Figure that continues the series.
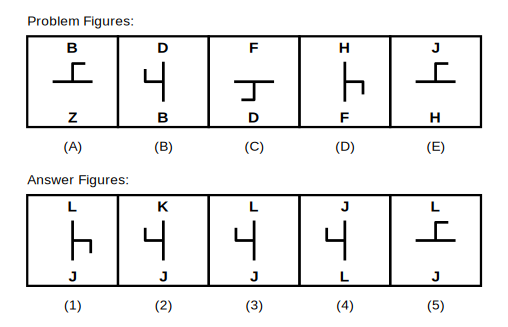
Explanation
The line figure turns 90 degrees anticlockwise at every step. The letter at the top moves to the bottom, and the new top letter skips one letter of the alphabet each time (B, D, F, H, J, L). Figure E has J at the top and H at the bottom, so continuing the pattern turns the figure 90 degrees anticlockwise, moves J down to the bottom, and places L (skipping K) at the top.
Options that use consecutive letters instead of skipping one, or that rotate the figure by the wrong angle, do not match the established rule.
Option 3 correctly shows the figure rotated 90 degrees anticlockwise with L at the top and J at the bottom, so it is the right answer.
Options that use consecutive letters instead of skipping one, or that rotate the figure by the wrong angle, do not match the established rule.
Option 3 correctly shows the figure rotated 90 degrees anticlockwise with L at the top and J at the bottom, so it is the right answer.
Shortcut Method
Rule: rotate 90° anticlockwise; top letter moves to bottom; new top letter skips one letter (B,D,F,H,J,L) → after J/H comes L/J
∴ Option 3 is correct ✓
∴ Option 3 is correct ✓
Question 37
A line figure and two letters change together in each Problem Figure below (A to E) by a more unusual rule. Work it out and select the Answer Figure that continues the series.
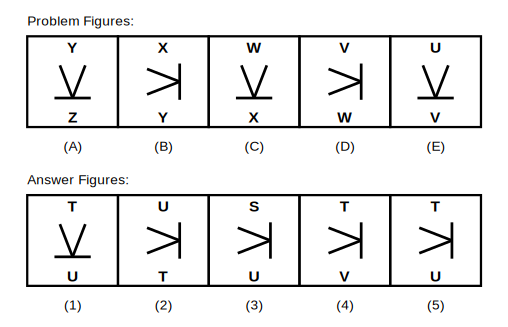
Explanation
At each step, the line figure is mirrored left to right and then turned 90 degrees clockwise, which together mirror it along a diagonal. The top letter moves to the bottom, and a new top letter appears by going backwards through the alphabet (Z, Y, X, and so on). Figure E has U at the top and V at the bottom, so continuing the pattern mirrors the figure along the diagonal again, moves U down to the bottom, and places T (the letter before U) at the top.
Options that move forwards through the alphabet instead of backwards, or that apply only one of the two transformations to the line figure, do not match the rule.
Option 5 correctly shows the figure mirrored along the diagonal with T at the top and U at the bottom, so it is the right answer.
Options that move forwards through the alphabet instead of backwards, or that apply only one of the two transformations to the line figure, do not match the rule.
Option 5 correctly shows the figure mirrored along the diagonal with T at the top and U at the bottom, so it is the right answer.
Shortcut Method
Rule: mirror left-right then rotate 90° clockwise (diagonal mirror); top letter moves to bottom; new top letter goes backwards through the alphabet → after U/V comes T/U
∴ Option 5 is correct ✓
∴ Option 5 is correct ✓
Question 38
A square with an inner line and an outer arrow changes in two independent ways across the five Problem Figures below (A to E). Work out both and select the Answer Figure that continues the series.
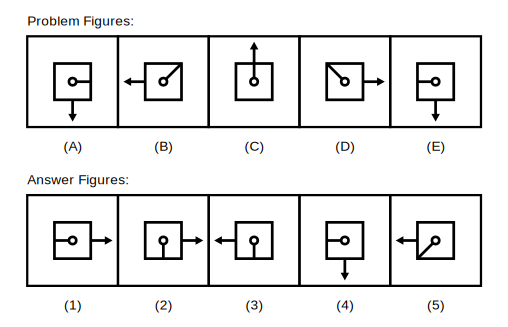
Explanation
Two independent changes happen at each step: the short line inside the square turns 45 degrees anticlockwise, and the arrow outside the square moves 90 degrees clockwise around the square's perimeter. Continuing from figure E, the inner line turns a further 45 degrees anticlockwise and the outer arrow moves a further 90 degrees clockwise.
Options that get the inner line's angle right but place the outer arrow on the wrong side, or vice versa, satisfy only one of the two independent changes.
Option 5 correctly advances both the inner line's rotation and the outer arrow's position together, so it is the right answer.
Options that get the inner line's angle right but place the outer arrow on the wrong side, or vice versa, satisfy only one of the two independent changes.
Option 5 correctly advances both the inner line's rotation and the outer arrow's position together, so it is the right answer.
Shortcut Method
Rule: inner line turns 45° anticlockwise each step AND outer arrow moves 90° clockwise around the square
∴ Option 5 is correct ✓
∴ Option 5 is correct ✓
Question 39
The inner line and the outer arrow in the five Problem Figures below (A to E) each follow their own fixed rule. Work out both rules and select the Answer Figure that continues the series.
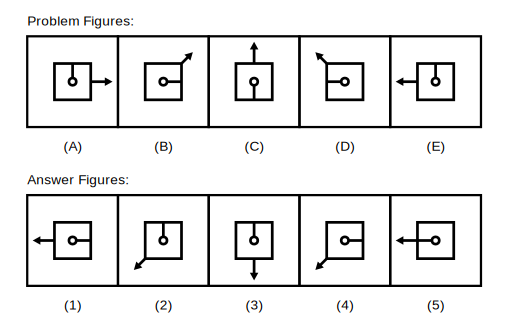
Explanation
The short line inside the square turns 90 degrees clockwise at each step, while the arrow outside the square moves 45 degrees anticlockwise at each step -- two separate, independent changes. Continuing from figure E, the inner line turns a further 90 degrees clockwise and the outer arrow moves a further 45 degrees anticlockwise.
Options that apply the correct change to only one of the two parts do not satisfy the full rule.
Option 4 correctly advances both the inner line's rotation and the outer arrow's position together, so it is the right answer.
Options that apply the correct change to only one of the two parts do not satisfy the full rule.
Option 4 correctly advances both the inner line's rotation and the outer arrow's position together, so it is the right answer.
Shortcut Method
Rule: inner line turns 90° clockwise each step AND outer arrow moves 45° anticlockwise
∴ Option 4 is correct ✓
∴ Option 4 is correct ✓
Question 40
In the five Problem Figures below (A to E), the inner line rotates while the outer arrow changes in a different way. Work out both changes and select the Answer Figure that continues the series.
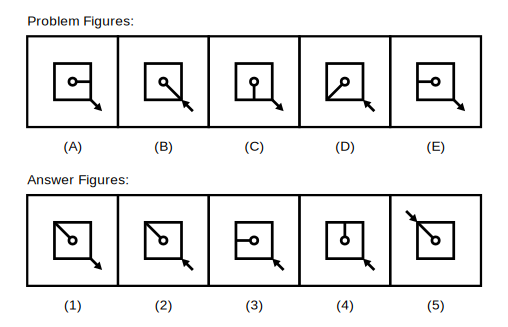
Explanation
The short line inside the square turns 45 degrees clockwise at each step. The arrow outside stays on the same side of the square throughout, but its arrowhead switches ends each time -- pointing outward in one figure, then pointing in towards the square in the next. Continuing from figure E, the inner line turns a further 45 degrees clockwise and the arrowhead switches to the opposite end again.
Options that move the outer arrow to a different side, or that keep the arrowhead on the same end as in figure E, break one part of the rule.
Option 2 correctly advances the inner line's rotation and switches the arrowhead to the opposite end, so it is the right answer.
Options that move the outer arrow to a different side, or that keep the arrowhead on the same end as in figure E, break one part of the rule.
Option 2 correctly advances the inner line's rotation and switches the arrowhead to the opposite end, so it is the right answer.
Shortcut Method
Rule: inner line turns 45° clockwise each step; outer arrow stays on the same side but its arrowhead switches ends
∴ Option 2 is correct ✓
∴ Option 2 is correct ✓
Question 41
Six symbols are arranged in a grid in each Problem Figure below (A to E). Work out how they move and select the Answer Figure that continues the series.
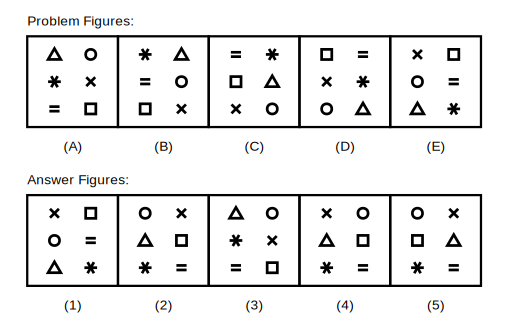
Explanation
All six symbols move one place clockwise around the grid at every step, keeping the same set of symbols but in a rotated arrangement. Continuing from figure E, every symbol must move one more place clockwise around the grid.
Options that move the symbols anticlockwise, or that move only some of them, do not follow the established clockwise rotation.
Option 2 correctly shows all six symbols shifted one more place clockwise, so it is the right answer.
Options that move the symbols anticlockwise, or that move only some of them, do not follow the established clockwise rotation.
Option 2 correctly shows all six symbols shifted one more place clockwise, so it is the right answer.
Shortcut Method
Rule: all six symbols move one place clockwise around the grid each step
∴ Option 2 is correct ✓
∴ Option 2 is correct ✓
Question 42
The two columns of symbols in the five Problem Figures below (A to E) move in opposite directions. Work out the rule and select the Answer Figure that continues the series.
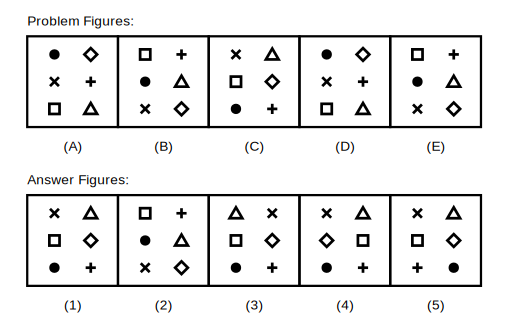
Explanation
The three symbols in the left column move down one place each step, with the bottom symbol wrapping around to the top; the three symbols in the right column move up one place each step, with the top symbol wrapping around to the bottom. Continuing from figure E, the left column shifts down once more and the right column shifts up once more, each wrapping around as needed.
Options that move both columns in the same direction, or that move only one column, do not match the established opposite-direction rule.
Option 1 correctly shows the left column shifted down and the right column shifted up, so it is the right answer.
Options that move both columns in the same direction, or that move only one column, do not match the established opposite-direction rule.
Option 1 correctly shows the left column shifted down and the right column shifted up, so it is the right answer.
Shortcut Method
Rule: left column moves down one place each step (wraps to top); right column moves up one place each step (wraps to bottom)
∴ Option 1 is correct ✓
∴ Option 1 is correct ✓
Question 43
In each Problem Figure below (A to E), the symbols in just one row swap places. Work out which row and in what order, then select the Answer Figure that continues the series.
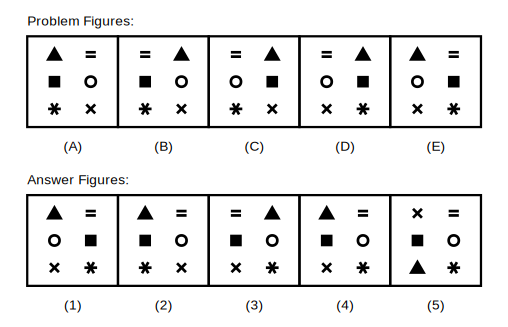
Explanation
At each step, the two symbols in exactly one row swap places, and which row swaps cycles through top row, then middle row, then bottom row, then back to the top row again. Figure B swaps the top row, C the middle row, D the bottom row and E the top row again, so continuing the cycle, the next figure must swap the middle row while leaving the top and bottom rows as they are in figure E.
Options that swap the wrong row, or that swap more than one row, do not follow the established cycling pattern.
Option 4 correctly swaps only the middle row's two symbols, leaving the other rows unchanged from figure E, so it is the right answer.
Options that swap the wrong row, or that swap more than one row, do not follow the established cycling pattern.
Option 4 correctly swaps only the middle row's two symbols, leaving the other rows unchanged from figure E, so it is the right answer.
Shortcut Method
Rule: one row's two symbols swap each step, cycling top → middle → bottom → top...
∴ Option 4 is correct ✓
∴ Option 4 is correct ✓
Question 44
A grid of chevrons gradually changes direction across the five Problem Figures below (A to E). Work out the order and select the Answer Figure that continues the series.
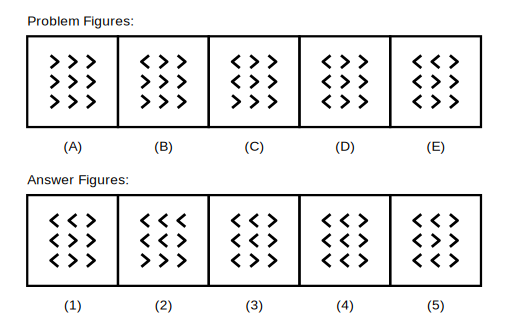
Explanation
Reading down each column from the left, one more chevron turns to point the opposite way at each step. By figure E, four chevrons have turned (the whole left column and the top of the middle column); continuing the same reading order, the next figure must have the fifth chevron (the middle one in the middle column) turned as well.
Options that turn a chevron out of this reading order, or that turn the wrong number of chevrons, do not match the established pattern.
Option 3 correctly turns the fifth chevron in the established column-by-column reading order, so it is the right answer.
Options that turn a chevron out of this reading order, or that turn the wrong number of chevrons, do not match the established pattern.
Option 3 correctly turns the fifth chevron in the established column-by-column reading order, so it is the right answer.
Shortcut Method
Rule: one more chevron turns round each step, reading down each column from the left → after 4 turned, the 5th turns next
∴ Option 3 is correct ✓
∴ Option 3 is correct ✓
Question 45
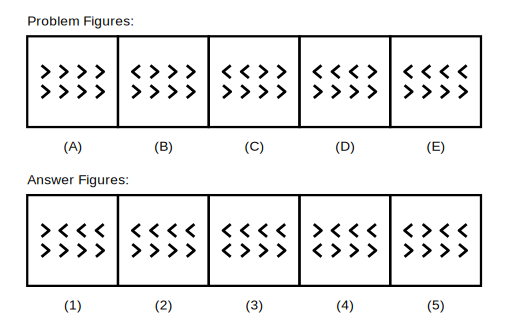
Only one chevron in the grid below points the opposite way in each Problem Figure (A to E). Track its movement and select the Answer Figure that continues the series.
Explanation
Exactly one chevron points the opposite way at each step, and that chevron moves one place along, reading left to right and row by row. Continuing from figure E, the reversed chevron must move one more place along in this same reading order.
Options with more than one reversed chevron, or with the reversed chevron in the wrong position, do not match the established single-chevron movement.
Option 5 correctly shows exactly one reversed chevron, moved one place further in the reading order, so it is the right answer.
Options with more than one reversed chevron, or with the reversed chevron in the wrong position, do not match the established single-chevron movement.
Option 5 correctly shows exactly one reversed chevron, moved one place further in the reading order, so it is the right answer.
Shortcut Method
Rule: exactly one chevron points the other way, moving one place along the rows (left to right, row by row) each step
∴ Option 5 is correct ✓
∴ Option 5 is correct ✓
Question 46
Chevrons in the top row of the grid below turn over one at a time across the five Problem Figures (A to E), and some turn back again. Work out the rule and select the Answer Figure that continues the series.
Explanation
At each step, one more chevron turns over, working left to right along the top row and then starting again from the left once the row is finished. A chevron that gets turned a second time simply goes back to how it started. Since the first chevron in the row has already been turned once earlier in the sequence, turning it a second time in the next figure reverts it to its original (untouched) direction.
Options that keep the first chevron turned, or that turn a different chevron instead, do not account for this turn-twice-reverts rule.
Option 1 correctly shows the first chevron reverted to normal while the established left-to-right order continues, so it is the right answer.
Options that keep the first chevron turned, or that turn a different chevron instead, do not account for this turn-twice-reverts rule.
Option 1 correctly shows the first chevron reverted to normal while the established left-to-right order continues, so it is the right answer.
Shortcut Method
Rule: one more chevron turns over each step, left to right then restart; turning a chevron twice reverts it to normal
∴ Option 1 is correct ✓
∴ Option 1 is correct ✓
Question 47
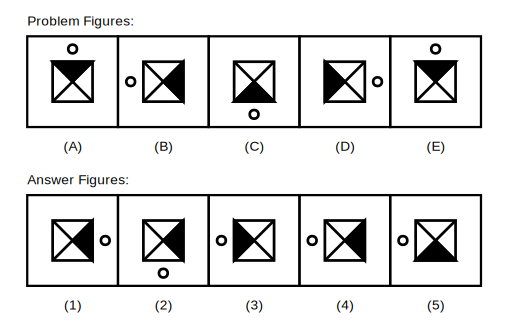
A black triangle inside a square and a small circle outside it move independently across the five Problem Figures below (A to E). Work out both movements and select the Answer Figure that continues the series.
Explanation
The black triangle inside the square moves one position clockwise at each step, while the small circle outside the square moves one side anticlockwise at each step -- two separate movements in opposite directions. Continuing from figure E, the black triangle moves one more position clockwise and the circle moves one more side anticlockwise.
Options that move the triangle correctly but place the circle on the wrong side, or vice versa, satisfy only one of the two required movements.
Option 4 correctly advances both the triangle's and the circle's positions together, so it is the right answer.
Options that move the triangle correctly but place the circle on the wrong side, or vice versa, satisfy only one of the two required movements.
Option 4 correctly advances both the triangle's and the circle's positions together, so it is the right answer.
Shortcut Method
Rule: black triangle moves one position clockwise each step AND the outside circle moves one side anticlockwise
∴ Option 4 is correct ✓
∴ Option 4 is correct ✓
Question 48
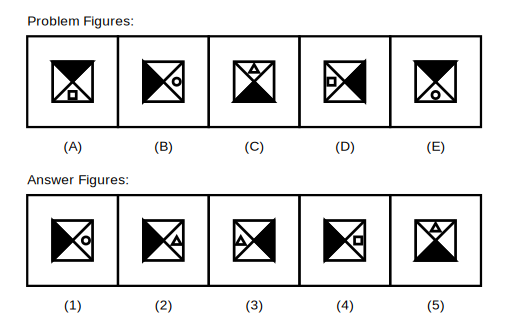
The black triangle and a small symbol in the opposite triangle both change across the five Problem Figures below (A to E), each by its own rule. Work out both and select the Answer Figure that continues the series.
Explanation
The black triangle moves one position anticlockwise at each step. At the same time, the small symbol drawn inside the opposite (non-black) triangle cycles through the fixed order square, circle, triangle, then back to square. Continuing from figure E, the black triangle moves one more position anticlockwise and the small symbol advances to the next shape in its cycle.
Options that move the black triangle correctly but use the wrong small symbol, or vice versa, satisfy only one of the two required changes.
Option 2 correctly advances both the triangle's position and the small symbol's cycle together, so it is the right answer.
Options that move the black triangle correctly but use the wrong small symbol, or vice versa, satisfy only one of the two required changes.
Option 2 correctly advances both the triangle's position and the small symbol's cycle together, so it is the right answer.
Shortcut Method
Rule: black triangle moves one position anticlockwise each step AND the small symbol cycles square → circle → triangle
∴ Option 2 is correct ✓
∴ Option 2 is correct ✓
Question 49
Two black triangles and a small mark outside the square all change together across the five Problem Figures below (A to E). Work out the full rule and select the Answer Figure that continues the series.
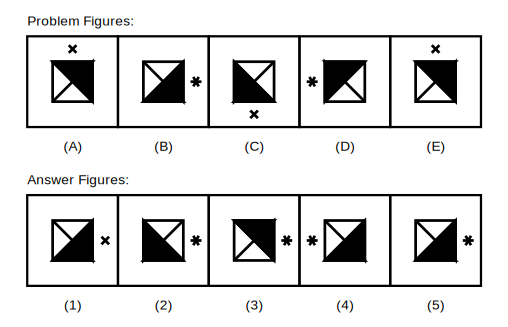
Explanation
The two black triangles both move one position clockwise at each step, and the small mark outside the square moves one side clockwise while also alternating between a cross and a star each time. Continuing from figure E, both black triangles move one more position clockwise, and the outside mark moves to the next side clockwise while switching to the other symbol (cross or star).
Options that move the triangles correctly but use the wrong outside symbol or position, or vice versa, satisfy only part of the full rule.
Option 5 correctly advances the triangles' positions, the outside mark's position, and its symbol together, so it is the right answer.
Options that move the triangles correctly but use the wrong outside symbol or position, or vice versa, satisfy only part of the full rule.
Option 5 correctly advances the triangles' positions, the outside mark's position, and its symbol together, so it is the right answer.
Shortcut Method
Rule: two black triangles move one position clockwise each step; outside mark moves one side clockwise AND alternates cross/star
∴ Option 5 is correct ✓
∴ Option 5 is correct ✓
Question 50
A bracket shape in the middle and two curves at the sides change together across the five Problem Figures below (A to E). Work out both changes and select the Answer Figure that continues the series.
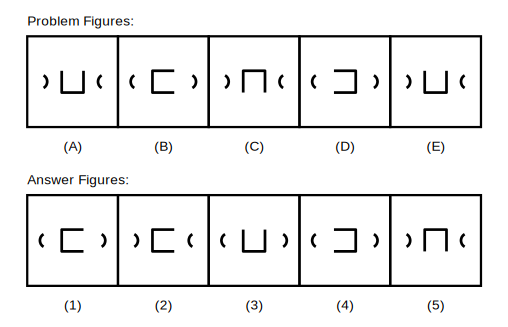
Explanation
The bracket shape in the middle turns 90 degrees clockwise at each step. The two curved marks at the sides alternate between facing outward and facing inward, switching every step (out, in, out, in...). Continuing from figure E, the bracket turns a further 90 degrees clockwise and the side curves switch to the opposite facing from figure E.
Options that rotate the bracket correctly but leave the side curves facing the same way as in E, or vice versa, satisfy only one of the two required changes.
Option 1 correctly shows the bracket rotated 90 degrees clockwise with the side curves switched to face the opposite way, so it is the right answer.
Options that rotate the bracket correctly but leave the side curves facing the same way as in E, or vice versa, satisfy only one of the two required changes.
Option 1 correctly shows the bracket rotated 90 degrees clockwise with the side curves switched to face the opposite way, so it is the right answer.
Shortcut Method
Rule: bracket turns 90° clockwise each step AND the side curves alternate facing out, in, out...
∴ Option 1 is correct ✓
∴ Option 1 is correct ✓
Question 51
An L-shaped line and two marks change together across the five Problem Figures below (A to E), with one of the marks staying fixed. Work out the rule and select the Answer Figure that continues the series.
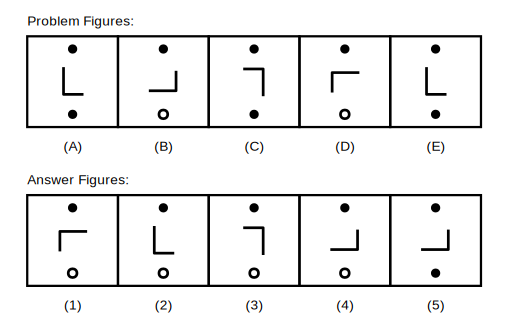
Explanation
The L-shaped line turns 90 degrees anticlockwise at each step. The dot at the top of the figure stays exactly the same throughout, while the mark at the bottom alternates between a solid black dot and a hollow circle each time. Continuing from figure E, the L-shape turns a further 90 degrees anticlockwise, the top dot remains unchanged, and the bottom mark switches to the other type (solid or hollow) from figure E.
Options that change the top dot, or that keep the bottom mark the same type as in E, do not follow the full rule.
Option 4 correctly rotates the L-shape, keeps the top dot fixed, and switches the bottom mark to the other type, so it is the right answer.
Options that change the top dot, or that keep the bottom mark the same type as in E, do not follow the full rule.
Option 4 correctly rotates the L-shape, keeps the top dot fixed, and switches the bottom mark to the other type, so it is the right answer.
Shortcut Method
Rule: L-shape turns 90° anticlockwise each step; top dot never changes; bottom mark alternates solid dot / hollow circle
∴ Option 4 is correct ✓
∴ Option 4 is correct ✓
Question 52
An open circle shape and a small side bar change together across the five Problem Figures below (A to E), with the bar appearing and disappearing. Work out the rule and select the Answer Figure that continues the series.
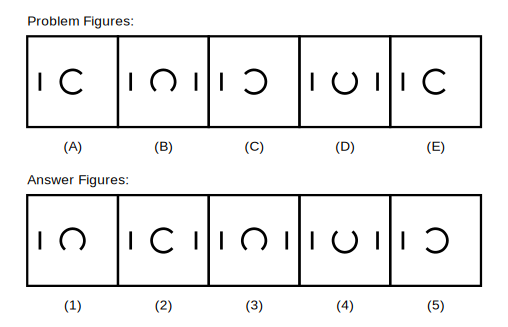
Explanation
The open circle shape turns 90 degrees clockwise at each step. A second short bar appears on the figure every other step, then disappears again on the next, alternating in turn. Continuing from figure E, the circle turns a further 90 degrees clockwise, and the second bar switches to the opposite state (present or absent) from figure E.
Options that rotate the circle correctly but keep the second bar's presence the same as in E, or vice versa, do not satisfy the full alternating rule.
Option 3 correctly rotates the circle and switches the second bar to the opposite state from figure E, so it is the right answer.
Options that rotate the circle correctly but keep the second bar's presence the same as in E, or vice versa, do not satisfy the full alternating rule.
Option 3 correctly rotates the circle and switches the second bar to the opposite state from figure E, so it is the right answer.
Shortcut Method
Rule: circle shape turns 90° clockwise each step; a second bar appears and disappears in alternation
∴ Option 3 is correct ✓
∴ Option 3 is correct ✓
Question 53
A grid of dots slowly turns into crosses across the five Problem Figures below (A to E), with more crosses appearing each time. Work out exactly how many and select the Answer Figure that continues the series.
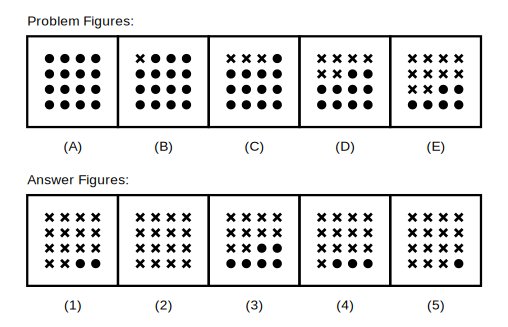
Explanation
Dots turn into crosses in reading order (left to right, row by row), and the number of new crosses added at each step goes up by one more than the step before: figure A has 0 crosses, B has 1, C has 3, D has 6, and E has 10 -- increases of 1, 2, 3, 4. Following the same pattern, the next increase is 5, so the next figure must have 10 + 5 = 15 crosses, continuing in the same reading order.
Options with the wrong number of crosses, or with crosses placed out of the established reading order, do not match this increasing pattern.
Option 5 correctly shows exactly 15 crosses filled in the same reading order, so it is the right answer.
Options with the wrong number of crosses, or with crosses placed out of the established reading order, do not match this increasing pattern.
Option 5 correctly shows exactly 15 crosses filled in the same reading order, so it is the right answer.
Shortcut Method
Rule: crosses replace dots in reading order; counts are 0,1,3,6,10 (increases of 1,2,3,4) → next increase is 5, giving 15
∴ Option 5 is correct ✓
∴ Option 5 is correct ✓
Question 54
In the five Problem Figures below (A to E), two more dots turn into crosses at each step, following an unusual path. Work out the path and select the Answer Figure that continues the series.
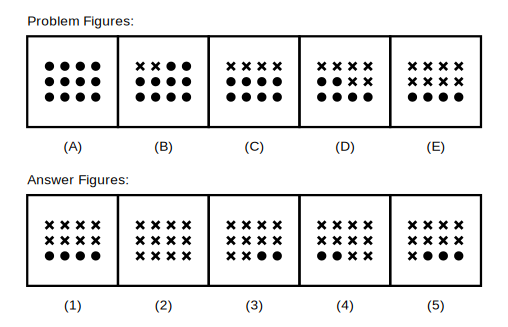
Explanation
Exactly two more dots turn into crosses at each step, following a zig-zag path: left to right along the first row, then right to left along the next row, and so on. Continuing this zig-zag path from figure E, two more dots along the next part of the zig-zag must turn into crosses, giving a total of 10 crosses.
Options with the wrong total number of crosses, or with crosses placed out of the established zig-zag order, do not match the pattern.
Option 3 correctly shows exactly 10 crosses filled following the same zig-zag path, so it is the right answer.
Options with the wrong total number of crosses, or with crosses placed out of the established zig-zag order, do not match the pattern.
Option 3 correctly shows exactly 10 crosses filled following the same zig-zag path, so it is the right answer.
Shortcut Method
Rule: 2 more dots become crosses each step, following a zig-zag path (left-right, then right-left) → next total is 10
∴ Option 3 is correct ✓
∴ Option 3 is correct ✓
Question 55
White circles turn black column by column across the five Problem Figures below (A to E), with more turning black each time. Work out exactly how many and select the Answer Figure that continues the series.
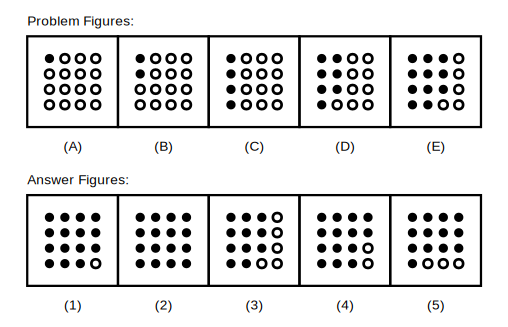
Explanation
Circles turn black going down each column, starting from the leftmost column. The number of black circles at each step is 1, 2, 4, 7, 11 -- increases of 1, 2, 3, 4. Following the same pattern, the next increase is 5, so the next figure must have 11 + 5 = 16 black circles, which is every circle in the grid, filled in the same column-by-column order.
Options with the wrong number of black circles, or with circles filled out of the established column order, do not match this increasing pattern.
Option 2 correctly shows all 16 circles turned black in the same column-by-column order, so it is the right answer.
Options with the wrong number of black circles, or with circles filled out of the established column order, do not match this increasing pattern.
Option 2 correctly shows all 16 circles turned black in the same column-by-column order, so it is the right answer.
Shortcut Method
Rule: circles turn black down each column; counts are 1,2,4,7,11 (increases of 1,2,3,4) → next increase is 5, giving 16 (all circles)
∴ Option 2 is correct ✓
∴ Option 2 is correct ✓
Question 56
Symbols placed along a diagonal slide one place at each step in the five Problem Figures below (A to E). Work out where they end up and select the Answer Figure that continues the series.
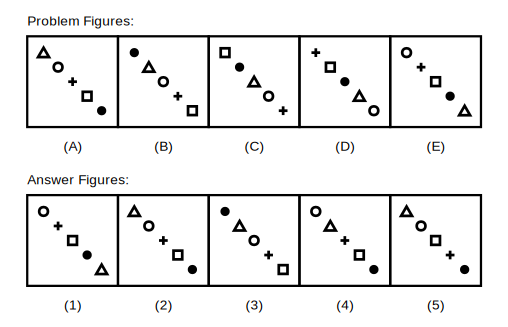
Explanation
Every symbol slides one place down the diagonal at each step, and the symbol that reaches the end wraps back around to the top-left corner. Since there are exactly five positions on the diagonal, each symbol returns to its original position after five such moves -- so the figure following E must look exactly like figure A.
Options that show a different arrangement, or that slide the symbols by the wrong amount, overlook that the full cycle has already completed.
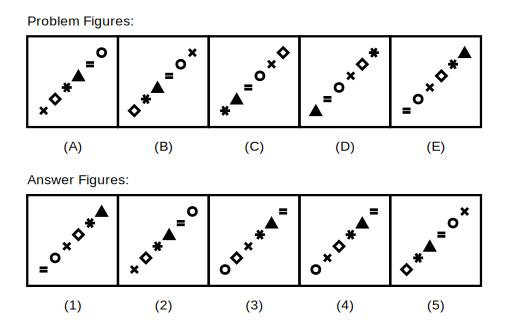
Option 2 correctly repeats figure A's arrangement, so it is the right answer.
Options that show a different arrangement, or that slide the symbols by the wrong amount, overlook that the full cycle has already completed.
Option 2 correctly repeats figure A's arrangement, so it is the right answer.
Shortcut Method
Rule: every symbol slides one place down the diagonal each step, wrapping at the end → after 5 steps (A to E), the next figure = A again
∴ Option 2 is correct ✓
∴ Option 2 is correct ✓
Question 57
The symbols along the diagonal in the five Problem Figures below (A to E) slide in a particular direction each step. Work out the direction and select the Answer Figure that continues the series.
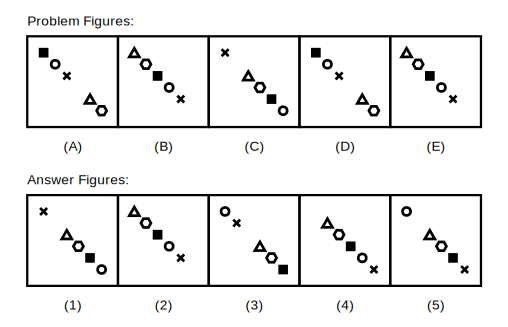
Explanation
All the symbols slide one place towards the bottom-left at every step, and the symbol that reaches the bottom-left corner jumps back around to the top-right corner. Continuing from figure E, every symbol must slide one more place towards the bottom-left, with the corner symbol wrapping back to the top-right as before.
Options that slide the symbols in the wrong direction, or that do not wrap the corner symbol correctly, do not match the established pattern.
Option 4 correctly shows every symbol slid one more place towards the bottom-left with the wrap applied, so it is the right answer.
Options that slide the symbols in the wrong direction, or that do not wrap the corner symbol correctly, do not match the established pattern.
Option 4 correctly shows every symbol slid one more place towards the bottom-left with the wrap applied, so it is the right answer.
Shortcut Method
Rule: every symbol slides one place towards the bottom-left each step, wrapping from bottom-left back to top-right
∴ Option 4 is correct ✓
∴ Option 4 is correct ✓
Question 58
There are six places along the diagonal in the five Problem Figures below (A to E), one of them always empty. Work out how far everything moves each step and select the Answer Figure that continues the series.
Explanation
There are six positions along the diagonal, one of which is always empty. Everything, including the empty position, slides two places down the diagonal at each step, with anything that goes past the last position wrapping back around to the top-left corner. Continuing from figure E, every symbol and the gap must slide two more places down the diagonal, wrapping around as needed.
Options that slide everything by only one place, or that do not wrap the gap and symbols correctly, do not match the established two-place movement.
Option 1 correctly shows every symbol and the gap shifted two places down the diagonal with the wrap applied, so it is the right answer.
Options that slide everything by only one place, or that do not wrap the gap and symbols correctly, do not match the established two-place movement.
Option 1 correctly shows every symbol and the gap shifted two places down the diagonal with the wrap applied, so it is the right answer.
Shortcut Method
Rule: 6 positions, 1 always empty; everything (including the gap) slides TWO places down the diagonal each step, wrapping at the end
∴ Option 1 is correct ✓
∴ Option 1 is correct ✓
Question 59
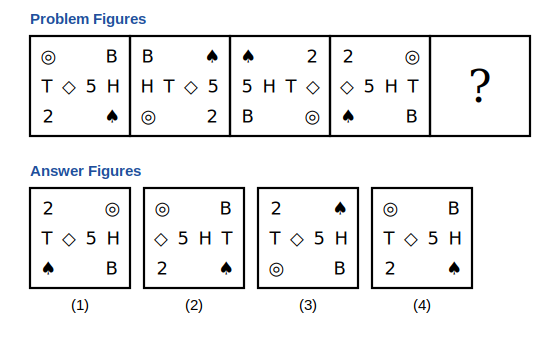
In every box, the corner symbols go round and the centre row of symbols shifts along. Work out both movements and select the figure that continues the pattern.
Explanation
The four corner symbols move one corner anticlockwise at each step. The four symbols in the middle row move one place to the right at each step (the end one comes round to the other end). Continuing both moves gives the answer.
So option (4) is correct.
Option 1 is wrong because the corner symbols have not moved (they are the same as in the fourth figure).
Option 2 is wrong because the middle row has not moved.
Option 3 is wrong because the corner symbols are in the wrong corners.
So option (4) is correct.
Option 1 is wrong because the corner symbols have not moved (they are the same as in the fourth figure).
Option 2 is wrong because the middle row has not moved.
Option 3 is wrong because the corner symbols are in the wrong corners.
Shortcut Method
Rule: corners 1 step anticlockwise; middle row 1 place right (the end symbol wraps round)
∴ Option 4 is correct ✓
∴ Option 4 is correct ✓
Question 60
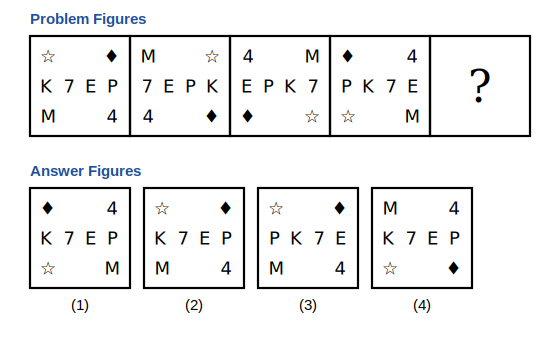
The four corner symbols move one way while the row of four in the middle slides the other way in these boxes. Pick the figure that comes next in the series.
Explanation
The four corner symbols move one corner clockwise at each step. The four symbols in the middle row move one place to the left at each step (the end one comes round to the other end). Continuing both moves gives the answer.
So option (2) is correct.
Option 1 is wrong because the corner symbols have not moved (they are the same as in the fourth figure).
Option 3 is wrong because the middle row has not moved.
Option 4 is wrong because the corner symbols are in the wrong corners.
So option (2) is correct.
Option 1 is wrong because the corner symbols have not moved (they are the same as in the fourth figure).
Option 3 is wrong because the middle row has not moved.
Option 4 is wrong because the corner symbols are in the wrong corners.
Shortcut Method
Rule: corners 1 step clockwise; middle row 1 place left (the end symbol wraps round)
∴ Option 2 is correct ✓
∴ Option 2 is correct ✓
Question 61
Study how each of the four symbols shifts around the boundary of the box from figure to figure and choose the one that should appear next.
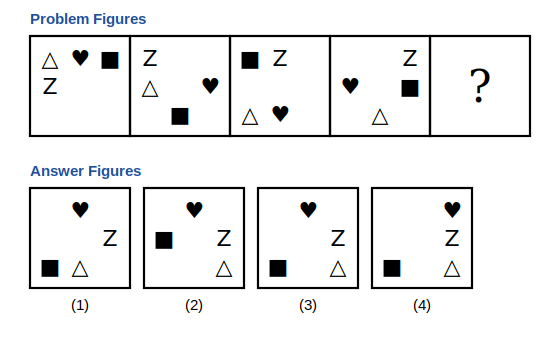
Explanation
Each symbol moves around the edge of the box by its own fixed amount at every step: △ moves 1 place anticlockwise; ■ moves 3 places clockwise; ♥ moves 2 places clockwise; Z moves 1 place clockwise. Moving each symbol once more gives the answer.
So option (3) is correct.
Option 1 is wrong because △ has not moved from the bottom middle.
Option 2 is wrong because ■ is at the middle of the left side instead of the bottom-left corner.
Option 4 is wrong because ♥ is at the top-right corner instead of the top middle.
So option (3) is correct.
Option 1 is wrong because △ has not moved from the bottom middle.
Option 2 is wrong because ■ is at the middle of the left side instead of the bottom-left corner.
Option 4 is wrong because ♥ is at the top-right corner instead of the top middle.
Shortcut Method
Rule: Each symbol moves around the edge of the box by its own fixed amount at every step: △ moves 1 place anticlockwise; ■ moves 3 places clockwise; ♥ moves 2 places clockwise; Z moves 1 place clockwise.
∴ Option 3 is correct ✓
∴ Option 3 is correct ✓
Question 62
Four different symbols go around the edge of the box, each moving by its own fixed number of places. Which answer figure continues the series?
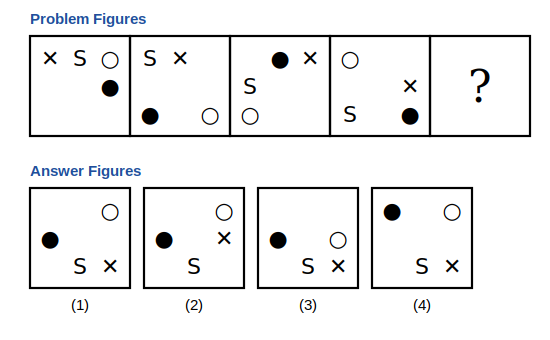
Explanation
Each symbol moves around the edge of the box by its own fixed amount at every step: ✕ moves 1 place clockwise; ○ moves 2 places clockwise; ● moves 3 places clockwise; S moves 1 place anticlockwise. Moving each symbol once more gives the answer.
So option (1) is correct.
Option 2 is wrong because ✕ has not moved from the middle of the right side.
Option 3 is wrong because ○ is at the middle of the right side instead of the top-right corner.
Option 4 is wrong because ● is at the top-left corner instead of the middle of the left side.
So option (1) is correct.
Option 2 is wrong because ✕ has not moved from the middle of the right side.
Option 3 is wrong because ○ is at the middle of the right side instead of the top-right corner.
Option 4 is wrong because ● is at the top-left corner instead of the middle of the left side.
Shortcut Method
Rule: Each symbol moves around the edge of the box by its own fixed amount at every step: ✕ moves 1 place clockwise; ○ moves 2 places clockwise; ● moves 3 places clockwise; S moves 1 place anticlockwise.
∴ Option 1 is correct ✓
∴ Option 1 is correct ✓
Question 63
Three symbols circle around the edge of the box in the four figures below, each at its own speed, and one of them also turns. Select the figure that replaces the question mark.
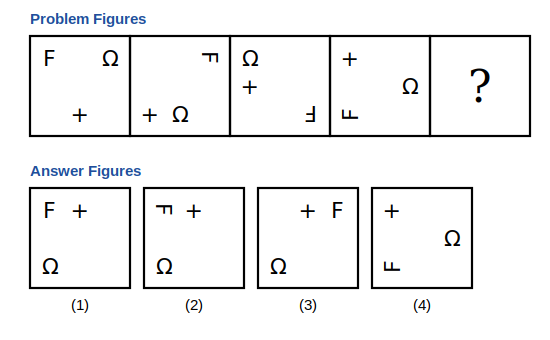
Explanation
All the symbols move around the edge of the box: F moves 2 places clockwise, + moves 1 place clockwise, Ω moves 3 places clockwise at each step. Also, F turns 90° clockwise at each step. Applying these changes once more gives the answer.
So option (1) is correct.
Option 2 is wrong because F is turned instead of upright (after four 90° turns it is upright again).
Option 3 is wrong because F is at the top-right corner instead of the top-left.
Option 4 is wrong because it is the same as the fourth figure, so nothing has moved.
So option (1) is correct.
Option 2 is wrong because F is turned instead of upright (after four 90° turns it is upright again).
Option 3 is wrong because F is at the top-right corner instead of the top-left.
Option 4 is wrong because it is the same as the fourth figure, so nothing has moved.
Shortcut Method
Rule: F +2, + +1, Ω +3 places clockwise; F also turns 90° clockwise each step
∴ Option 1 is correct ✓
∴ Option 1 is correct ✓
Question 64
Some symbols travel around the border of the box while turning. Find how far each one moves and rotates at every step and choose the next figure.
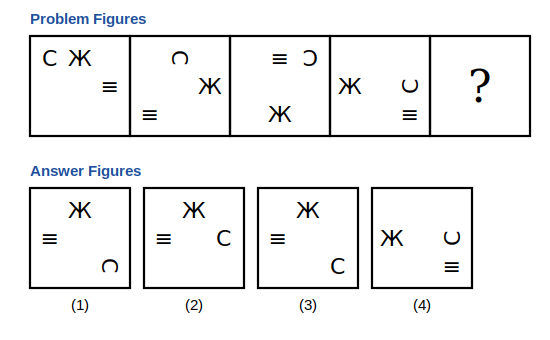
Explanation
All the symbols move around the edge of the box: C moves 1 place clockwise, Ж moves 2 places clockwise, ≡ moves 3 places clockwise at each step. Also, C turns 90° clockwise at each step. Applying these changes once more gives the answer.
So option (3) is correct.
Option 1 is wrong because C is in the right place but turned the wrong way.
Option 2 is wrong because C is at the middle of the right side instead of the bottom-right corner.
Option 4 is wrong because it is the same as the fourth figure, so nothing has moved.
So option (3) is correct.
Option 1 is wrong because C is in the right place but turned the wrong way.
Option 2 is wrong because C is at the middle of the right side instead of the bottom-right corner.
Option 4 is wrong because it is the same as the fourth figure, so nothing has moved.
Shortcut Method
Rule: C +1, Ж +2, ≡ +3 places clockwise; C also turns 90° clockwise each step
∴ Option 3 is correct ✓
∴ Option 3 is correct ✓
Question 65
Five symbols sit at the corners and the centre of each box. Trace how every symbol travels from figure to figure and pick the figure that should come next.
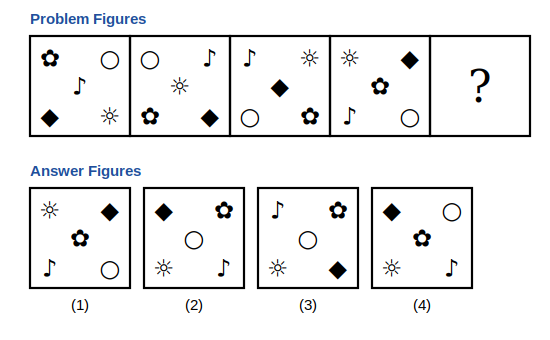
Explanation
Each symbol moves one step at a time along the path top-left → bottom-left → bottom-right → centre → top-right → top-left. Moving every symbol one more step gives the answer.
So option (2) is correct.
Option 1 is wrong because it is the same as the fourth figure, so nothing has moved.
Option 3 is wrong because ♪ and ◆ have changed places.
Option 4 is wrong because ○ and ✿ have changed places.
So option (2) is correct.
Option 1 is wrong because it is the same as the fourth figure, so nothing has moved.
Option 3 is wrong because ♪ and ◆ have changed places.
Option 4 is wrong because ○ and ✿ have changed places.
Shortcut Method
Rule: Each symbol moves one step at a time along the path top-left → bottom-left → bottom-right → centre → top-right → top-left.
∴ Option 2 is correct ✓
∴ Option 2 is correct ✓
Question 66
Follow each symbol as it hops from one position to another in the four problem figures below, and select the answer figure that should replace the question mark.
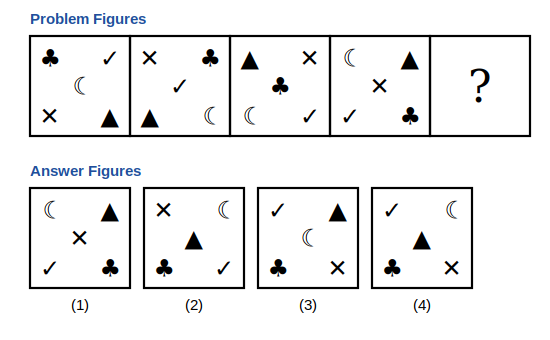
Explanation
Each symbol moves one step at a time along the path top-left → top-right → centre → bottom-right → bottom-left → top-left. Moving every symbol one more step gives the answer.
So option (4) is correct.
Option 1 is wrong because it is the same as the fourth figure, so nothing has moved.
Option 2 is wrong because ✓ and ✕ have changed places.
Option 3 is wrong because ▲ and ☾ have changed places.
So option (4) is correct.
Option 1 is wrong because it is the same as the fourth figure, so nothing has moved.
Option 2 is wrong because ✓ and ✕ have changed places.
Option 3 is wrong because ▲ and ☾ have changed places.
Shortcut Method
Rule: Each symbol moves one step at a time along the path top-left → top-right → centre → bottom-right → bottom-left → top-left.
∴ Option 4 is correct ✓
∴ Option 4 is correct ✓
Question 67
In the first pair a circle with spokes becomes a figure whose corners point along the spokes. Which answer figure should replace the question mark for the third circle?
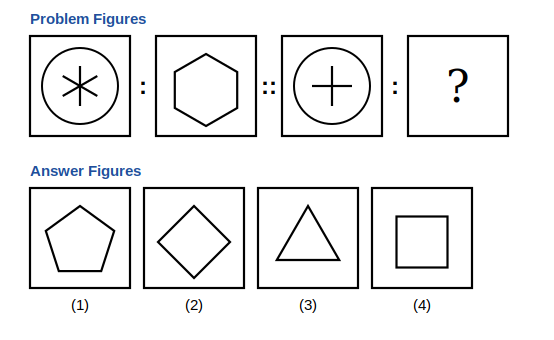
Explanation
The first figure is a circle with 6 spokes and the second is a figure with 6 sides, with its corners in the directions of the spokes. The third figure has 4 spokes, so the answer is a figure with 4 sides with corners pointing in the same directions as the spokes.
So option (2) is correct.
Option 1 is wrong because it has 5 sides, not 4.
Option 3 is wrong because it has 3 sides, not 4.
Option 4 is wrong because it is a square with its corners on the diagonals, not along the vertical and horizontal spokes.
So option (2) is correct.
Option 1 is wrong because it has 5 sides, not 4.
Option 3 is wrong because it has 3 sides, not 4.
Option 4 is wrong because it is a square with its corners on the diagonals, not along the vertical and horizontal spokes.
Shortcut Method
Rule: 4 spokes (vertical and horizontal) → square standing on a corner
∴ Option 2 is correct ✓
∴ Option 2 is correct ✓
Question 68
A circle with spokes is changed into a polygon in the first pair. Using the same rule, find the figure that matches the third circle in place of the question mark.
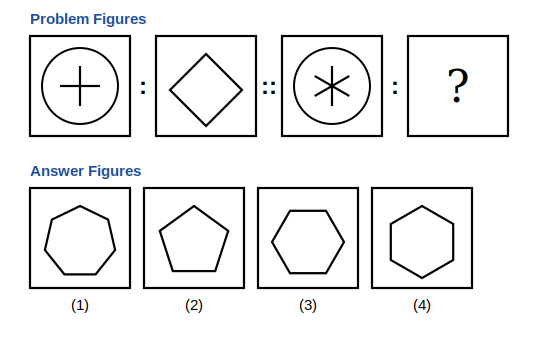
Explanation
The first figure is a circle with 4 spokes and the second is a figure with 4 sides, with its corners in the directions of the spokes. The third figure has 6 spokes, so the answer is a figure with 6 sides with corners pointing in the same directions as the spokes.
So option (4) is correct.
Option 1 is wrong because it has 7 sides, not 6.
Option 2 is wrong because it has 5 sides, not 6.
Option 3 is wrong because it has 6 sides, but its corners point left and right, not along the spokes (one spoke is vertical).
So option (4) is correct.
Option 1 is wrong because it has 7 sides, not 6.
Option 2 is wrong because it has 5 sides, not 6.
Option 3 is wrong because it has 6 sides, but its corners point left and right, not along the spokes (one spoke is vertical).
Shortcut Method
Rule: n spokes → n-sided figure with corners on the spokes; 6 spokes with one vertical → hexagon with a corner at the top
∴ Option 4 is correct ✓
∴ Option 4 is correct ✓
Question 69
The symbols above and below the line keep shifting from figure to figure. Decide the rule for each row and choose the figure that follows.
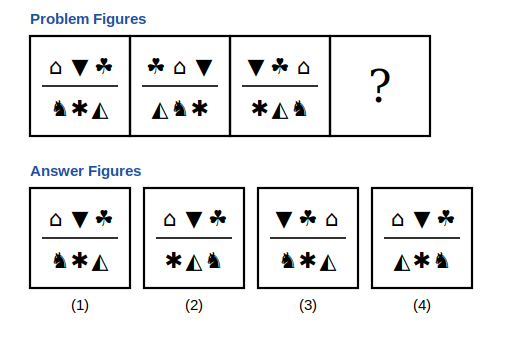
Explanation
In the upper row the symbols move one place to the right at each step (the end symbol comes round to the other end). In the lower row they move one place to the right at each step. Continuing both moves gives the answer.
So option (1) is correct.
Option 2 is wrong because the lower row has not moved.
Option 3 is wrong because the upper row has not moved.
Option 4 is wrong because the lower row is in the wrong order.
So option (1) is correct.
Option 2 is wrong because the lower row has not moved.
Option 3 is wrong because the upper row has not moved.
Option 4 is wrong because the lower row is in the wrong order.
Shortcut Method
Rule: both rows move 1 place right (the end symbol wraps round)
∴ Option 1 is correct ✓
∴ Option 1 is correct ✓
Question 70
Two rows of symbols, separated by a line, change from one problem figure to the next. Work out how each row moves and select the figure that continues the series.
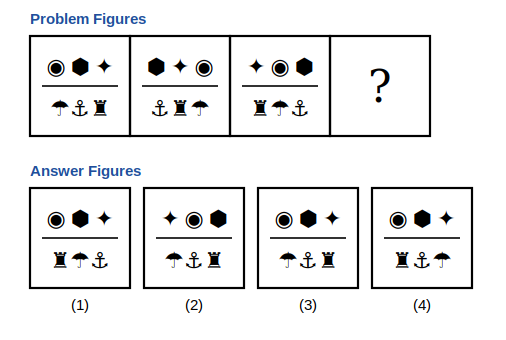
Explanation
In the upper row the symbols move one place to the left at each step (the end symbol comes round to the other end). In the lower row they move one place to the left at each step. Continuing both moves gives the answer.
So option (3) is correct.
Option 1 is wrong because the lower row has not moved.
Option 2 is wrong because the upper row has not moved.
Option 4 is wrong because the lower row is in the wrong order.
So option (3) is correct.
Option 1 is wrong because the lower row has not moved.
Option 2 is wrong because the upper row has not moved.
Option 4 is wrong because the lower row is in the wrong order.
Shortcut Method
Rule: both rows move 1 place left (the end symbol wraps round)
∴ Option 3 is correct ✓
∴ Option 3 is correct ✓
Question 71
Watch how the upper and lower rows of symbols shift in the three figures below, and pick the answer figure that should come next.
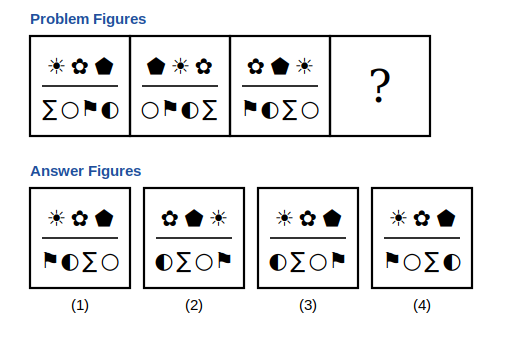
Explanation
In the upper row the symbols move one place to the right at each step (the end symbol comes round to the other end). In the lower row they move one place to the left at each step. Continuing both moves gives the answer.
So option (3) is correct.
Option 1 is wrong because the lower row has not moved.
Option 2 is wrong because the upper row has not moved.
Option 4 is wrong because the lower row is in the wrong order.
So option (3) is correct.
Option 1 is wrong because the lower row has not moved.
Option 2 is wrong because the upper row has not moved.
Option 4 is wrong because the lower row is in the wrong order.
Shortcut Method
Rule: upper row 1 place right, lower row 1 place left (the end symbol wraps round)
∴ Option 3 is correct ✓
∴ Option 3 is correct ✓
Question 72
Each problem figure has a row of three symbols above a line and a row of four below it. Find how each row changes and choose the figure that comes next in the series.
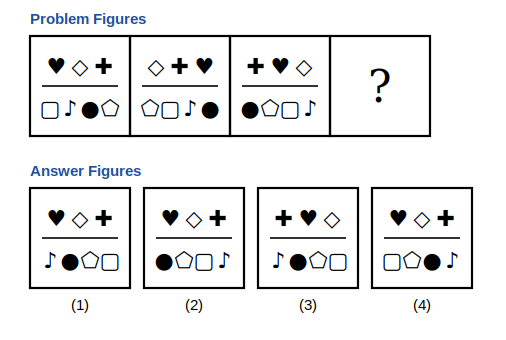
Explanation
In the upper row the symbols move one place to the left at each step (the end symbol comes round to the other end). In the lower row they move one place to the right at each step. Continuing both moves gives the answer.
So option (1) is correct.
Option 2 is wrong because the lower row has not moved (it is the same as in the third figure).
Option 3 is wrong because the upper row has not moved.
Option 4 is wrong because the lower row is in the wrong order.
So option (1) is correct.
Option 2 is wrong because the lower row has not moved (it is the same as in the third figure).
Option 3 is wrong because the upper row has not moved.
Option 4 is wrong because the lower row is in the wrong order.
Shortcut Method
Rule: upper row 1 place left, lower row 1 place right (the end symbol wraps round)
∴ Option 1 is correct ✓
∴ Option 1 is correct ✓
Question 73
The symbols in the second box are a rearrangement of those in the first. Apply the identical rearrangement to the third box and choose the figure that should stand in place of the question mark.
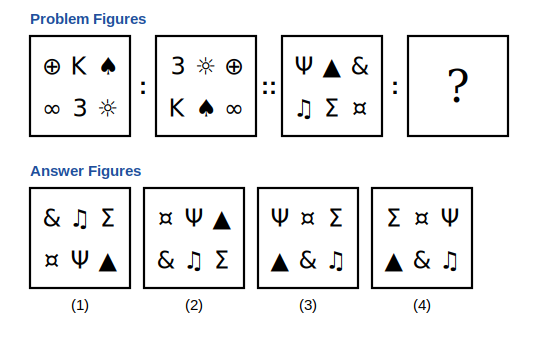
Explanation
Read the six symbols of each figure row by row (top row left to right, then bottom row left to right). From the first figure to the second, every symbol moves 2 places forward in this order (the last 2 symbols come round to the front). Doing the same to the third figure gives the answer.
So option (4) is correct.
Option 1 is wrong because the symbols are moved 2 places the wrong way (the first 2 go to the end).
Option 2 is wrong because the symbols are moved only 1 place.
Option 3 is wrong because Ψ and Σ have changed places.
So option (4) is correct.
Option 1 is wrong because the symbols are moved 2 places the wrong way (the first 2 go to the end).
Option 2 is wrong because the symbols are moved only 1 place.
Option 3 is wrong because Ψ and Σ have changed places.
Shortcut Method
Rule: every symbol moves 2 places forward in reading order (the last 2 come to the front)
∴ Option 4 is correct ✓
∴ Option 4 is correct ✓
Question 74
Compare the first two boxes below to see how the six symbols are rearranged, then make the same change to the third box. Select the figure that replaces the question mark.
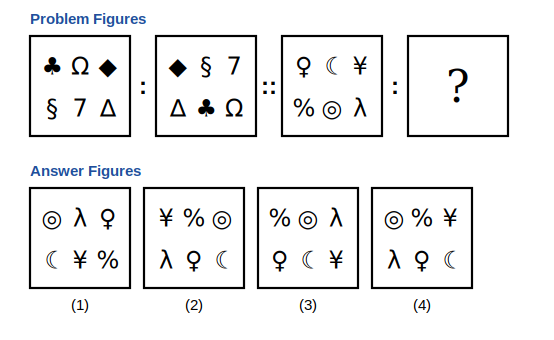
Explanation
Read the six symbols of each figure row by row (top row left to right, then bottom row left to right). From the first figure to the second, every symbol moves 2 places back in this order (the first 2 symbols go to the end). Doing the same to the third figure gives the answer.
So option (2) is correct.
Option 1 is wrong because the symbols are moved 4 places instead of 2 (◎ λ ♀ / ☾ ¥ %).
Option 3 is wrong because the symbols are moved 3 places instead of 2.
Option 4 is wrong because ◎ and ¥ have changed places.
So option (2) is correct.
Option 1 is wrong because the symbols are moved 4 places instead of 2 (◎ λ ♀ / ☾ ¥ %).
Option 3 is wrong because the symbols are moved 3 places instead of 2.
Option 4 is wrong because ◎ and ¥ have changed places.
Shortcut Method
Rule: every symbol moves 2 places back in reading order (the first 2 go to the end)
∴ Option 2 is correct ✓
∴ Option 2 is correct ✓