Practice Non Verbal Reasoning questions on Water Images, covering vertical reflections, top-bottom reversal, and identifying the correct water image of letters, numbers, and figures. Each question shows a figure with a water line XY beside it, followed by four alternatives (1), (2), (3) and (4). Choose the alternative that correctly shows the water image of the figure, that is, its reflection in the water line.
Question 1
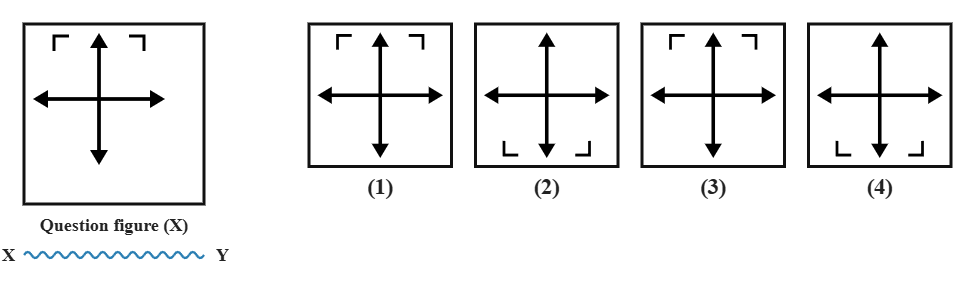
If the water source XY shown below is placed as indicated, which of the four options is the correct water image of the given figure?
Explanation
A water image is a vertical inversion: the top of the figure becomes the bottom and the bottom becomes the top, while left and right stay exactly the same. The four arrows point the same directions either way, but the small bracket -- which sits above the top arrow in the original -- must move to below the bottom arrow.
Option 1 is simply the original figure unchanged, with the bracket still on top.
Option 3 has been mirrored left-to-right instead of flipped top-to-bottom, as a side mirror would show.
Option 4 has been rotated a full 180 degrees, which happens to put the bracket at the bottom but also swaps left and right, which a water image never does.
Option 2 correctly moves the bracket to the bottom while leaving left and right unchanged, so it is the true water image.
Option 1 is simply the original figure unchanged, with the bracket still on top.
Option 3 has been mirrored left-to-right instead of flipped top-to-bottom, as a side mirror would show.
Option 4 has been rotated a full 180 degrees, which happens to put the bracket at the bottom but also swaps left and right, which a water image never does.
Option 2 correctly moves the bracket to the bottom while leaving left and right unchanged, so it is the true water image.
Shortcut Method
Water image → top ↔ bottom swap only, left-right unchanged
∴ Option 2 is the true water image ✓
∴ Option 2 is the true water image ✓
Question 2
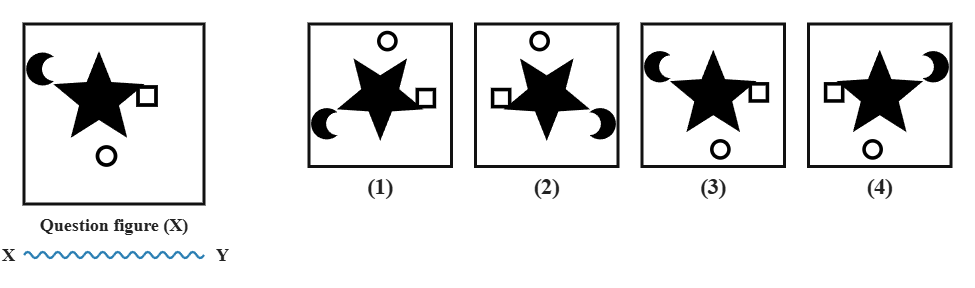
A starburst figure with three small satellite shapes is shown below next to a water line XY. Select the option that correctly shows its water image.
Explanation
A water image swaps top and bottom while leaving left and right unchanged. The starburst itself looks the same, but the crescent (originally top-left), the square (originally on the right) and the circle (originally at the bottom) must all move to their vertically flipped positions.
Option 2 has been rotated 180 degrees, which also swaps left and right and is not what a water image does.
Option 3 is simply the original figure unchanged.
Option 4 has been mirrored left-to-right instead of flipped top-to-bottom.
Option 1 correctly flips every satellite shape top-to-bottom while keeping left and right unchanged, so it is the true water image.
Option 2 has been rotated 180 degrees, which also swaps left and right and is not what a water image does.
Option 3 is simply the original figure unchanged.
Option 4 has been mirrored left-to-right instead of flipped top-to-bottom.
Option 1 correctly flips every satellite shape top-to-bottom while keeping left and right unchanged, so it is the true water image.
Shortcut Method
Water image → top ↔ bottom swap only, left-right unchanged
∴ Option 1 is the true water image ✓
∴ Option 1 is the true water image ✓
Question 3
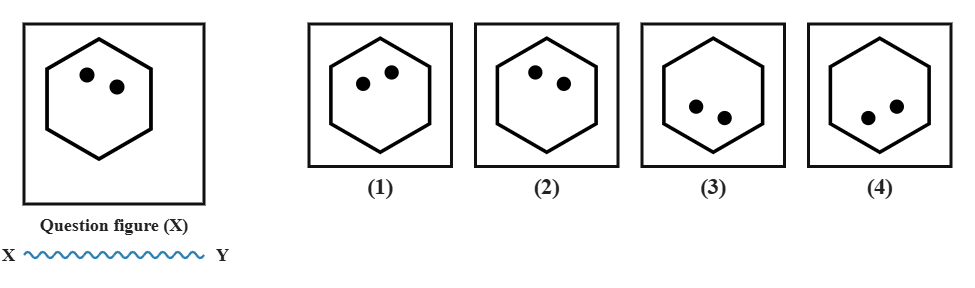
The figure below shows a hexagon with two dots next to a water source XY. Which of the given options will be the water reflection of the figure?
Explanation
A water image swaps top and bottom while leaving left and right unchanged. The hexagon outline looks the same either way, but the two dots -- both in the upper half in the original -- must both move to the lower half, keeping their left-right positions.
Option 1 has been mirrored left-to-right instead of flipped top-to-bottom.
Option 2 is simply the original figure unchanged.
Option 3 has been rotated 180 degrees, which also swaps left and right.
Option 4 correctly moves both dots to the lower half while keeping left and right unchanged, so it is the true water image.
Option 1 has been mirrored left-to-right instead of flipped top-to-bottom.
Option 2 is simply the original figure unchanged.
Option 3 has been rotated 180 degrees, which also swaps left and right.
Option 4 correctly moves both dots to the lower half while keeping left and right unchanged, so it is the true water image.
Shortcut Method
Water image → top ↔ bottom swap only, left-right unchanged
∴ Option 4 is the true water image ✓
∴ Option 4 is the true water image ✓
Question 4
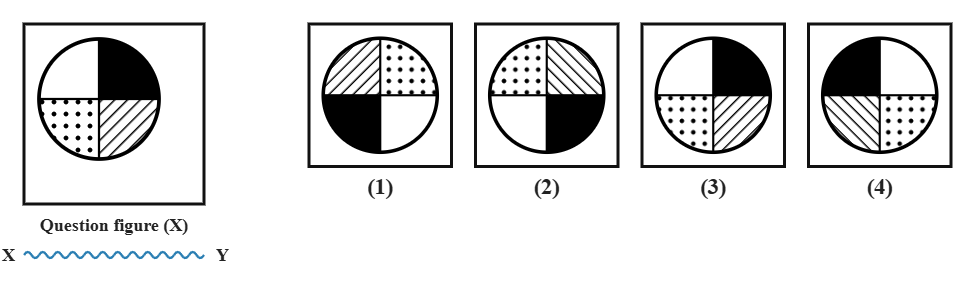
If a water source is placed along XY as shown below, which option correctly shows the water image of the four-texture circle?
Explanation
A water image swaps top and bottom while leaving left and right unchanged. The circle outline stays the same, but each of the four differently-textured quadrants must move to its vertically flipped position -- the top-left texture swaps with the bottom-left, and the top-right swaps with the bottom-right.
Option 1 has been rotated 180 degrees, which also swaps left and right.
Option 3 is simply the original figure unchanged.
Option 4 has been mirrored left-to-right instead of flipped top-to-bottom.
Option 2 correctly swaps each texture with the one vertically opposite it, so it is the true water image.
Option 1 has been rotated 180 degrees, which also swaps left and right.
Option 3 is simply the original figure unchanged.
Option 4 has been mirrored left-to-right instead of flipped top-to-bottom.
Option 2 correctly swaps each texture with the one vertically opposite it, so it is the true water image.
Shortcut Method
Water image → top ↔ bottom swap only, left-right unchanged
∴ Option 2 is the true water image ✓
∴ Option 2 is the true water image ✓
Question 5
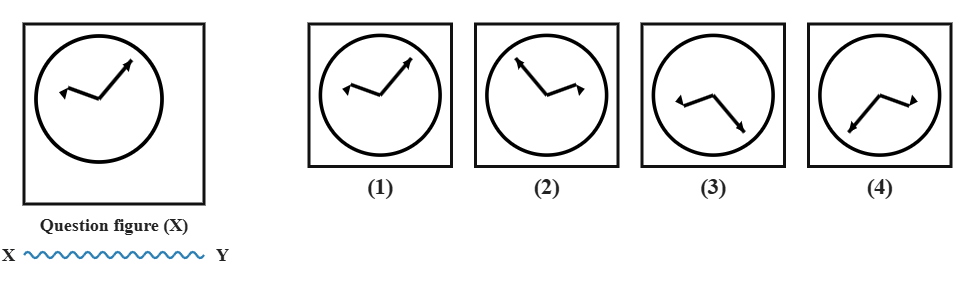
A dial-like figure with two arrow hands is shown next to a water line XY below. Choose the option that correctly represents its water image.
Explanation
A water image swaps top and bottom while leaving left and right unchanged. The circle outline stays the same, but both arrows -- which point upward in the original -- must flip to point in their vertically mirrored directions, staying on the same left or right side.
Option 1 is simply the original figure unchanged.
Option 2 has been mirrored left-to-right instead of flipped top-to-bottom.
Option 4 has been rotated 180 degrees, which also swaps left and right.
Option 3 correctly flips both arrows top-to-bottom while keeping their left-right side unchanged, so it is the true water image.
Option 1 is simply the original figure unchanged.
Option 2 has been mirrored left-to-right instead of flipped top-to-bottom.
Option 4 has been rotated 180 degrees, which also swaps left and right.
Option 3 correctly flips both arrows top-to-bottom while keeping their left-right side unchanged, so it is the true water image.
Shortcut Method
Water image → top ↔ bottom swap only, left-right unchanged
∴ Option 3 is the true water image ✓
∴ Option 3 is the true water image ✓
Question 6
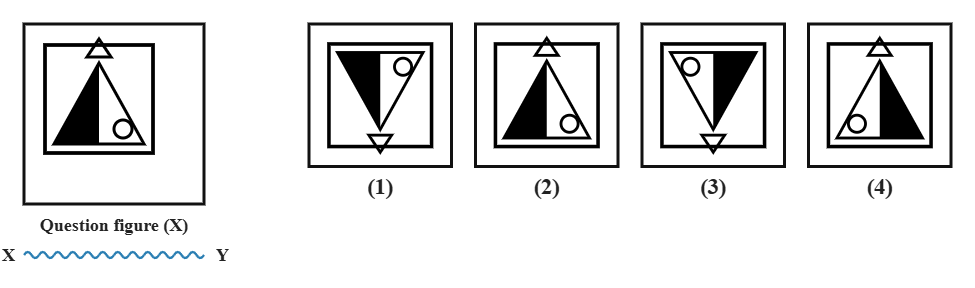
Study the figure and the water source XY given below. Which of the four options is the correct water image?
Explanation
A water image swaps top and bottom while leaving left and right unchanged. The square outline stays the same, but the small outline triangle (above the main triangle) and the small circle (below it) must swap places, and the half-shaded triangle itself flips so its shaded half moves to the opposite side vertically.
Option 2 has been mirrored left-to-right instead of flipped top-to-bottom.
Option 3 is simply the original figure unchanged.
Option 4 has been rotated 180 degrees, which also swaps left and right.
Option 1 correctly swaps the small triangle and circle and flips the shaded triangle, so it is the true water image.
Option 2 has been mirrored left-to-right instead of flipped top-to-bottom.
Option 3 is simply the original figure unchanged.
Option 4 has been rotated 180 degrees, which also swaps left and right.
Option 1 correctly swaps the small triangle and circle and flips the shaded triangle, so it is the true water image.
Shortcut Method
Water image → top ↔ bottom swap only, left-right unchanged
∴ Option 1 is the true water image ✓
∴ Option 1 is the true water image ✓
Question 7
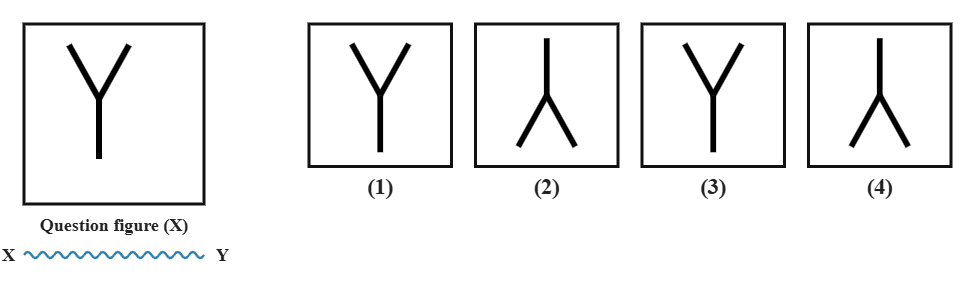
The letter-like figure (Y) below sits next to a water source placed along XY. Select the option that correctly shows its water image.
Explanation
A water image swaps top and bottom while leaving left and right unchanged. The Y-shape has its stem at the bottom and branches at the top in the original, with a small dot marking only the right branch tip; its water image must show the stem at the top and the branches at the bottom -- an upside-down Y, like a trident shape -- with the dot still marking the same (right) branch.
Option 1 has been mirrored left-to-right instead of flipped top-to-bottom, moving the dot to the left branch instead.
Option 2 has been rotated 180 degrees, which also moves the dot to the left branch.
Option 3 is simply the original figure unchanged.
Option 4 correctly shows the stem on top, the branches at the bottom, and the dot still on the right branch, so it is the true water image.
Option 1 has been mirrored left-to-right instead of flipped top-to-bottom, moving the dot to the left branch instead.
Option 2 has been rotated 180 degrees, which also moves the dot to the left branch.
Option 3 is simply the original figure unchanged.
Option 4 correctly shows the stem on top, the branches at the bottom, and the dot still on the right branch, so it is the true water image.
Shortcut Method
Water image → top ↔ bottom swap only, left-right unchanged
∴ Option 4 is the true water image ✓
∴ Option 4 is the true water image ✓
Question 8
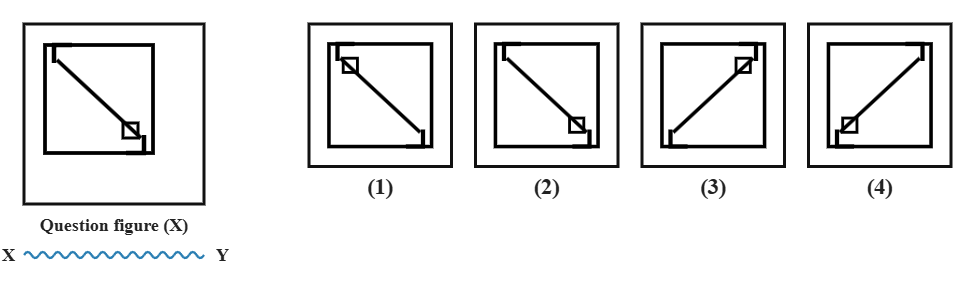
Given below is a square figure with a bracket and a diagonal, next to a water line XY. Which option is its correct water image?
Explanation
A water image swaps top and bottom while leaving left and right unchanged. The square outline stays the same, but the bracket (originally at top-left) must move to bottom-left, the small box (originally at bottom-right) must move to top-right, and the diagonal line's slope flips.
Option 1 has been rotated 180 degrees, which also swaps left and right.
Option 2 is simply the original figure unchanged.
Option 4 has been mirrored left-to-right instead of flipped top-to-bottom.
Option 3 correctly moves the bracket and box to their vertically flipped corners, so it is the true water image.
Option 1 has been rotated 180 degrees, which also swaps left and right.
Option 2 is simply the original figure unchanged.
Option 4 has been mirrored left-to-right instead of flipped top-to-bottom.
Option 3 correctly moves the bracket and box to their vertically flipped corners, so it is the true water image.
Shortcut Method
Water image → top ↔ bottom swap only, left-right unchanged
∴ Option 3 is the true water image ✓
∴ Option 3 is the true water image ✓
Question 9
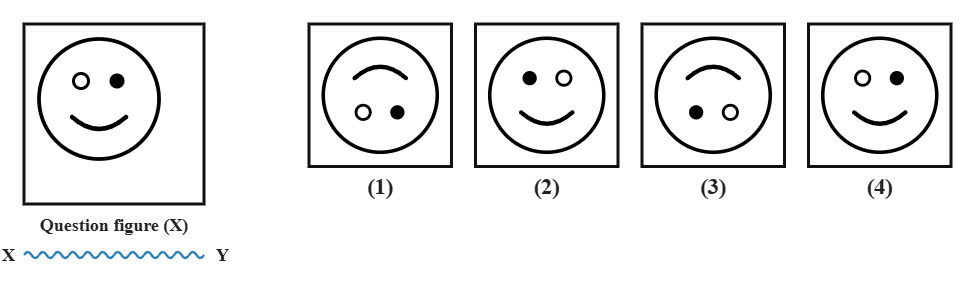
A smiling face figure is shown below next to a water source placed along XY. Which of the four options correctly shows its water image?
Explanation
A water image swaps top and bottom while leaving left and right unchanged. The face outline and the left-right positions of the two different eye styles stay the same, but the eyes (near the top) and the mouth (near the bottom) must swap places, and the smiling mouth curve flips into a frown.
Option 2 has been mirrored left-to-right instead of flipped top-to-bottom (swapping which eye style is on which side).
Option 3 has been rotated 180 degrees.
Option 4 is simply the original figure unchanged.
Option 1 correctly swaps the eyes and mouth vertically and flips the smile into a frown, so it is the true water image.
Option 2 has been mirrored left-to-right instead of flipped top-to-bottom (swapping which eye style is on which side).
Option 3 has been rotated 180 degrees.
Option 4 is simply the original figure unchanged.
Option 1 correctly swaps the eyes and mouth vertically and flips the smile into a frown, so it is the true water image.
Shortcut Method
Water image → top ↔ bottom swap only, left-right unchanged
∴ Option 1 is the true water image ✓
∴ Option 1 is the true water image ✓
Question 10
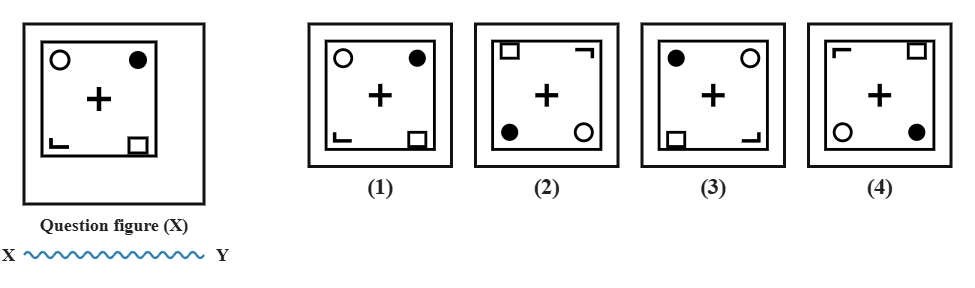
The figure below has a different small icon in each corner, next to a water line XY. Select the option that correctly shows its water image.
Explanation
A water image swaps top and bottom while leaving left and right unchanged. The centre plus sign stays exactly where it is, but each of the four different corner icons must swap with the icon vertically above or below it -- the top-left icon swaps with the bottom-left, and the top-right swaps with the bottom-right.
Option 1 is simply the original figure unchanged.
Option 2 has been rotated 180 degrees, which also swaps left and right.
Option 3 has been mirrored left-to-right instead of flipped top-to-bottom.
Option 4 correctly swaps each corner icon with the one vertically opposite it, so it is the true water image.
Option 1 is simply the original figure unchanged.
Option 2 has been rotated 180 degrees, which also swaps left and right.
Option 3 has been mirrored left-to-right instead of flipped top-to-bottom.
Option 4 correctly swaps each corner icon with the one vertically opposite it, so it is the true water image.
Shortcut Method
Water image → top ↔ bottom swap only, left-right unchanged
∴ Option 4 is the true water image ✓
∴ Option 4 is the true water image ✓
Question 11
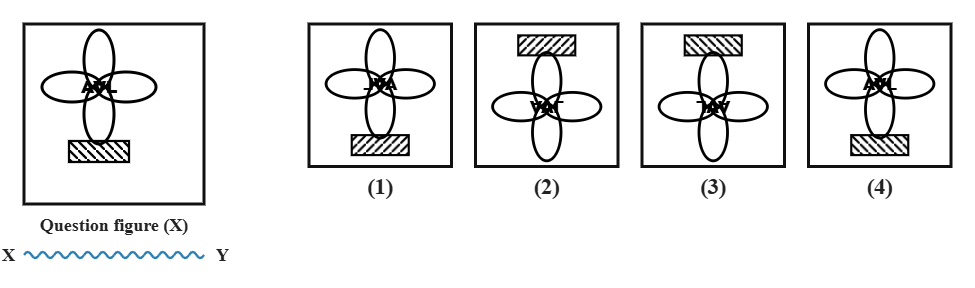
A flower-shaped figure with a word inside and a striped bar below is shown next to a water source XY. Which option correctly shows the water image?
Explanation
A water image swaps top and bottom while leaving left and right unchanged. The flower-and-word block (originally above) and the hatched bar (originally below) must swap places, moving as a unit to their vertically flipped positions.
Option 1 has been mirrored left-to-right instead of flipped top-to-bottom.
Option 3 has been rotated 180 degrees.
Option 4 is simply the original figure unchanged.
Option 2 correctly swaps the flower/word block and the hatched bar top-to-bottom, so it is the true water image.
Option 1 has been mirrored left-to-right instead of flipped top-to-bottom.
Option 3 has been rotated 180 degrees.
Option 4 is simply the original figure unchanged.
Option 2 correctly swaps the flower/word block and the hatched bar top-to-bottom, so it is the true water image.
Shortcut Method
Water image → top ↔ bottom swap only, left-right unchanged
∴ Option 2 is the true water image ✓
∴ Option 2 is the true water image ✓
Question 12
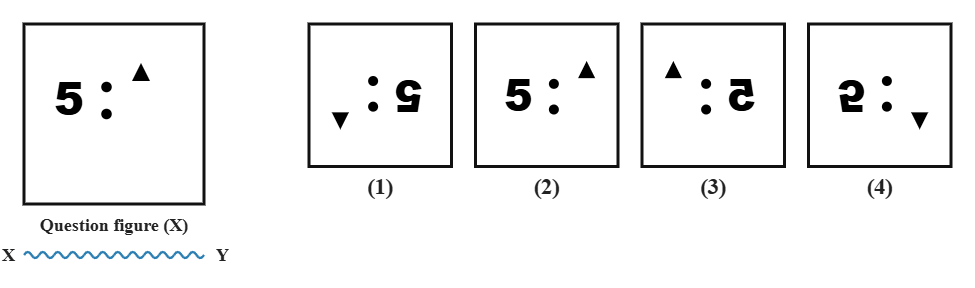
The compact figure below shows a digit, two dots and a triangle, next to a water line XY. Choose the option that correctly shows its water image.
Explanation
A water image swaps top and bottom while leaving left and right unchanged. The digit, dots and triangle all stay in the same left-to-right order, but the digit flips top-to-bottom, the dot pair swaps which dot is on top, and the triangle -- pointing up in the original -- must point down.
Option 1 has been rotated 180 degrees, which also reverses the left-to-right order.
Option 2 is simply the original figure unchanged.
Option 3 has been mirrored left-to-right instead of flipped top-to-bottom (also reversing the order).
Option 4 correctly flips every element top-to-bottom while keeping the left-to-right order, so it is the true water image.
Option 1 has been rotated 180 degrees, which also reverses the left-to-right order.
Option 2 is simply the original figure unchanged.
Option 3 has been mirrored left-to-right instead of flipped top-to-bottom (also reversing the order).
Option 4 correctly flips every element top-to-bottom while keeping the left-to-right order, so it is the true water image.
Shortcut Method
Water image → top ↔ bottom swap only, left-right unchanged
∴ Option 4 is the true water image ✓
∴ Option 4 is the true water image ✓
Question 13
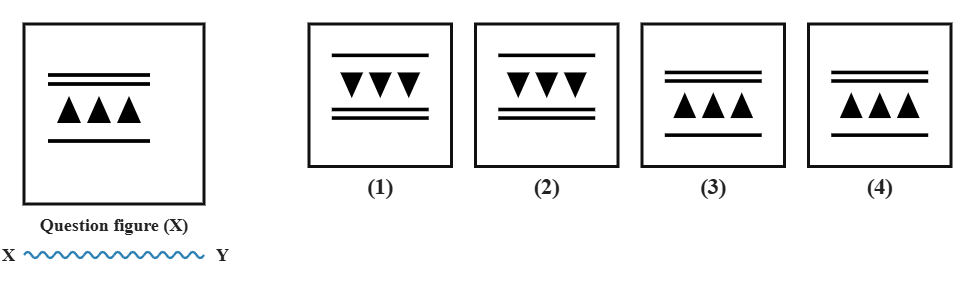
A row of triangles sits between two bars in the figure below, next to a water source XY. Which of the options correctly shows its water image?
Explanation
A water image swaps top and bottom while leaving left and right unchanged. The double bar (originally above the triangles) and the single bar (originally below) must swap places, and the triangles -- pointing up in the original -- must point down, with the small dot still marking the same (leftmost) triangle.
Option 2 has been mirrored left-to-right instead of flipped top-to-bottom, moving the dot to the rightmost triangle instead.
Option 3 has been rotated 180 degrees, which also moves the dot to the rightmost triangle.
Option 4 is simply the original figure unchanged.
Option 1 correctly swaps the bars, flips the triangles to point down, and keeps the dot on the leftmost triangle, so it is the true water image.
Option 2 has been mirrored left-to-right instead of flipped top-to-bottom, moving the dot to the rightmost triangle instead.
Option 3 has been rotated 180 degrees, which also moves the dot to the rightmost triangle.
Option 4 is simply the original figure unchanged.
Option 1 correctly swaps the bars, flips the triangles to point down, and keeps the dot on the leftmost triangle, so it is the true water image.
Shortcut Method
Water image → top ↔ bottom swap only, left-right unchanged
∴ Option 1 is the true water image ✓
∴ Option 1 is the true water image ✓
Question 14
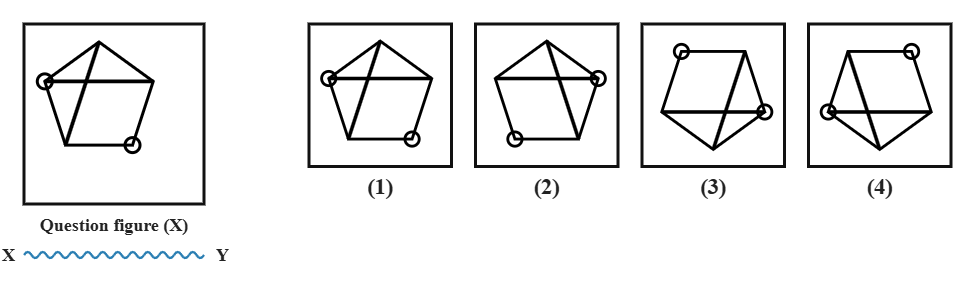
A star figure with crossing lines and two open circles is shown below next to a water line XY. Select its correct water image.
Explanation
A water image swaps top and bottom while leaving left and right unchanged. The star outline and crossing lines flip vertically along with everything else, and the two open circles -- marking two specific points of the star -- must move to their vertically flipped positions.
Option 1 is simply the original figure unchanged.
Option 2 has been mirrored left-to-right instead of flipped top-to-bottom.
Option 3 has been rotated 180 degrees, which also swaps left and right.
Option 4 correctly flips the whole star and both circles top-to-bottom, so it is the true water image.
Option 1 is simply the original figure unchanged.
Option 2 has been mirrored left-to-right instead of flipped top-to-bottom.
Option 3 has been rotated 180 degrees, which also swaps left and right.
Option 4 correctly flips the whole star and both circles top-to-bottom, so it is the true water image.
Shortcut Method
Water image → top ↔ bottom swap only, left-right unchanged
∴ Option 4 is the true water image ✓
∴ Option 4 is the true water image ✓
Question 15
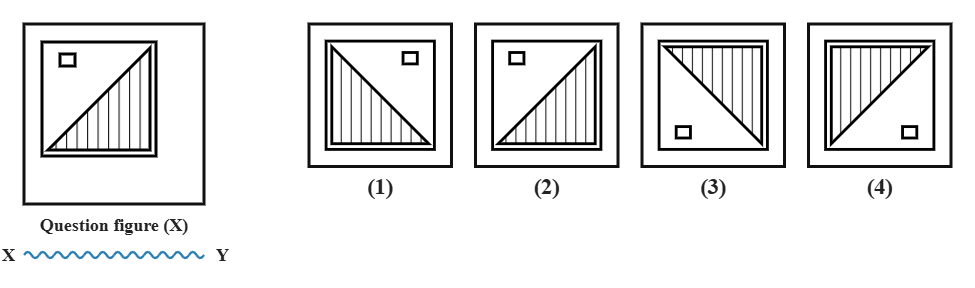
The striped right-triangle figure below sits next to a water source placed along XY. Which of the four options is the correct water image?
Explanation
A water image swaps top and bottom while leaving left and right unchanged. The striped triangle flips vertically -- its right-angle corner moves from bottom-right to top-right -- and the small bracket icon, which sits near the top edge in the original, must move to near the bottom edge.
Option 1 has been rotated 180 degrees, which also swaps left and right.
Option 2 is simply the original figure unchanged.
Option 4 has been mirrored left-to-right instead of flipped top-to-bottom.
Option 3 correctly flips the triangle and moves the bracket to the bottom edge, so it is the true water image.
Option 1 has been rotated 180 degrees, which also swaps left and right.
Option 2 is simply the original figure unchanged.
Option 4 has been mirrored left-to-right instead of flipped top-to-bottom.
Option 3 correctly flips the triangle and moves the bracket to the bottom edge, so it is the true water image.
Shortcut Method
Water image → top ↔ bottom swap only, left-right unchanged
∴ Option 3 is the true water image ✓
∴ Option 3 is the true water image ✓
Question 16
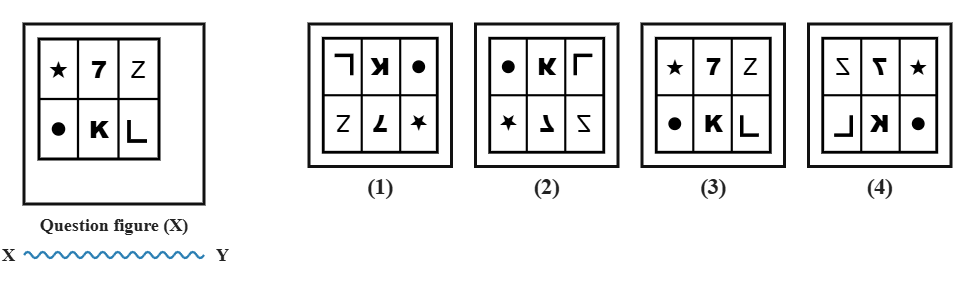
A grid of six different icons in two rows is shown below next to a water line XY. Which option correctly shows its water image?
Explanation
A water image swaps top and bottom while leaving left and right unchanged. The grid lines look the same, but the entire top row of icons and the entire bottom row of icons must swap places, while each icon stays in the same column.
Option 1 has been rotated 180 degrees, which also reverses the column order.
Option 3 has been mirrored left-to-right instead of flipped top-to-bottom (also reversing the column order).
Option 4 is simply the original figure unchanged.
Option 2 correctly swaps the two rows while keeping each icon in its own column, so it is the true water image.
Option 1 has been rotated 180 degrees, which also reverses the column order.
Option 3 has been mirrored left-to-right instead of flipped top-to-bottom (also reversing the column order).
Option 4 is simply the original figure unchanged.
Option 2 correctly swaps the two rows while keeping each icon in its own column, so it is the true water image.
Shortcut Method
Water image → top ↔ bottom swap only, left-right unchanged
∴ Option 2 is the true water image ✓
∴ Option 2 is the true water image ✓
Question 17
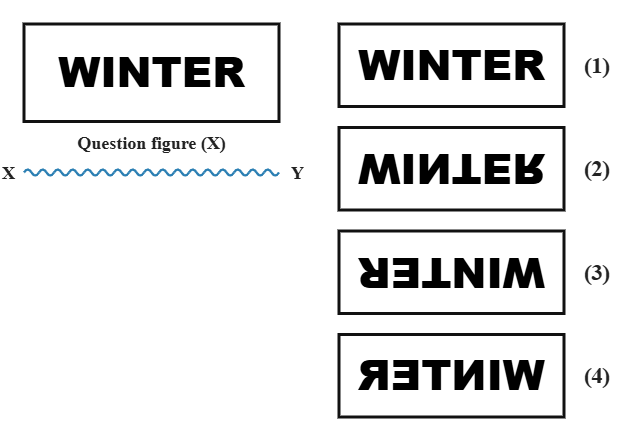
What is the water image of the word WINTER when a water source is placed along XY, as shown in the figure below?
Explanation
Unlike a side mirror, a water image keeps the letters in the SAME left-to-right order -- only each individual letter flips top-to-bottom.
Option 1 is simply the original word WINTER, unchanged.
Option 3 has been rotated 180 degrees, which reverses the letter order (RETNIW) as well as flipping each letter.
Option 4 has been mirrored left-to-right instead, which also reverses the letter order and mirrors each letter sideways instead of vertically.
Option 2 correctly keeps the letters WINTER in order and flips each one top-to-bottom, so it is the true water image.
Option 1 is simply the original word WINTER, unchanged.
Option 3 has been rotated 180 degrees, which reverses the letter order (RETNIW) as well as flipping each letter.
Option 4 has been mirrored left-to-right instead, which also reverses the letter order and mirrors each letter sideways instead of vertically.
Option 2 correctly keeps the letters WINTER in order and flips each one top-to-bottom, so it is the true water image.
Shortcut Method
Word water image = SAME left-right letter order, each letter flipped top-bottom only
∴ Option 2 is the true water image ✓
∴ Option 2 is the true water image ✓
Question 18
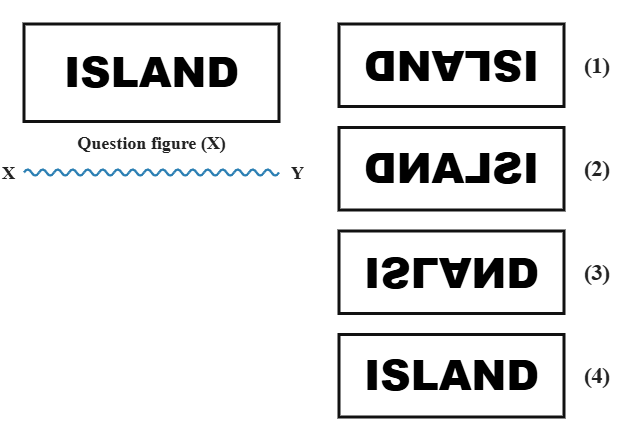
The word ISLAND is shown next to a water source placed along XY in the figure below. Choose the option that correctly shows its water image.
Explanation
Unlike a side mirror, a water image keeps the letters in the SAME left-to-right order -- only each individual letter flips top-to-bottom.
Option 1 has been rotated 180 degrees, which reverses the letter order (DNALSI) as well as flipping each letter.
Option 2 has been mirrored left-to-right instead, which also reverses the letter order and mirrors each letter sideways instead of vertically.
Option 4 is simply the original word ISLAND, unchanged.
Option 3 correctly keeps the letters ISLAND in order and flips each one top-to-bottom, so it is the true water image.
Option 1 has been rotated 180 degrees, which reverses the letter order (DNALSI) as well as flipping each letter.
Option 2 has been mirrored left-to-right instead, which also reverses the letter order and mirrors each letter sideways instead of vertically.
Option 4 is simply the original word ISLAND, unchanged.
Option 3 correctly keeps the letters ISLAND in order and flips each one top-to-bottom, so it is the true water image.
Shortcut Method
Word water image = SAME left-right letter order, each letter flipped top-bottom only
∴ Option 3 is the true water image ✓
∴ Option 3 is the true water image ✓
Question 19
Four figures are shown below. Which one of these figures will look EXACTLY THE SAME as its own water image?
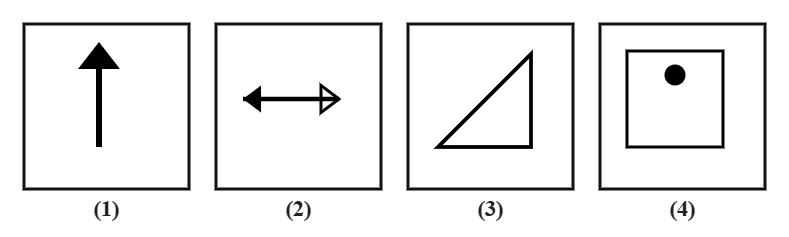
Explanation
A figure's water image looks identical to the figure itself only when the figure is already symmetric about its own horizontal centre line -- that is, its top half is a mirror of its bottom half.
Option 1, the upward arrow, is not symmetric top-to-bottom: its arrowhead is at the top, so its water image would show the arrowhead at the bottom, pointing down.
Option 3, the right-angled triangle, has its right-angle corner at the bottom, so its water image would move that corner to the top -- a visibly different shape.
Option 4 has a dot only near the top of the square, so its water image would show the dot near the bottom instead.
Option 2, the horizontal double-headed arrow, lies entirely along one horizontal line with a solid head on the left and a hollow head on the right -- nothing about it sits above or below that line, so flipping top-to-bottom leaves it looking exactly the same. It is the correct answer.
Option 1, the upward arrow, is not symmetric top-to-bottom: its arrowhead is at the top, so its water image would show the arrowhead at the bottom, pointing down.
Option 3, the right-angled triangle, has its right-angle corner at the bottom, so its water image would move that corner to the top -- a visibly different shape.
Option 4 has a dot only near the top of the square, so its water image would show the dot near the bottom instead.
Option 2, the horizontal double-headed arrow, lies entirely along one horizontal line with a solid head on the left and a hollow head on the right -- nothing about it sits above or below that line, so flipping top-to-bottom leaves it looking exactly the same. It is the correct answer.
Shortcut Method
Identical water image → figure must be symmetric about its own horizontal centre line
∴ Option 2 (horizontal double arrow) is the only symmetric figure ✓
∴ Option 2 (horizontal double arrow) is the only symmetric figure ✓
Question 20
Look at the four figures given below. Which one of them would produce a water image identical to itself?
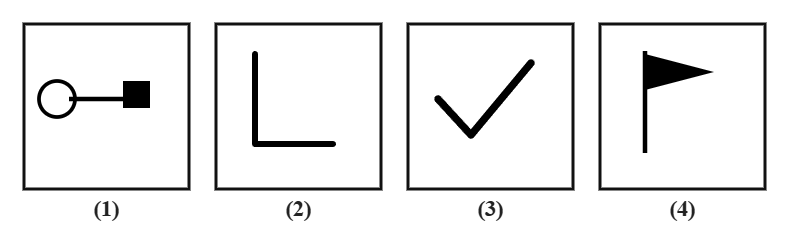
Explanation
A figure's water image looks identical to the figure itself only when the figure is already symmetric about its own horizontal centre line -- that is, its top half is a mirror of its bottom half.
Option 2, the L-shaped bracket, has its corner at the bottom-left, so its water image would move that corner to the top-left -- a visibly different shape.
Option 3, the checkmark, dips down in the middle and rises on the right, so it is not symmetric top-to-bottom; its water image would look noticeably different.
Option 4, the flag, has its pennant near the top of the pole, so its water image would show the pennant near the bottom instead.
Option 1, the dumbbell (an open circle, a bar, and a filled square all centred on one horizontal line), has nothing above or below that line, so flipping top-to-bottom leaves it looking exactly the same. It is the correct answer.
Option 2, the L-shaped bracket, has its corner at the bottom-left, so its water image would move that corner to the top-left -- a visibly different shape.
Option 3, the checkmark, dips down in the middle and rises on the right, so it is not symmetric top-to-bottom; its water image would look noticeably different.
Option 4, the flag, has its pennant near the top of the pole, so its water image would show the pennant near the bottom instead.
Option 1, the dumbbell (an open circle, a bar, and a filled square all centred on one horizontal line), has nothing above or below that line, so flipping top-to-bottom leaves it looking exactly the same. It is the correct answer.
Shortcut Method
Identical water image → figure must be symmetric about its own horizontal centre line
∴ Option 1 (circle-bar-square dumbbell) is the only symmetric figure ✓
∴ Option 1 (circle-bar-square dumbbell) is the only symmetric figure ✓
Question 21
The combination of letters and numbers given below stands above a water surface. Choose the alternative that closely resembles its water image.
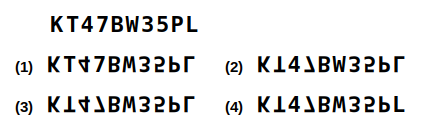
Explanation
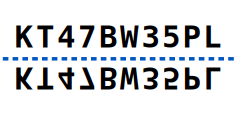
In a water image the characters stay in the same order from left to right, but each character is turned upside down (top and bottom change places). Only option (3) shows this. The solution image shows KT47BW35PL with its water image below the water line.
Question 22
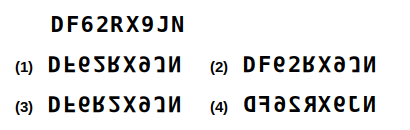
Imagine water lying just below the given combination. Which of the alternatives (1) to (4) is its water image?
Explanation
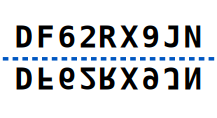
In a water image the characters stay in the same order from left to right, but each character is turned upside down (top and bottom change places). Only option (1) shows this. The solution image shows DF62RX9JN with its water image below the water line.
Question 23
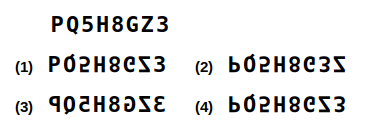
The combination below is reflected in water placed beneath it. Select the alternative that most closely shows the reflection.
Explanation
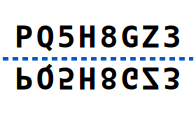
In a water image the characters stay in the same order from left to right, but each character is turned upside down (top and bottom change places). Only option (4) shows this. The solution image shows PQ5H8GZ3 with its water image below the water line.
Question 24
A mixture of capital letters, small letters and digits is given below, with water beneath it. Which alternative is its water image?
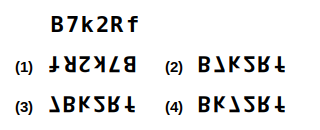
Explanation
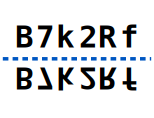
In a water image the characters stay in the same order from left to right, but each character is turned upside down (top and bottom change places). Only option (2) shows this. The solution image shows B7k2Rf with its water image below the water line.
Question 25
Choose the alternative that closely resembles the water image of the given combination, if water is placed just below it.
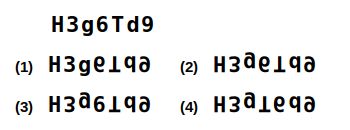
Explanation
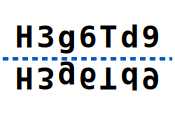
In a water image the characters stay in the same order from left to right, but each character is turned upside down (top and bottom change places). Only option (2) shows this. The solution image shows H3g6Td9 with its water image below the water line.
Question 26
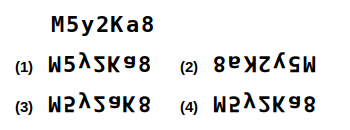
Imagine a water surface under the combination below. Select the alternative that shows how it would appear in the water.
Explanation
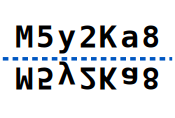
In a water image the characters stay in the same order from left to right, but each character is turned upside down (top and bottom change places). Only option (4) shows this. The solution image shows M5y2Ka8 with its water image below the water line.
Question 27
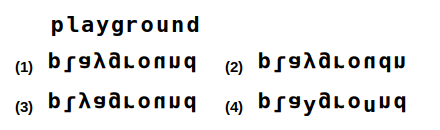
A small-letter word is given below with water placed beneath it. Which alternative closely resembles the water image of the word?
Explanation
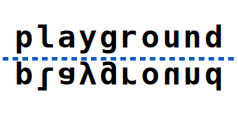
In a water image the characters stay in the same order from left to right, but each character is turned upside down (top and bottom change places). Only option (1) shows this. The solution image shows playground with its water image below the water line.
Question 28
Look at the given word and imagine water below it. Choose the alternative that shows its water image.
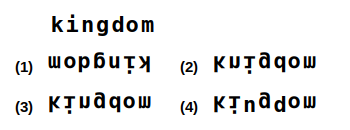
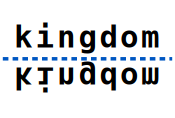
Explanation
In a water image the characters stay in the same order from left to right, but each character is turned upside down (top and bottom change places). Only option (3) shows this. The solution image shows kingdom with its water image below the water line.
Question 29
Select the alternative that most closely resembles the water image of the given word, with the water placed below it.
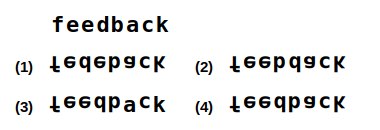
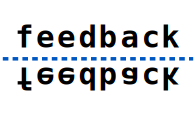
Explanation
In a water image the characters stay in the same order from left to right, but each character is turned upside down (top and bottom change places). Only option (4) shows this. The solution image shows feedback with its water image below the water line.
Question 30
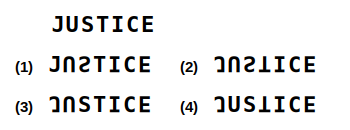
A capital-letter word is given below with water beneath it. Which alternative closely resembles its water image?
Explanation
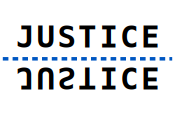
In a water image the characters stay in the same order from left to right, but each character is turned upside down (top and bottom change places). Only option (2) shows this. The solution image shows JUSTICE with its water image below the water line.
Question 31
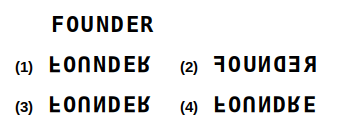
Imagine water lying under the given word. Which of the alternatives (1) to (4) shows its water image?
Explanation
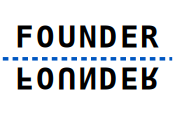
In a water image the characters stay in the same order from left to right, but each character is turned upside down (top and bottom change places). Only option (3) shows this. The solution image shows FOUNDER with its water image below the water line.
Question 32
Pick the alternative that closely resembles the water image of the given word when water is placed just below it.
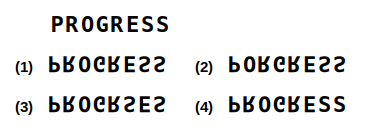
Explanation
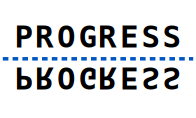
In a water image the characters stay in the same order from left to right, but each character is turned upside down (top and bottom change places). Only option (1) shows this. The solution image shows PROGRESS with its water image below the water line.
Question 33
Water is placed just below figure (X). Choose the correct water image of the figure from the four alternatives.
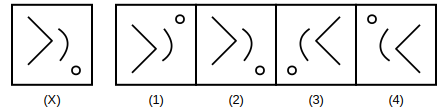
Explanation
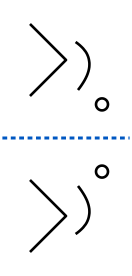
In a water image the top and bottom of the figure change places while left and right stay the same. Only figure (1) shows this. The other figures are the original, its mirror image, a turned figure or a water image with one part not inverted.
Question 34
Figure (X) is shown below with a water surface beneath it. Which alternative is its correct water image?
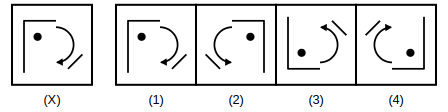
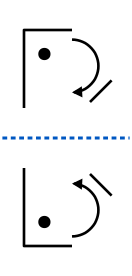
Explanation
In a water image the top and bottom of the figure change places while left and right stay the same. Only figure (3) shows this. The other figures are the original, its mirror image, a turned figure or a water image with one part not inverted.
Question 35
Select, from the four alternatives, the figure that shows the water image of figure (X) when water lies below it.
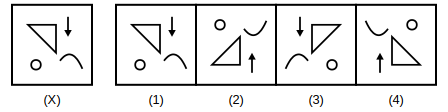
Explanation
In a water image the top and bottom of the figure change places while left and right stay the same. Only figure (2) shows this. The other figures are the original, its mirror image, a turned figure or a water image with one part not inverted.