|
Adding Images to Products
Doug is not happy with the products on his website as they don't have any
pictures next to them, so he wants to upload some for his customers to know
what they are buying.
There are quite a number of different methods for adding images and other
related files to products and content types. First, let's have a look at the
methods available:
-
A built-in upload module
Listed as an attachment
Embedded into the description
-
A third-party image module
Embedded into the description
As a product
Both these modules have their own merits and uses; the upload module can be used
to upload fi les that are attached to a content element such as a product or a
page. Attachments can be directly linked to or listed with the content.
A third-party image module can be used for uploading an image as a fi le in its
own right; we can then embed this image into content (primitively using links
and HTML tags) or we can edit the image to become a new content element, such
as a page or a product and then turn it into the product we want. If we use
this method then the image is automatically displayed in the product listing.
Built-in Upload Module
|

Book Excerpt: Selling Online with Drupal e-Commerce
Chapter Contents
This excerpt from Selling
Online with Drupal e-Commerce by Michael Peacock, is
printed with permission from Packt Publishing,
Copyright 2007.
|
|
|
To enabl e this we need to install the Upload module, and then we can edit the
product and upload the images.

This module is not just for use in the e-Commerce section; we can use it for
pages and other types of content to add images to the site.
Let's edit a product and also add a picture of that product. In the edit screen,
we have a new section called File attachments; this is what we use to upload
the pictures to the product. To try it out I'm just going to use the company’s
logo as the picture.
|
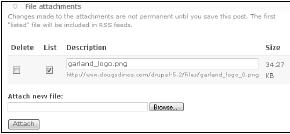
List as Attachment
To list th e image as an attachment on the product page we need to leave the
list box checked (as shown in the previous image) and then save the product.
Now when we view the product we have a list of attachments at the bottom of the
page.
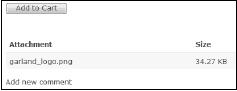
This is particularly useful for attaching fi les such as PDF fact sheets about
the product in question.
Embed Image into Description
For images, having a list of attachments isn't very good, so let's embed the
image into the product description using HTML.
If we go back to Edit the product, and scroll down to the attachments, the URL
of the image is shown; we need to make a note of this:
http://www.dougsdinos.com/ drupal-5.7/files/garland_logo_0.png.
To use this image, we would add the following HTML in the Description section:
<img src='http://www.dougsdinos.com/drupal-
5.7/files/garland_logo_0.png'
style='float:left; padding: 5px;' alt='PRODUCT NAME' />
This adds t he image, and allows text to wrap around it (but leaving some space)
so it looks nice on the page, the end result is shown below:
Third-party Image Module
The Image mo dule is one that we must download and install into our Drupal
installation; it can be downloaded from the Drupal website: http://drupal.org/
project/image.
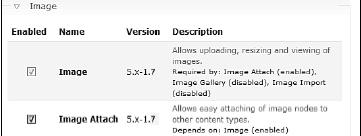
Once we have downloaded the Image module package, decompressed the fi les, and
uploaded it to our installation we need to enable the related modules within
the package, including:
We don't need the other sub-modules at this time, so let's enable these two for
now.
Now that we have it installed, let's have a look at the module and how it works.
Within Site confi guration there are two new sections, Image and Image attach.
We are only concerned with the Image section. It has the following settings:
Within Site c onfi guration there are two new sections, Image and Image attach.
We are only concerned with the Image section. It has the following settings:
-
The default path where the images are stored
-
The maximum fi le size of images uploaded
-
The sizes of the image, preview image, and thumbnail
For now, we shall leave these values as they are and upload an image.
Embed Image into Description
To upload the image, we need to go into Create content and select Image.

The Submit Image page asks for the following information:
-
Title (required)
-
Image (required)
-
Description or body
We can also change settings for things like comments, menus, and author
information and set the image to be a product (we will try that next). Once we
have uploaded an image and entered the name of the image we are taken to the
page containing the image. From here we can swap between Original view,
Preview, and Thumbnail.
The best way t o embed an uploaded image is to right-click on the thumbnail
picture and copy the URL of the web address, and then do the same for the
preview image. We can then add the HTML for the image and link it to the larger
version of the image.
For the image I have just uploaded, the thumbnail link is:
http://www.dougsdinos. com/drupal-5.7/files/images/1847191118.thumbnail.jpg and
the preview link is:
http://www.dougsdinos.com/drupal-5.7/files/images/1847191118.jpg. We can now
create the HTML link for this and add it to the product page.
<a href='http://www.dougsdinos.com/drupal-
5.7/files/images/1847191118.jpg'>
<img src='http://www.dougsdinos.com/drupal-
5.7/files/images/1847191118.thumbnail.jpg'
alt='PRODUCT NAME' />
</a>
As a Product
The embedded option is not very practical because it involves looking up the
image locations and creating the HTML code for the product. If we are creating
a new product, we could create the image fi rst, and then turn the image
content into a product. To do this, we go through the process of creating the
image as we did before, but we expand the product options and select a product
type for the image.
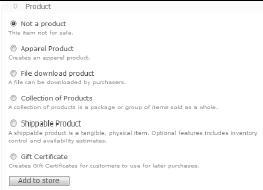
We select the product type, click Add to store, and then we can continue editing
the product, using the Title and Body fi elds for the product name and
description.
This method creates a neater product entry with the image already there for us,
which is much neater and cleaner than the other methods.
Page 1 |
Page 2 |
page 3 |
page 4 |
page 5 |
page 6 |
page 7 |
page 8
|